Page 336 of 557
: Do not reuse
1. Valve cotters
2. Valve spring retainer
3. Valve spring:
be sure to position
spring in place with its
bottom end (small-pitch
end) facing the bottom
(valve spring seat side).
4. Valve stem seal
5. Valve spring seat
6. Exhaust valve
7. Intake valve
8. Cylinder head bolt
9. Camshaft housing bolt10. Camshaft housing:
Apply sealant to mating surface of
No.1 and No.6 housings.
11. Valve guide
12. Oil venturi plug
13. Cylinder head gasket:
“TOP” mark provided on gasket comes to
crankshaft pulley side, facing up
(toward cylinder head side).
14. Dowel pin
: Tightening Torque
: Apply engine oil to sliding
: surfaces of each part.
3.5 N.m (0.35 kg-m)
ENGINE MECHANICAL (G13B, 1-CAM 16-VALVES ENGINE) 6A1-41
VALVES AND CYLINDER HEAD
REMOVAL
1) Relieve fuel pressure according to procedure described in Sec-
tion 6.
2) Disconnect negative cable at battery.
3) Drain cooling system.
4) Remove air cleaner outlet hose as previously outlined.
Page 338 of 557
3
2. Breather hose
3. PCV valve4. High-tension cords
5. Ignition coil assembly
6. Ignition coil coupler
A: Camshaft pulley side
B: CMP sensor case side
ENGINE MECHANICAL (G13B, 1-CAM 16-VALVES ENGINE) 6A1-43
9) Remove cylinder head cover (1) as previously outlined.
Loosen all valve lash adjusting screws fully.
10) Remove timing belt and camshaft as previously outlined.
11) Disconnect exhaust pipe from exhaust manifold and remove
exhaust manifold stiffener (if equipped).
12) Loosen cylinder head bolts in such order as indicated in figure
and remove them.
13) Check all around cylinder head for any other parts required to
be removed or disconnected and remove or disconnect what-
ever necessary.
14) Remove cylinder head with intake manifold, exhaust manifold
CMP sensor case, using lifting device if necessary.
Page 339 of 557
6A1-44 ENGINE MECHANICAL (G13B, 1-CAM 16-VALVES ENGINE)
DISASSEMBLY
1) For ease in servicing cylinder head, remove CMP sensor case,
intake manifold with throttle body and exhaust manifold from cyl-
inder head.
2) Remove rocker arms and washers by pulling its shaft out to
transmission side.
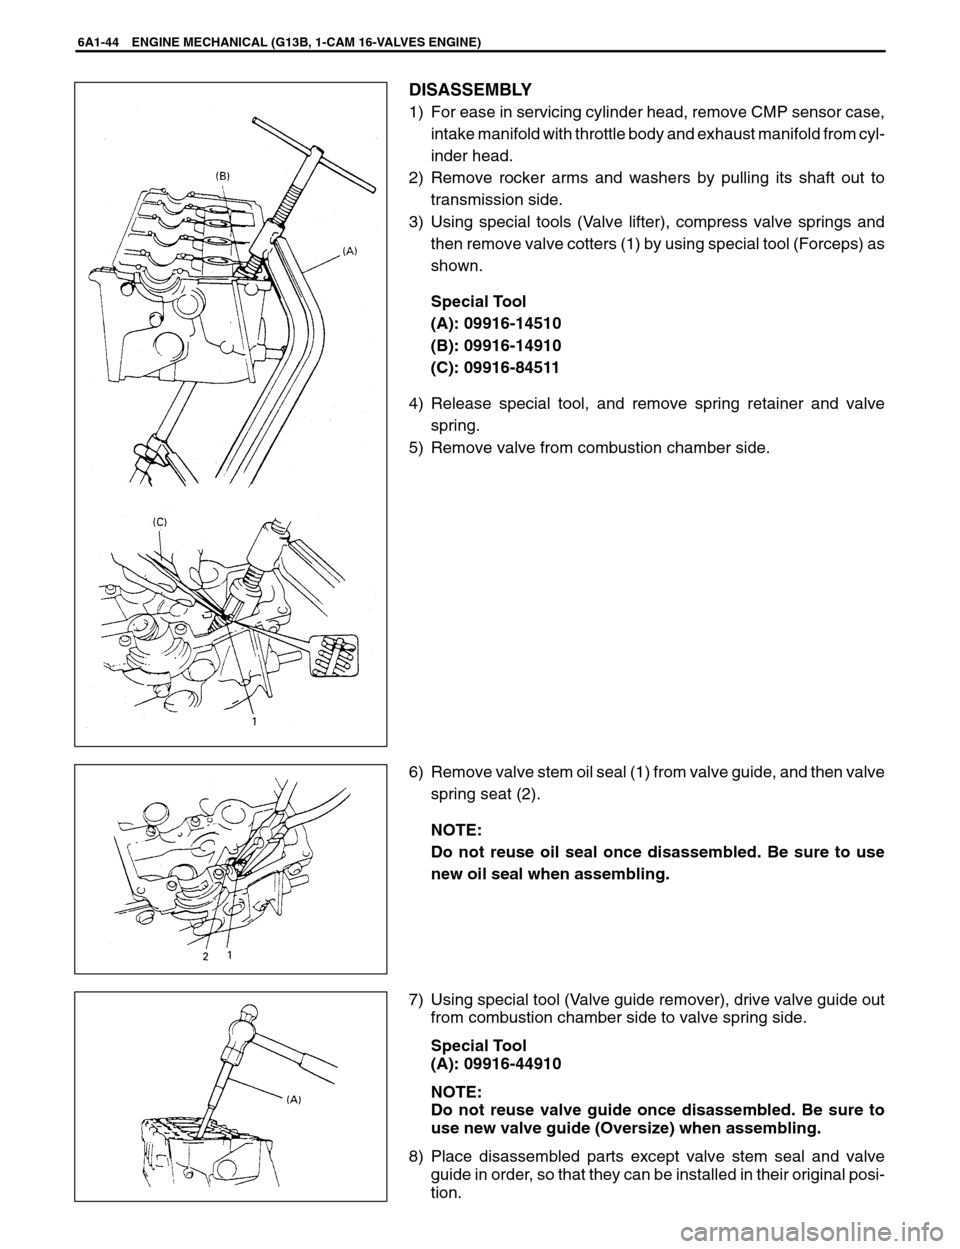
3) Using special tools (Valve lifter), compress valve springs and
then remove valve cotters (1) by using special tool (Forceps) as
shown.
Special Tool
(A): 09916-14510
(B): 09916-14910
(C): 09916-84511
4) Release special tool, and remove spring retainer and valve
spring.
5) Remove valve from combustion chamber side.
6) Remove valve stem oil seal (1) from valve guide, and then valve
spring seat (2).
NOTE:
Do not reuse oil seal once disassembled. Be sure to use
new oil seal when assembling.
7) Using special tool (Valve guide remover), drive valve guide out
from combustion chamber side to valve spring side.
Special Tool
(A): 09916-44910
NOTE:
Do not reuse valve guide once disassembled. Be sure to
use new valve guide (Oversize) when assembling.
8) Place disassembled parts except valve stem seal and valve
guide in order, so that they can be installed in their original posi-
tion.
Page 342 of 557
ENGINE MECHANICAL (G13B, 1-CAM 16-VALVES ENGINE) 6A1-47
�Valve seat repair:
A valve seat (2) not producing a uniform contact with its valve or
showing width of seating contact that is out of specified range
must be repaired by regrinding or by cutting and regrinding and
finished by lapping.
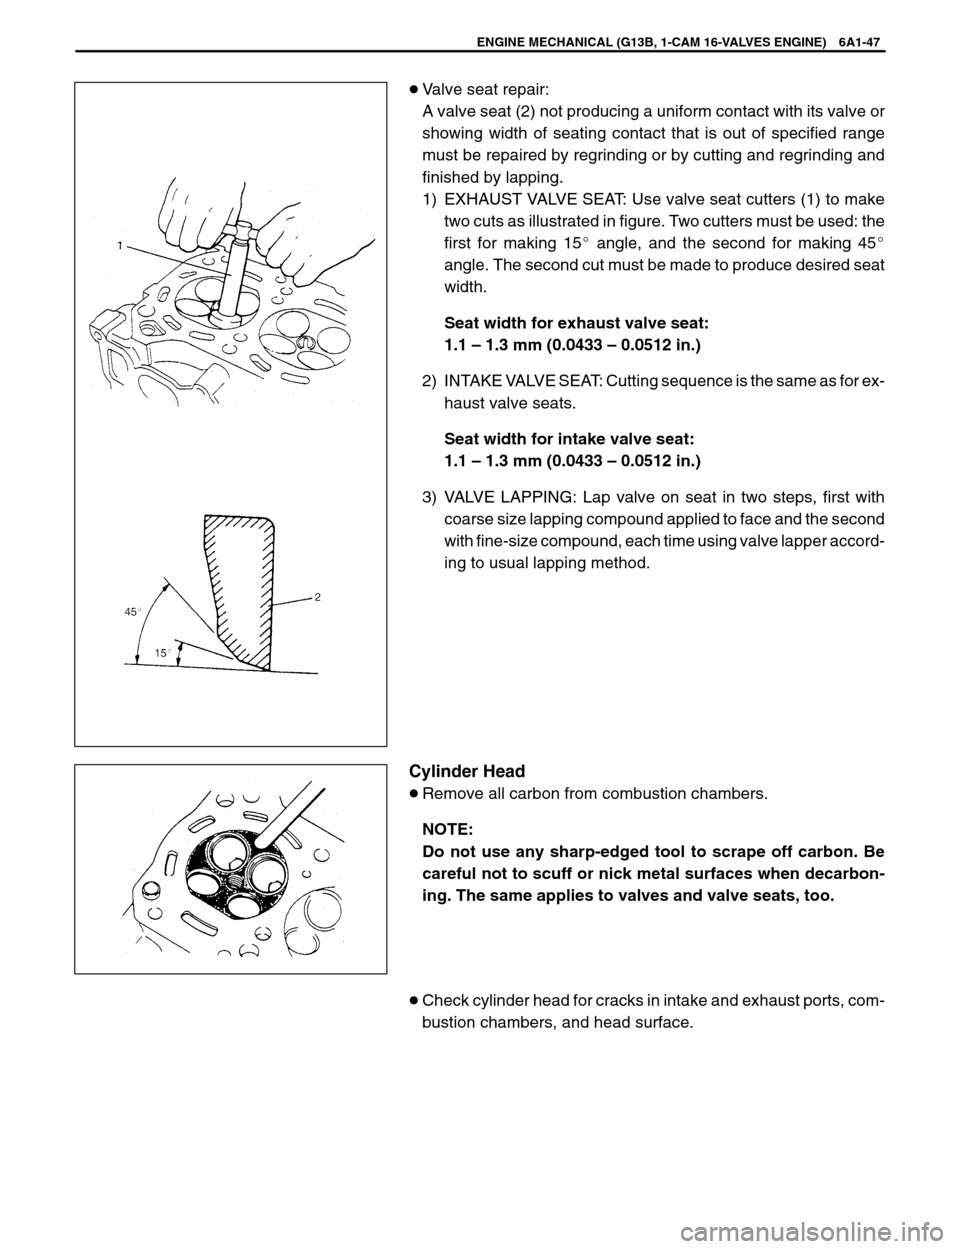
1) EXHAUST VALVE SEAT: Use valve seat cutters (1) to make
two cuts as illustrated in figure. Two cutters must be used: the
first for making 15� angle, and the second for making 45�
angle. The second cut must be made to produce desired seat
width.
Seat width for exhaust valve seat:
1.1 – 1.3 mm (0.0433 – 0.0512 in.)
2) INTAKE VALVE SEAT: Cutting sequence is the same as for ex-
haust valve seats.
Seat width for intake valve seat:
1.1 – 1.3 mm (0.0433 – 0.0512 in.)
3) VALVE LAPPING: Lap valve on seat in two steps, first with
coarse size lapping compound applied to face and the second
with fine-size compound, each time using valve lapper accord-
ing to usual lapping method.
Cylinder Head
�Remove all carbon from combustion chambers.
NOTE:
Do not use any sharp-edged tool to scrape off carbon. Be
careful not to scuff or nick metal surfaces when decarbon-
ing. The same applies to valves and valve seats, too.
�Check cylinder head for cracks in intake and exhaust ports, com-
bustion chambers, and head surface.
Page 345 of 557
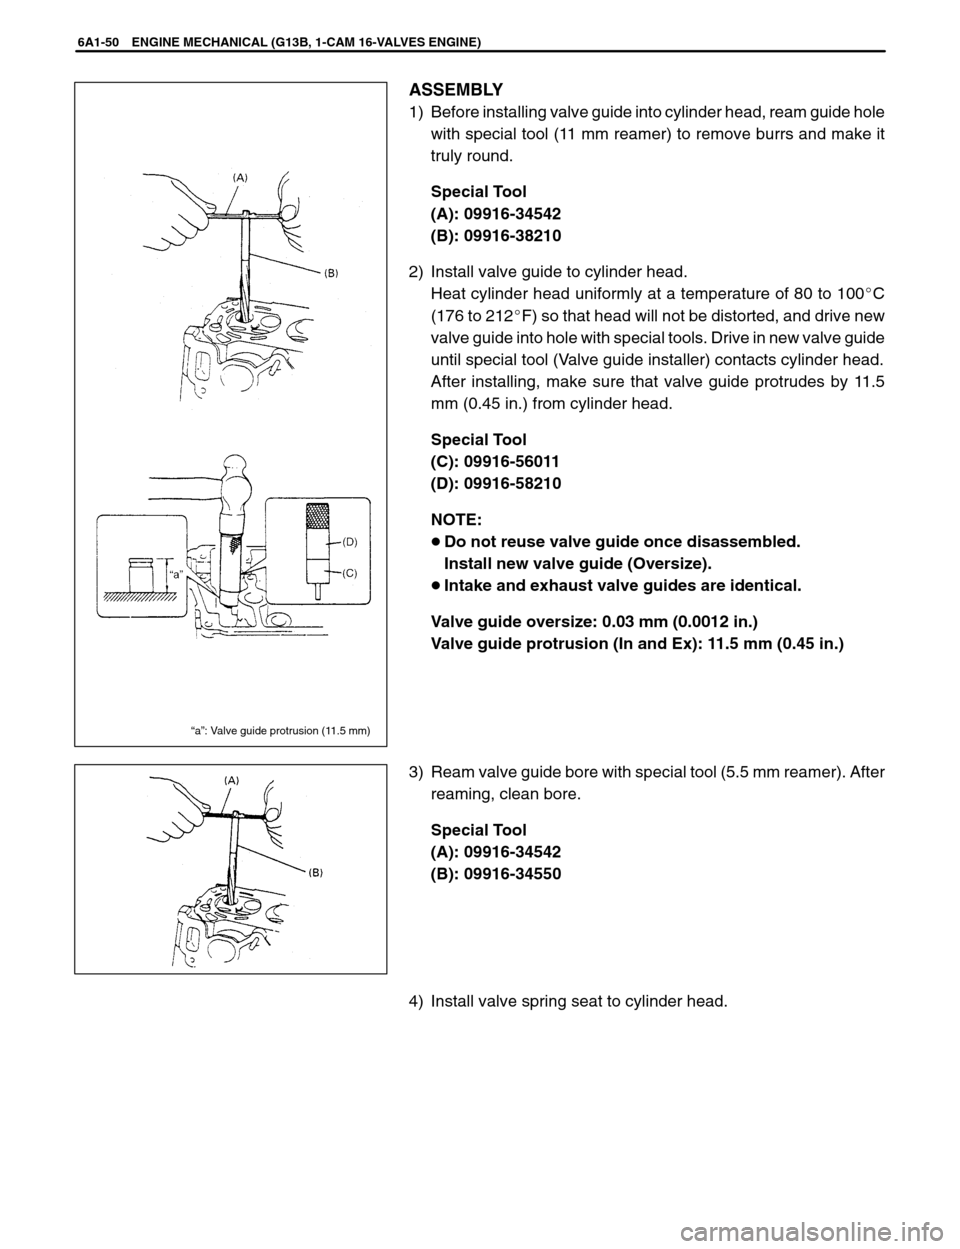
“a”: Valve guide protrusion (11.5 mm)
6A1-50 ENGINE MECHANICAL (G13B, 1-CAM 16-VALVES ENGINE)
ASSEMBLY
1) Before installing valve guide into cylinder head, ream guide hole
with special tool (11 mm reamer) to remove burrs and make it
truly round.
Special Tool
(A): 09916-34542
(B): 09916-38210
2) Install valve guide to cylinder head.
Heat cylinder head uniformly at a temperature of 80 to 100�C
(176 to 212�F) so that head will not be distorted, and drive new
valve guide into hole with special tools. Drive in new valve guide
until special tool (Valve guide installer) contacts cylinder head.
After installing, make sure that valve guide protrudes by 11.5
mm (0.45 in.) from cylinder head.
Special Tool
(C): 09916-56011
(D): 09916-58210
NOTE:
�Do not reuse valve guide once disassembled.
Install new valve guide (Oversize).
�Intake and exhaust valve guides are identical.
Valve guide oversize: 0.03 mm (0.0012 in.)
Valve guide protrusion (In and Ex): 11.5 mm (0.45 in.)
3) Ream valve guide bore with special tool (5.5 mm reamer). After
reaming, clean bore.
Special Tool
(A): 09916-34542
(B): 09916-34550
4) Install valve spring seat to cylinder head.
Page 347 of 557
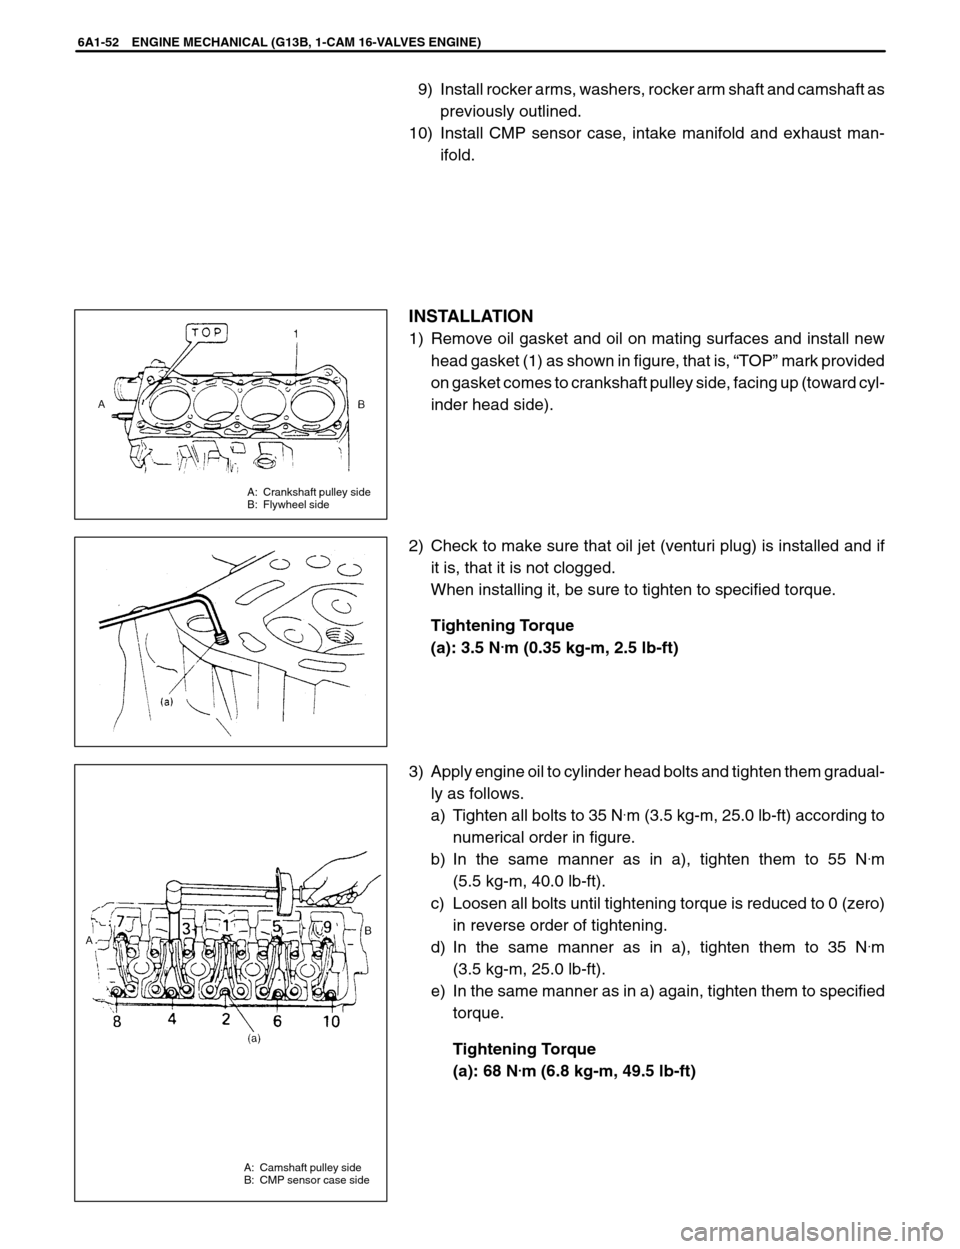
A: Crankshaft pulley side
B: Flywheel side
A: Camshaft pulley side
B: CMP sensor case side
6A1-52 ENGINE MECHANICAL (G13B, 1-CAM 16-VALVES ENGINE)
9) Install rocker arms, washers, rocker arm shaft and camshaft as
previously outlined.
10) Install CMP sensor case, intake manifold and exhaust man-
ifold.
INSTALLATION
1) Remove oil gasket and oil on mating surfaces and install new
head gasket (1) as shown in figure, that is, “TOP” mark provided
on gasket comes to crankshaft pulley side, facing up (toward cyl-
inder head side).
2) Check to make sure that oil jet (venturi plug) is installed and if
it is, that it is not clogged.
When installing it, be sure to tighten to specified torque.
Tightening Torque
(a): 3.5 N
.m (0.35 kg-m, 2.5 lb-ft)
3) Apply engine oil to cylinder head bolts and tighten them gradual-
ly as follows.
a) Tighten all bolts to 35 N
.m (3.5 kg-m, 25.0 lb-ft) according to
numerical order in figure.
b) In the same manner as in a), tighten them to 55 N
.m
(5.5 kg-m, 40.0 lb-ft).
c) Loosen all bolts until tightening torque is reduced to 0 (zero)
in reverse order of tightening.
d) In the same manner as in a), tighten them to 35 N
.m
(3.5 kg-m, 25.0 lb-ft).
e) In the same manner as in a) again, tighten them to specified
torque.
Tightening Torque
(a): 68 N
.m (6.8 kg-m, 49.5 lb-ft)
Page 348 of 557
ENGINE MECHANICAL (G13B, 1-CAM 16-VALVES ENGINE) 6A1-53
4) Reverse removal procedure for installation.
5) Adjust water pump drive belt tension by referring to “ENGINE
COOLING” section.
6) Adjust power steering pump belt tension or A / C compressor
belt tension, if equipped.
Refer to Section 0B.
7) Adjust intake and exhaust valve lashes as previously outlined.
8) Adjust accelerator cable play.
Refer to Section 6E.
9) Check to ensure that all removed parts are back in place.
Reinstall any necessary parts which have not been reinstalled.
10) Refill cooling system referring to Section 6B.
11) Connect negative cable at battery.
12) Confirm that ignition timing is within specification.
13) Verify that there is no fuel leakage, coolant leakage and ex-
haust gas leakage at each connection.
Page 356 of 557
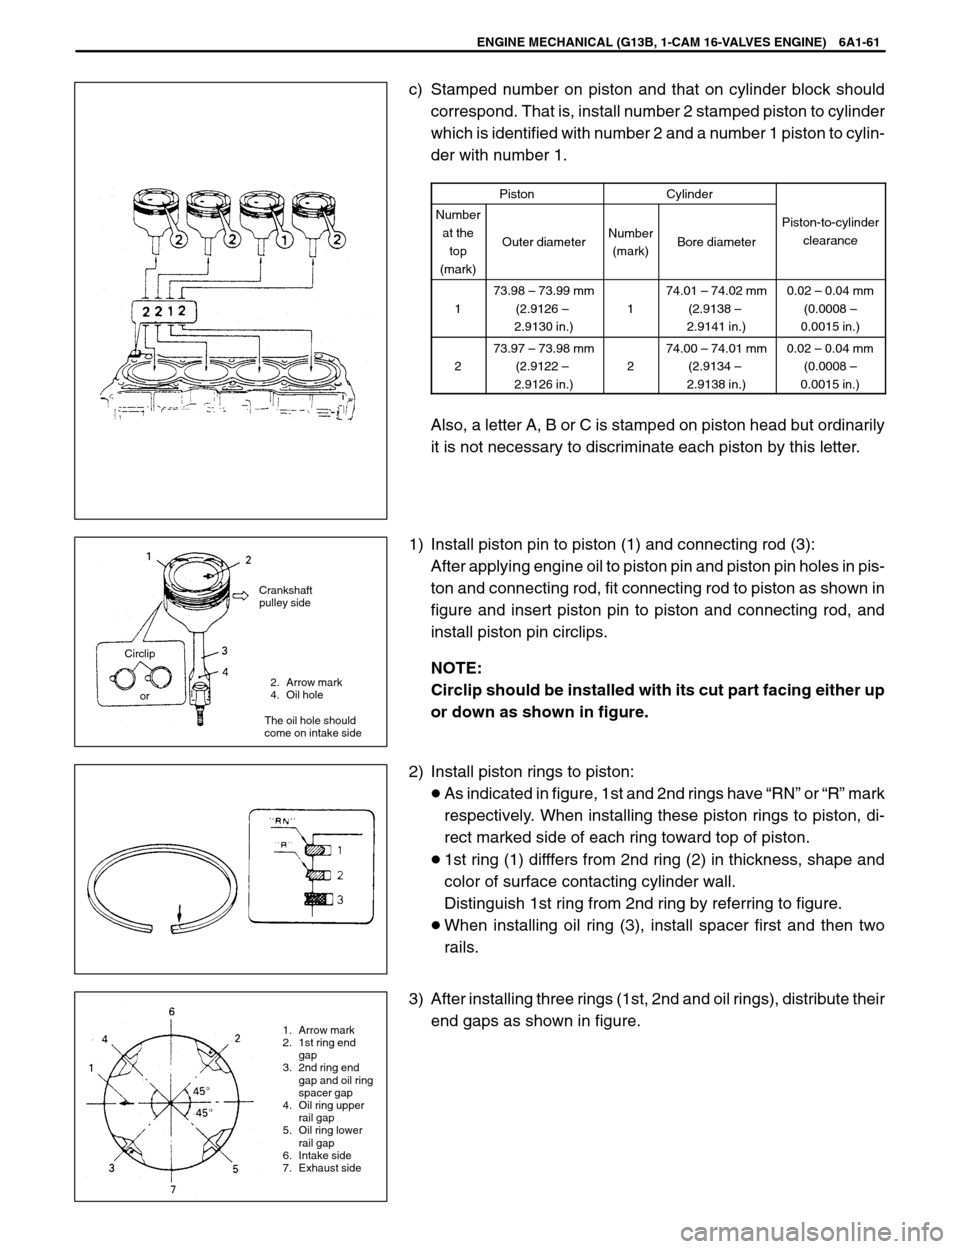
2. Arrow mark
4. Oil hole
The oil hole should
come on intake side
1. Arrow mark
2. 1st ring end
gap
3. 2nd ring end
gap and oil ring
spacer gap
4. Oil ring upper
rail gap
5. Oil ring lower
rail gap
6. Intake side
7. Exhaust side Crankshaft
pulley side
Circlip
or
ENGINE MECHANICAL (G13B, 1-CAM 16-VALVES ENGINE) 6A1-61
c) Stamped number on piston and that on cylinder block should
correspond. That is, install number 2 stamped piston to cylinder
which is identified with number 2 and a number 1 piston to cylin-
der with number 1.
PistonCylinder
Number
at the
top
(mark)
Outer diameterNumber
(mark)Bore diameter
Piston-to-cylinder
clearance
1
73.98 – 73.99 mm
(2.9126 –
2.9130 in.)
1
74.01 – 74.02 mm
(2.9138 –
2.9141 in.)0.02 – 0.04 mm
(0.0008 –
0.0015 in.)
2
73.97 – 73.98 mm
(2.9122 –
2.9126 in.)
2
74.00 – 74.01 mm
(2.9134 –
2.9138 in.)0.02 – 0.04 mm
(0.0008 –
0.0015 in.)
Also, a letter A, B or C is stamped on piston head but ordinarily
it is not necessary to discriminate each piston by this letter.
1) Install piston pin to piston (1) and connecting rod (3):
After applying engine oil to piston pin and piston pin holes in pis-
ton and connecting rod, fit connecting rod to piston as shown in
figure and insert piston pin to piston and connecting rod, and
install piston pin circlips.
NOTE:
Circlip should be installed with its cut part facing either up
or down as shown in figure.
2) Install piston rings to piston:
�As indicated in figure, 1st and 2nd rings have “RN” or “R” mark
respectively. When installing these piston rings to piston, di-
rect marked side of each ring toward top of piston.
�1st ring (1) difffers from 2nd ring (2) in thickness, shape and
color of surface contacting cylinder wall.
Distinguish 1st ring from 2nd ring by referring to figure.
�When installing oil ring (3), install spacer first and then two
rails.
3) After installing three rings (1st, 2nd and oil rings), distribute their
end gaps as shown in figure.