2000 SUZUKI SWIFT brake fluid
[x] Cancel search: brake fluidPage 231 of 698

3E-18 REAR SUSPENSION
8) Install wheel speed sensor and clamp wire securely (right &
left) (if equipped with ABS).
9) Install LSPV spring (1) to rear axle (2).
Tighten nut (3) temporarily at this step (if equipped with
LSPV).
10) Connect brake pipes (1) (right & left) to wheel cylinders (2)
and tighten brake pipe flare nuts (3) to specified torque.
Tightening torque
Brake pipe flare nuts (a) : 16 N·m (1.6 kg-m, 11.5 lb-ft)
11) Connect brake flexible hoses (1) to bracket on rear axle and
secure it with E-rings (2).
12) Install brake drums (right & left). Refer to “BRAKE DRUM” in
Section 5.
13) Fill reservoir with brake fluid and bleed brake system (For
bleeding operation, refer to Section 5.)
14) Install wheel and tighten wheel nuts (1) to specified torque.
Tightening torque
Wheel nuts (a) : 85 N·m (8.5 kg-m, 61.5 lb-ft)
231
Page 232 of 698

REAR SUSPENSION 3E-19
15) Upon completion of all jobs, depress brake pedal with about
30 kg (66 Ibs) load three to five times so as to obtain proper
drum-to-shoe clearance.
Adjust parking brake cable. Refer to Section 5.
16) Install console box.
17) Lower hoist and bounce vehicle up and down several times
to stabilize suspension.
Be sure that vehicle is off hoist and in non loaded condition.
18) Tighten rear trailing arm nuts (1), shock absorber lower bolts
(2) and lateral rod left side nut (3) to specified torque (right
and left).
Tightening torque
Rear trailing arm nuts (a) : 80 N·m (8.0 kg-m, 58.0 lb-ft)
Rear shock absorber lower bolts
(b) : 58 N·m (5.8 kg-m, 42.0 lb-ft)
Lateral rod left side nut (c) : 50 N·m (5.0 kg-m, 36.5 lb-ft)
19) Check to ensure that brake drum is free from dragging and
proper braking is obtained.
20) If equipped with LSPV, check and adjust LSPV spring refer-
ring to “LSPV INSPECTION AND ADJUSTMENT” and per-
form “FLUID PRESSURE TEST” in Section 5.
21) Perform brake operation test (foot brake and parking brake).
WHEEL BEARING AND WHEEL STUD (2WD
VEHICLE)
REMOVAL
1) Remove rear brake drum. Refer to “REAR BRAKE DRUM” in
Section 5.
2) Remove wheel sensor ring (if equipped with ABS). Refer to
“REAR WHEEL SENSOR RING” of Section 5E.
Page 235 of 698

3E-22 REAR SUSPENSION
4) Disconnect parking brake cable from parking brake shoe
lever (2) and remove parking brake cable (1) from brake
back plate.
5) Remove brake back plate bolts from axle housing.
6) Disconnect brake pipe(s) (2) from wheel cylinder and put
wheel cylinder bleeder plug (3) cap onto pipe to prevent fluid
from spilling.
7) Remove wheel speed sensor (1) from axle housing (if
equipped with ABS).
8) Using special tools indicated, draw out axle shaft with brake
back plate.
Special tool
(A) : 09942-15510
(B) : 09943-17912
9) Remove wheel sensor ring (if equipped with ABS). Refer to
“REAR WHEEL SENSOR RING” of Section 5E.
10) In order to remove the retainer ring (1) from the axle shaft
(2), grind (3) with a grinder two parts of the bearing retainer
ring as illustrated till it becomes thin.
11) Break with a chisel the thin ground retainer ring, and it can
be removed.
CAUTION:
Be careful not to go so far as to grind the shaft.
Page 238 of 698

REAR SUSPENSION 3E-25
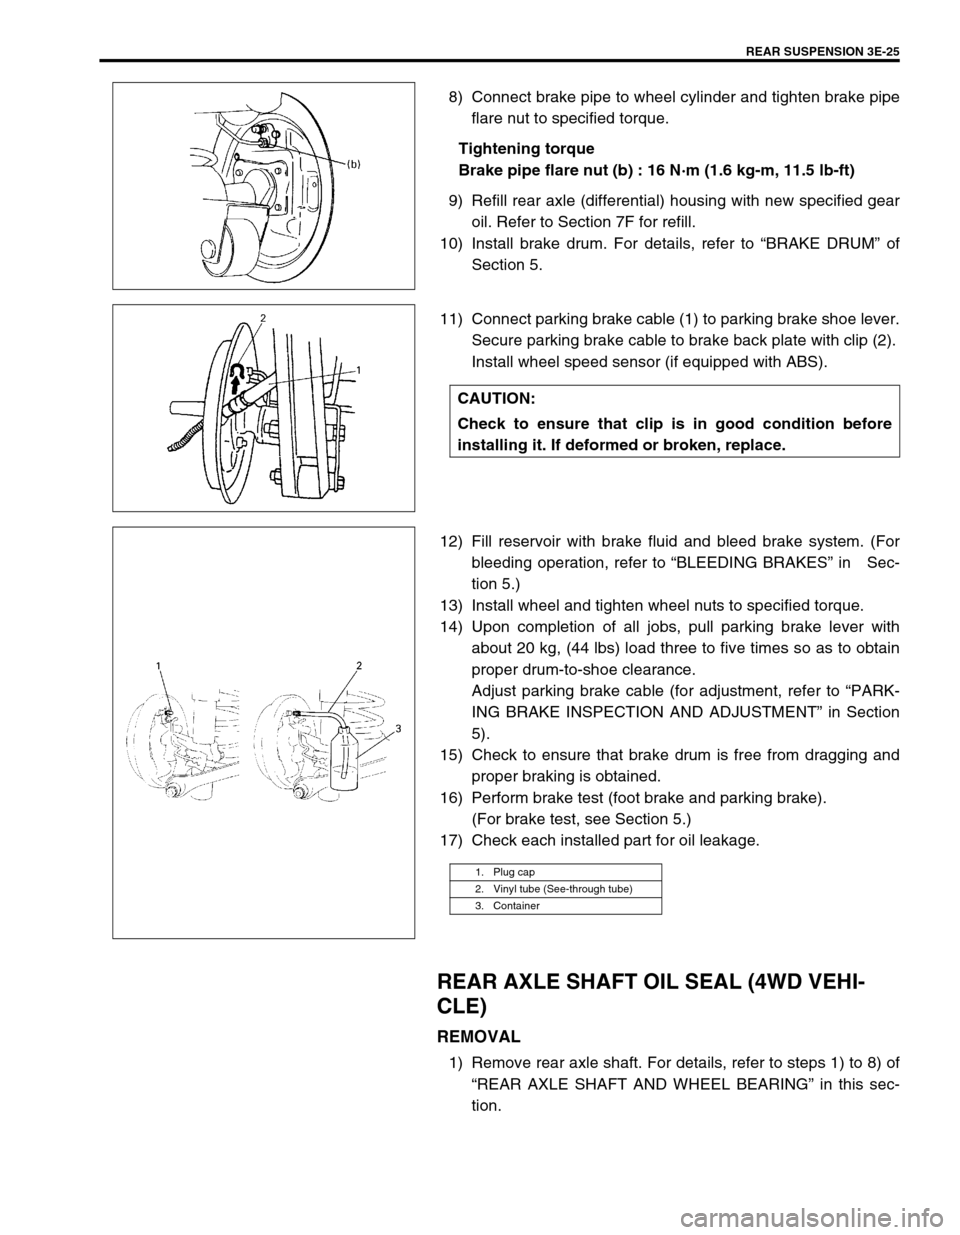
8) Connect brake pipe to wheel cylinder and tighten brake pipe
flare nut to specified torque.
Tightening torque
Brake pipe flare nut (b) : 16 N·m (1.6 kg-m, 11.5 lb-ft)
9) Refill rear axle (differential) housing with new specified gear
oil. Refer to Section 7F for refill.
10) Install brake drum. For details, refer to “BRAKE DRUM” of
Section 5.
11) Connect parking brake cable (1) to parking brake shoe lever.
Secure parking brake cable to brake back plate with clip (2).
Install wheel speed sensor (if equipped with ABS).
12) Fill reservoir with brake fluid and bleed brake system. (For
bleeding operation, refer to “BLEEDING BRAKES” in Sec-
tion 5.)
13) Install wheel and tighten wheel nuts to specified torque.
14) Upon completion of all jobs, pull parking brake lever with
about 20 kg, (44 lbs) load three to five times so as to obtain
proper drum-to-shoe clearance.
Adjust parking brake cable (for adjustment, refer to “PARK-
ING BRAKE INSPECTION AND ADJUSTMENT” in Section
5).
15) Check to ensure that brake drum is free from dragging and
proper braking is obtained.
16) Perform brake test (foot brake and parking brake).
(For brake test, see Section 5.)
17) Check each installed part for oil leakage.
REAR AXLE SHAFT OIL SEAL (4WD VEHI-
CLE)
REMOVAL
1) Remove rear axle shaft. For details, refer to steps 1) to 8) of
“REAR AXLE SHAFT AND WHEEL BEARING” in this sec-
tion.
CAUTION:
Check to ensure that clip is in good condition before
installing it. If deformed or broken, replace.
1. Plug cap
2. Vinyl tube (See-through tube)
3. Container
Page 243 of 698

3E-30 REAR SUSPENSION
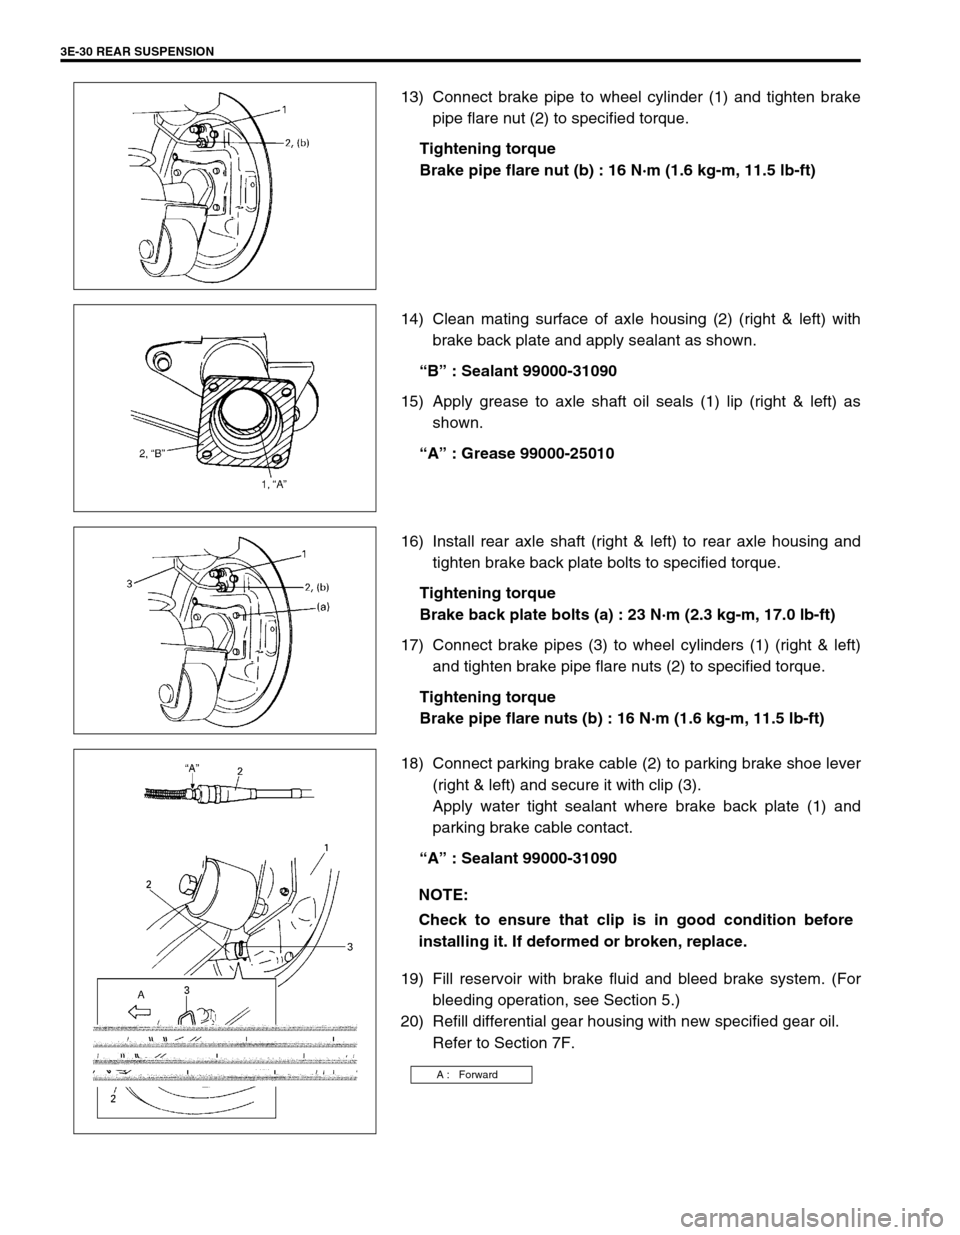
13) Connect brake pipe to wheel cylinder (1) and tighten brake
pipe flare nut (2) to specified torque.
Tightening torque
Brake pipe flare nut (b) : 16 N·m (1.6 kg-m, 11.5 lb-ft)
14) Clean mating surface of axle housing (2) (right & left) with
brake back plate and apply sealant as shown.
“B” : Sealant 99000-31090
15) Apply grease to axle shaft oil seals (1) lip (right & left) as
shown.
“A” : Grease 99000-25010
16) Install rear axle shaft (right & left) to rear axle housing and
tighten brake back plate bolts to specified torque.
Tightening torque
Brake back plate bolts (a) : 23 N·m (2.3 kg-m, 17.0 lb-ft)
17) Connect brake pipes (3) to wheel cylinders (1) (right & left)
and tighten brake pipe flare nuts (2) to specified torque.
Tightening torque
Brake pipe flare nuts (b) : 16 N·m (1.6 kg-m, 11.5 lb-ft)
18) Connect parking brake cable (2) to parking brake shoe lever
(right & left) and secure it with clip (3).
Apply water tight sealant where brake back plate (1) and
parking brake cable contact.
“A” : Sealant 99000-31090
19) Fill reservoir with brake fluid and bleed brake system. (For
bleeding operation, see Section 5.)
20) Refill differential gear housing with new specified gear oil.
Refer to Section 7F.
NOTE:
Check to ensure that clip is in good condition before
installing it. If deformed or broken, replace.
A : Forward
Page 244 of 698

REAR SUSPENSION 3E-31
21) Install wheel and tighten wheel nuts to specified torque.
Tightening torque
Wheel nuts (f) : 85 N·m (8.5 kg-m, 61.5 lb-ft)
22) Upon completion of all jobs, pull parking brake lever with
about 20 kg, (44 lbs) load three to five times so as to obtain
proper drum-to-shoe clearance.
Adjust parking brake cable (for adjustment, see Section 5.)
23) Lower hoist.
24) Tighten right and left trailing arm bolts and nuts (1) and
shock absorber lower bolts (2) to specified torque.
Tighten lateral rod bolt and nut (3) to specified torque.
Tightening torque
Rear trailing arm bolts (a) : 80 N·m (8.0 kg-m, 58.0 lb-ft)
Rear shock absorber lower bolts
(b) : 58 N·m (5.8 kg-m, 42.0 lb-ft)
Lateral rod axle housing side nut
(c) : 50 N·m (5.0 kg-m, 36.5 lb-ft)
Lateral rod body side nut (d) : 65 N·m (6.5 kg-m, 47.0 lb-ft)
25) Check to ensure that brake drum is free from dragging and
proper braking is obtained.
26) Perform brake test (foot brake and parking brake).
(For brake test, see Section 5.)
27) If equipped with LSPV, check and adjust LSPV spring refer-
ring to “LSPV INSPECTION AND ADJUSTMENT” and per-
form “FLUID PRESSURE TEST” in Section 5.
28) Check each installed part for oil leakage.
NOTE:
When tightening these bolts and nuts, be sure that vehi-
cle is off hoist and in non loaded condition.
Page 274 of 698

BRAKES 5-1
6F1
6F2
6G
6H
6K
7A
7A1
7B1
7C1
7D
7E
7F
8A
8B
8C
5
9
10
10A
10B
SECTION 5
BRAKES
CONTENTS
GENERAL DESCRIPTION ................................ 5-2
DIAGNOSIS ....................................................... 5-4
ROAD TESTING BRAKES ............................. 5-4
BRAKE FLUID LEAKS ................................... 5-4
SUBSTANDARD OR CONTAMINATED
BRAKE FLUID ................................................ 5-4
DIAGNOSIS TABLE ....................................... 5-5
BRAKE PEDAL FREE HEIGHT
ADJUSTMENT ............................................... 5-8
BRAKE PEDAL PLAY INSPECTION ............. 5-8
STOP LIGHT SWITCH ADJUSTMENT.......... 5-8
EXCESSIVE PEDAL TRAVEL
INSPECTION ................................................. 5-9
FRONT BRAKE PAD INSPECTION .............. 5-9
BRAKE DISC INSPECTION........................... 5-9
PARKING BRAKE INSPECTION AND
ADJUSTMENT ............................................. 5-10
BOOSTER OPERATION INSPECTION....... 5-11
FLUID PRESSURE TEST (IF EQUIPPED
WITH LSPV) ................................................ 5-12
MASTER CYLINDER AND BRAKE FLUID
LEVEL INSPECTION ................................... 5-14
BRAKE HOSE AND PIPE INSPECTION ..... 5-15
HOSE ....................................................... 5-15
PIPE ......................................................... 5-15
ON-VEHICLE SERVICE .................................. 5-15AIR BLEEDING OF BRAKE SYSTEM ......... 5-15
FRONT BRAKE ........................................... 5-17
BRAKE PAD............................................. 5-17
CALIPER ASSEMBLY ............................. 5-19
BRAKE DISC ........................................... 5-23
REAR BRAKE .............................................. 5-25
BRAKE DRUM ......................................... 5-26
BRAKE SHOE .......................................... 5-29
WHEEL CYLINDER ................................. 5-30
BRAKE BACK PLATE (FOR 2WD
VEHICLE)................................................. 5-31
BRAKE BACK PLATE (FOR 4WD
VEHICLE)................................................. 5-33
MASTER CYLINDER ................................... 5-33
MASTER CYLINDER RESERVOIR ......... 5-33
MASTER CYLINDER ASSEMBLY........... 5-34
BRAKE BOOSTER ...................................... 5-38
BRAKE HOSE/PIPE .................................... 5-41
FRONT BRAKE HOSE/PIPE ................... 5-41
REAR BRAKE HOSE/PIPE...................... 5-44
PARKING BRAKE CABLE ........................... 5-46
LSPV (LOAD SENSING PROPORTIONING
VALVE) ASSEMBLY (IF EQUIPPED).......... 5-48
REQUIRED SERVICE MATERIAL.................. 5-50
SPECIAL TOOL .............................................. 5-50
NOTE:
All front fasteners are important attaching parts in that they could affect the performance of vital parts
and systems, and/or could result in major repair expense. They must be replaced with one of same
part number or with an equivalent part if replacement becomes necessary. Do not use a replacement
part of lesser quality or substitute design. Torque values must be used as specified during reassem-
bly to assure proper retention of all parts. There is to be no welding as it may result in extensive dam-
age and weakening of the metal.
Page 277 of 698

5-4 BRAKES
DIAGNOSIS
ROAD TESTING BRAKES
Brakes should be tested on dry, clean, smooth and reasonably level roadway which is not crowned. Road test
brakes by making brake applications with both light and heavy pedal forces at various speeds to determine if the
vehicle stops evenly and effectively. Also drive vehicle to see if it leads to one side or the other without brake
application. If it does, check the tire pressure, front end alignment and front suspension attachments for loose-
ness. See diagnosis table for other causes.
BRAKE FLUID LEAKS
Check the master cylinder fluid levels. While a slight drop in reservoir level does result from normal lining wear,
an abnormally low level indicates a leak in the system. In such a case, check the entire brake system for leak-
age. If even a slight evidence of leakage is noted, the cause should be corrected or defective parts should be
replaced.
SUBSTANDARD OR CONTAMINATED BRAKE FLUID
Improper brake fluid, mineral oil or water in the fluid may cause the brake fluid to boil or the rubber components
in the hydraulic system to deteriorate.
If primary piston cups are swollen, then rubber parts have deteriorated. This deterioration may also be evi-
denced by swollen wheel cylinder piston cups on the drum brake wheels.
If deterioration of rubber is evident, disassemble all hydraulic parts and wash with alcohol. Dry these parts with
compressed air before assembly to keep alcohol out of the system. Replace all rubber parts in the system,
including hoses. Also, when working on the brake mechanisms, check for fluid on the linings.
If excessive fluid is found, replace the pads.
If master cylinder piston seals are satisfactory, check for leakage or excessive heat conditions. If leakage is not
found, drain fluid, flush with brake fluid, refill and bleed system.
The system must be flushed if there is any doubt as to the grade of fluid in the system or if fluid has been used
which contained parts that have been subjected to contaminated fluid.