Page 35 of 118
Downloaded from www.Manualslib.com manuals search engine TOP AND FRONT OF ENGINE
Cylinder head gasket
11
11 - 9
– the brake servo vacuum pipe,
– the pipes on the cylinder head water outlet unit and
the sensor connections (1),
– the pipes (3),– the fuel pipes (4) (fit cleanliness plugs) and the wiring
mounting (5),
– the cylinder marking sensor (7),
16179R
16869R116870R5
16181R
Page 45 of 118
Downloaded from www.Manualslib.com manuals search engine TURBOCHARGING
Air-air exchanger
12
12-7
Air-air exchanger
REMOVAL
It is necessary to remove the bumper to access the air-
air exchanger.
To do this, remove:
– the two upper side mounting bolts (A) (torx 20) and
the lower side mounting bolt (B) (torx 20) from the
front section of the front wing inner protector,
– the three mounting clips (C),
– the mounting clip (D) and separate the front section
of the right and left wing protector.If the vehicle is fitted with fog lights.
Disconnect:
– the battery,
– the fog light wiring harness connector (E) located in
the front section of the left-hand front wheel arch.
Remove:
– the upper side mounting bolt (F) on the bumper (on
each side),
– the two front engine underbody mounting bolts,
98710R2
99184R
99147R
Page 99 of 118

Downloaded from www.Manualslib.com manuals search engine STARTING - CHARGING
Alternator
16
16-2
REMOVAL
Put the vehicle on a 2 post lift.
Disconnect the battery as well as all electrical
connections on the alternator.
Separate the diesel filter from its mounting and
remove.
Unclip the power steering reservoir.
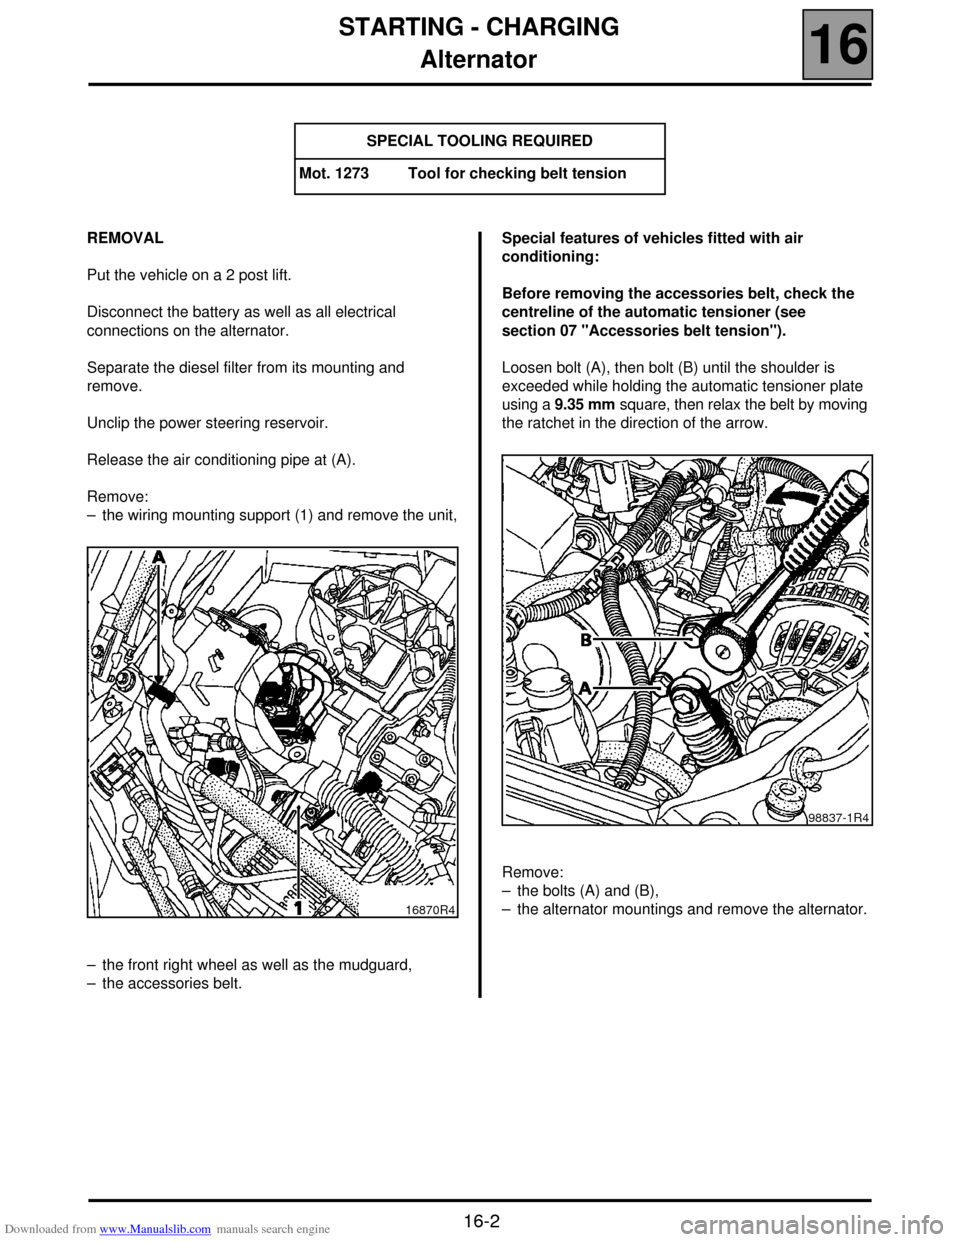
Release the air conditioning pipe at (A).
Remove:
– the wiring mounting support (1) and remove the unit,
– the front right wheel as well as the mudguard,
– the accessories belt.Special features of vehicles fitted with air
conditioning:
Before removing the accessories belt, check the
centreline of the automatic tensioner (see
section 07 "Accessories belt tension").
Loosen bolt (A), then bolt (B) until the shoulder is
exceeded while holding the automatic tensioner plate
using a 9.35 mm square, then relax the belt by moving
the ratchet in the direction of the arrow.
Remove:
– the bolts (A) and (B),
– the alternator mountings and remove the alternator. SPECIAL TOOLING REQUIRED
Mot. 1273 Tool for checking belt tension
16870R4
98837-1R4
Page 106 of 118

Downloaded from www.Manualslib.com manuals search engine COOLING SYSTEM
Radiator
19
19-4
Radiator
REMOVAL
Put the vehicle on a two post lift.
Disconnect the battery.
Remove the engine undertray.
Drain the cooling circuit through the lower radiator
hose.
Disconnect the wiring of the fan unit.
Unclip the power steering reservoir and remove it.
Remove:
– the upper cross member,
– the upper radiator mountings,
– the upper hoses on the radiator,
– the inlet manifold-air exchanger duct,
– the fan unit mountings on the radiator and remove
the fan,
– the radiator mountings on the condenser and remove
the radiator.REFITTING
Refitting is the reverse of removal.
Fill and bleed the cooling circuit (see section 19
"Filling and bleeding").
NOTE: ensure that the fins of the radiator or of the
condenser (if fitted) are not damaged when
removing-refitting, and protect them if necessary. SPECIAL TOOLING REQUIRED
Mot. 1202 -01
Hose clip pliers
Mot. 1202 -02
Mot. 1448 Long nose pliers for hose clips