2000 NISSAN ALTIMA battery
[x] Cancel search: batteryPage 115 of 242

Station memory operations
Six stations can be set for the AM band. 12
stations can be set for the FM band (six for
FM1, six for FM2).
1. Push
to select AM, FM1, or FM2.The selected band illuminates in the dis-
play.
2. Tune to the desired station.
3. Push the desired station select button for
more than 1.5 seconds. For example, in
the illustrations ch2 is to be memorized.
The radio mutes when the select button
is pushed.
4. The indicator, ch2, then illuminates in the
display and the sound resumes. Memo-
rizing is now complete.
5. Other station select buttons can be set in
the same manner.
If the battery cable is disconnected, or if the
radio fuse opens, the radio memory is can-
celled. In that case, reset the desired stations.
Cassette tape player operation
Precautions on cassette tape player op-
eration
cTo maintain good quality sound,
NISSAN recommends using cassette
tapes of 60 minutes or shorter in
length.
cCassette tapes should be removedfrom the player when not in use. Store
cassettes in their protective cases
and away from direct sunlight, heat,
dust moisture or magnetic sources.
cDirect sunlight can cause the cassette
to become deformed. The use of de-
formed cassettes may cause the cas-
sette to jam in the player.
cDo not use cassettes that have peel-
ing or loose labels. If used, the label
could jam in the player.
cIf a cassette has loose tape, insert a
pencil through one of the cassette
hubs and rewind the tape firmly.
Loose tape may cause jamming and
wavering sound quality.
cOver a period of time, the playback
head, capstan and pinch roller may
collect a tape coating residue as the
tape is played. This residue accumu-
lation can cause a weak or wavering
sound and should be removed peri-
odically with a head cleaning tape. If
the residue is not removed periodi-
cally, the player may need to be dis-
assembled for cleaning.AHA1087
4-20Heater, air conditioner and audio systems
ZX
Page 120 of 242

5 Starting and driving
Precautions when starting and driving ...................5-2
Exhaust gas (carbon monoxide) ............................5-2
Three way catalyst .................................................5-2
Avoiding collision and rollover................................5-3
Drinking alcohol/drugs and driving .........................5-3
Ignition switch .........................................................5-4
Automatic transmission ..........................................5-4
Manual transmission ..............................................5-5
Key positions ..........................................................5-5
Nissan vehicle immobilizer system (NVIS) ............5-6
Before starting the engine ......................................5-6
Starting the engine .................................................5-7
Driving the vehicle ..................................................5-7
Automatic transmission ..........................................5-7
Manual transmission ............................................5-12
Parking brake .......................................................5-13
Cruise control (if so equipped) .............................5-14
Precautions on cruise control...............................5-14Cruise control operations .....................................5-14
Break-in schedule ................................................5-15
Increasing fuel economy ......................................5-16
Parking/parking on hills ........................................5-17
Power steering .....................................................5-18
Brake system........................................................5-18
Braking precautions .............................................5-18
Anti-lock brake system (ABS) (if so equipped) ....5-19
Cold weather driving ............................................5-20
Freeing a frozen door lock ...................................5-20
Anti-freeze ............................................................5-20
Battery ..................................................................5-20
Draining of coolant water .....................................5-20
Tire equipment .....................................................5-21
Special winter equipment .....................................5-21
Driving on snow or ice .........................................5-21
Engine block heater (if so equipped) ...................5-22
ZX
Page 123 of 242

laws vary on what is considered to be
legally intoxicated, the fact is that alcohol
affects all people differently and most
people underestimate the effects of alcohol.
Remember, drinking and driving don't mix!
And that's true for drugs, too (over the
counter, prescription, and illegal drugs).
Don't drive if your ability to operate your
vehicle is impaired by alcohol, drugs, or
some other physical condition.
AUTOMATIC TRANSMISSION
On automatic transmission models the igni-
tion lock is designed so the key cannot be
turned to LOCK and removed until the shift
selector lever is moved to the P (Park)
position.
When removing the key from the ignition,
make sure the shift selector lever is in the P
(Park) position.
If the key cannot be turned to the LOCK
position, proceed as follows to remove the
key.1) Move the shift selector lever into the P
(Park) position.
2) Turn the ignition key slightly toward the
ON position.
3) Turn the key to the LOCK position.
4) Remove the key.
The shift lever is designed so it cannot be
moved out of P (Park) and into any of the
other gear positions if the ignition key is
turned to OFF or if the key is removed from
the switch.
The shift selector lever can be moved if
the ignition switch is in the ACC posi-
tion. This allows the vehicle to be moved
if the battery is discharged. The shift
selector lever can also be moved if the
ignition switch is in the ON position and
the foot brake pedal is depressed.
There is an OFF position between the
LOCK and ACC positions. The OFF posi-
tion is indicated by a ``1'' on the key
cylinder. When the ignition is in OFF, the
steering wheel is not locked.
In order for the steering wheel to be locked,
it must be turned about 1/8 of a turn clock-
wise from the straight up position.
ASD1014
IGNITION SWITCH
5-4Starting and driving
ZX
Page 127 of 242

The automatic transmission in your vehicle
is electronically controlled by the transmis-
sion control module to produce maximum
power and smooth operation.
The recommended operating procedures for
this transmission are shown on the following
pages. Follow these procedures for maximum
vehicle performance and driving enjoyment.
Starting the vehicle
cAfter starting the engine, fully depress
the foot brake pedal before shifting the
shift selector lever to the D (Drive), R
(Reverse), 2 or 1 position. Be sure the
vehicle is fully stopped before attempt-
ing to shift the shift selector lever.
cKeep the foot brake pedal depressed
and shift into a driving gear.
c
Release the foot brake, then gradually
start the vehicle in motion.
The automatic transmission is designed
so the foot brake pedal MUST be de-
pressed before shifting from P (Park) to
any drive position while the ignition switch
is ON.
The selector lever cannot be moved out
of P (Park) and into any of the other gearpositions if the ignition key is turned to
LOCK or if the key is removed.
The shift selector lever can be moved if
the ignition switch is in the ACC posi-
tion. This allows the vehicle to be moved
if the battery is discharged.
5-8Starting and driving
ZX
Page 129 of 242

D (Drive)
Use this position for all normal forward
driving.
2 (Second gear)
Use this position for hill climbing or engine
braking on downhill grades.
Do not shift into the 2 position at speeds
above 74 MPH (118 Km/h). Do not exceed
74 MPH (118 Km/h) in the 2 position.
1 (Low gear)
Use this position when climbing steep hills
slowly or slow driving through deep snow,
sand or mud, or for maximum engine brak-
ing on steep downhill grades.
Do not shift into the 1 position at speeds
above 41 MPH (66 km/h). Do not exceed 41
MPH (66 km/h) in the 1 position.Selector lock release
(if so equipped)
If the battery is discharged, the selector
lever may not be moved from the P position
even with the brake pedal depressed and
the selector lever button pushed.
To move the selector lever, push the shift
lock release and selector lever button. The
selector lever can be moved to N (Neutral).
To push the shift lock release, follow the
following procedure:
1. Turn the ignition key to the lock position
and remove the key
2. Apply the parking brake.
3. Remove the shift lock release cap.
4. Insert a small screwdriver in the shift lock
release slot, and push down.
5. Push the selector lever button and move
the selector lever to N (Neutral) position
while holding down the shift lock release.
6. Start the engine.
If there is any problem moving the selector
lever out of P (Park), take your vehicle to an
authorized NISSAN dealership as soon as
possible.
ASD1018
5-10Starting and driving
ZX
Page 139 of 242

The brake system then operates normally,
but without anti-lock assistance.
If the light comes on during the self-test or
while driving, take the vehicle to an autho-
rized NISSAN dealer for repair.
WARNING
The anti-lock brake system is a sophis-
ticated device, but it cannot prevent
accidents resulting from careless or
dangerous driving techniques. It can
help maintain vehicle control during
braking on slippery surfaces, but re-
member that the stopping distance on
slippery surfaces will be longer than on
normal surfaces, even with the anti-
lock brake system. Stopping distances
may also be longer on rough, gravel or
snow covered roads, or if you are using
tire chains. Always maintain a safe dis-
tance from the vehicle in front of you.
Ultimately, the responsibility for safety
of self and others rests in the hands of
the driver.
Tire type and condition of tires may
also affect braking effectiveness.cWhen replacing tires, install the
specified size of tire on all four
wheels.
cWhen installing a spare tire, make
sure it is the proper size and type as
specified on the tire placard. For tire
placard location information, refer to
ªTire placardº in the ``Technical and
Consumer information'' section of
this manual.
Refer to ``Wheels and tires'' in the ``Do-
it-yourself'' section of this manual.
FREEING A FROZEN DOOR
LOCK
To prevent a door lock from freezing, apply
de-icer or glycerin through the key hole. If
the lock becomes frozen, heat the key be-
fore inserting it into the key hole.
ANTI-FREEZE
In the winter when it is anticipated that the
temperature will drop below 32ÉF (0ÉC),
check the anti-freeze (ethylene glycol base)
to assure proper winter protection. For de-
tails, see ``Engine cooling system'' in the
``Do-it-yourself'' section.
BATTERY
If the battery is not fully charged during
extremely cold weather conditions, the bat-
tery fluid may freeze and damage the bat-
tery. To maintain maximum efficiency, the
battery should be checked regularly. For
details, see ``Battery'' in the ``Do-it-yourself ''
section.
DRAINING OF COOLANT WATER
If the vehicle is to be left outside without
anti-freeze, drain the cooling system by
opening the drain valves located under the
COLD WEATHER DRIVING
5-20Starting and driving
ZX
Page 149 of 242

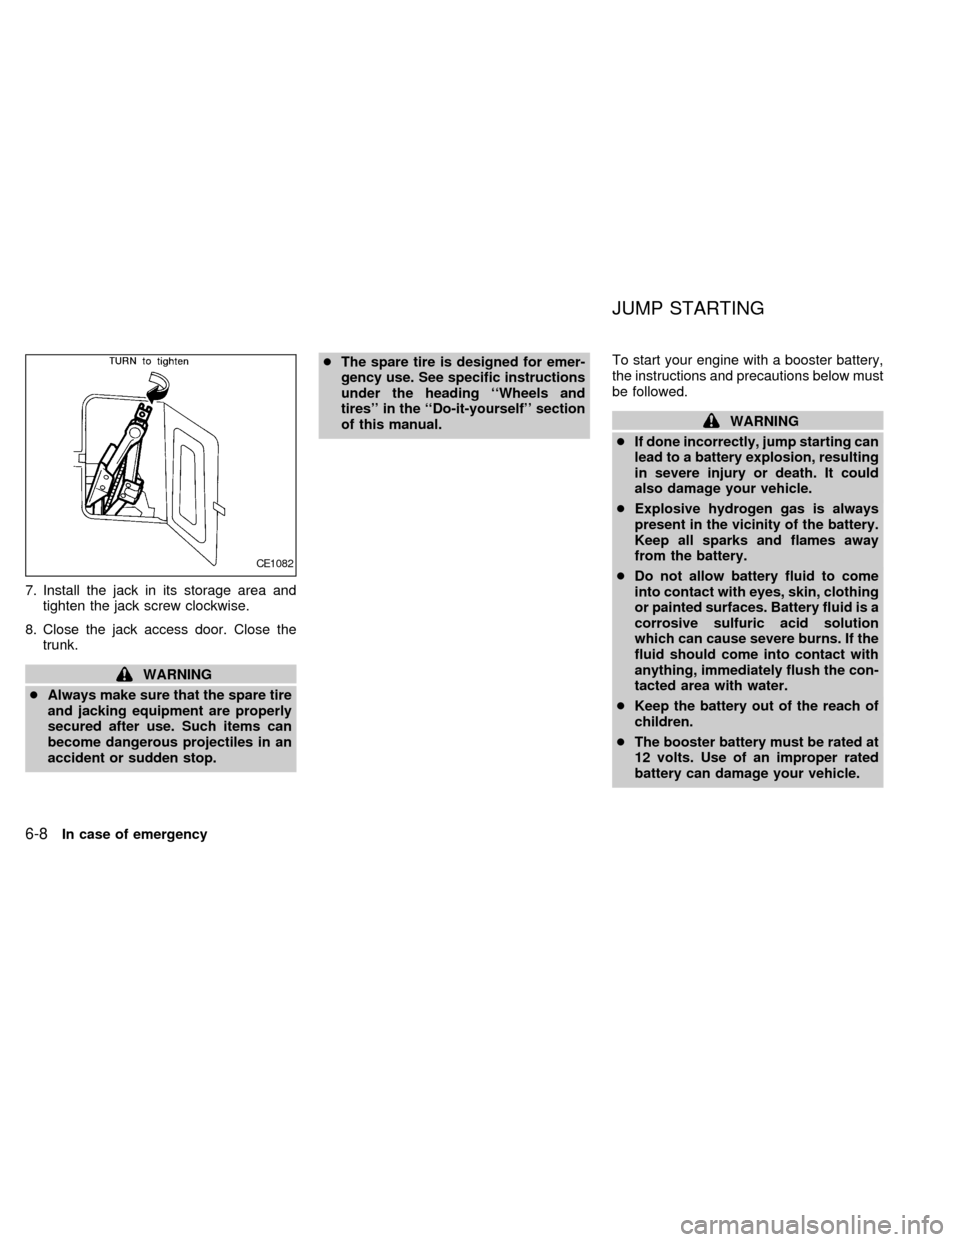
7. Install the jack in its storage area and
tighten the jack screw clockwise.
8. Close the jack access door. Close the
trunk.
WARNING
cAlways make sure that the spare tire
and jacking equipment are properly
secured after use. Such items can
become dangerous projectiles in an
accident or sudden stop.cThe spare tire is designed for emer-
gency use. See specific instructions
under the heading ``Wheels and
tires'' in the ``Do-it-yourself'' section
of this manual.To start your engine with a booster battery,
the instructions and precautions below must
be followed.
WARNING
cIf done incorrectly, jump starting can
lead to a battery explosion, resulting
in severe injury or death. It could
also damage your vehicle.
cExplosive hydrogen gas is always
present in the vicinity of the battery.
Keep all sparks and flames away
from the battery.
cDo not allow battery fluid to come
into contact with eyes, skin, clothing
or painted surfaces. Battery fluid is a
corrosive sulfuric acid solution
which can cause severe burns. If the
fluid should come into contact with
anything, immediately flush the con-
tacted area with water.
cKeep the battery out of the reach of
children.
cThe booster battery must be rated at
12 volts. Use of an improper rated
battery can damage your vehicle.
CE1082
JUMP STARTING
6-8In case of emergency
ZX
Page 150 of 242

cWhenever working on or near a bat-
tery, always wear suitable eye pro-
tectors (for example, goggles or in-
dustrial safety spectacles) and
remove rings, metal bands, or any
other jewelry. Do not lean over the
battery when jump starting.
cDo not attempt to jump start a frozen
battery. It could explode and cause
serious injury.
cYour vehicle has an automatic en-
gine cooling fan. It could come on at
any time. Keep hands and other ob-
jects away from it.
Always follow the instructions below.
Failure to do so could result in damage
to the charging system and cause per-
sonal injury.
1. If the booster battery is in another ve-
hicle, position the two vehicles to bring
their batteries into close proximity to
each other.
Do not allow the two vehicles to
touch.
2. Apply the parking brake. Move the shift
selector lever to N (Neutral) (manual
transmission) or to P (Park) (automatic
transmission). Switch off all unncessaryelectrical systems (lights, heater, air con-
ditioner, etc.).
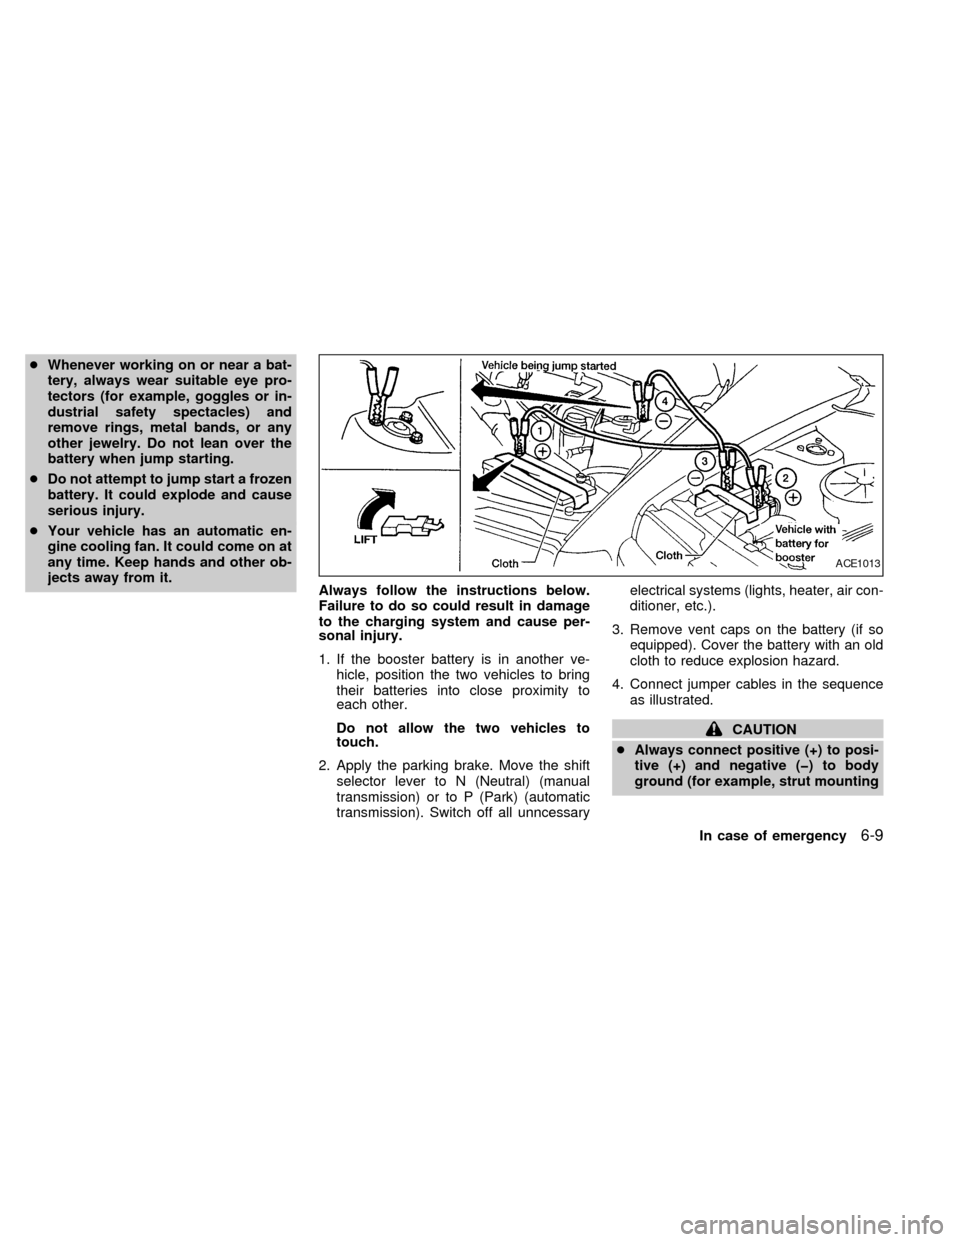
3. Remove vent caps on the battery (if so
equipped). Cover the battery with an old
cloth to reduce explosion hazard.
4. Connect jumper cables in the sequence
as illustrated.
CAUTION
cAlways connect positive (+) to posi-
tive (+) and negative (þ) to body
ground (for example, strut mounting
ACE1013
In case of emergency6-9
ZX