2000 NISSAN ALTIMA oil filter
[x] Cancel search: oil filterPage 163 of 242

8 Do-it-yourself
Maintenance precautions .......................................8-2
Engine compartment check locations ....................8-4
Engine cooling system ...........................................8-5
Checking engine coolant level ...............................8-5
Changing engine coolant .......................................8-6
Engine oil ...............................................................8-8
Checking engine oil level .......................................8-8
Changing engine oil ...............................................8-9
Changing engine oil filter .....................................8-10
Automatic transmission fluid ................................8-10
Temperature conditions for checking ...................8-11
Power steering fluid..............................................8-12
Brake fluid ............................................................8-12
Clutch fluid............................................................8-12
Window washer fluid ............................................8-13
Window washer fluid reservoir .............................8-13
Battery ..................................................................8-14
Jump starting ........................................................8-15
Drive belts ............................................................8-15
Spark plugs ..........................................................8-15
Replacing spark plugs ..........................................8-15
Air cleaner ............................................................8-16Windshield wiper blades ......................................8-18
Cleaning ...............................................................8-18
Replacing .............................................................8-18
Parking brake and brake pedal ............................8-19
Checking parking brake .......................................8-19
Checking brake pedal ..........................................8-19
Brake booster .......................................................8-20
Clutch pedal .........................................................8-21
Checking clutch pedal ..........................................8-21
Fuses ....................................................................8-21
Engine compartment ............................................8-21
Passenger compartment ......................................8-22
Multi-remote controller battery replacement ........8-23
Lights ....................................................................8-24
Headlights ............................................................8-24
Front turn signal lamp ..........................................8-27
Front parking and cornering lamp ........................8-27
Front sidemarker lamp .........................................8-28
Fog lights ..............................................................8-29
Exterior and interior lights ....................................8-30
Wheels and tires ..................................................8-34
Tire pressure ........................................................8-34
ZX
Page 165 of 242

When performing any inspection or mainte-
nance work on your vehicle, always take
care to prevent serious accidental injury to
yourself or damage to the vehicle. The
following are general precautions which
should be closely observed.
WARNING
cPark the vehicle on a level surface,
apply the parking brake securely and
block the wheels to prevent the ve-
hicle from moving. For manual trans-
mission models, move the shift lever
to (N) Neutral. For an automatic
transmission models, move the shift
selector lever to P (Park).
cBe sure the ignition key is in the OFF
or LOCK position when performing
any parts replacement or repairs.
cYour vehicle is equipped with an
automatic engine cooling fan. It may
come on at any time without warn-
ing, even if the ignition key is in the
OFF position and the engine is not
running. To avoid injury, always dis-
connect the negative battery cable
before working near the fan.c
If you must work with the engine run-
ning, keep your hands, clothing, hair
and tools away from moving fans,
belts and any other moving parts.
cIt is advisable to secure or remove
any loose clothing and remove any
jewelry, such as rings, watches, etc.
before working on your vehicle.
cAlways wear eye protection when-
ever you work on your vehicle.
cIf you must run the engine in an
enclosed space such as a garage, be
sure there is proper ventilation for
exhaust gases to escape.
cNever get under the vehicle while it
is supported only by a jack. If it is
necessary to work under the vehicle,
support it with safety stands.
c
Keep smoking materials, flame and
sparks away from the fuel tank and
battery.cOn gasoline engine models with the
multiport fuel injection (MFI) system,
the fuel filter or fuel lines should be
serviced by an authorized NISSAN
dealer because the fuel lines are un-
der high pressure even when the en-
gine is off.
CAUTION
cDo not work under the hood while
the engine is hot. Turn off the engine
and wait until it cools down.
cNever connect or disconnect the bat-
tery or any transistorized compo-
nent while the ignition is in the ON
position.
cNever leave the engine or automatic
transmission related component
harnesses disconnected while the
ignition is in the ON position.
c
Avoid contact with used engine oil.
Improperly disposed engine oil
and/or other vehicle fluids can dam-
age the environment. Always con-
form to local regulations for disposal
of vehicle fluid.
MAINTENANCE
PRECAUTIONS
8-2Do-it-yourself
ZX
Page 172 of 242

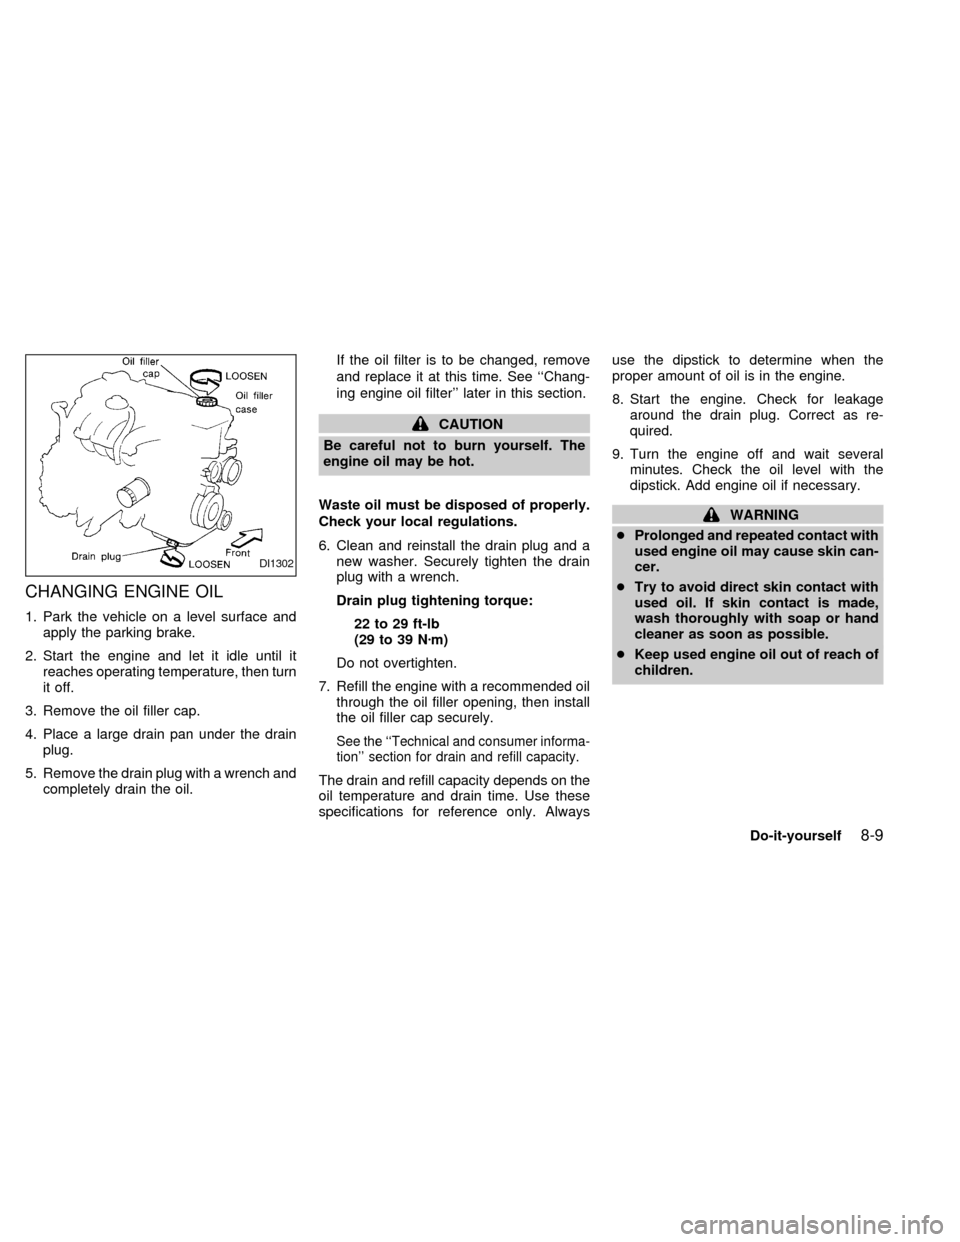
CHANGING ENGINE OIL
1. Park the vehicle on a level surface and
apply the parking brake.
2. Start the engine and let it idle until it
reaches operating temperature, then turn
it off.
3. Remove the oil filler cap.
4. Place a large drain pan under the drain
plug.
5. Remove the drain plug with a wrench and
completely drain the oil.If the oil filter is to be changed, remove
and replace it at this time. See ``Chang-
ing engine oil filter'' later in this section.
CAUTION
Be careful not to burn yourself. The
engine oil may be hot.
Waste oil must be disposed of properly.
Check your local regulations.
6. Clean and reinstall the drain plug and a
new washer. Securely tighten the drain
plug with a wrench.
Drain plug tightening torque:
22 to 29 ft-lb
(29 to 39 Nzm)
Do not overtighten.
7. Refill the engine with a recommended oil
through the oil filler opening, then install
the oil filler cap securely.
See the ``Technical and consumer informa-
tion'' section for drain and refill capacity.
The drain and refill capacity depends on the
oil temperature and drain time. Use these
specifications for reference only. Alwaysuse the dipstick to determine when the
proper amount of oil is in the engine.
8. Start the engine. Check for leakage
around the drain plug. Correct as re-
quired.
9. Turn the engine off and wait several
minutes. Check the oil level with the
dipstick. Add engine oil if necessary.
WARNING
cProlonged and repeated contact with
used engine oil may cause skin can-
cer.
cTry to avoid direct skin contact with
used oil. If skin contact is made,
wash thoroughly with soap or hand
cleaner as soon as possible.
cKeep used engine oil out of reach of
children.
DI1302
Do-it-yourself8-9
ZX
Page 173 of 242

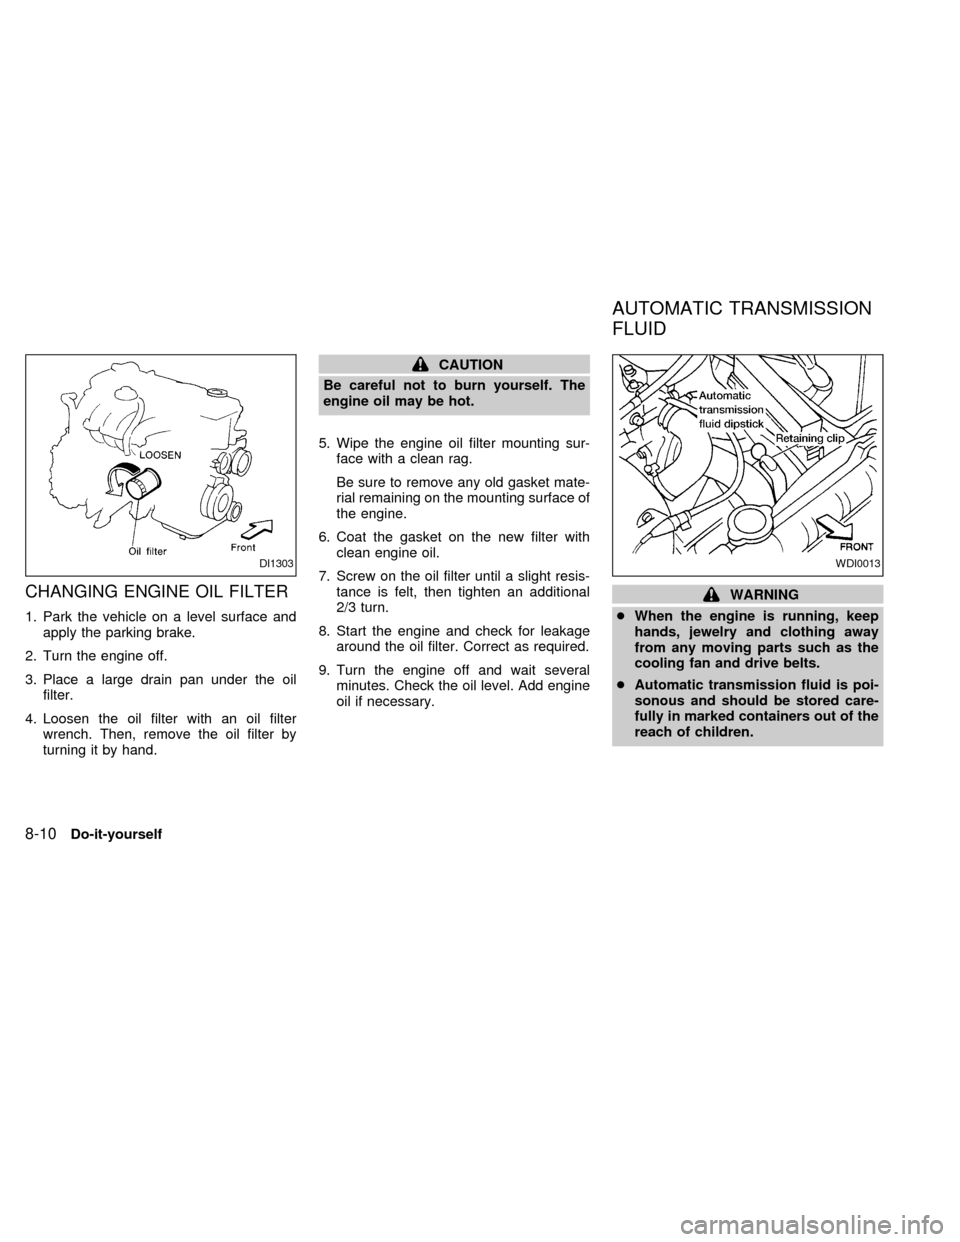
CHANGING ENGINE OIL FILTER
1. Park the vehicle on a level surface and
apply the parking brake.
2. Turn the engine off.
3. Place a large drain pan under the oil
filter.
4. Loosen the oil filter with an oil filter
wrench. Then, remove the oil filter by
turning it by hand.
CAUTION
Be careful not to burn yourself. The
engine oil may be hot.
5. Wipe the engine oil filter mounting sur-
face with a clean rag.
Be sure to remove any old gasket mate-
rial remaining on the mounting surface of
the engine.
6. Coat the gasket on the new filter with
clean engine oil.
7. Screw on the oil filter until a slight resis-
tance is felt, then tighten an additional
2/3 turn.
8. Start the engine and check for leakage
around the oil filter. Correct as required.
9. Turn the engine off and wait several
minutes. Check the oil level. Add engine
oil if necessary.
WARNING
cWhen the engine is running, keep
hands, jewelry and clothing away
from any moving parts such as the
cooling fan and drive belts.
cAutomatic transmission fluid is poi-
sonous and should be stored care-
fully in marked containers out of the
reach of children.
DI1303WDI0013
AUTOMATIC TRANSMISSION
FLUID
8-10Do-it-yourself
ZX
Page 207 of 242
![NISSAN ALTIMA 2000 L30 / 2.G Owners Manual Schedule 1
Abbreviations: R = Replace I = Inspect. Correct or replace if necessary. [ ]: At the mileage intervals only
MAINTENANCE OPERATIONMAINTENANCE INTERVAL
Perform at number of miles,
kilometers NISSAN ALTIMA 2000 L30 / 2.G Owners Manual Schedule 1
Abbreviations: R = Replace I = Inspect. Correct or replace if necessary. [ ]: At the mileage intervals only
MAINTENANCE OPERATIONMAINTENANCE INTERVAL
Perform at number of miles,
kilometers](/manual-img/5/637/w960_637-206.png)
Schedule 1
Abbreviations: R = Replace I = Inspect. Correct or replace if necessary. [ ]: At the mileage intervals only
MAINTENANCE OPERATIONMAINTENANCE INTERVAL
Perform at number of miles,
kilometers or months,
whichever comes first.Miles x 1,000 3.75 7.5 11.25 15 18.75 22.5 26.25 30 33.75 37.5 41.25 45 48.75 52.5 56.25 60
(km x 1,000) (6) (12) (18) (24) (30) (36) (42) (48) (54) (60) (66) (72) (78) (84) (90) (96)
Months 3 6 9 12 15 18 21 24 27 30 33 36 39 42 45 48
Emission control system maintenance
Drive belts See NOTE (1)I*
Air cleaner filter See NOTE (2) [R] [R]
EVAP vapor linesI* I*
Fuel linesI* I*
Fuel filter See NOTE (3)*
Engine coolant See NOTE (4)R*
Engine oilRRRRRRRRRRRRRRRR
Engine oil filterRRRRRRRRRRRRRRRR
Spark plugs (Use PLATINUM-TIPPED type) Replace every 105,000 miles (169,000 km)
Intake & exhaust valve clearance See NOTE (5)*
NOTE: (1) After 60,000 miles (96,000 km) or 48 months, inspect every 15,000 miles (24,000 km) or 12 months.
(2) If operating mainly in dusty conditions, more frequent maintenance may be required.
(3) When the filter becomes clogged, the vehicle speed cannot be increased as the driver wishes. In such an event,
replace the filter.
(4) After 60,000 miles (96,000 km) or 48 months, replace every 30,000 miles (48,000 km) or 24 months.
(5) If valve noise increases, inspect valve clearance.
* Maintenance items and intervals marked with an ``*'' are recommended by NISSAN for reliable vehicle operation. The
owner need not perform such maintenance in order to maintain the emission warranty or manufacturer recall liability.
Other maintenance items and intervals are required.
9-6Maintenance
ZX
Page 209 of 242
![NISSAN ALTIMA 2000 L30 / 2.G Owners Manual Schedule 2
Abbreviations: R = Replace I = Inspect. Correct or replace if necessary. [ ]: At the mileage intervals only
MAINTENANCE OPERATIONMAINTENANCE INTERVAL
Perform at number of miles, kilometers NISSAN ALTIMA 2000 L30 / 2.G Owners Manual Schedule 2
Abbreviations: R = Replace I = Inspect. Correct or replace if necessary. [ ]: At the mileage intervals only
MAINTENANCE OPERATIONMAINTENANCE INTERVAL
Perform at number of miles, kilometers](/manual-img/5/637/w960_637-208.png)
Schedule 2
Abbreviations: R = Replace I = Inspect. Correct or replace if necessary. [ ]: At the mileage intervals only
MAINTENANCE OPERATIONMAINTENANCE INTERVAL
Perform at number of miles, kilometers or
months, whichever comes first.Miles x 1,000 7.5 15 22.5 30 37.5 45 52.5 60
(km x 1,000) (12) (24) (36) (48) (60) (72) (84) (96)
Months 6 12 18 24 30 36 42 48
Emission control system maintenance
Drive belts See NOTE (1)I*
Air cleaner filter[R] [R]
EVAP vapor linesI* I*
Fuel linesI* I*
Fuel filter See NOTE (2)*
Engine coolant See NOTE (3)R*
Engine oilRRRRRRRR
Engine oil filterRRRRRRRR
Spark plugs (Use PLATINUM-TIPPED type) Replace every 105,000 miles (169,000 km)
Intake & exhaust valve clearance See NOTE (4)*
NOTE: (1) After 60,000 miles (96,000 km) or 48 months, inspect every 15,000 miles (24,000 km) or 12 months.
(2) When the filter becomes clogged, the vehicle speed cannot be increased as the driver wishes. In such an event,
replace the filter.
(3) After 60,000 miles (96,000 km) or 48 months, replace every 30,000 miles (48,000 km) or 24 months.
(4) If valve noise increases, inspect valve clearance.
* Maintenance items and intervals marked with an ``*'' are recommended by NISSAN for reliable vehicle operation. The
owner need not perform such maintenance in order to maintain the emission warranty or manufacturer recall liability.
Other maintenance items and intervals are required.
9-8Maintenance
ZX
Page 211 of 242

EXPLANATION OF
MAINTENANCE ITEMS
Additional information on the following
items marked with an ``*'' is found in the
``Do-it- yourself'' section of this manual.
Emission control system
maintenance
Drive belts* ÐCheck drive belts for wear,
fraying or cracking and also for proper ten-
sion. Replace any damaged drive belts.
Air cleaner filter ÐUnder normal driving
conditions, the air cleaner filter should be
replaced in accordance with the mainte-
nance schedule. However, driving the ve-
hicle in dusty areas may cause rapid clog-
ging of the element. Consequently, the
element may have to be replaced more
frequently.
EVAP vapor lines ÐCheck vapor lines
and connections for leaks, looseness or
deterioration. If leaks are found, replace
them.
Fuel lines ÐCheck the fuel hoses, piping
and connections for leaks, looseness or
deterioration. Replace any damaged parts.Fuel filter ÐIf the vehicle is operated
under extremely adverse weather condi-
tions or in areas where ambient tempera-
tures are either extremely low or extremely
high, the filter might become clogged. In
such an event, replace the filter immedi-
ately.
Engine coolant* ÐDrain and flush the
cooling system.
Engine oil & oil filter* ÐUnder normal
driving conditions, the engine oil and oil filter
should be replaced in accordance with the
maintenance schedule. However, under se-
vere driving conditions, they may have to be
replaced more frequently.
Spark plugs* ÐReplace with new plugs
having the correct heat range.
Intake & exhaust valve clearance Ð
Check the valve clearance if valve noise
increases.
Chassis and body maintenance
Brake lines & cables ÐCheck the brake
lines and hoses (including brake booster
vacuum hoses, connections & check valve)and parking brake cables for proper attach-
ment, leaks, cracks, chafing, abrasion, de-
terioration, etc.
Brake pads, rotors, drums & linings Ð
Check these and the other neighboring
brake components for wear, deterioration
and leaks. Under severe driving conditions,
they may have to be inspected more fre-
quently.
Manual & automatic transmission fluid*
ÐCheck the fluid level and visually inspect
for signs of leakage.
Under severe driving conditions, the fluid
should be replaced at the specified interval.
Steering gear & linkage, axle & suspen-
sion parts, and drive shaft boots Ð
Check for damage, looseness and leakage
of oil or grease. Under severe driving con-
ditions, inspection should be performed
more frequently.
Exhaust system ÐVisually check the ex-
haust pipes, muffler, and hangers for proper
attachment, leaks, cracks, chafing, abra-
sion, deterioration, etc. Under severe driv-
ing conditions, inspection should be per-
formed more frequently.
9-10Maintenance
ZX
Page 214 of 242

10 Technical and consumer information
Capacities and recommended fuel/lubricants ......10-2
Fuel recommendation...........................................10-3
Engine oil and oil filter recommendation..............10-5
Recommended SAE viscosity number.................10-6
Air conditioner system refrigerant and
lubricant recommendations ..................................10-7
Specifications .......................................................10-8
Engine ..................................................................10-8
Wheels and tires ..................................................10-9
Dimensions and weights ......................................10-9
When traveling or registering your vehicle in
another country ..................................................10-10
Vehicle identification ..........................................10-10
Vehicle identification number (VIN) plate...........10-10
Vehicle identification number
(chassis number) ................................................10-10
Engine serial number .........................................10-11
F.M.V.S.S. certification label ..............................10-11
Emission control information label .....................10-12Tire placard ........................................................10-12
Air conditioner specification label.......................10-12
Installing front license plate................................10-13
Vehicle loading information ................................10-13
Terms .................................................................10-13
Determining vehicle load capacity .....................10-14
Loading tips ........................................................10-14
Towing a trailer...................................................10-15
Maximum load limits...........................................10-15
Towing load/specification chart ..........................10-16
Towing safety .....................................................10-16
Uniform tire quality grading ................................10-18
Emission control system warranty .....................10-19
Reporting safety defects (US only) ....................10-19
Readiness for inspection/maintenance (I/M)
test (US only) .....................................................10-20
Owner's manual/service manual order
information ..........................................................10-21
ZX