Page 10 of 242
FRONT MANUAL SEAT
ADJUSTMENT
WARNING
cDo not adjust the driver's seat while
driving so full attention may be given
to vehicle operation. The seat may
move suddenly and could cause
loss of control of the vehicle.
cAfter adjustment, gently rock in the
seat to make sure it is securely
locked.
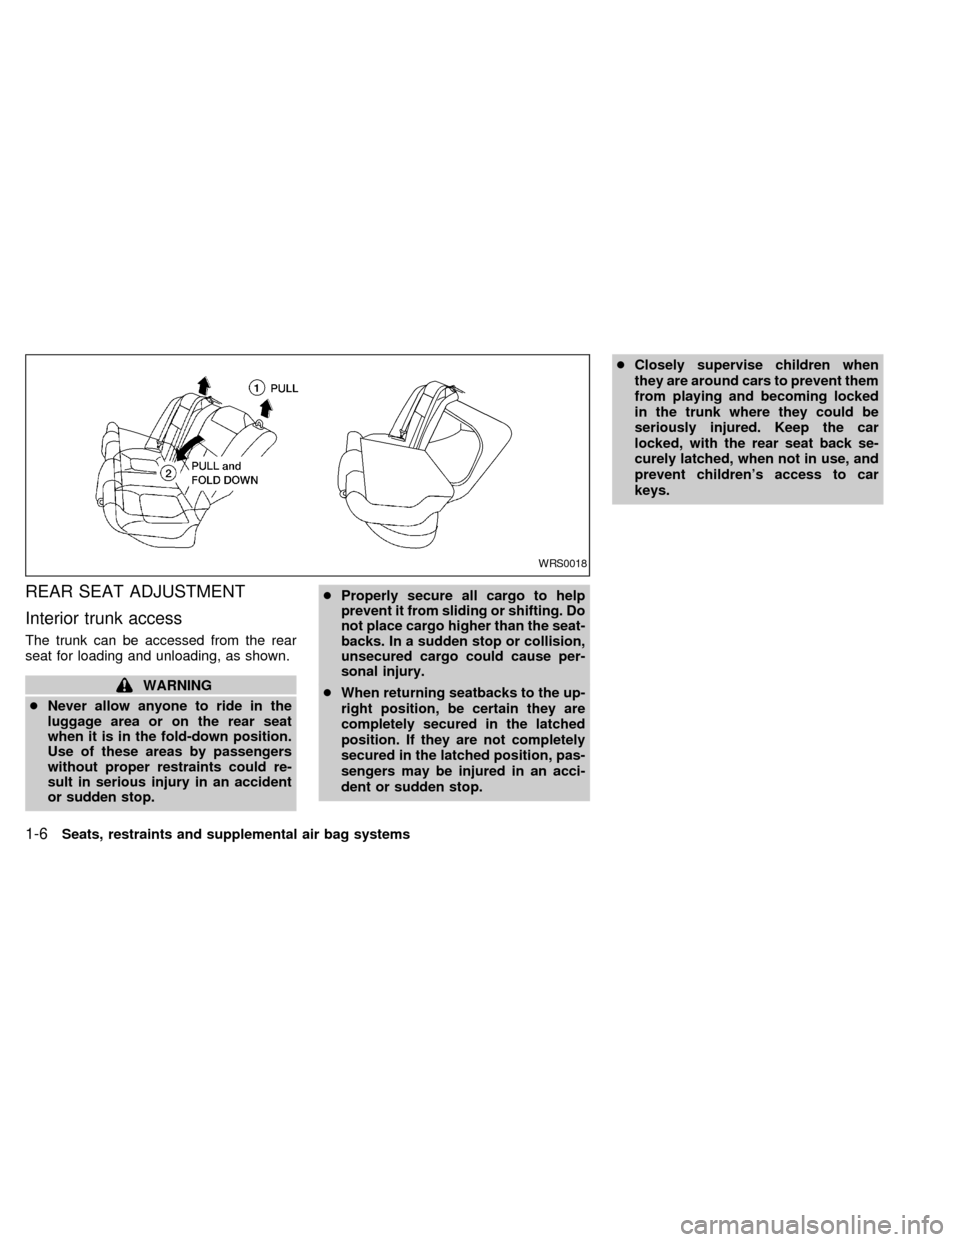
Forward and backward
Pull the lever up while you slide the seat
forward or backward to the desired position.
Release the lever to lock the seat in posi-
tion.
Reclining
To recline the seatback, pull the lever up
and lean back. To bring the seatback for-
ward again, pull the lever and move your-
body forward.
WRS0001
Seats, restraints and supplemental air bag systems1-3
ZX
Page 13 of 242

REAR SEAT ADJUSTMENT
Interior trunk access
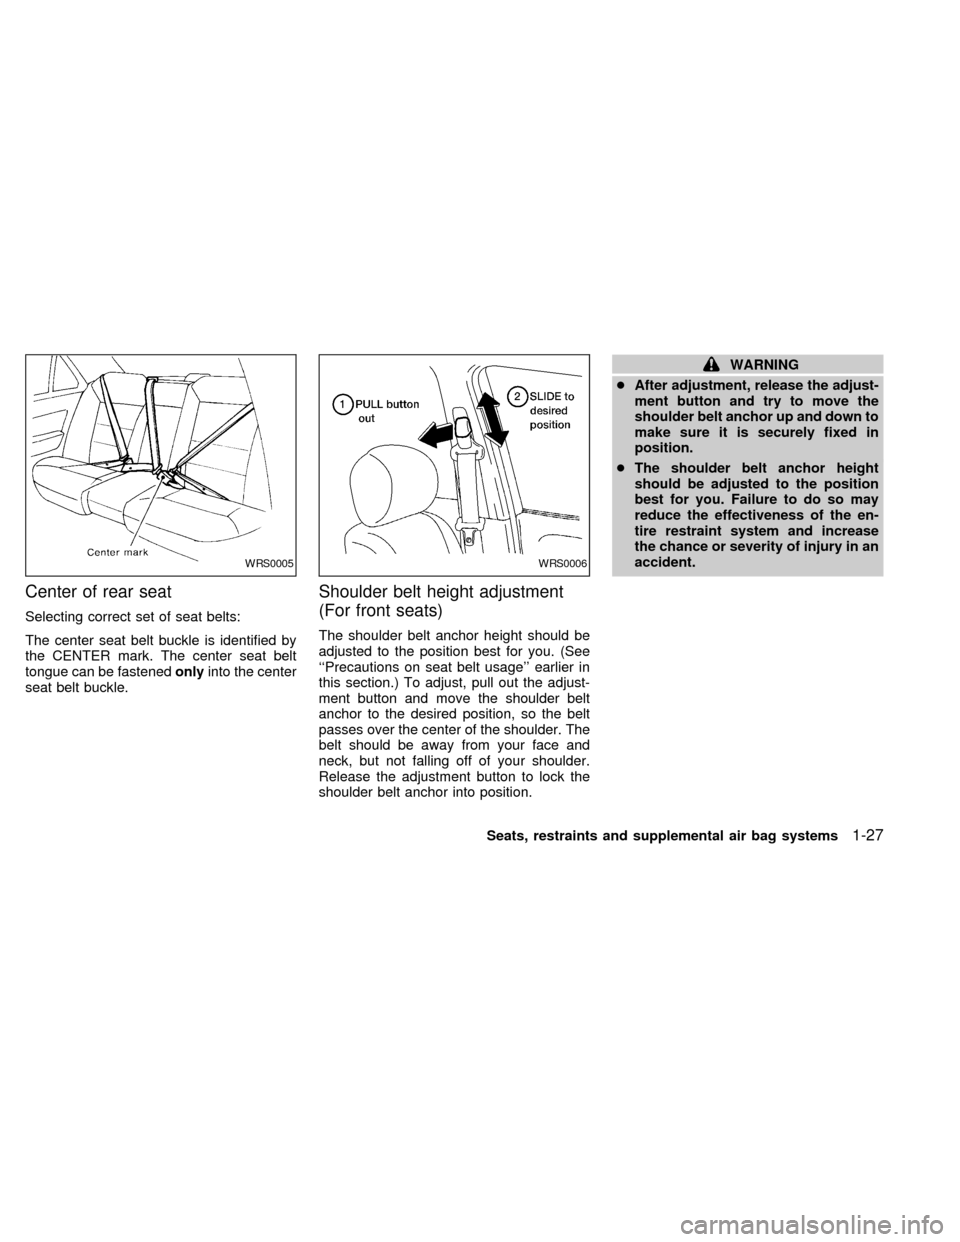
The trunk can be accessed from the rear
seat for loading and unloading, as shown.
WARNING
cNever allow anyone to ride in the
luggage area or on the rear seat
when it is in the fold-down position.
Use of these areas by passengers
without proper restraints could re-
sult in serious injury in an accident
or sudden stop.cProperly secure all cargo to help
prevent it from sliding or shifting. Do
not place cargo higher than the seat-
backs. In a sudden stop or collision,
unsecured cargo could cause per-
sonal injury.
cWhen returning seatbacks to the up-
right position, be certain they are
completely secured in the latched
position. If they are not completely
secured in the latched position, pas-
sengers may be injured in an acci-
dent or sudden stop.cClosely supervise children when
they are around cars to prevent them
from playing and becoming locked
in the trunk where they could be
seriously injured. Keep the car
locked, with the rear seat back se-
curely latched, when not in use, and
prevent children's access to car
keys.
WRS0018
1-6Seats, restraints and supplemental air bag systems
ZX
Page 34 of 242

Center of rear seat
Selecting correct set of seat belts:
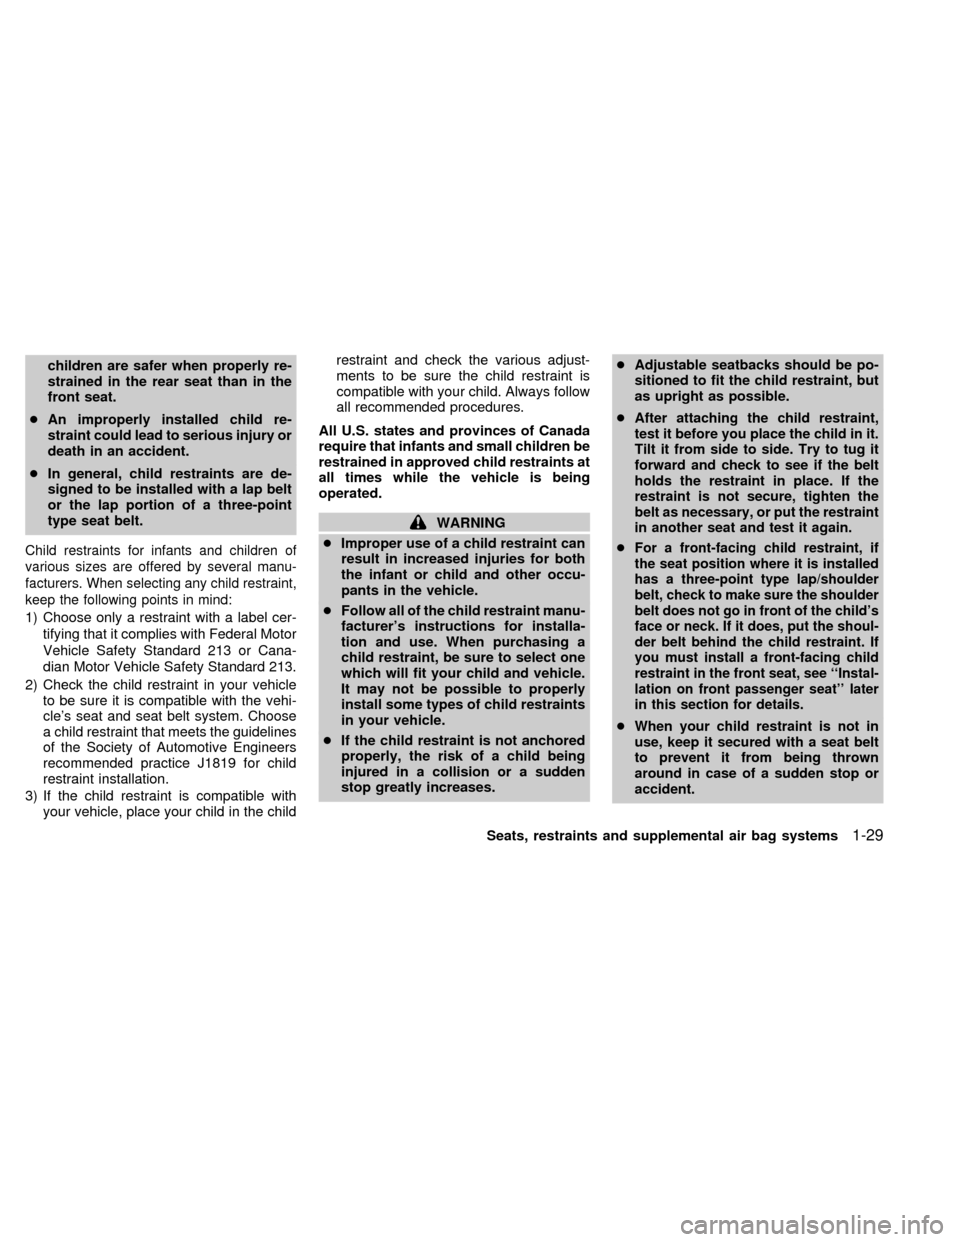
The center seat belt buckle is identified by
the CENTER mark. The center seat belt
tongue can be fastenedonlyinto the center
seat belt buckle.
Shoulder belt height adjustment
(For front seats)
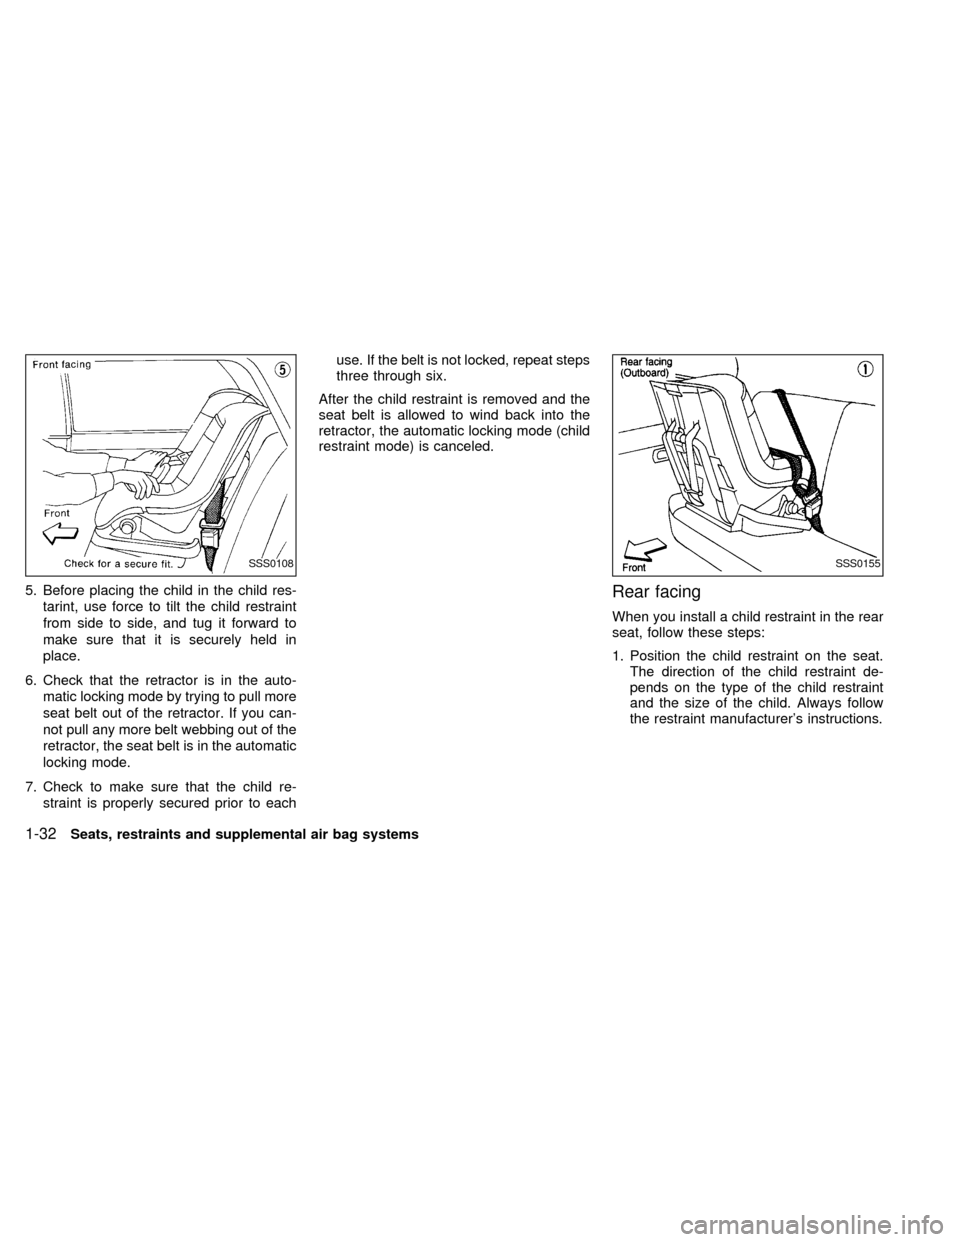
The shoulder belt anchor height should be
adjusted to the position best for you. (See
``Precautions on seat belt usage'' earlier in
this section.) To adjust, pull out the adjust-
ment button and move the shoulder belt
anchor to the desired position, so the belt
passes over the center of the shoulder. The
belt should be away from your face and
neck, but not falling off of your shoulder.
Release the adjustment button to lock the
shoulder belt anchor into position.
WARNING
cAfter adjustment, release the adjust-
ment button and try to move the
shoulder belt anchor up and down to
make sure it is securely fixed in
position.
cThe shoulder belt anchor height
should be adjusted to the position
best for you. Failure to do so may
reduce the effectiveness of the en-
tire restraint system and increase
the chance or severity of injury in an
accident.
WRS0005WRS0006
Seats, restraints and supplemental air bag systems1-27
ZX
Page 36 of 242

children are safer when properly re-
strained in the rear seat than in the
front seat.
cAn improperly installed child re-
straint could lead to serious injury or
death in an accident.
cIn general, child restraints are de-
signed to be installed with a lap belt
or the lap portion of a three-point
type seat belt.
Child restraints for infants and children of
various sizes are offered by several manu-
facturers. When selecting any child restraint,
keep the following points in mind:
1) Choose only a restraint with a label cer-
tifying that it complies with Federal Motor
Vehicle Safety Standard 213 or Cana-
dian Motor Vehicle Safety Standard 213.
2) Check the child restraint in your vehicle
to be sure it is compatible with the vehi-
cle's seat and seat belt system. Choose
a child restraint that meets the guidelines
of the Society of Automotive Engineers
recommended practice J1819 for child
restraint installation.
3) If the child restraint is compatible with
your vehicle, place your child in the childrestraint and check the various adjust-
ments to be sure the child restraint is
compatible with your child. Always follow
all recommended procedures.
All U.S. states and provinces of Canada
require that infants and small children be
restrained in approved child restraints at
all times while the vehicle is being
operated.
WARNING
cImproper use of a child restraint can
result in increased injuries for both
the infant or child and other occu-
pants in the vehicle.
cFollow all of the child restraint manu-
facturer's instructions for installa-
tion and use. When purchasing a
child restraint, be sure to select one
which will fit your child and vehicle.
It may not be possible to properly
install some types of child restraints
in your vehicle.
cIf the child restraint is not anchored
properly, the risk of a child being
injured in a collision or a sudden
stop greatly increases.cAdjustable seatbacks should be po-
sitioned to fit the child restraint, but
as upright as possible.
c
After attaching the child restraint,
test it before you place the child in it.
Tilt it from side to side. Try to tug it
forward and check to see if the belt
holds the restraint in place. If the
restraint is not secure, tighten the
belt as necessary, or put the restraint
in another seat and test it again.
cFor a front-facing child restraint, if
the seat position where it is installed
has a three-point type lap/shoulder
belt, check to make sure the shoulder
belt does not go in front of the child's
face or neck. If it does, put the shoul-
der belt behind the child restraint. If
you must install a front-facing child
restraint in the front seat, see ``Instal-
lation on front passenger seat'' later
in this section for details.
cWhen your child restraint is not in
use, keep it secured with a seat belt
to prevent it from being thrown
around in case of a sudden stop or
accident.
Seats, restraints and supplemental air bag systems1-29
ZX
Page 37 of 242
CAUTION
Remember that a child restraint left in a
closed vehicle can become very hot.
Check the seating surface and buckles
before placing your child in the child
restraint.
INSTALLATION ON REAR SEAT
CENTER OR OUTBOARD POSI-
TIONS
WARNING
cThe three-point belt in your vehicle
is equipped with a locking mode re-
tractor which must be used when
installing a child restraint.
cFailure to use the retractor's locking
mode will result in the child restraint
not being properly secured. The re-
straint could tip over or otherwise be
unsecured and cause injury to the
child in a sudden stop or collision.
Front facing
When you install a child restraint in the rear
seat, follow these steps:
1. Position the child restraint on the seat. It
can be placed in a front facing direction,
depending on the size of the child. Al-
ways follow the restraint manufacturer's
instructions.
WRS0007WRS0008
1-30Seats, restraints and supplemental air bag systems
ZX
Page 39 of 242

5. Before placing the child in the child res-
tarint, use force to tilt the child restraint
from side to side, and tug it forward to
make sure that it is securely held in
place.
6. Check that the retractor is in the auto-
matic locking mode by trying to pull more
seat belt out of the retractor. If you can-
not pull any more belt webbing out of the
retractor, the seat belt is in the automatic
locking mode.
7. Check to make sure that the child re-
straint is properly secured prior to eachuse. If the belt is not locked, repeat steps
three through six.
After the child restraint is removed and the
seat belt is allowed to wind back into the
retractor, the automatic locking mode (child
restraint mode) is canceled.Rear facing
When you install a child restraint in the rear
seat, follow these steps:
1. Position the child restraint on the seat.
The direction of the child restraint de-
pends on the type of the child restraint
and the size of the child. Always follow
the restraint manufacturer's instructions.
SSS0108SSS0155
1-32Seats, restraints and supplemental air bag systems
ZX
Page 41 of 242
4. Allow the seat belt to retract. Pull up on
the seat belt to remove any slack in the
belt.5. Before placing the child in the child re-
straint, use force to tilt the child restraint
from side to side, and tug it forward to
make sure that it is securely held in
place.
6. Check that the retractor is in the auto-
matic locking mode by trying to pull more
seat belt out of the retractor. If you can-
not pull any more seat belt webbing out
of the retractor, the seat belt is in the
automatic locking mode.
7. Check to make sure that the child re-
straint is properly secured prior to eachuse. If the belt is not locked, repeat steps
three through six.
After the child restraint is removed and the
seat belt is allowed to wind back into the
retractor, the automatic locking mode (child
restraint mode) is canceled; the seat belt
only locks during a sudden stop or impact.
SSS0109SSS0110
1-34Seats, restraints and supplemental air bag systems
ZX
Page 42 of 242
TOP TETHER STRAP CHILD RE-
STRAINT
If your child restraint has a top tether strap,
it must be secured to the provided anchor
point. First, secure the child restraint with
the rear seat belt.
Flip up the anchor cover from the anchor
point which is located directly behind the
child seat.
Secure the top tether strap to the anchor
bracket.
WARNING
Child restraint anchor points are de-
signed to withstand only those loads
imposed by correctly fitted child re-
straints. Under no circumstances are
they to be used for adult seat belts or
harnesses.
Anchor point locations
Anchor points are located on the rear parcel
shelf finisher.
When installing a top strap child re-
straint on the rear seat for the first time,
consult your NISSAN dealer for details.
WRS0011
Seats, restraints and supplemental air bag systems1-35
ZX