Page 105 of 280

STARTING AND DRIVING
5–5
5. When the gun stops automatically, re-
move the gun half the way in the tank
port. After the second automatic stop,
do not fill with fuel any more.
CAUTION
To avoid fuel spillage and overfilling,
do not ”top–off” the fuel tank.
6. To close, turn the fuel tank filler tube
cap slowly clockwise until you hear
clicking sounds, then gently push the
fuel tank filler door closed.
CAUTION
If you need replace the fuel tank filler
tube cap, use only the cap specified
for your model vehicle.
C18A001a
Catalytic converterEC18A-Jc
For ordinary use, there are no particular pre-
cautions except that of using unleaded pet-
rol.
The exhaust gas scavenging device with
catalytic converter is extremely efficient for
the reduction of noxious gases. The catalytic
converter is installed in the exhaust system.
It is important to keep the engine properly
tuned to ensure proper catalyst operation
and prevent possible catalyst damage.
CAUTION
Damage to the catalytic converter can
result if your vehicle is not kept in
proper operating condition. In the
event of an engine malfunction par-
ticularly involving engine misfire or
other apparent loss of performance
have your vehicle serviced promptly.
Continued operation of your vehicle
with a severe overheated condition
may result in possible damage to the
converter and vehicle.
WARNING
(1) As with any vehicle, do not park
or operate this vehicle in areas
where combustible materials
such as dry grass or leaves can
come into contact with a hot ex-
haust since a fire could occur.
(2) Undercoating paint should not be
applied to the catalytic converter.
Page 109 of 280
 The heavier weight and higher rolling
and air resistance will increase fuel con-
sumption.
Additional precautions for vehicles
equipped with an automatic
transmission
Th")
STARTING AND DRIVING
5–9
(6) The heavier weight and higher rolling
and air resistance will increase fuel con-
sumption.
Additional precautions for vehicles
equipped with an automatic
transmission
The “2” position (INVECS–II 4A/T) or 2nd
gear (INVECS–II Sport Mode 4A/T) is re-
commended on slopes or at low speed. Use
the “L” position (INVECS–II 4A/T) or 1st gear
(INVECS–II Sport Mode 4A/T) in mountain-
ous areas in order to make better use of en-
gine braking and to assist the brake system.
However, be sure that the speed does not
exceed the maximum speed limit for the se-
lected gear.
For maximum speed of the vehicles
equipped with INVECS–II 4A/T, refer to the
description of the “Possible driving speed”
on page 5–24.Vehicles with automatic transmission
I21A070a
Ignition switchEI21AAGe
1-The engine is stopped, and the steer-
ing wheel is locked. The key can only
be inserted and removed only when
the switch is in this position.
2-The engine is stopped, but the radio,
cigarette lighter and other electrical
devices can be operated.
3-The engine is running and all the ve-
hicle’s electrical devices can be oper-
ated.
4-The starter motor operates. After the
engine has started, release the key
and it will automatically return to the
“ON” position.
Vehicles with manual transmission
I21A031a
Page 110 of 280
STARTING AND DRIVING
5–10
Vehicles with automatic
transmission
I21A058a
NOTE
(1) For vehicles with a manual trans-
mission, when removing the key, push
the key in at the “ACC” position and
keep it depressed until it is turned to the
“LOCK” position, and remove.
For vehicles with an automatic trans-
mission, when removing the key, first set
the selector lever to the “P” (PARK) posi-
tion, and then turn the key to “LOCK”
and remove it.
(2) For vehicles equipped with the Daytime
Running Lamp, when the ignition switch
is in the “ON” position, the headlamp low
beams etc. are turned on.
(Refer to “Headlamps” on page 4–12.)(3) Your vehicle is equipped with an elec-
tronic immobilizer, to start the engine,
the ID code which the transponder in-
side the key sends must match the one
registered to the immobilizer computer.
(Refer to page 2–2)
Vehicles with manual
transmission
I21A057a
Page 111 of 280
 Do not remove the ignition key
from the ignition switch while
driving. The steering wheel will
lock, causing loss of control.
(2) If the engine is stopped while")
STARTING AND DRIVING
5–11
CAUTION
(1) Do not remove the ignition key
from the ignition switch while
driving. The steering wheel will
lock, causing loss of control.
(2) If the engine is stopped while
driving, the brake servomechan-
ism will cease to function and
braking efficiency will deterio-
rate. Also, the power steering
system will not function and it will
require greater manual effort to
operate the steering.
(3) Do not leave the key in the “ON”
position for a long time when the
engine is not running, doing so
will cause the battery to be dis-
charged.
(4) Do not turn the key to the
“START” position when the en-
gine is running, doing so could
damage the starter motor.
I01B015a
How to lock and unlock the steer-
ing wheel
EI01B-Kb
To lockRemove the key at the “LOCK” position.
Turn the steering wheel until it is locked.
To unlockTurn the key to the “ACC” position while
moving the steering wheel slightly.
CAUTION
Remove the key when leaving the ve-
hicle.
NOTEIf the front wheels are turned, the anti-theft
lock may sometimes make it difficult to turn
the key from “LOCK” to “ACC”. Firmly turn
the steering wheel to the left or to the right as
you turn the key.
Page 112 of 280
 Do not operate the starter motor con-
tinuously for anything longer than 10
seconds; doing so could run down the
battery. If the engi")
STARTING AND DRIVING
5–12
StartingEI02FAIh
Tips for starting
(1) Do not operate the starter motor con-
tinuously for anything longer than 10
seconds; doing so could run down the
battery. If the engine does not start, turn
the ignition switch back to “LOCK”, wait
a few seconds, and then try again.
Trying repeatedly with the starter mo-
tor still turning will damage the starter
mechanism.
(2) If the engine cannot be started because
the battery is weak or dead, refer to the
“Emergency starting” section for instruc-
tions on starting the engine.
(3) The engine is well warmed up if the
coolant temperature gauge needle
starts to move (the engine speed de-
creases). Extended warming - up oper-
ation will result in excessive fuel con-
sumption.
WARNING
Never run the engine in a closed or
poorly ventilated area any longer than
is needed to move your vehicle in or
out of the area. Carbon monoxide
gases are odourless and can be fatal.
CAUTION
(1) Never attempt to start the engine
by pushing or pulling the vehicle.
Especially in the automatic trans-
mission since the structure is dif-
ferent from a manual transmis-
sion, it is not possible to start the
engine by using this technique.
Never attempt this or it could
damage the automatic transmis-
sion.
(2) Do not run the engine at high rpm
or drive the vehicle at high speed
until the engine has a chance to
warm up.
(3) Release the ignition key as soon
as the engine starts to avoid dam-
aging the starter motor.
(4) If your vehicle is equipped with a
turbocharger, do not stop the en-
gine immediately after operating
the vehicle at high speeds. Allow
the engine to idle for approxi-
mately 60 seconds or more to
give the turbocharger a chance to
cool down.
NOTE
After replacing the battery, the electronic
control system data for the engine, auto-
matic transmission, etc., will be erased. As a
result, the engine speed may become un-
stable and shift shocks may occur.
If the engine speed becomes unstable, initial
engine adjustments will need to be per-
formed.
Refer to the section ”What to do if the engine
speed becomes unstable after the battery is
replaced” on page 8–22.
Shift shocks will become smoother after sev-
eral changes in speed.
Page 114 of 280

1. Insert the ignition key and fasten the
seat belt.
2. Apply the parking brake.
3. Depress and hold the brake pedal.")
STARTING AND DRIVING
5–14
I27A075a
Starting the engine
(Diesel-powered vehicles)
1. Insert the ignition key and fasten the
seat belt.
2. Apply the parking brake.
3. Depress and hold the brake pedal.
4. Place the gearshift lever in the “N”
(Neutral) position.
5. Fully depress the clutch pedal.
6. Turn the ignition key to the “ON” posi-
tion. The diesel preheat indication
lamp will first illuminate in amber, and
then after a short time go out, indicat-
ing that preheating is completed.
7. Turn the ignition key to the “START”
position without depressing the accel-
erator pedal, and release it when the
engine starts.NOTE
(1) If the engine is cold, the diesel preheat
indication lamp is on for a longer time.
(2) When the engine has not been started
within about 5 seconds after the diesel
preheat indication lamp will go out, re-
turn the ignition key to the “LOCK” posi-
tion. Then, turn the key to the “ON” posi-
tion to preheat the engine again.
(3) When the engine is warm, the diesel
preheat indication lamp does not come
on, even if the ignition key is placed in
the “ON” position.
Start the engine by turning the ignition
key right to the “START” position.
Type 1
I29A014a
Manual transmissionEI29A–Jd
The shift pattern is shown on the gearshift
lever knob. Be sure to always fully depress
the clutch pedal before attempting to shift the
lever.
For smooth gearchanging
�Depress the clutch pedal completely.
�1st and 2nd gear: first move the gear
lever fully left and then forward or back
into 1st and 2nd gear.
�3rd and 4th gear: move the gear lever
forward or back from neutral (N).
�5th gear: first move the gear lever right
and then into 5th gear.
Page 115 of 280
STARTING AND DRIVING
5–15
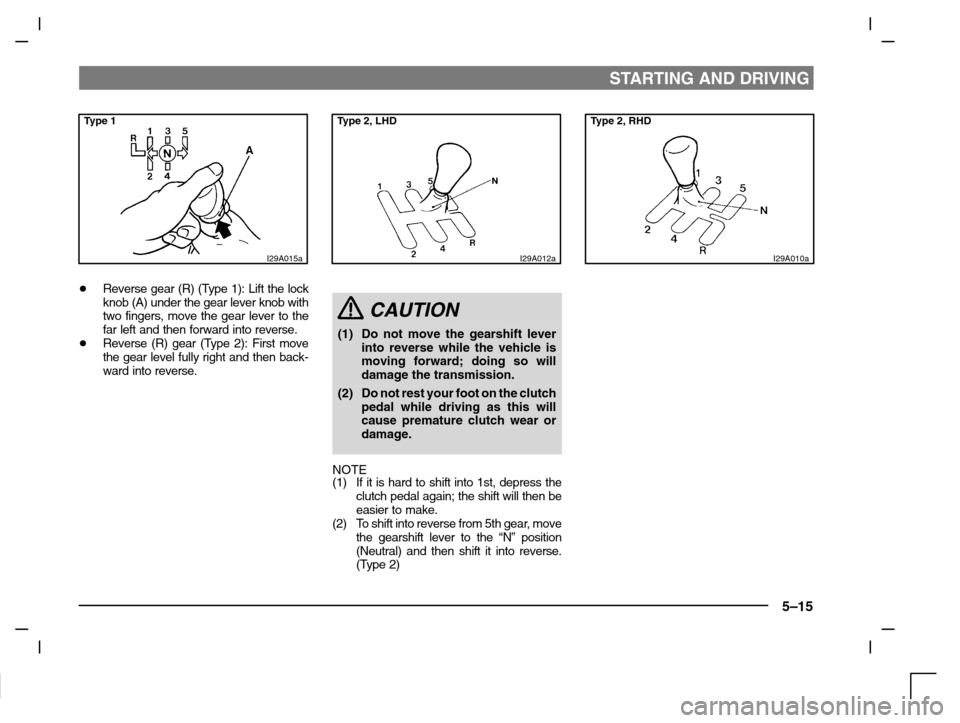
Type 1
I29A015a
�Reverse gear (R) (Type 1): Lift the lock
knob (A) under the gear lever knob with
two fingers, move the gear lever to the
far left and then forward into reverse.
�Reverse (R) gear (Type 2): First move
the gear level fully right and then back-
ward into reverse.
Type 2, LHD
I29A012a
CAUTION
(1) Do not move the gearshift lever
into reverse while the vehicle is
moving forward; doing so will
damage the transmission.
(2) Do not rest your foot on the clutch
pedal while driving as this will
cause premature clutch wear or
damage.
NOTE
(1) If it is hard to shift into 1st, depress the
clutch pedal again; the shift will then be
easier to make.
(2) To shift into reverse from 5th gear, move
the gearshift lever to the “N” position
(Neutral) and then shift it into reverse.
(Type 2)
Type 2, RHD
I29A010a
Page 117 of 280

STARTING AND DRIVING
5–17
NOTE
During running–in period or immediately
after reconnection of the battery cable, there
may be a case where gearshifts are not
made smoothly. This does not indicate a
faulty transmission.
Gearshifts will become smooth after the
transmission has been shifted several times
by the electronic control system.
I04A235a
Selector lever operation
Except for vehicles with Sports modeThe transmission has 4 forward gears and 1
reverse gear.
The individual gears are selected automati-
cally, depending on the position of the gear
selector lever, the speed of the vehicle and
the position of the accelerator pedal.
The selector lever has 7 positions, and is
equipped with a lock button (A) to avoid inad-
vertent selection of the wrong gear.
Button must be pushed and brake
pedal must be depressed to move
the lever
Button must be pushed to move the
lever.
Button need not be pushed to move
the lever.
I04B008a
Vehicles with Sports modeThe transmission has 4 forward gears and 1
reverse gear.
The individual gears are selected automati-
cally, depending on the position of the gear
selector lever, the speed of the vehicle and
the position of the accelerator pedal.
The selector lever has 2 gates; the main gate
(1) and the manual gate (2).
NOTE
For information on manual gate operation,
please refer to “Sports mode (Vehicles with
Sports mode)” on page 5–22.
 For vehicles with a manual trans-
mission, when removing the key, push
the key in at the “ACC” position and
keep")