Page 222 of 280
 Do not smoke or have any other
open flame near the vehicle while
bleeding the fuel system.
(2) Be sure to carefully clean away
any water drained out, because
any fue")
FOR EMERGENCIES
8–22
CAUTION
(1) Do not smoke or have any other
open flame near the vehicle while
bleeding the fuel system.
(2) Be sure to carefully clean away
any water drained out, because
any fuel mixed with the water
could ignite and cause a fire.
What to do if the engine
speed becomes unstable
after the battery is replaced:
EN38B–P
If the engine speed becomes unstable after
the battery is replaced, reset the engine
using the following method:
1. Stop the vehicle in a safe place.
2. Place the gearshift lever (manual
transmission) in the ”N” (Neutral) or
the selector lever (automatic trans-
mission) in the ”P” (PARK) position.
Stop the engine.
3. Restart the engine.
4. Turn off the air conditioning (if so
equipped).
5. Allow the engine to warm up until the
needle in the water temperature
gauge stabilizes near the centre of the
gauge.
6. Stop and restart the engine.
7. Allow the engine to idle for approxi-
mately 10 minutes.
8. When the engine speed stabilizes, the
resetting procedure is complete.
NOTE
If the engine speed remains unstable after
the resetting procedure has been per-
formed, have the vehicle inspected by an
authorized MITSUBISHI dealer.
N09A030a
FusesEN09A - Na
Fuse block
To prevent damage to the electric system
due to short - circuiting or overloading, each
individual circuit is provided with a fuse.
There are fuse boxes in the passenger com-
partment and in the engine compartment.
The fuse box in the passenger compartment
is located in front of the driver’s seat as
shown in the illustration.
Page 224 of 280
FOR EMERGENCIES
8–24
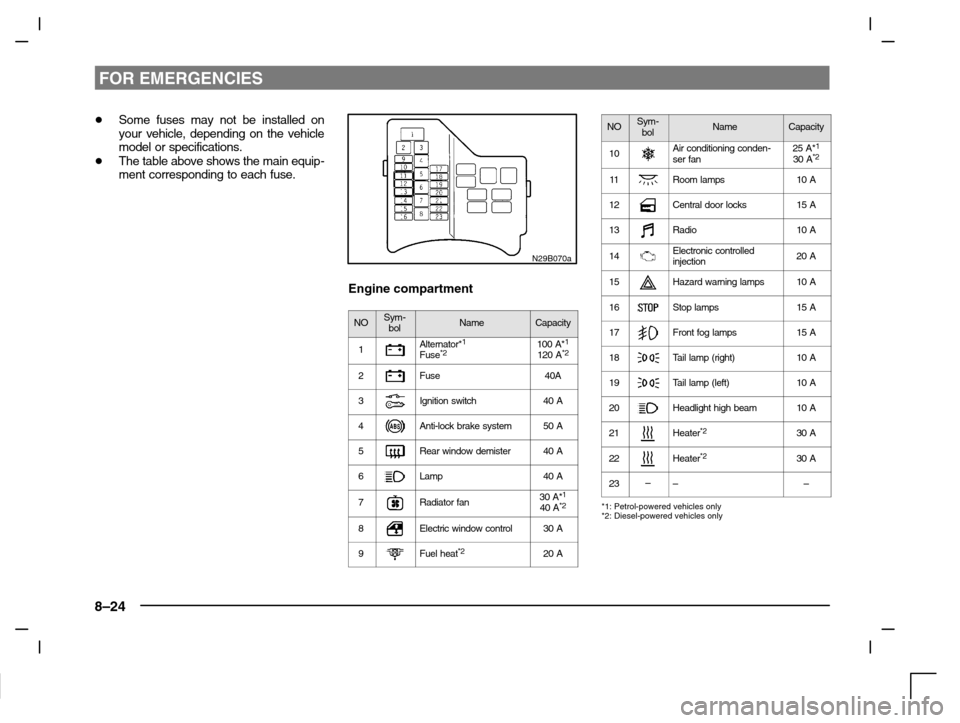
�Some fuses may not be installed on
your vehicle, depending on the vehicle
model or specifications.
�The table above shows the main equip-
ment corresponding to each fuse.
N29B070a
Engine compartment
NOSym-
bolNameCapacity
1Alternator*1Fuse*2100 A*1120 A*2
2Fuse40A
3Ignition switch40 A
4Anti-lock brake system50 A
5Rear window demister40 A
6Lamp40 A
7Radiator fan30 A*140 A*2
8Electric window control30 A
9Fuel heat*220 A
NOSym-
bolNameCapacity
10Air conditioning conden-
ser fan25 A*130 A*2
11Room lamps10 A
12Central door locks15 A
13Radio10 A
14Electronic controlled
injection20 A
15Hazard warning lamps10 A
16Stop lamps15 A
17Front fog lamps15 A
18Ta i l l a m p (right)10 A
19Ta i l l a m p (left)10 A
20Headlight high beam10 A
21–Heater*230 A
22–Heater*230 A
23–––
*1: Petrol-powered vehicles only
*2: Diesel-powered vehicles only
Page 225 of 280
FOR EMERGENCIES
8–25
�Some fuses may not be installed on
your vehicle, depending on the vehicle
model or specifications.
�The table above shows the main equip-
ment corresponding to each fuse.
N29C013a
Changing a fuseEN29C - Ce
1. Before replacing a fuse, always turn
off the electrical circuit concerned and
turn the ignition key to the “LOCK”
position.
2. Remove the fuse box cover.
3. Referring to the fuse load capacity
table, check the fuse pertaining to the
problem.
A - Fuse is OK
B - Blown fuse
N29C008a
4. There is a fuse removing tool in the
fuse cover of the passenger com-
partement. First take the fuse remov-
ing tool out of the fuse cover slowly
and then by using the fuse removing
tool, pull the fuse straight out from the
fuse box. If it is not blown, something
else must be causing the problem;
contact an authorized MITSUBISHI
dealer to have the problem checked.
Page 227 of 280
FOR EMERGENCIES
8–27
Hatchback
N10B173a
6-Rear turn - signal lamps
21W (PY21W) . . . . . . . . . . . . . . . . . .
7-Reversing lamps 21W (P21W). . . . .
8-Licence - plate lamps 5W (W5W). .
9-Tail lamps 21/5W (P21/5W). . . . . . .
10-Stop lamps (Hatchback)
21W (P21W) . . . . . . . . . . . . . . . . . . . .
Stop and tail lamps (Sedan)
21/5W (P21/5W) . . . . . . . . . . . . . . . .
11-Rear fog lamp 21W (P21W). . . . . . .
12-High mounted stop lamp 5W (W5W)
Inside
Front room lamps 10W. . . . . . . . . . . . . . . .
Spot lamps*
Vehicles without sunroof 10W. . . . . . . .
Vehicles with sunroof 5W. . . . . . . . . . .
Luggage compartment lamp 10W. . . . . . . .
Sedan
N10B171aN10C046a
Headlamps and position lampsEN10CAHd
Remove the sealing cover by turning it
anti clockwise and disconnect the connector.
Page 228 of 280
FOR EMERGENCIES
8–28
N10C123a
Headlamps
Unhook the spring which secures the bulb,
and then remove the bulb.
N10C086a
CAUTION
Never hold the halogen lamp bulb
with a bare hand, dirty glove, etc.
The oil from your hand could cause
the bulb to break the next time the
headlamps or position lamps are op-
erated.
If the glass surface is dirty, it must be
cleaned with alcohol, paint thinner,
etc., and refit it after drying it thor-
oughly.
N10C048a
Position lamps
Remove the lamp socket by turning it
anti clockwise, then pull out the bulb from the
socket.
Page 229 of 280
FOR EMERGENCIES
8–29
N10F055a
Front turn–signal lamps
Petrol–powered vehicles,
Diesel–powered vehicles (right side)
EN10FANc
Turn the bulb socket anticlockwise to re-
move. And remove the bulb from the socket
by turning anticlockwise while pressing it in-
ward.
N10F054a
Diesel–powered vehicles
(left side)
1. Remove the cover.
N10F048a
2. Turn the bulb socket anticlockwise to
remove it. And remove the bulb from
the socket by turning anticlockwise
while pressing it inward.
Page 230 of 280
FOR EMERGENCIES
8–30
N10E002a
Side turn - signal lampsEN10E-Gd
Insert a straight blade (or minus) screwdriver
at the edge of the lens, remove the socket
assembly and bulb together by turning it anti-
clockwise, and then remove the bulb by pul-
ling out.
NOTEWrap a piece of cloth around the straight
blade (or mines) screwdriver in order to
avoid scratching the lens and the body.
N10X035a
Front fog lamps*EN10X - Oc
Remove the cover mounting screw.
N10X036a
Remove bolts (1) and (2) with a screwdriver,
and pull the lamp body towards you.
NOTE
Do not turn the aiming adjusting bolt (3).
Page 232 of 280
FOR EMERGENCIES
8–32
N10X079a
CAUTION
Never hold the halogen lamp bulb
with a bare hand, dirty glove, etc.
The oil from your hand could cause
the bulb to break the next time the
front fog lamps are operated.
If the glass surface is dirty, it must be
cleaned with alcohol, paint thinner,
etc., and refit after drying it thorough-
ly.
N10I088a
Rear combination lampsEN10IAJa
HatchbackRemove the lid.
Turn the bulb socket anti-clockwise to re-
move it. And remove it anti-clockwise while
pressing it inward.
1-Tail lamp
2-Rear turn-signal lamp
3-Stop lamp
N10I047a
SedanTurn and remove the knob (1) and then turn
down the cover.

 . . . . . . . . . . . . . . . . . .
7-Reversing lamps 21W (P21W). . . . .
8-Licence - plate lamps 5W (W5W). .
9-Tail")


EN10FANc
Turn the bulb socket anticlockwise to re-
move. And remove the bulb")
 screwdriver
at the edge of the lens, remove the socket
assembly and bulb together by turning it anti")
