Page 105 of 130
Caution !
Vehicles with Acceleration Slip Regulation (ASR)
If the vehicle is towed with the front axle raised, the engine must be shut off (electronic key in steering lock position
0 or 1). Otherwise, the ASR will immediately be engaged and will apply the rear wheel brakes.
Caution !
Vehicles with Electronic Stability System (ESP)
If the vehicle is towed with the front axle raised, the engi ne must be shut off (electronic key in steering lock position
0 or 1). Otherwise, the ESP will immediately be engaged and will apply the rear wheel brakes.
Page 106 of 130

Cleaning and Care of the Vehicle
Warning !
Many cleaning products can be hazardous. Some are poisonous, others are flammable.
Always follow the instructions on the particular container. Always open your car's doors or
windows when cleaning the inside. Never use fluids or solvents that are not designed for
cleaning your car.
In operation, your vehicle is subjected to varying external influences which, if gone unchecked, can
attack the paintwork as well as the underbody and cause lasting damage.
Such damage is caused not only by extreme and varying climatic conditions, but also by air
pollution, road salt, tar, gravel and stone chipping. Grease and oil, fuel, coolant, brake fluid, bird
droppings, insects, tree resins etc. should be removed immediately to avoid paint damage. Frequent
washing reduces and/or eliminates the aggr essiveness and potency of the above adverse
influences.
More frequent washings are necessary to deal with unfavorable conditions; for example, near the
ocean, in industrial areas (smoke, exhaust emissions), or during winter operation.
You should check your vehicle from time to time for stone chipping or other damage. Any damage
should be repaired as soon as possible to prevent the start of corrosion. In doing so, do not neglect
the underside of the car. A prerequisite for a t horough check is a washing of the underbody followed
by a thorough inspection. Damage d areas need to be reundercoated.
Your vehicle has been treated at the factory with a wax-base rustproofing in the body cavities which
will last for the lifetime of t he vehicle. Post-production treatment is neither necessary nor
recommended by Mercedes-Be nz because of the possibility of incompatibility between materials
used in the production proc ess and others applied later.
We have selected car care products and compiled recommendations which are specially matched to
our vehicles and which always reflect the late st technology. You can obtain Mercedes- Benz
approved car care products at your authorized Mercedes-Benz dealer.
Scratches, corrosive deposits, corrosion or damage due to negligent or incorrect care cannot always
be removed or repaired with the car care products recommended here. In such cases it is best to
seek aid at your authorized Mercedes-Benz dealer. The following topics deal with the cleaning and
care of your vehicle and give important "how-to" in formation as well as references to Mercedes-Benz
approved car care products. Additional information can be found in the booklet titled "Car Care".
Engine Cleaning
Prior to cleaning the engine compartment make sure to protect electrical components and
connectors from the intrusion of water and cleaning agents.
Corrosion protection, such as MB Anticorrosion Wax should be applied to the engine compartment
after every engine cleaning. Before applying, all control linkage bushings and joints should be
lubricated. The poly-V-belt and all pulleys should be protected from any wax.
Car Washing
Do not use hot water or wash your car in direct sunlight. Use only a mild car wash detergent, such
as Mercedes-Benz approved Car Shampoo.
Thoroughly spray the car with a diffused jet of wa ter. Direct only a very weak spray towards the
ventilation intake. Use plenty of water an d rinse the sponge and chamois frequently.
Rinse with clear water and thoroughly wipe dry with a chamois. Do not allow cleaning agents to dry
on the finish. If the vehicle has been run through an automatic car wash - in particular one of the
older installations - rewipe the recessed sections in the taillamps (designed to prevent soiling) if
necessary. No solvents (fuels, thi nners etc.) must be used. In the winter, thoroughly remove all
traces of road salt as soon as possible.
When washing the underbody, do not forget to clean the inner sides of the wheels.
Tar Stains
Quickly remove tar stains before they dry and beco me more difficult to remove. A tar remover is
recommended.
Window Cleaning
Use a window cleaning solution on all glass surfac es. An automotive glass cleaner is recommended.
Page 107 of 130

Wiper Blade
Clean the wiper blade rubber with a clean cloth and detergent solution. Replace blade twice a year;
once before and once after winter.
Headlamp Cleaning System
The condition of the wiper blades is important fo r satisfactory cleaning of the headlamp lenses.
We therefore recommend that the blades be insp ected regularly. Replace damaged wiper blades.
Paintwork. Painted Body Components
Mercedes-Benz approved Paint Care should be a pplied when water drops on the paint surface do
not "bead up"; normally in 3 to 5 months, depending on climate and washing detergent used.
Mercedes-Benz approved Paint Cleaner should be ap plied if paint surface shows signs of dirt
embedding
(i.e. loss of gloss).
Do not apply any of these products or wax if your car is parked in the sun or if the hood is still hot.
Use the appropriate MB-Touch-Up Stick for quick and provisional repairs of minor paint damage
(i.e. chips from stones, car doors etc.).
Seat Belts
The webbing must not be treated with chemical cleaning agents. Use only clear, lukewarm water
and soap. Do not dry the webbing at temperatures above 176°F (80°C) or in direct sunlight.
Warning !
Do not bleach or dye seat belts as this may severely weaken them. In a crash they
may not be able to provide adequate protection.
Hard Plastic Trim Items
Pour Mercedes-Benz approved Interior Care onto so ft lint-free cloth and apply with light pressure.
Headliner and Shelf below Rear Window
Clean with soft bristle brush, or use a dry- shampoo cleaner in case of excessive dirt.
Plastic and Rubber Parts
Do not use oil or wax on these parts.
Steering Wheel and Gear Selector Lever
Wipe with a damp cloth and dry thoroughly or clean with Mercedes-Benz approved Leather Care.
Light Alloy Wheels
Mercedes-Benz approved Wheel Care should be used for regular cleaning of the light alloy wheels.
If possible, clean wheels once a week with Merc edes-Benz approved Wheel Care, using a soft
bristle brush and a strong spray of water. Follow instructions on container.
Note:
Use only acid-free cleaning materials. The acid could lead to corrosion.
Ornamental Moldings
For regular cleaning and care of very dirty chrome-plated parts, use a chrome cleaner.
Page 108 of 130
Upholstery
Using aftermarket seat covers or wearing clothing that have the tendency to give off coloring (e.g.
when wet etc.) may cause the upholstery to become permanently discolored. By lining the seats with
a proper intermediate cover, contac t-discoloration will be prevented.
Leather Upholstery
Wipe leather upholstery with a damp cloth and dry thoroughly or clean with Mercedes-Benz approved
Leather Care. Exercise particular care when cleaning perforated leather as its underside should not
become wet. MB Tex Upholstery Pour Mercedes-Benz approved Interior Care onto soft lint-free cloth
and apply with light pressure.
Instrument Cluster
Use a gentle dish-washing detergent or mild detergent for delicate fabrics as a washing solution.
Wipe with a cloth moistened in lukewarm solution. Do not use scouring agents.
Page 109 of 130

Electronic Main Key Remote Control
1. Transmit buttons
2. Lamp for battery check and function control
Checking Batteries:
If one of the transmit buttons is pressed, the function control lamp briefly illuminates - indicating that the batteries
are in order.Change batteries if the function control lamp does not light up briefly.
Changing Batteries:
Move lock (1) in direction of right arrow and slide out mechanical key (2, left arrow). Insert mechanical key (2) in
side opening (3) to open latch. Press briefly (do not use key as lever) to release battery compartment.
Remove mechanical key.
Lift battery compartment (4) slightly in direction of arrow (5) and remove in direction of arrow (6). Change batteries
(7), inserting new ones under contact spring (8) with plus (+) side facing up. Return battery compartment into housing
until locked in place.
Important !
Batteries contain materials that can harm the environment if disposed of improperly. Recycling of batteries is the
preferred method of disposal. For disposal, please follow manufacturer's recommendation on battery package.
Replacement battery: Lithium, type CR 2025 or equivalent.
Synchronizing Remote Control:
The remote control may have to be resynchronized, if the vehicle cannot be locked or unlocked. To synchronize
insert electronic key in steering lock. The remote control should once again be operational.
Page 110 of 130
Front Head Restraints
Warning !
For your protection, drive only with properly positioned head restraints. Adjust head restraint to support the
back of the head approximately at ear level. Do not drive the vehicle without the seat head restraints.
Head restraints are intended to help reduce injuries during an accident.
For positioning of head restraints refer to sections Manual Seats, Power Seats, and Head Restraints, Rear in Index.
Power seats
Removal:
Push button (1) up to bring the head restraint to its highest position. Pull out head restraint completely with both
hands. Installation: Push button (1) up for approximately 5 seconds. Insert head restraint and push it down to the
stop. Adjust
head restraint, see Index.
Manual seat
Removal:
Pull head restraint up to the stop. Push button (1) and pull head restraint out. Installation: Insert the head restraint and
push it down to the stop. Adjust head restraint, see Index.
Page 111 of 130
Rear Seat Cushion
Removal:
Push in locking tabs (on left and right side of seat) and pull up seat at the front. Installation: Slide rear edge of
cushion under the backrest. Push front of cushion down until it locks in place.
Caution!
Watch out for sharp edges when removing or installing the rear seat cushion, and make sure that it is securely
locked in place again, to prevent personal injury.
Emergency Operation of Sliding/Pop-Up Roof
The sliding/pop-up roof can be opened or closed manually should an electrical malfunction occur.
The sliding/pop-up roof drive is located behind the lens of the left interior lamp between the sun visors.
1. Pry off lens (1) by using a screw driver.
2. Obtain crank (2) (supplied with vehicle) and insert it through hole.
To slide the roof closed or to raise the roof at the rear: turn crank clockwise.
To slide the roof open or to lower the roof at the rear: turn crank counterclockwise.
Page 112 of 130

Replacing Wiper Blade Insert
For safety reasons, remove electronic key from steering lock before replacing the wiper blade, otherwise the motor
can suddenly turn on and cause injury.
Notes:
Do not open engine hood with wiper arm folded forward. Do not allow the wiper arm to contact the windshield glass
without a wiper blade inserted. The glass may be scratched or broken. Make certain that the wiper blade is properly
installed. An improperly installed blade may cause windshield damage.
Removal:
Fold wiper arm forward. Press safety tab down (1), push wiper blade downward (2)
and remove.
Place wiper blade on firm support.
Slide (direction of arrow) the wiper blade insert out of the retainer claws.
Installation:
Slide (direction of arrow) wiper blade insert into retainer claws until tabs are engaged.
Insert wiper blade between tabs (3) on the wiper arm, and slide into end of wiper arm.
Press safety tab upward until it locks in place.
Headlamp Wiper Blades
Removal:
Fold wiper arm forward. Push pin (1) and remove wiper blade.
Installation:
Place wiper blade on wiper arm and press in pin (1).
 1
1 2
2 3
3 4
4 5
5 6
6 7
7 8
8 9
9 10
10 11
11 12
12 13
13 14
14 15
15 16
16 17
17 18
18 19
19 20
20 21
21 22
22 23
23 24
24 25
25 26
26 27
27 28
28 29
29 30
30 31
31 32
32 33
33 34
34 35
35 36
36 37
37 38
38 39
39 40
40 41
41 42
42 43
43 44
44 45
45 46
46 47
47 48
48 49
49 50
50 51
51 52
52 53
53 54
54 55
55 56
56 57
57 58
58 59
59 60
60 61
61 62
62 63
63 64
64 65
65 66
66 67
67 68
68 69
69 70
70 71
71 72
72 73
73 74
74 75
75 76
76 77
77 78
78 79
79 80
80 81
81 82
82 83
83 84
84 85
85 86
86 87
87 88
88 89
89 90
90 91
91 92
92 93
93 94
94 95
95 96
96 97
97 98
98 99
99 100
100 101
101 102
102 103
103 104
104 105
105 106
106 107
107 108
108 109
109 110
110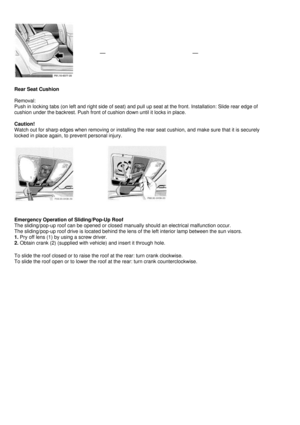 111
111 112
112 113
113 114
114 115
115 116
116 117
117 118
118 119
119 120
120 121
121 122
122 123
123 124
124 125
125 126
126 127
127 128
128 129
129
If the vehicle is towed with the front axle raised, the engine must be shut off (electronic key in steering lock position
0 or 1). Otherwi")
 may cause the upholstery to become permanently discolored. By linin")

 and pull up seat at the front. Installation: Slide rear edge of
cushion under the backrest. Push fr")