2000 HONDA PASSPORT service
[x] Cancel search: servicePage 3 of 267

A
Wor d t o th e Owne r
We urge you to carefully read this manual and follow its
recommendations to help assure enjoyable and trouble-free operation.
Please keep this Owner's Manual in the glove box of your Passport as
permanent reference material.
While reading this manual you will notice that specifications are given in both metric and English measurements. Where accuracy is not
needed, some conversions have been rounded off for your convenience.
When it comes to service, remember that your Honda dealer knows
your vehicle best and is interested in your complete satisfaction.
We thank you for choosing a Honda product, and want to assure you
that we will continue to be interested in your motoring pleasure and
satisfaction.
America n Hond a Moto r Co. , Inc . As you read this manual, you will
find information that is preceded by
symbol. This
information is intended to help you
avoid damage to your Honda, other
property, or the environment.
Preface
NOTIC
E
a
Page 6 of 267

Drive
r an d Passenge r Safet y
This section gives you important information about how to protect
you and your passengers. It shows
how to use seat belts properly. It
explains the Supplemental
Restraint System. And it tells you how to properly restrain infantsand children in your vehicle.
Important Safety Precautions .. 4
Your Vehicle's Safety Features 5
Seat Belts ............... 6
Airbags ................ 7 Seats and Seat-Backs ...... 8
Head Restraints .......... 8
Door Locks ............. 9
Pre-Drive Safety Checklist . 9
Protecting Adults .......... 10 1. Close and Lock the Doors 10
2. Adjust the Front Seats . . 10 3. Adjust the Seat-Backs . . 11
4. Adjust the Head Restraints 12 5. Fasten and Position
the Seat Belts ......... 13
6. Adjust the Steering Wheel 15
7. Maintain a Proper Sitting Position ....... 16
Advice for Pregnant Women 16 Additional Safety Precautions 17
Protecting Children ........ 18 All Children MustBe Restrained .......... 18
Children Should Sit in the Back Seat .......... 19
The Passenger's Airbag Poses
Serious Risks to Children 19
If You Must Drive With Several Children ....... 20
If a Child Requires
Close Attention ........ 20
Additional Safety Precautions 21 General Guidelines for Using Child Seats ...... 21
Protecting Infants........ 25 Protecting Small Children . 29
Protecting Larger Children 33
Using Child Seats With Tethers ........... 36
Additional Information About Your Seat Belts ........... 38
Seat Belt SystemComponents ........... 38
Lap/Shoulder Belt ....... 38
Lap Belt ............... 39 Seat Belt Maintenance .... 39
Additional Information About Your SRS ............... 40
SRS Components ........ 40
How Your Airbags Work .. 41
How Your SRS IndicatorLight Works ........... 42
SRS Service ............ 43
Additional Safety Precautions 43
Carbon Monoxide Hazard ... 44
Safety Labels ............. 45
Drive r an d Passenge r Safet y
Page 46 of 267

If the light stays on after the
engine starts.
If the light comes on or flashes
on and off while you drive.
If you see any of these
indications, your airbags may not
deploy when you need them. See your Honda dealer as soon as
possible.
SR
S Servic e
Your Supplemental Restraint
System is virtually maintenance-
free, and there are no parts you
can safely service. However, you
must have your vehicle serviced if:
Your airbags ever inflate. The
airbags and control unit must
be replaced. Do not try to
remove or replace the airbags yourself. This must be done by
a Honda dealer or a
knowledgeable body shop.
The SRS indicator light alerts
you to a problem. Take your vehicle to an authorized Honda
dealer as soon as possible. If
you ignore this indication, the
airbags might not inflate when
you need them.
Additiona
l Safet y
Precaution s
Do not attempt to deactivate
your airbags. Together, airbags and seat belts provide the best
protection in a moderate to severe frontal collision.
Do not tamper with SRS components or wiring for any
reason. Tampering could cause
the airbags to deploy, possibly
causing very serious injury.
See page 170 for further information and precautions
relating to your SRS.
Drive r an d Passenge r Safet y
Ignoring the SRS indicator light
can result in serious injury or
death if the airbags do not inflate when needed.
Have your vehicle checked by a
dealer as soon as possible if
the SRS light alerts you to a potential problem.
Page 61 of 267

The needle may move during
turning, stopping and
acceleration.
Fue l Doo r
This is a reminder that the fuel fill door is on the left side of the
vehicle. Always park with that side closest to the service station
pumps.
Engin
e Coolan t
Temperatur e Gaug e
When the key is in the "ON"
position, the engine coolant temperature gauge indicates the
temperature of the engine coolant.
The letters "C" and "H" on the gauge represent "Cold" and
"Hot," respectively. The gray area indicates the
normal engine coolant
temperature.
If the pointer reaches the "H"
mark, pull safely to the side of the
road. Turn to page 213 for instructions and precautions on
checking the engine's cooling
system.
Driving with the temperature gauge pointer at "H" can causeserious damage to the engine.
Instrument s an d Control s
NOTIC
E
NORMA
L
RANG E OVERHEATIN
G
Page 62 of 267

Indicato
r Light s
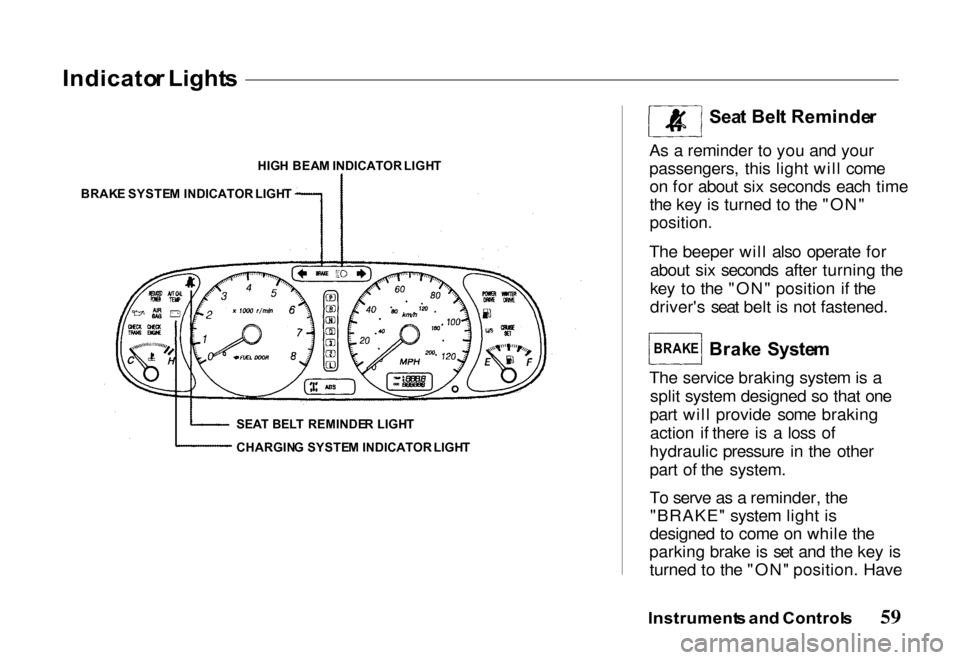
SEA T BEL T REMINDE R LIGH T Sea
t Bel t Reminde r
As a reminder to you and your
passengers, this light will come on for about six seconds each time
the key is turned to the "ON"
position.
The beeper will also operate for about six seconds after turning the
key to the "ON" position if the
driver's seat belt is not fastened.
Brake Syste m
The service braking system is a split system designed so that one
part will provide some braking action if there is a loss of
hydraulic pressure in the other
part of the system.
To serve as a reminder, the "BRAKE" system light is
designed to come on while the
parking brake is set and the key is turned to the "ON" position. Have
Instrument s an d Control s
BRAK
E
HIG
H BEA M INDICATOR LIGHT
BRAK E SYSTE M INDICATOR LIGHT
CHARGIN G SYSTE M INDICATOR LIGHT
Page 70 of 267

Depending on the type of problem,
the "CHECK TRANS" light will
flash but the transmission may continue to shift automatically. If
the transmission is shifting
normally, you do not have tochoose gears with the shift lever.
However, continued operation of the vehicle with this light flashingcan cause serious mechanical
damage. You should have the vehicle serviced by your Honda
dealer as soon as possible.
Winte r Driv e Indicato r
Automatic Transmission only
The "Winter Drive" light will
come on when you push the
Winter Drive button with the
engine running and the
transmission lever in the "D"
range.
It also comes on for a few seconds
when you turn the ignition switch
to the "ON" position.
Refer to "Driving PatternSelector" later in this section.
Powe r Driv e Indicato r
Automatic Transmission only
The "Power Drive" light will
come on when you push the
Power Drive button with the
engine running.
It also comes on for a few seconds
when you turn the ignition switch
to the "ON" position.
Refer to "Driving PatternSelector" later in this section.
Instrument s an d Control s
NOTIC
E
Page 92 of 267

Fore/Af
t Sea t Adjustmen t
See pages 10-11 for important
safety information and warnings
about how to properly position
seats and seat-backs.
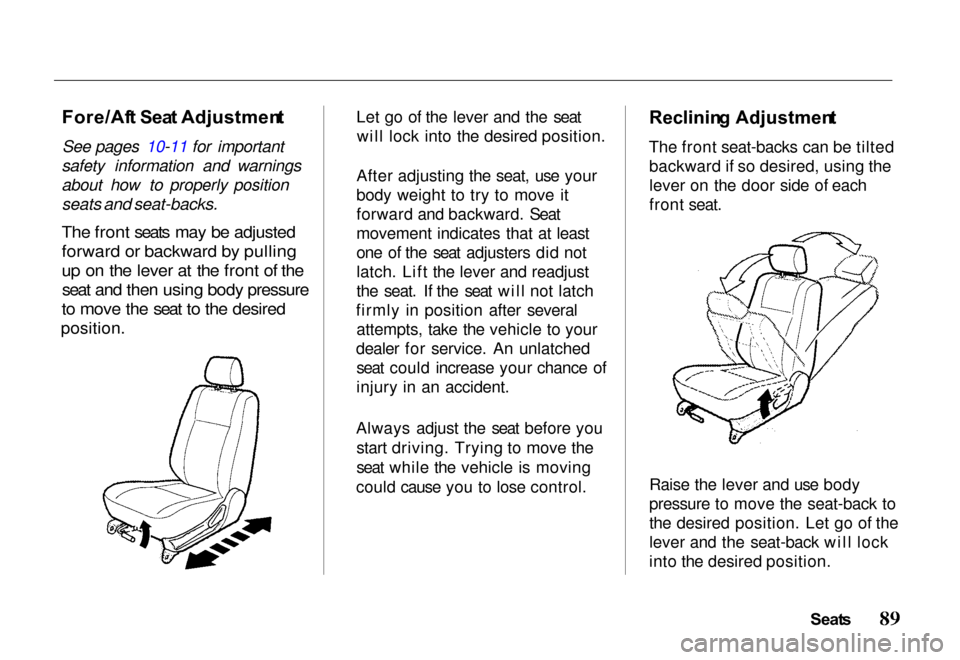
The front seats may be adjusted
forward or backward by pulling
up on the lever at the front of the seat and then using body pressure
to move the seat to the desired
position.
Let go of the lever and the seat
will lock into the desired position.
After adjusting the seat, use your
body weight to try to move it
forward and backward. Seat
movement indicates that at least
one of the seat adjusters did not
latch. Lift the lever and readjust
the seat. If the seat will not latch
firmly in position after several attempts, take the vehicle to your
dealer for service. An unlatched seat could increase your chance of
injury in an accident.
Always adjust the seat before you start driving. Trying to move the
seat while the vehicle is moving
could cause you to lose control.
Reclinin
g Adjustmen t
The front seat-backs can be tilted backward if so desired, using the
lever on the door side of each
front seat.
Raise the lever and use body
pressure to move the seat-back to
the desired position. Let go of the
lever and the seat-back will lock
into the desired position.
Seats
Page 158 of 267

If your vehicle is equipped with
an automatic transmission, set
the parking brake before you
leave the driver's seat. If the
vehicle is parked on a grade and the transmission shift leveris placed in "P" (Park) position
before you set the parking
brake, the weight of the vehicle may exert so much force on the
transmission that you may have
difficulty moving the shift
lever out of "P" (Park)
position. To prevent this, apply the parking brake BEFORE
moving the shift lever to "P" (Park). When you want to drive
away, move the shift lever out
of the "P" (Park) position
BEFORE releasing the parking
brake. It is good driving
practice to set the parking
brake first, then place the
transmission in "PARK"
position, even on level
surfaces.
If the parking brake does not
seem to hold the vehicle as
well as before, have the vehicle
serviced by your Honda dealer.
Do not park your vehicle over
high grass, dry leaves or other
combustible materials. The
catalytic converter gets very
hot and could set fire to these
materials.
Anti-Loc
k Brake s
Your vehicle has an Anti-lock
Brake System (ABS) as standard
equipment. ABS helps to prevent
the wheels from locking up and skidding during hard braking,
allowing you to retain steering
control.
When the front tires skid, you lose steering control; the vehicle
continues straight ahead even
though you turn the steering
wheel. The ABS helps to prevent
lock-up and retain steering control
by pumping the brakes rapidly;
much faster than a person can do it.
Yo u shoul d neve r pum p th e
brak e pedal , this defeats the
purpose of the ABS. Let the ABS work for you by always keeping
firm, steady pressure on the brake
pedal as you steer away from the
Driving Tip s
Brake
s