2000 HONDA PASSPORT tow
[x] Cancel search: towPage 18 of 267

into the buckle, and tug on the
belt to make sure the belt is
securely latched.
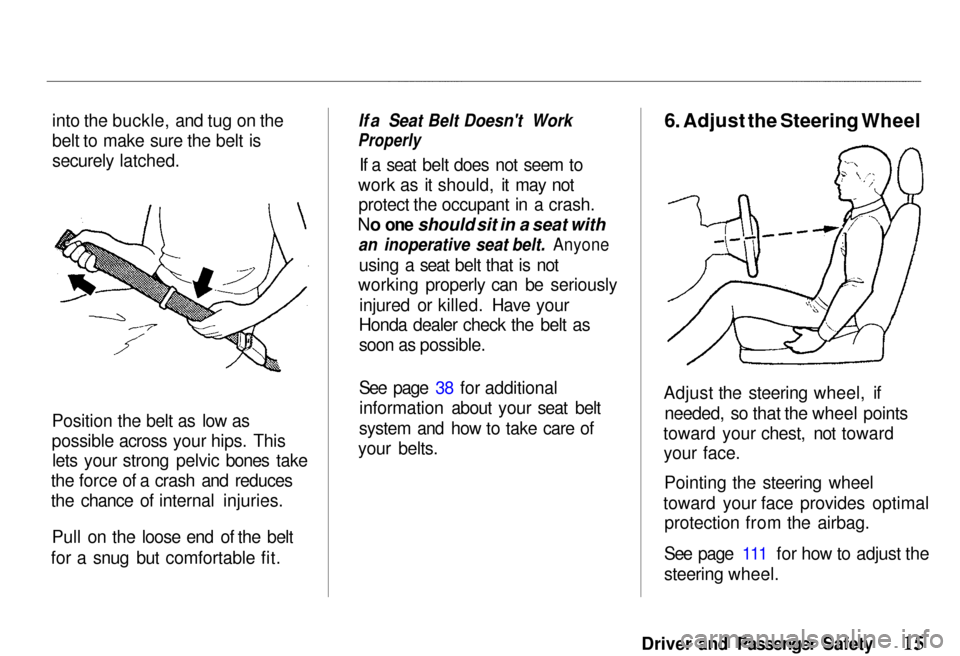
Position
the belt as low as
possible across your hips. This lets your strong pelvic bones take
the force of a crash and reduces
the chance of internal injuries.
Pull
on the loose end of the belt
for a snug but comfortable fit.
If a Seat Belt Doesn't Work
Properly
If a seat belt does not seem to
work as it should, it may not protect
the occupant in a crash.
No one should sit in a seat with
an inoperative seat belt. Anyone
using
a seat belt that is not
working
properly can be seriously
injured or killed. Have your
Honda
dealer check the belt as
soon as possible.
See
page 38 for additional
information
about your seat belt
system and how to take care of
your
belts. 6. Adjust the Steering Wheel
Adjust
the steering wheel, if
needed, so that the wheel points
toward your chest, not toward your face.
Pointing the steering wheel
toward
your face provides optimal
protection from the airbag.
See page 111 for how to adjust the
steering
wheel.
Driver and Passenger Safety
Page 32 of 267

doctor, or follow the seat maker's
recommendations.
To achieve the desired reclining
angle, it may help to put a rolled-
up towel under the toe of the child seat, as shown.
When properly installed, a rear- facing child seat may prevent a
driver or a front seat passenger
from moving the seat as far back as recommended (see page 10).
Or it may prevent them from
locking the seat-back in the
desired upright position (see page
11).
In either case, we recommend that
you place the child seat directly
behind the front passenger seat,
move the front seat as far forward as needed, and leave it
unoccupied. You may also wish to
get a smaller child seat that allows
you to safely carry a front
passenger.
Additional Precautions for
Infants Never hold an infant on your
lap. If you are not wearing a
seat belt in a crash, you could
be thrown forward into the
dashboard and crush the infant.
If you are wearing a seat belt,
the infant can be torn from
your arms. For example, if
your vehicle crashes into a
parked vehicle at 30 mph (48
km/h), a 20 Ib (9 kg) infant will
become a 600 Ib (275 kg)
force, and you will not be able
to hold on.
Never put a seat belt over
yourself and an infant. During a crash, the belt could press
deep into the infant and cause
very serious injuries. Protectin
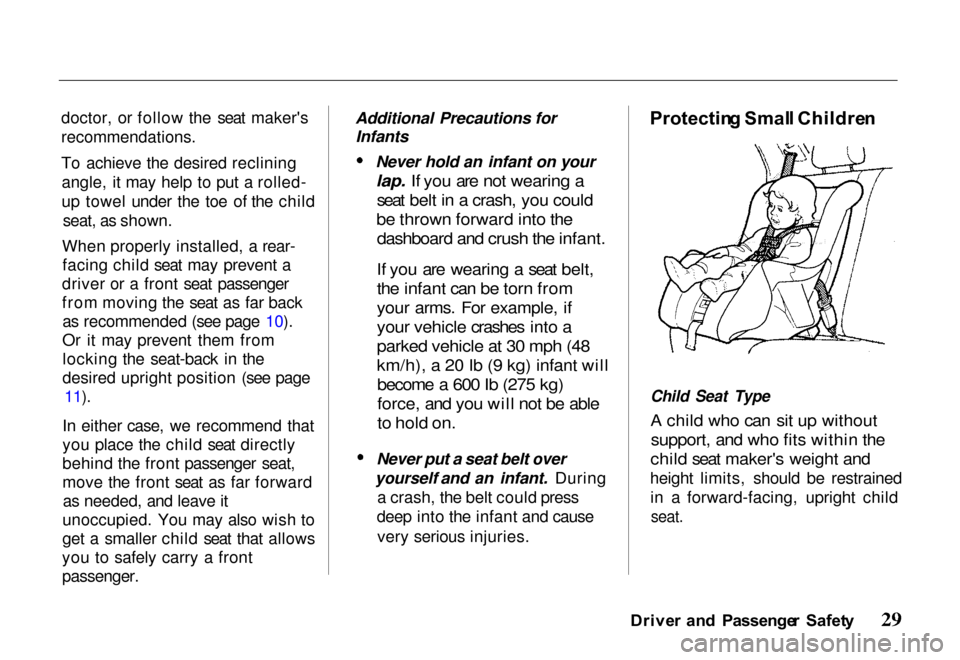
g Smal l Childre n
Child Seat Type
A child who can sit up without
support, and who fits within the
child seat maker's weight and
height limits, should be restrained in a forward-facing, upright child
seat.
Drive r an d Passenge r Safet y
Page 63 of 267

the system repaired if the light
does not come on when the key is
turned to the "ON" position
without the engine running or
when the parking brake is set.
This light does not eliminate the need for brake inspection and
maintenance. The brake fluid
level must be checked regularly.See the maintenance section of
this manual for other brake
checks.
If the light remains on after
engine start up with the parking
brake released, or comes on during operation of the vehicle, it
may mean that there is something
wrong with the brake system.
What to do?1. Check to see if the parking
brake has been fully released.
2. If it has, pull off the road and
stop carefully. Remember that: Stopping distances may be
longer.
You may have to push
harder on the pedal. The pedal may go down
farther than normal.
3. Have the vehicle towed to the nearest Honda dealer for
repair.
Do not continue to drive with the
brake system light on. There may
be a serious problem with the braking system. Driving under
this condition is hazardous and
could lead to an accident.
The brake system light does not indicate that the parking brake is
fully set. When applying the
parking brake, always pull it up as
far as possible. Hig
h Bea m
The headlight high beam indicator
lights up when the headlights are
on high beam.
Chargin g Syste m
This light should come on when
the key is turned to the "ON"
position and the alternator is not
charging. The light may stay on at
engine idle; however, it should go off and stay off above the normal
engine idle speed. If the light
comes on while driving, the
charging system should be
checked at once so the battery will
not completely discharge. Stop the engine, and check for a broken
drive belt. If it is broken, or if the
drive belt is not responsible for the trouble, have your Honda
dealer inspect and correct the
fault. If the drive belt is broken,
Instrument s an d Control s
Page 65 of 267

If you keep driving with the
malfunction indicator lamp on,
you can damage your vehicle's emissions controls and engine.Those repairs may not be covered
by your vehicle's warranties.
Reduce d Powe r
Indicato r
This light comes on for a few seconds when you turn the key to
the "ON" position
If it comes on at any other time, it
indicates that there is a problem in
the throttle "drive-by-wire"
system. With the light on, your
vehicle goes into "limp home"
mode — the engine runs on three
cylinders, and the accelerator
pedal no longer controls engine
speed.
As soon as it is safe, pull off the
road and turn off the engine.
Restart the engine to reset the
system. If the light remains on, or
comes on again while driving, have the vehicle towed to your
Honda dealer for repair.
Turn Signa l
Indicator s
A green light flashing on the instrument panel lets you know
that the front and rear turn signal lights are working. If the light
stays on and does not flash, check
for a burned out bulb. If there is no light when the lever is moved,check the fuse and bulb.
Whenever the Hazard Warning
Flasher Switch is on, both turn signals will flash.
Lo
w Fue l Indicato r
This light comes on when the tank
becomes nearly empty. Fill up the tank as soon as possible.
If the low fuel indicator light
comes on when the fuel tank is
not nearly empty, have the fuel
tank sensing unit and related
components inspected and
repaired by your Honda dealer.
Driving on a road with many
sharp curves may cause the fuel
indicator light to blink
intermittently. This is normal.
Low Oi l
Pressur e Indicato r
This light is designed to come on
to provide a "bulb check" when
the key is turned to the "ON"
position, but should go out after
Instrument s an d Control s
NOTIC
E
REDUCEDPOWER
Page 69 of 267

Chec
k Automati c
Transmissio n Indicato r
The indicator light comes on for a
few seconds when the ignition
switch is turned to the "ON"
position.
If the light flashes, it means the
computer controlling the
transmission has found a problem.
Have the automatic transmission checked by your Honda dealer as
soon as possible. You can safely
drive the vehicle while the light is
flashing, but the computer may
put the transmission into its "backup mode."
In the backup mode, the
transmission may not shiftautomatically. If the transmission
does not shift automatically, you must move the shift lever to
change gears. This chart shows the shift lever position and the
gear range that will result. "L" position First gear
"2" position Third gear
"3" position Fourth gear
"D" position Fourth gear
When the transmission is in
backup mode and does not shift
automatically, you should move
the selector lever to the
appropriate position for your
driving needs, as follows:
Select "3" or "D" for high speed
driving (over 50 mph, 80 km/h).
Select "2" for moderate speed
driving (between 15 mph [25
km/h] and 50 mph [80 km/h]).
Select "L" when starting from a
stop, driving up or down a steep
hill, or for engine braking when
towing a trailer downhill.
Do not exceed 65 mph (45 mph if
towing a trailer).
Instrument s an d Control s
Page 78 of 267

and the forward driving ranges.
The shift lever can be shifted freely into any position indicated by the arrow The lever
cannot be shifted into any position
indicated by the arrow
without pushing the button located on the end of the shift
lever. In this 4-speed automatic
transmission, the following three
modes can be selected by pressing the "POWER" or "WINTER"switch on the floor console, with
the key switch in the "ON"
position: NORMAL mode
POWER mode
WINTER mode
P (Park ) — Used to lock the
transmission when the vehicle is
parked or while starting the engine. Never move the shift lever
to Park until your vehicle is fullystopped. Use this position
together with the parking brake.
The shift lever can be moved from
PARK position if the regular brake is applied.
Refer to "Starting" in this section.R (Reverse ) — Used for backing
the vehicle. Bring your vehicle to a complete stop before shifting to
Reverse.
N (Neutral ) — The out-of-gear
position. You may restart a stalled
engine while the vehicle is still moving with the selector in
Neutral. Refer to "Starting" in thissection. This position is also used
when towing the vehicle. See "In
Case of Emergency" for towing information.
D (Drive ) (Firs t t o Fourt h
Gear ) — This position is for all
normal forward driving. For
normal driving, we recommend that you put the shift lever in the
"D" range. This will reduce
vehicle noise and improve fuel
economy.
Instrument s an d Control s
PAR
K
RE V
NEU T
DRIV E
3R D
2N D
1S T
Page 80 of 267

1. Check that the parking brake
is fully applied.
2. Turn the key switch to "ACC" position.
3. Move the shift lever from "P" to "N" position, depress the
brake pedal, and start the
engine again.
4. Operate the shift lever.
Have the transmission checked by
your Honda dealer as soon as
possible. Drivin
g Tip s
Before going down a steep or long
grade, reduce speed and shift the
transmission into a lower gear or
range to control the vehicle's speed. This will provide engine
braking to help slow the vehicle.
Try not to hold the brake pedal
down too long or too often. This
could cause the brakes to get hot
and not work properly.
Downshifting to a lower gear is
especially important when towing a trailer in mountainous terrain.
Do not hold the vehicle on a hill
by pressing on the accelerator. Do
not press on the accelerator pedal and brake pedal at the same time.
Either of these actions can
overheat the automatic
transmission and cause damage. Always keep your foot off the
accelerator pedal when shifting
from "P" or "N" to another gear.
Do not shift to "P" (Park) when
the vehicle is moving; you could
damage the automatic
transmission. Always come to a
complete stop.
Be careful that you do not exceed
the following maximum allowable speeds when accelerating.
Instrument s an d Control s
mph (km/h)
Page 94 of 267

Rea
r Sea t
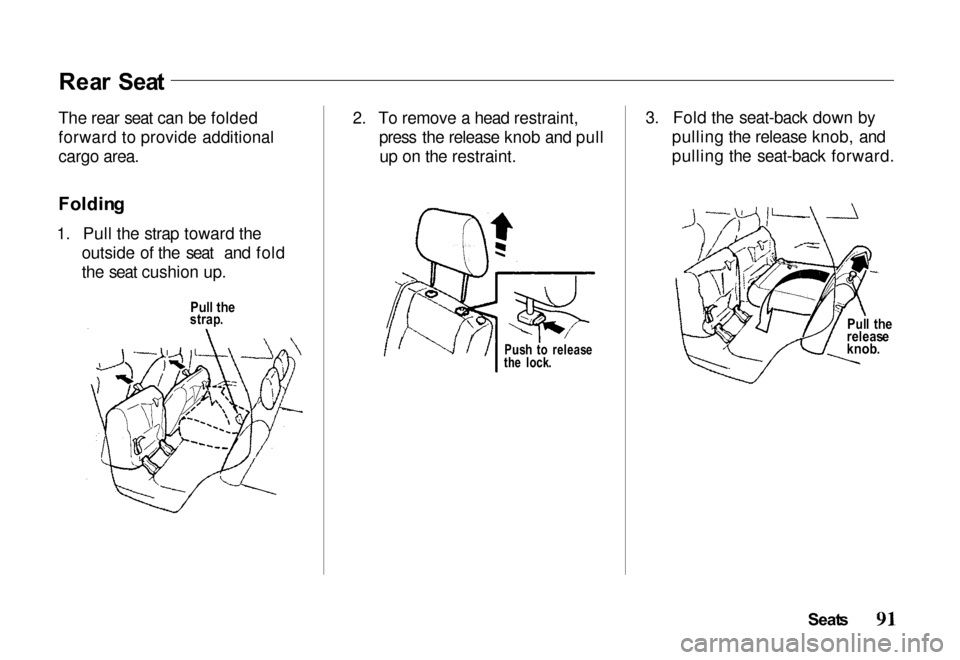
The rear seat can be folded
forward to provide additional
cargo area.
Foldin g
1. Pull the strap toward the outside of the seat and fold
the seat cushion up. 2. To remove a head restraint,
press the release knob and pullup on the restraint. 3. Fold the seat-back down by
pulling the release knob, and
pulling the seat-back forward.
Seats
Pul
l th e
releas e
knob .
Pul
l th e
strap .
Push t o releas e
th e lock .