2000 HONDA PASSPORT reset
[x] Cancel search: resetPage 56 of 267

Instrument
s an d Control s
This section explains the controls
and displays that contribute to the
daily operation of your Honda.
All the essential controls are
within easy reach. Control Locations ......... 54
Indicators an
d Gauges ...... 55
Gauges .................. 56 Tachometer ............ 56Speedometer ........... 56
Odometer ............. 56
Trip Odometer/ Reset Knob ........... 56
Fuel Gauge ............ 57
Engine Coolant Temperature Gauge .... 58
Indicator Lights ........... 59
Switches ................. 68 Windshield Wiper/Washer 68Headlights ............. 70
Illumination Control ..... 71
Rear Window Defogger . . 72
Rear Window Wiper/ Washer .............. 72
Turn Signals ............ 73 Hazard Warning Flasher . .
74
Automatic Transmissio
n .... 74
Transfer Control (4WD Models) ......... 78
5-Speed Manual Transmission 81 Transfer Control(4WD Models) ......... 82
Parking Brake ............ 84
Accelerator Pedal .......... 85
Clutch Pedal ............. 85
Instrument s an d Control s
Page 60 of 267

ENGIN
E COOLAN T
TEMPERATUR E GAUG E
FUE
L GAUG E
odometer by repeatedly pressing
and releasing the reset button.
To reset a trip odometer, display it, then press and hold the reset
button until the odometer clears to
zero.
Fue l Gaug e
The fuel gauge will register the approximate fuel level in the tank
when the key is in the "ON"
position. The following conditions may be considered normal: Gas station pumps may shut off
before the fuel gauge indicates
"F" (FULL). The amount of fuel required for
a fill-up may not exactly
correspond to the gauge. The needle may not move away
from "F" (FULL) until some
time after fill-up.
Instrument s an d Control s
Page 65 of 267

If you keep driving with the
malfunction indicator lamp on,
you can damage your vehicle's emissions controls and engine.Those repairs may not be covered
by your vehicle's warranties.
Reduce d Powe r
Indicato r
This light comes on for a few seconds when you turn the key to
the "ON" position
If it comes on at any other time, it
indicates that there is a problem in
the throttle "drive-by-wire"
system. With the light on, your
vehicle goes into "limp home"
mode — the engine runs on three
cylinders, and the accelerator
pedal no longer controls engine
speed.
As soon as it is safe, pull off the
road and turn off the engine.
Restart the engine to reset the
system. If the light remains on, or
comes on again while driving, have the vehicle towed to your
Honda dealer for repair.
Turn Signa l
Indicator s
A green light flashing on the instrument panel lets you know
that the front and rear turn signal lights are working. If the light
stays on and does not flash, check
for a burned out bulb. If there is no light when the lever is moved,check the fuse and bulb.
Whenever the Hazard Warning
Flasher Switch is on, both turn signals will flash.
Lo
w Fue l Indicato r
This light comes on when the tank
becomes nearly empty. Fill up the tank as soon as possible.
If the low fuel indicator light
comes on when the fuel tank is
not nearly empty, have the fuel
tank sensing unit and related
components inspected and
repaired by your Honda dealer.
Driving on a road with many
sharp curves may cause the fuel
indicator light to blink
intermittently. This is normal.
Low Oi l
Pressur e Indicato r
This light is designed to come on
to provide a "bulb check" when
the key is turned to the "ON"
position, but should go out after
Instrument s an d Control s
NOTIC
E
REDUCEDPOWER
Page 68 of 267

as indicated by the "U/S" (upshift)
light on the instrument panel.
If vehicle speed drops below
20 mph (30 km/h), or if the
engine is not running smoothly,
you should downshift to the next lower gear. You may need to
downshift two or more gears to
keep the engine running smoothly or for satisfactory performance.
This indicator comes on for a fewseconds when you turn the
ignition switch to the "ON"
position. 4-Whee
l Driv e
(4WD ) Indicato r
4WD models only
This indicator lights when the 4-Wheel Drive system is engaged.
With the 4WD-2WD switch in the "OFF" or 2WD position, this light
will come on to provide a "bulb
check" when the key is turned to the "ON" position, but should go
out after the engine is started.
If the 4WD-2WD switch is in the "ON" or 4WD position, this light
will come on when the key is
turned to the "ON" position and
remain on after the engine is
started.
Anti-Loc
k Indicato r
This light will come on and go out when the ignition switch is turned
to the "ON" position. (If the light
does not come on, see your Honda
dealer to have the system
repaired.)
If the light remains on after
engine start-up or comes on
during operation of the vehicle, stop as soon as possible and turn
the key off. Then start the engine
to reset the system. If the light stays on, or it comes on again
while you're driving, the anti-lock
brake system should be checked at your Honda dealer.
Until you get it fixed, you'll have
normal brakes, but you won't
have anti-lock.
Instrument s an d Control s
AB
S
Page 82 of 267

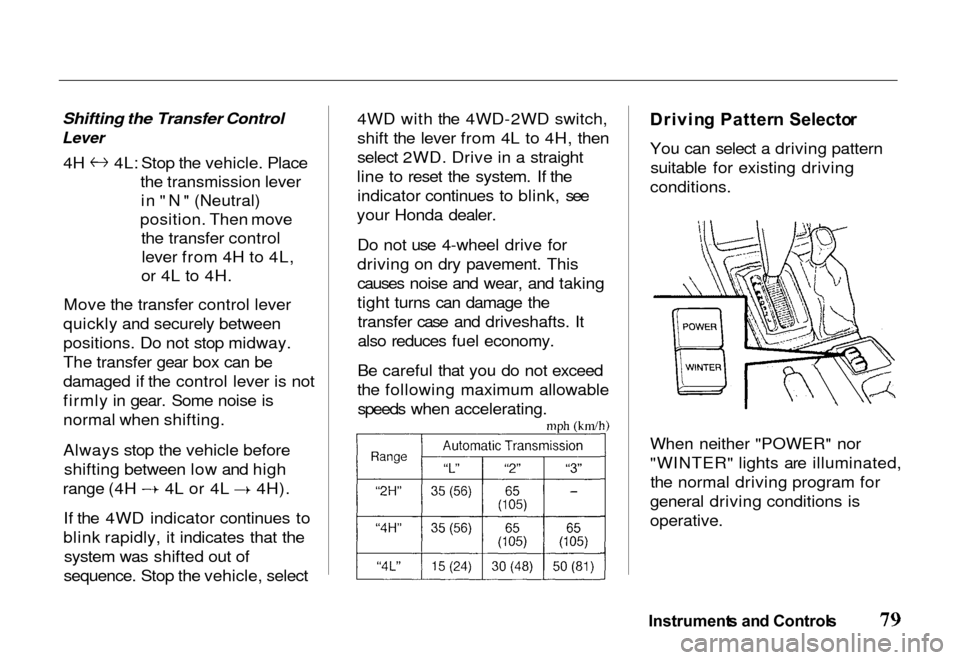
Shifting the Transfer Control
Lever
4H 4L: Stop the vehicle. Place
the transmission leverin "N" (Neutral)
position. Then move the transfer controllever from 4H to 4L,
or 4L to 4H.
Move the transfer control lever
quickly and securely between
positions. Do not stop midway.
The transfer gear box can be
damaged if the control lever is not
firmly in gear. Some noise is
normal when shifting.
Always stop the vehicle before shifting between low and high range (4H 4L or 4L 4H).
If the 4WD indicator continues to
blink rapidly, it indicates that the system was shifted out of
sequence. Stop the vehicle, select 4WD with the 4WD-2WD switch,
shift the lever from 4L to 4H, then
select 2WD. Drive in a straight
line to reset the system. If the indicator continues to blink, see
your Honda dealer.
Do not use 4-wheel drive for
driving on dry pavement. This
causes noise and wear, and taking
tight turns can damage thetransfer case and driveshafts. It
also reduces fuel economy.
Be careful that you do not exceed
the following maximum allowable speeds when accelerating.
Drivin
g Patter n Selecto r
You can select a driving pattern suitable for existing driving
conditions.
When neither "POWER" nor
"WINTER" lights are illuminated, the normal driving program for
general driving conditions is
operative.
Instrument s an d Control s
Page 86 of 267

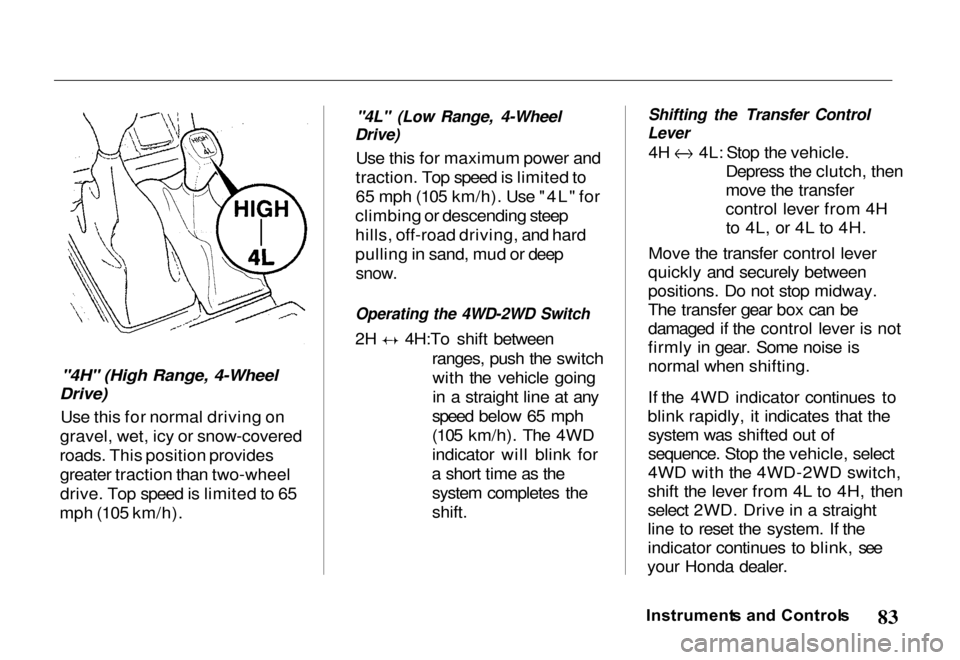
"4H" (High Range, 4-Wheel
Drive)
Use this for normal driving on
gravel, wet, icy or snow-covered
roads. This position provides greater traction than two-wheel
drive. Top speed is limited to 65
mph (105 km/h).
"4L" (Low Range, 4-Wheel
Drive)
Use this for maximum power and
traction. Top speed is limited to
65 mph (105 km/h). Use "4L" for
climbing or descending steep
hills, off-road driving, and hard
pulling in sand, mud or deep
snow.
Operating the 4WD-2WD Switch
2H 4H:To shift between
ranges, push the switchwith the vehicle going
in a straight line at any
speed below 65 mph
(105 km/h). The 4WD
indicator will blink for
a short time as the system completes the
shift.
Shifting the Transfer Control
Lever
4H 4L: Stop the vehicle.
Depress the clutch, then
move the transfer
control lever from 4Hto 4L, or 4L to 4H.
Move the transfer control lever
quickly and securely between
positions. Do not stop midway.
The transfer gear box can be
damaged if the control lever is not
firmly in gear. Some noise is
normal when shifting.
If the 4WD indicator continues to
blink rapidly, it indicates that the system was shifted out of
sequence. Stop the vehicle, select
4WD with the 4WD-2WD switch,
shift the lever from 4L to 4H, then
select 2WD. Drive in a straight
line to reset the system. If the
indicator continues to blink, see
your Honda dealer.
Instrument s an d Control s
Page 107 of 267

The LOCK button on the driver's
door panel removes power from
the passengers' windows. Only
the driver's window can be raised
and lowered. Checkin
g th e Circui t Breake r
In the event the power windows
d o no t
operate
, chec k th e circui t
breaker .
To reset the circuit breaker, first turn the ignition switch off, and
then push the knob on the circuit
breaker. The windows should
now operate.
If the circuit breaker
immediately goes off again or
the windows do not operate,
have the electrical system checked by a dealer as soon as
possible.
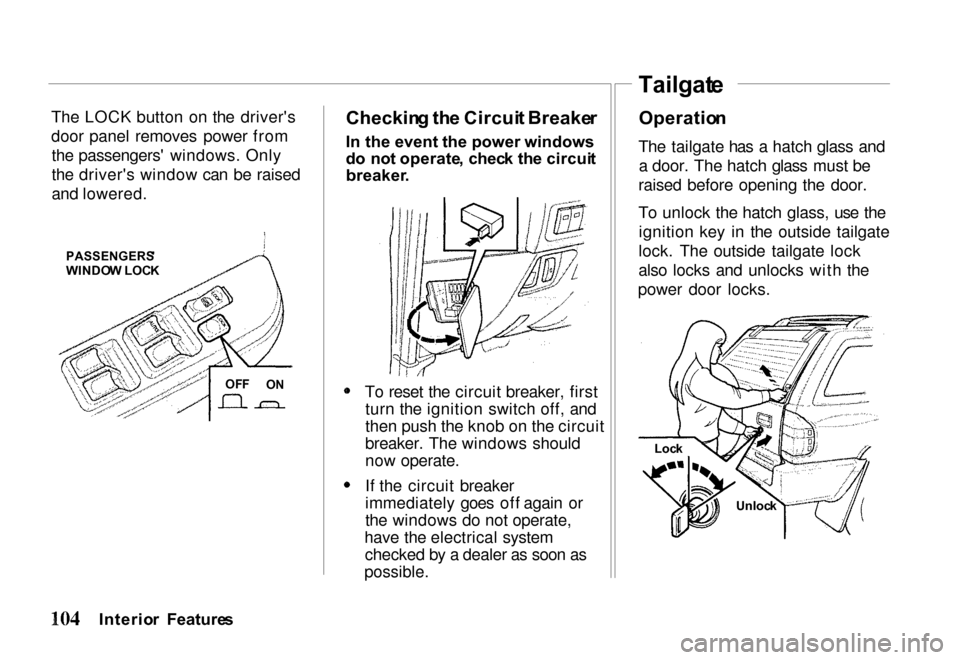
Operatio
n
The tailgate has a hatch glass and a door. The hatch glass must be
raised before opening the door.
To unlock the hatch glass, use the ignition key in the outside tailgate
lock. The outside tailgate lock
also locks and unlocks with the
power door locks.
Interio r Feature s
Tailgat
e
PASSENGERS '
WINDO W LOC K
Lock
Unlock
OF
F
ON
Page 124 of 267

Audi
o Syste m
AM/FM/Cassett e Stere o
Audi o Syste m
For LX and EX models
Your Honda's audio system
provides clear reception on both AM and FM bands, while the
preset buttons allow you to easily select your favorite stations.
The cassette system features Dolby B* noise reduction,
automatic sensing of chromium-
dioxide (CrC2) tape, and autoreverse for continuous play.
* Dolby noise reduction manufactured under
license from Dolby Laboratories Licensing Corporation. "DOLBY" and the symbol
are trademarks of Dolby Laboratories
Licensing Corporation. Operatin
g th e Radi o
The ignition switch must be in
ACCESSORY or ON. Turn the system on by pressing the PWR/
VOL knob. Adjust the volume by
turning the PWR/VOL knob.
The band and frequency that the
radio was last tuned to is
displayed. To change bands, press the AM or FM button. On the FM
band, ST will be displayed if the station is broadcasting in stereo.
Stereo reproduction on AM is not
available.
You can use any of three methods
to find radio stations on the selected band: TUNE , SEEK , or
the Preset buttons.
TUN E — Use the TUNE bar to tune
the radio to a desired frequency. Press the right side ( ) to tune to
a higher frequency, or the left side ( ) to tune to a lower frequency.
The frequency numbers will start to change rapidly. Release the bar
when the display reaches the
desired frequency. To change the
frequency in small increments,
press and release the TUNE bar quickly.
SEE K — The SEEK function
searches the band for a station
with a strong signal. To activate it,
press and release the SEEK/SCAN
button. The system scans upward
from the current frequency. It stops when it finds a station with
a strong signal.
Preset — You can store the
frequencies of your favorite radio stations in the six preset buttons.
Each button will store one
frequency on the AM band, and two on the FM band (FM1 and
FM2).
Comfor t an d Convenienc e Feature s