Page 50 of 267
Of
f to a Goo d Star t
To make it easier for you to enjoyyour new Passport, we've
gathered together the bits and
pieces of information that will get you "off to a good start." Eachitem in this section refers you to a
page of the manual for detailed instructions on that aspect of
vehicle operation. While you should take the time to become
familiar with all the information in this manual, we hope that thissection saves some time in getting
you safely behind the wheel.
Seats .................... 48
Interior .................. 49
Engine Compartment ....... 51
Off t o a Goo d Star t
Page 51 of 267
Seat
s
C — TIL T STEERIN G WHEE L
B
— SEA T BEL T
A SEAT ADJUSTMENT
See page 89.
B SEAT BELT
See pages 13 — 15.
C TILT STEERING WHEEL
See page 111.
A — SEA T ADJUSTMEN T
Of f t o a Goo d Star t
Page 53 of 267
Interio
r
D IGNITION SWITCH
See page 97.
E STARTING THE ENGINE
See page 153.
F GAUGES
See page 56.
G ADJUSTING REAR AND
SIDE VIEW MIRRORS
See page 101.
H SHIFTING
For automatic, see page 74.
For manual, see page 81.
For four-wheel drive, see pages
78 and 82.
I
PARKING BRAKE
See page 84.
J HEADLIGHTS
See page 70.
K WINDSHIELD WIPERS
See page 68.
L TURN SIGNALS
See page 73.
M HEATER CONTROLS
See page 116.
N MAP LIGHT AND
MOONROOF
See pages 108. O
PUTTING FUEL IN
THE VEHICLE
See page 193.
Of f t o a Goo d Star t
Page 58 of 267
Indicator
s an d Gauge s
TUR N SIGNA L INDICATO R LIGH T
SR S INDICATO R LIGH T
CHEC K ENGIN E
INDICATO R LIGH T
LO W OI L PRESSUR E
INDICATO R LIGH T
ENGIN E COOLAN T
TEMPERATUR E GAUG E
CHARGIN G SYSTE M
INDICATO R LIGH T TUR
N SIGNA L INDICATO R LIGH T
SPEEDOMETE R
POWE R DRIV E
INDICATO R LIGH T
SEA T BEL T
REMINDE R
LIGH T
ANTI-LOCK BRAK E
SYSTE M INDICATO R CRUIS
E SE T
INDICATO R LIGH T
FUE L GAUG E
TRI P ODOMETE R
RESE T KNO B
TACHOMETE R 4-WHEEL DRIV E (4WD )
INDICATO R LIGH T
Instrument s an d Control s
HIG
H BEA M INDICATO R LIGH T
BRAK E SYSTE M INDICATO R LIGH T
TRIP ODOMETE R
WINTE R DRIV E
INDICATO R LIGH T
LO W FUE L
INDICATO R LIGH T
REDUCE
D POWE R
INDICATO R LIGH T
CHECKTRAN S
INDICATO R LIGH T
(A/ T only )
A/
T OI L TEM P
INDICATO R LIGH T
(A/ T only )
ODOMETER
Page 68 of 267

as indicated by the "U/S" (upshift)
light on the instrument panel.
If vehicle speed drops below
20 mph (30 km/h), or if the
engine is not running smoothly,
you should downshift to the next lower gear. You may need to
downshift two or more gears to
keep the engine running smoothly or for satisfactory performance.
This indicator comes on for a fewseconds when you turn the
ignition switch to the "ON"
position. 4-Whee
l Driv e
(4WD ) Indicato r
4WD models only
This indicator lights when the 4-Wheel Drive system is engaged.
With the 4WD-2WD switch in the "OFF" or 2WD position, this light
will come on to provide a "bulb
check" when the key is turned to the "ON" position, but should go
out after the engine is started.
If the 4WD-2WD switch is in the "ON" or 4WD position, this light
will come on when the key is
turned to the "ON" position and
remain on after the engine is
started.
Anti-Loc
k Indicato r
This light will come on and go out when the ignition switch is turned
to the "ON" position. (If the light
does not come on, see your Honda
dealer to have the system
repaired.)
If the light remains on after
engine start-up or comes on
during operation of the vehicle, stop as soon as possible and turn
the key off. Then start the engine
to reset the system. If the light stays on, or it comes on again
while you're driving, the anti-lock
brake system should be checked at your Honda dealer.
Until you get it fixed, you'll have
normal brakes, but you won't
have anti-lock.
Instrument s an d Control s
AB
S
Page 76 of 267

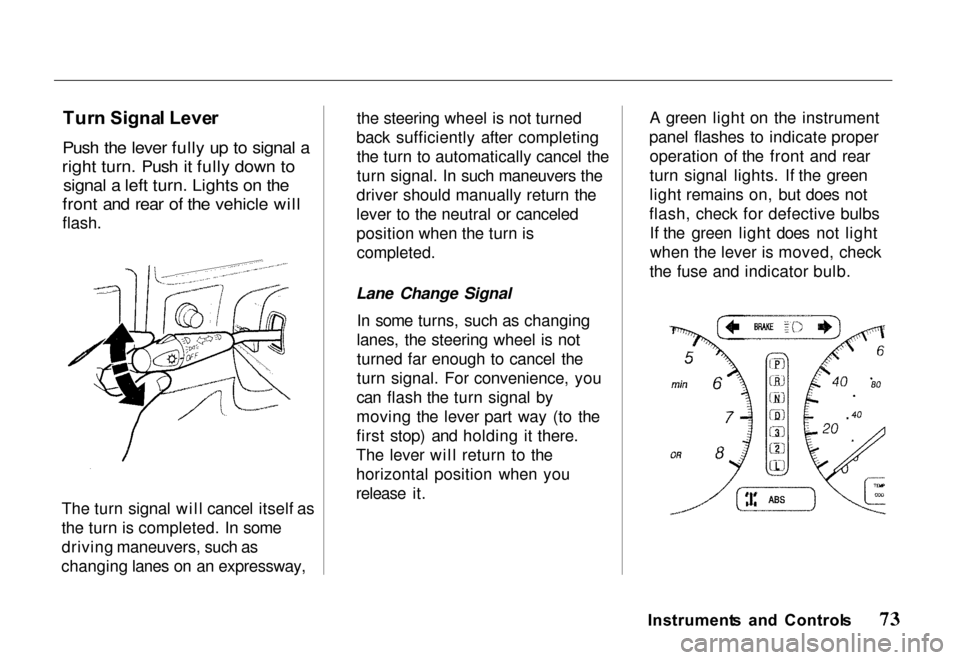
Tur
n Signa l Leve r
Push the lever fully up to signal a
right turn. Push it fully down to signal a left turn. Lights on the
front and rear of the vehicle will
flash.
The turn signal will cancel itself as
the turn is completed. In some
driving maneuvers, such as
changing lanes on an expressway, the steering wheel is not turned
back sufficiently after completing the turn to automatically cancel the
turn signal. In such maneuvers the
driver should manually return the
lever to the neutral or canceled
position when the turn is
completed.
Lane Change Signal In some turns, such as changing
lanes, the steering wheel is not
turned far enough to cancel the
turn signal. For convenience, you
can flash the turn signal by
moving the lever part way (to the
first stop) and holding it there.
The lever will return to the
horizontal position when you
release it. A green light on the instrument
panel flashes to indicate proper operation of the front and rear
turn signal lights. If the green
light remains on, but does not
flash, check for defective bulbs If the green light does not lightwhen the lever is moved, check
the fuse and indicator bulb.
Instrument s an d Control s
Page 81 of 267
Transfe
r Contro l
4WD Models
The "4WD" indicator light illuminates when 4WD is engaged
with the 4WD-2WD switch.
"2H" (High Range, 2-Wheel
Drive)
Use this for normal driving on dry
pavement. This position gives
greater economy, quieter ride and
the least drivetrain wear.
"4H" (High Range, 4-Wheel
Drive)
Use this for normal driving on
gravel, wet, icy or snow-covered
roads. This position provides
greater traction than two-wheel
drive. Top speed is limited to 65
mph(105km/h).
"4L" (Low Range, 4-Wheel
Drive)
Use this for maximum power andtraction. Top speed is limited to
65 mph (105 km/h). Use "4L" for
climbing or descending steep hills, off-road driving, and hard
pulling in sand, mud or deep
snow.
Operating the 4WD-2WD Switch
2H 4H:To shift between
ranges, push the switch
with the vehicle goingin a straight line at any
speed below 65 mph
(105 km/h). The 4WD indicator will blink for
a short time as the
system completes the
shift.
Instrument s an d Control s
Page 82 of 267

Shifting the Transfer Control
Lever
4H 4L: Stop the vehicle. Place
the transmission leverin "N" (Neutral)
position. Then move the transfer controllever from 4H to 4L,
or 4L to 4H.
Move the transfer control lever
quickly and securely between
positions. Do not stop midway.
The transfer gear box can be
damaged if the control lever is not
firmly in gear. Some noise is
normal when shifting.
Always stop the vehicle before shifting between low and high range (4H 4L or 4L 4H).
If the 4WD indicator continues to
blink rapidly, it indicates that the system was shifted out of
sequence. Stop the vehicle, select 4WD with the 4WD-2WD switch,
shift the lever from 4L to 4H, then
select 2WD. Drive in a straight
line to reset the system. If the indicator continues to blink, see
your Honda dealer.
Do not use 4-wheel drive for
driving on dry pavement. This
causes noise and wear, and taking
tight turns can damage thetransfer case and driveshafts. It
also reduces fuel economy.
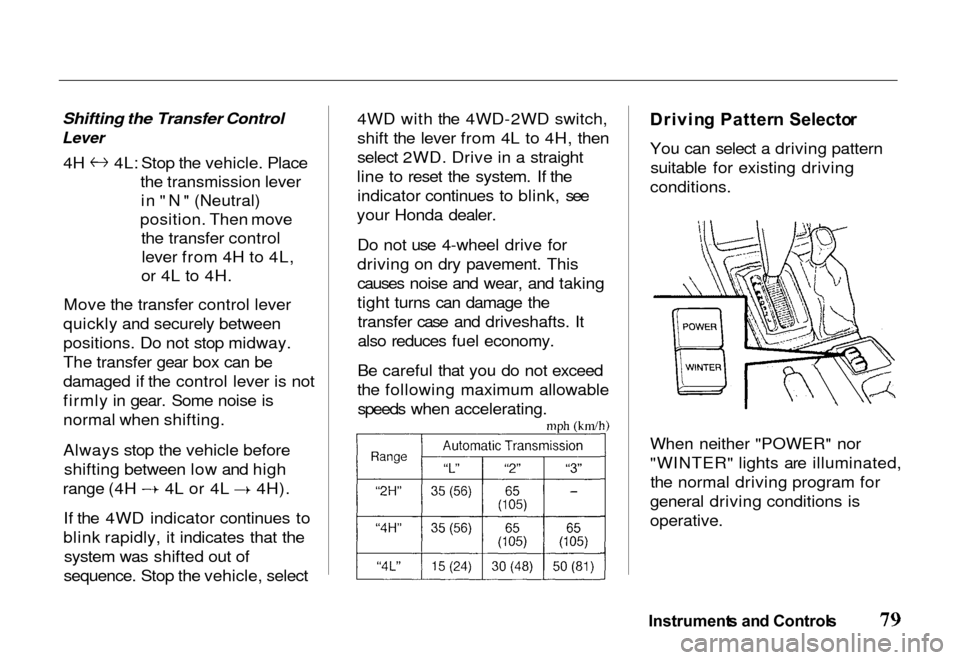
Be careful that you do not exceed
the following maximum allowable speeds when accelerating.
Drivin
g Patter n Selecto r
You can select a driving pattern suitable for existing driving
conditions.
When neither "POWER" nor
"WINTER" lights are illuminated, the normal driving program for
general driving conditions is
operative.
Instrument s an d Control s