2000 HONDA ODYSSEY maintenance schedule
[x] Cancel search: maintenance schedulePage 255 of 352
Air Cleane r Elemen t
The air cleaner element should be
cleaned or replaced according to the
time and distance recommendations
in the maintenance schedule.
Cleanin g (Sever e Conditions )
Clean the air cleaner element by
blowing compressed air through it in
the opposite direction to normal air
flow. If you do not have access to compressed air (such as a servicestation), ask your Honda dealer to do
this service.
Follow the replacement procedure
for removal and reinstallation.
Replacemen t
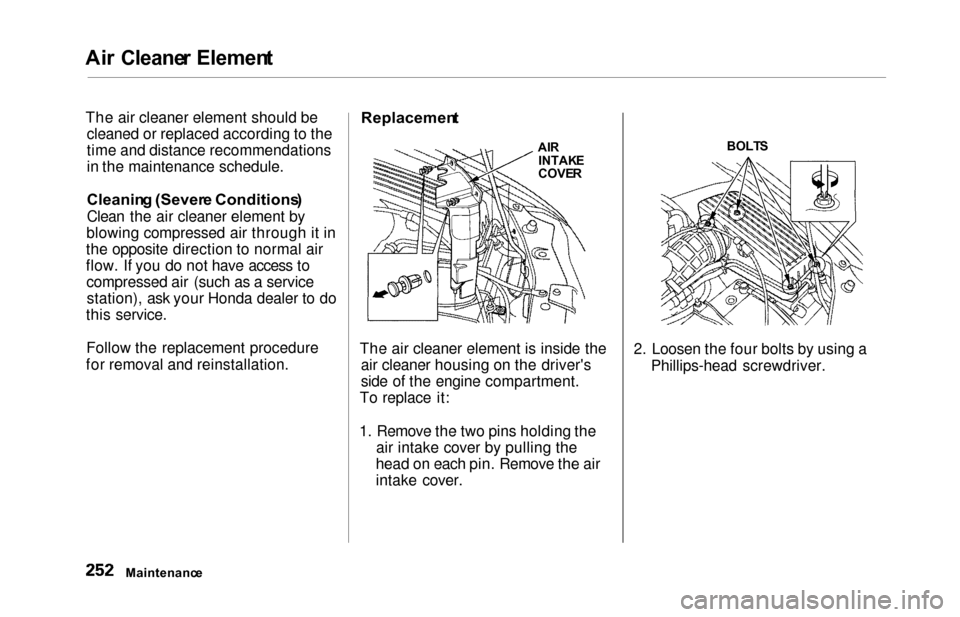
The air cleaner element is inside the
air cleaner housing on the driver's
side of the engine compartment.
To replace it:
1. Remove the two pins holding the air intake cover by pulling the
head on each pin. Remove the air
intake cover. 2. Loosen the four bolts by using a
Phillips-head screwdriver.
Maintenanc e AI
R
INTAK E
COVER BOLT
S
Page 257 of 352
Hood Latch , Spar k Plug s
Hood Latc h
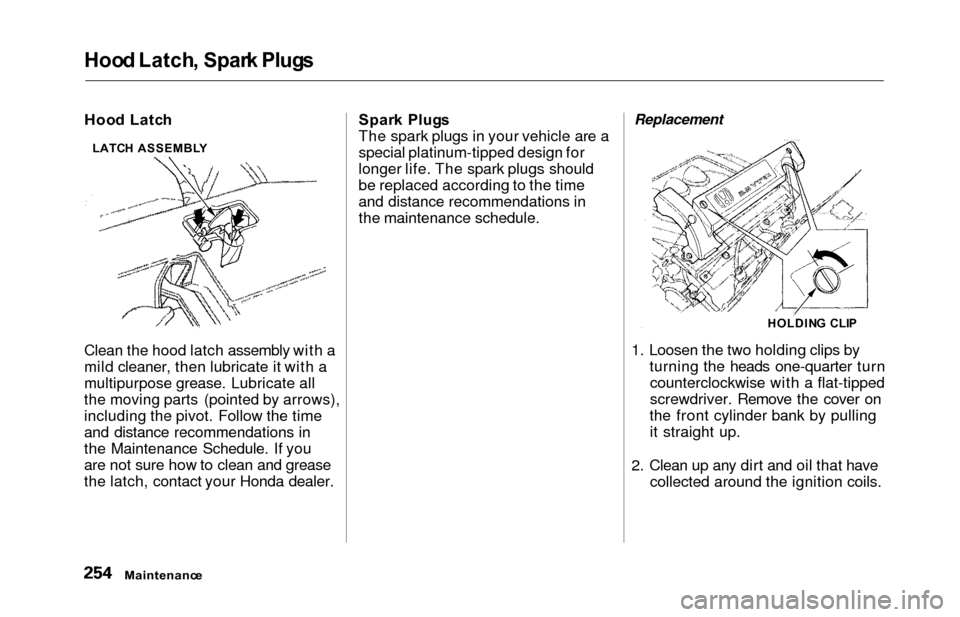
Clean the hood latch assembly with a
mild cleaner, then lubricate it with a
multipurpose grease. Lubricate all
the moving parts (pointed by arrows), including the pivot. Follow the time
and distance recommendations in
the Maintenance Schedule. If you
are not sure how to clean and grease
the latch, contact your Honda dealer. Spar
k Plug s
The spark plugs in your vehicle are a
special platinum-tipped design for
longer life. The spark plugs should
be replaced according to the time
and distance recommendations in
the maintenance schedule.Replacement
1. Loosen the two holding clips by turning the heads one-quarter turncounterclockwise with a flat-tipped
screwdriver. Remove the cover on
the front cylinder bank by pulling it straight up.
2. Clean up any dirt and oil that have collected around the ignition coils.
Maintenanc e
LATCH ASSEMBL Y
HOLDING CLI P
Page 266 of 352
Timing Belt , Tire s
Timin g Bel t
The timing belt should normally be replaced at the intervals shown in
the maintenance schedule.
Replace the belt at 60,000 miles (U.S.)
or 100,000 km (Canada) if you regu-
larly drive your vehicle in one or more of these conditions:
In very high temperatures
(over 110°F,43°C).
In very low temperatures
(under — 20°F, — 29°C).
Tire s
To safely operate your vehicle, your tires must be the proper type andsize, in good condition with adequate
tread, and correctly inflated. The
following pages give more detailed information on how and when tocheck air pressure, how to inspect
your tires for damage and wear, and
what to do when your tires need to be replaced.Inflatio n
Keeping the tires properly inflated
provides the best combination of
handling, tread life and riding comfort. Underinflated tires wear
unevenly, adversely affect handlingand fuel economy, and are more
likely to fail from being overheated. Overinflated tires can make your
vehicle ride more harshly, are more prone to damage from road hazards,and wear unevenly.
We recommend that you visually check your tires every day. If you
think a tire might be low, check it immediately with a tire gauge.
CONTINUED
Maintenanc e
Using tires that are excessively
worn or improperly inflated can
cause a crash in which you can be seriously hurt or killed.
Follow all instructions in this
owner's manual regarding tire inflation and maintenance.
Page 284 of 352
Storing You r Vehicl e
If you need to park your vehicle for
an extended period (more than one
month), there are several things you
should do to prepare it for storage.
Proper preparation helps prevent
deterioration and makes it easier to
get your vehicle back on the road. If
possible, store your vehicle indoors.
Fill the fuel tank.Change the engine oil and filter
(see page 241).
Wash and dry the exterior
completely.
Clean the interior. Make sure the
carpeting, floor mats, etc. are
completely dry.
Leave the parking brake off. Put
the transmission in Park.
Block the rear wheels.
If the vehicle is to be stored for a
longer period, it should be
supported on jackstands so the
tires are off the ground. Leave one window open slightly (if
the vehicle is being stored
indoors).
Disconnect the battery.
Support the front and rear wiper
blade arms with a folded towel or rag so they do not touch the
windshield.
To minimize sticking, apply a silicone spray lubricant to all door
and tailgate seals. Also, apply a
vehicle body wax to the painted surfaces that mate with the door
and tailgate seals.
Cover the vehicle with a
"breathable" cover, one made
from a porous material such as cotton. Nonporous materials, such
as plastic sheeting, trap moisture,
which can damage the paint.
If possible, run the engine for a
while periodically (preferably once a month).
If you store your vehicle for 12
months or longer, have your Honda
dealer perform the inspections called
for in the 24 months/30,000 miles (48,000 km) maintenance schedule
(Normal Conditions) as soon as you
take it out of storage (see page 230).
The replacements called for in the maintenance schedule are not
needed unless the vehicle hasactually reached that time or mileage.
Maintenanc e
Page 331 of 352
Emissions Control s
The burning of gasoline in your
vehicle's engine produces several by-products. Some of these are carbon
monoxide (CO), oxides of nitrogen (NO
x) and hydrocarbons (HC).
Gasoline evaporating from the tank
also produces hydrocarbons. Con-
trolling the production of NOx, CO, and HC is important to the environ-
ment. Under certain conditions ofsunlight and climate, NOx and HC
react to form photochemical "smog." Carbon monoxide does not contri-
bute to smog creation, but it is a
poisonous gas.
Th e Clea n Ai r Ac t
The United States Clean Air Act*
sets standards for automobile
emissions. It also requires that
automobile manufacturers explain to
owners how their emissions controls
work and what to do to maintain
them. This section summarizes how
the emissions controls work.
Scheduled maintenance is on page
230.
* In Canada, Honda vehicles comply
with the Canadian Motor Vehicle
Safety Standards (CMVSS) for
Emissions valid at the time they are
manufactured.
Crankcas e Emission s Contro l
System
Your vehicle has a Positive
Crankcase Ventilation System. This
keeps gasses that build up in the engine's crankcase from going into
the atmosphere. The Positive Crank- case Ventilation valve routes them
from the crankcase back to the
intake manifold. They are then drawn into the engine and burned.
Evaporativ e Emission s Contro l
Syste m
As gasoline evaporates in the fuel tank, an evaporative emissions
control canister filled with charcoaladsorbs the vapor. It is stored in this
canister while the engine is off. After
the engine is started and warmed up,
the vapor is drawn into the engine and burned during driving.
Technica l Informatio n
Page 347 of 352
Index
Leaking of Exhaust into Vehicle ... 53
Light Control Switch..................... 125
Lights Bulb Replacement..................... 272
Indicator........................................ 57
Interior........................................ 125
Parking.......................................... 66
Turn Signal................................... 68
Load Limits............................. 198, 218
LOCK (Ignition Key Position)....... 7 8
Locks Anti-theft Steering Column........ 78
Fuel Fill Door............................ . 189
Glove Box.................................... . 87
Lockout Prevention..................... 80
Power Door.................................. 79
Sliding Doors................................ 88
Tailgate......................................... 85
Low Coolant Level......................... 193
Low Fuel Indicator.......................... 61
Low Oil Pressure Indicator.... 58, 307
Lubricant Specifications Chart.... 322
Luggage.......................................... 197 Maintenance...................................
225
Owner Maintenance Checks.... 237
Record.................................. 235-236
Required Indicator...................... . 64
Safety.......................................... . 226
Schedule.............................. 230-234
Malfunction Indicator Lamp.. 58, 309
Manual Sliding Doors...................... 88
Maximum Allowable Speeds........ 207
Meters, Gauges................................ 62
Methanol in Gasoline.................... 326
Mirrors, Adjusting.........................
115
Moving the Second Row Bucket
Seat.............................................. 106
Neutral Gear Position.................... 206
New Vehicle Break-in ................... 188
NOTICE, Explanation of.................... i
Numbers, Identification................ 320
Octane Requirement, Gasoline.... 188
Odometer.......................................... 62
Odometer, Trip............................... . 63
Oil
Change, How to......................... 241
Change, When to....................... 230
Checking Engine....................... 192
Pressure Indicator............... 58, 307
Selecting Proper Viscosity Chart....................................... 240
ON (Ignition Key Position)............ 79
Opening the Hood......................... 190
Operation in Foreign Countries... 327
Outside Mirrors............................ . 115
Overheating, Engine..................... 305
Owner Maintenance Checks........ 237
Oxygenated Fuels.......................... 327
Paint Touch-up.............................. . 285
Panel Brightness Control............... 67
Park Gear Position......................... 205
Parking............................................ 209