Page 233 of 352
U.S. Owner s
Follow the Normal Conditions
Maintenance Schedule if the severe driving conditions
specified in the Severe
Conditions Maintenance
Schedule do not apply.
NOTE: If you only
OCCASIONALLY drive under a "severe" condition, you should
follow the Normal Conditions Maintenance Schedule.
Canadia n Owner s
Follow the Maintenance
Schedule for Severe Conditions.
#: Se e informatio n o n maintenanc e an d emission s warranty , las t column , pag e 229 .
Maintenanc e
Page 234 of 352
Service at the indicated distance or time, whichever comes first. Do the items in A, B , C as required for each distance/time interval. Follow this
schedule if the severe driving conditions described in the Severe Conditions Schedule on the next page do not apply.
Canadia n owners : Follow the schedule for Severe Conditions.
NOTE:Check engine oil and coolant at each fuel stop.
Check and adjust valve clearance, cold engine, if noisy.
Maintenanc e
#: See information on maintenance and emissions warranty, last
column, page 229. pag
e 26 6
Page 235 of 352
U.S. Owner s
Follow the Severe Conditions
Maintenance Schedule if you
drive your vehicle MAINLY
under one or more of the
following conditions: Driving less than 5 miles (8
km) per trip or, in freezing
temperatures, driving less than 10 miles (16 km) per trip.Driving in extremely hot [over 90°F (32°C)] conditions.
Extensive idling or long
periods of stop-and-go driving.
Trailer towing, driving with a roof top carrier, or driving in
mountainous conditions.Driving on muddy, dusty, or
de-iced roads.
*1: Refer to page 263 for replacement
information under special driving
conditions.
*2: Refer to page 262 for replacement
information under special driving
conditions.
# : See page 229.
Canadia n Owner s
Follow the Maintenance
Schedule for Severe Conditions.
Maintenanc e
Page 238 of 352
Required Maintenanc e Recor d (fo r Norma l an d Sever e Schedules )
You or the servicing dealer can record all completed maintenance here, whether you follow the schedule for normal conditions (page 230) or severe
conditions (page 232). Keep the receipts for all work done on your vehicle.
Maintenanc e
CONTINUED
Page 243 of 352
Engine Oi l
The oil container may also display
the API Certification seal. Make sure
it says "For Gasoline Engines."
AP I CERTIFICATIO N SEA L
The SAE numbers tell you the oil's
viscosity or weight. Select the oil for
your vehicle according to this chart.
An oil with a viscosity of 5W-30 ispreferred for improved fuel economy
and year-round protection in your
Honda. You may use a 10W-30 oil if
the temperature in your area never
goes below 20°F(— 7°C).
Syntheti c Oi l
You may use a synthetic motor oil if it meets the same requirements
given for conventional motor oil:energy conserving, a service
classification of SJ, and the proper
weight as shown on the chart. When
using synthetic oil, you must follow
the oil and filter change intervals
given in the maintenance schedule.
Maintenanc e
Ambient Temperatur e
Page 244 of 352

Engine Oi l
Additive s
Your Honda does not need any oil additives. Purchasing additives for
the engine or transmission will not increase your vehicle's performance
or longevity. It only increases the
cost of operating your vehicle. Changin
g th e Oi l an d Filte r
Always change the oil and filter according to the time and distance (miles/kilometers) recommenda-
tions in the maintenance schedule.
The oil and filter collect contami- nants that can damage your engine if
they are not removed regularly.
Changing the oil and filter requires
special tools and access from
underneath the vehicle. The vehicle should be raised on a service station-
type hydraulic lift for this service. Unless you have the knowledge and
proper equipment, you should have
this maintenance done by a skilled mechanic.
1. Run the engine until it reaches normal operating temperature,
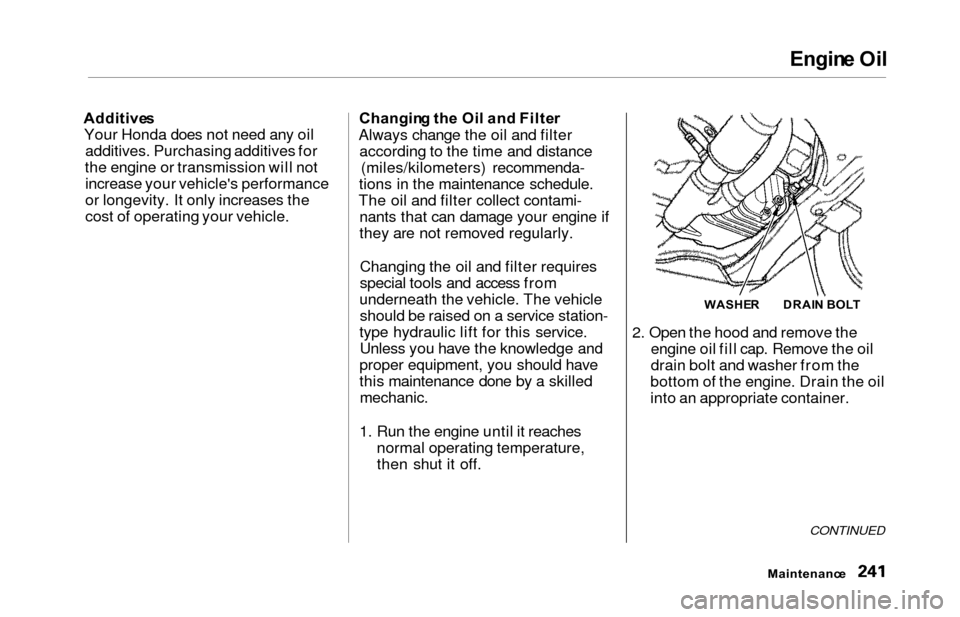
then shut it off. 2. Open the hood and remove the
engine oil fill cap. Remove the oil
drain bolt and washer from the
bottom of the engine. Drain the oil
into an appropriate container.
CONTINUED
Maintenanc e
WASHERDRAIN BOL T
Page 248 of 352
Cooling Syste m
Replacin g Engin e Coolan t
The cooling system should be completely drained and refilled with
new coolant according to the time
and distance recommendations in
the maintenance schedule. Only use Genuine Honda Antifreeze/Coolant.
Draining the coolant requires access
to the underside of the vehicle. Unless you have the tools and
knowledge, you should have this maintenance done by a skilled
mechanic.
1. Turn the ignition ON (II). Turn the heater temperature controldial fully clockwise. Turn the
ignition off.
Open the hood. Make sure the
engine and radiator are cool to the
touch.
2. Remove the radiator cap. 3. Loosen the drain plug on the
bottom of the radiator. Thecoolant will drain through thesplash guard. Loosen the drain
bolt.
CONTINUED
Maintenanc e
DRAIN PLU G DRAI
N BOL T
Page 252 of 352

Automatic Transmissio n Flui d
Check the fluid level with the engine
at normal operating temperature.
1. Park the vehicle on level ground. Shut off the engine.
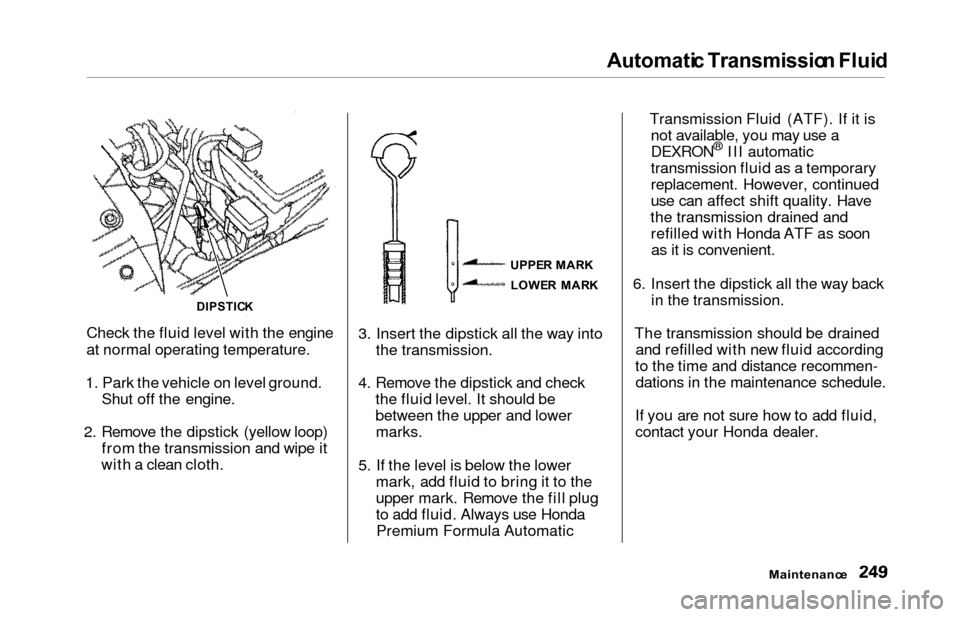
2. Remove the dipstick (yellow loop) from the transmission and wipe it
with a clean cloth. 3. Insert the dipstick all the way into
the transmission.
4. Remove the dipstick and check the fluid level. It should be
between the upper and lowermarks.
5. If the level is below the lower mark, add fluid to bring it to the
upper mark. Remove the fill plug
to add fluid. Always use HondaPremium Formula Automatic Transmission Fluid (ATF). If it is
not available, you may use a
DEXRON
® III automatic
transmission fluid as a temporary
replacement. However, continued
use can affect shift quality. Have
the transmission drained and refilled with Honda ATF as soonas it is convenient.
6. Insert the dipstick all the way back in the transmission.
The transmission should be drained and refilled with new fluid according
to the time and distance recommen- dations in the maintenance schedule.
If you are not sure how to add fluid,
contact your Honda dealer.
Maintenanc e
DIPSTICK
UPPER MAR K
LOWE R MAR K