2000 HONDA ODYSSEY storage
[x] Cancel search: storagePage 58 of 352

Instrument
s an d Control s
This section gives information about
the controls and displays that
contribute to the daily operation of
your Honda. All the essential
controls are within easy reach.
Control Locations............................
56
Indicator Lights...............................
. 57
Gauges.............................................. 62
Controls Near the Steering
Wheel........................................ 65
Headlights.................................... 66
Automatic Lighting Off
Feature......................................
67
Daytime Runnin
g Lights.............
67
Instrument
Pane
l Brightness.....
67
Turn
Signals................................
.
68
Windshield
Wipers.....................
. 68
Windshield Washers................... 70
Rear Window Wiper and Washer...................................... 70
Hazard Warning........................ 70
Rear Windo
w Defogger.............. 71
Steering Wheel Adjustment....... 72
Steering Wheel Controls................ 73
Cruise Control.............................. 73
Remote Audio Controls .............. 76
Keys and Locks................................ 76
Keys............................................... 76
Immobilizer System..................... 77
Ignition Switch............................. 78
Power Door Locks....................... 79
Remote Transmitter.................... 81
Childproof Door Locks............... 85
Tailgate......................................... 85
Glove Box..................................... 87
Manual Sliding Doors...................... 88
Power Sliding Doors........................ 89
HomeLink Universal Transmitter.................................. 95
Seats.................................................. 99
Passenger Seating....................... 99
Seat Adjustments....................... 100
Driver's Seat Power
Adjustments........................... 102
Armrests..................................... 103
Head Restraints......................... 104
Third Seat Access...................... 105 Moving the Second Row Bucket Seat............................ 106
Removing the Bucket Seats in the Second Row................. 108
Folding the Third Seat.............. 109
Power Windows............................. 112
Mirrors............................................ 115
Parking Brake................................ 116
Digital Clock................................... 117 Center Table................................... 117
Beverage Holder............................ 118
Sunglasses Holder......................... 120
Sun Visor......................................... 121
Vanity Mirror................................. 121 Rear Compartment........................ 122
Center Pocket................................ 122Coin Holder.................................... 122
Storage Box.................................... 123
Coat Hook....................................... 123
Accessory Power Sockets............. 124 Interior Lights................................ 125
Instrument s an d Control s
Page 125 of 352
Rear Compartment , Cente r Pocket , Coi n Holde r
Rear Compartmen t
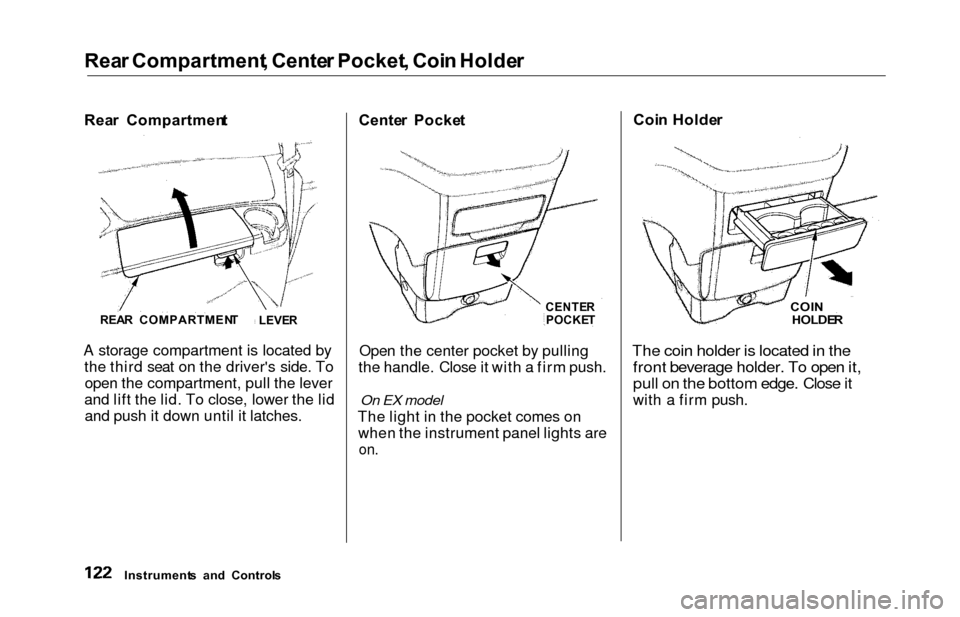
A storage compartment is located by the third seat on the driver's side. Toopen the compartment, pull the lever
and lift the lid. To close, lower the lid and push it down until it latches. Cente
r Pocke t
CENTER
POCKE T
Open the center pocket by pulling
the handle. Close it with a firm push.
On EX model
The light in the pocket comes on when the instrument panel lights are
on.
Coi n Holde r
COIN
HOLDE R
The coin holder is located in the
front beverage holder. To open it,
pull on the bottom edge. Close it
with a firm push.
Instrument s an d Control s
REA
R COMPARTMEN T
LEVER
Page 126 of 352
Storage Box , Coa t Hoo k
Storag e Bo x
STORAG E BO X
On EX model
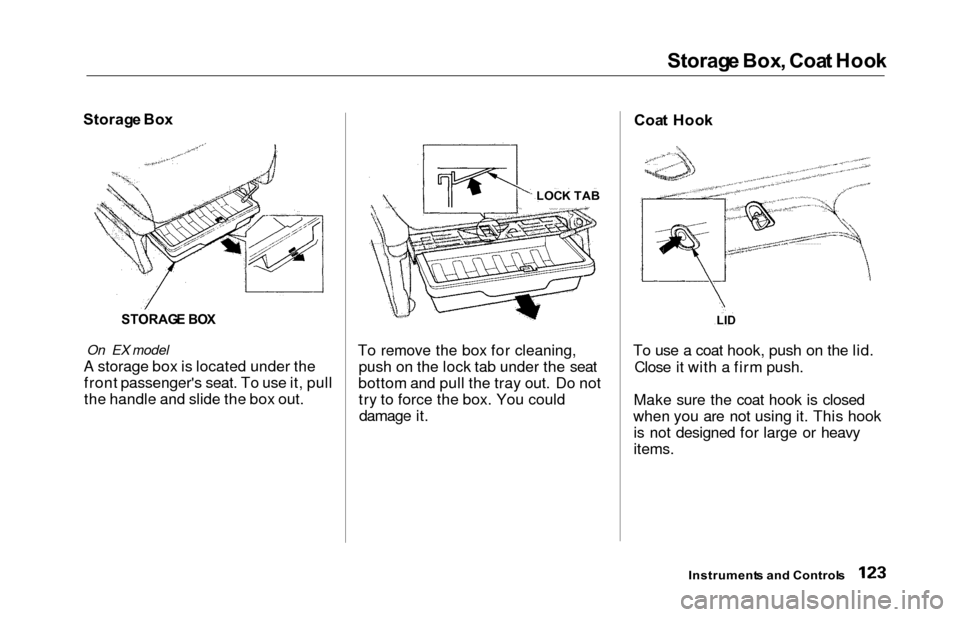
A storage box is located under the
front passenger's seat. To use it, pull
the handle and slide the box out. To remove the box for cleaning,
push on the lock tab under the seat
bottom and pull the tray out. Do not try to force the box. You coulddamage it. Coa
t Hoo k
To use a coat hook, push on the lid. Close it with a firm push.
Make sure the coat hook is closed
when you are not using it. This hook is not designed for large or heavy
items.
Instrument s an d Control s
LID
LOC K TA B
Page 200 of 352
Carryin
g Carg o
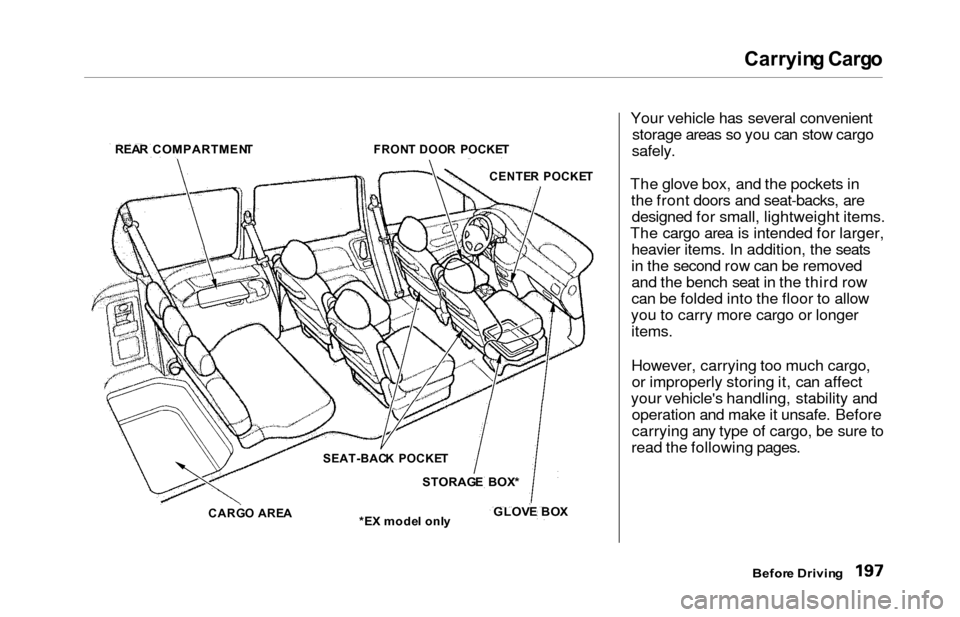
Your vehicle has several convenient storage areas so you can stow cargo
safely.
The glove box, and the pockets in the front doors and seat-backs, aredesigned for small, lightweight items.
The cargo area is intended for larger, heavier items. In addition, the seats
in the second row can be removed
and the bench seat in the third row
can be folded into the floor to allow
you to carry more cargo or longer items.
However, carrying too much cargo,or improperly storing it, can affect
your vehicle's handling, stability and operation and make it unsafe. Before
carrying any type of cargo, be sure to
read the following pages.
Before Drivin g
REA
R COMPARTMEN T
FRONT DOO R POCKE T
CENTE R POCKE T
SEAT-BAC K POCKE T
STORAG E BOX *
GLOV E BO X
*E X mode l onl y
CARG
O ARE A
Page 284 of 352
Storing You r Vehicl e
If you need to park your vehicle for
an extended period (more than one
month), there are several things you
should do to prepare it for storage.
Proper preparation helps prevent
deterioration and makes it easier to
get your vehicle back on the road. If
possible, store your vehicle indoors.
Fill the fuel tank.Change the engine oil and filter
(see page 241).
Wash and dry the exterior
completely.
Clean the interior. Make sure the
carpeting, floor mats, etc. are
completely dry.
Leave the parking brake off. Put
the transmission in Park.
Block the rear wheels.
If the vehicle is to be stored for a
longer period, it should be
supported on jackstands so the
tires are off the ground. Leave one window open slightly (if
the vehicle is being stored
indoors).
Disconnect the battery.
Support the front and rear wiper
blade arms with a folded towel or rag so they do not touch the
windshield.
To minimize sticking, apply a silicone spray lubricant to all door
and tailgate seals. Also, apply a
vehicle body wax to the painted surfaces that mate with the door
and tailgate seals.
Cover the vehicle with a
"breathable" cover, one made
from a porous material such as cotton. Nonporous materials, such
as plastic sheeting, trap moisture,
which can damage the paint.
If possible, run the engine for a
while periodically (preferably once a month).
If you store your vehicle for 12
months or longer, have your Honda
dealer perform the inspections called
for in the 24 months/30,000 miles (48,000 km) maintenance schedule
(Normal Conditions) as soon as you
take it out of storage (see page 230).
The replacements called for in the maintenance schedule are not
needed unless the vehicle hasactually reached that time or mileage.
Maintenanc e
Page 297 of 352
Changing a Fla t Tir e
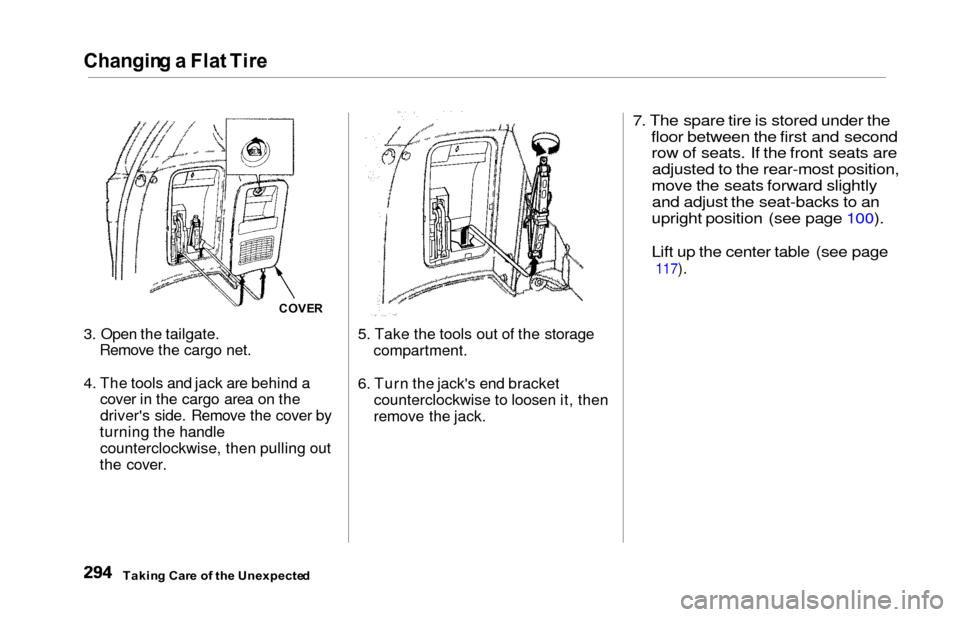
3. Open the tailgate.
Remove the cargo net.
4. The tools and jack are behind a cover in the cargo area on the
driver's side. Remove the cover by
turning the handle counterclockwise, then pulling out
the cover. 5. Take the tools out of the storage
compartment.
6. Turn the jack's end bracket counterclockwise to loosen it, then
remove the jack.
7. The spare tire is stored under the
floor between the first and second row of seats. If the front seats areadjusted to the rear-most position,
move the seats forward slightly and adjust the seat-backs to an
upright position (see page 100).
Lift up the center table (see page
117).
Takin g Car e o f th e Unexpecte d
COVER
Page 349 of 352

Index
Safety Labels, Location of.............. 54
Safety Messages................................ ii
Seat Belt, Additional Information.. 45 Lap/Shoulder Belt....................... 45Seat Belt Maintenance................ 47
Seat Belt System Components... 45
Seat Belts..................................... . 8, 45
Cleaning...................................... 286
Maintenance................................ . 47
Reminder Light and Beeper................................. 45, 57
System Components.................... 45
Tether Attachment Points.......... 43 Use During Pregnancy................ 20
Wearing a Lap/Shoulder Belt.... 15
Seats................................................. 99
Adjustments............................... 100
Folding the Third Seat .............. 109
Head Restraints ........................ 104
Passenger Seating....................... 99
Reclining the Second Seat ....... 101
Reclining the Third Seat ........... 101
Removing the Second
Seats........................................ 108
Third Seat Access ...................... 105
Serial Number................................ 320
Service Intervals............................ 230
Service Manual*............................ 337
Service Station Procedures .......... 189
Setting the Clock .......................... 117
Shifting the Automatic Transmission.............................. 205
Shift Lever Position Indicator...... 204 Shift Lock Release......................... 20 7
Side Marker Lights, Bulb
Replacement in.......................... 273
Signaling Turns................................ 68
Sliding Doors.................................... 88
Snow Tires...................................... 269
Solvent-type Cleaners.................... 284
Sound System........................ 155, 16 7
Spare Tire Inflating...................................... . 292
Specifications............................. 323
Spark Plugs..................................... 254
Specifications Charts..................... 322
Speed Control................................... 7 3
Speedometer.................................... 62
SRS, Additional Information........... 48 Additional Safety Precautions.... 52How the Automatic Seat Belt Tensioners Work..................... 50
How the SRS Indicator
Works........................................ 50
How Your Airbags Work............ 48
SRS Components ....................... . 48
SRS Service ................................. 51
SRS Indicator ............................. 50, 58
START (Ignition Key Position)..... 79
Starting the Engine........................ 203 In Cold Weather at High
Altitude.................................. . 203
With a Dead Battery................. 303
Steam Coming from Engine......... 305
Steering Wheel Adjustment.................................. . 72
Anti-theft Column Lock.............. 78
Stereo Sound System........... 155, 167
Storing Your Vehicle.................... 28 1
Storage Box.................................... 123
Sunglasses Holder......................... 120
Sun Visor......................................... 121
Supplemental Restraint System Servicing...................................... . 51
SRS Indicator......................... 50, 58
System Components.................... 48
Synthetic Oil................................... 240
Page 350 of 352

Index
Tachometer...................................... 62
Tailgate............................................. 85
Opening the.................................. 85
Open Monitor Light.................... 60
Taillights, Changing Bulbs in....... 275
Taking Care of the Unexpected .. 291
Tape Player ........................... 160, 181
Technical Descriptions DOT Tire Quality Grading....... 324
Driving in Foreign Countries... 327
Emissions Control Systems...... 328Oxygenated Fuels...................... 326
Three Way Catalytic Converter................................ 330
Temperature Gauge........................ 63 Tensioners, Seat Belts.................... 50Tether Attachment Points.............. 43
Theft Protection............................ .
186
Three Way Catalytic Converter... 330
Time, Setting the........................... 117
Timing Belt..................................... 263
Tire Chains..................................... 269
Tire, How to Change a Flat.......... 293 Tires...............................................
. 263
Air Pressure.............................. . 263
Balancing.................................... 266
Checking Wear.......................... 265
Compact Spare........................... 292
DOT Tire Quality Grading....... 324
Inflation....................................... 263
Inspection................................... 265 Replacing.................................... 267
Rotating....................................... 266
Snow........................................... . 269
Specifications............................ . 323
Tire Chains................................. 269
Towing
A Trailer ................................. 218
Emergency Wrecker................. 317
Traction Control System (TCS)... 213
Transmission
Checking Fluid Level................ 249
Fluid Selection........................... . 249
Identification Number............... 321
Shifting the Automatic.............. 205
Treadwear...................................... 324
Trip Meter......................................... 63
Turn Signals..................................... 68
Tools, Tire Changing ................... 293
Underside, Cleaning...................... 288
Unexpected, Taking Care
of the .......................................... 29 1
Uniform Tire Quality Grading .... 324
Unleaded Gasoline......................... 188
Upholstery Cleaning...................... 286
Used Oil, How to Dispose of........ 242
Vanity Mirror................................. 121
Vehicle Capacity Load.......... 198, 218
Vehicle Dimensions....................... 322
Vehicle Identification Number..... 320
Vehicle Storage.............................. 281
Ventilation............................. 133, 138
VIN ................................................. 320
Vinyl Cleaning ............................... 286
Viscosity, Oil.................................. . 240
CONTINUED