Page 241 of 280

Do not remove lamp bulbs unless they will be replaced immediately. If a
bulb is removed for an extended period of time, contaminants may enter
the lamp housings and affect performance.
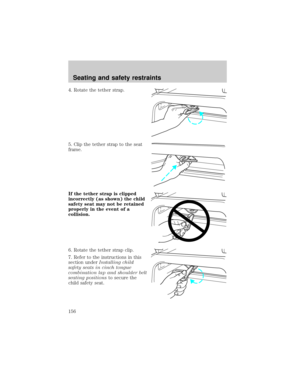
Replacing headlamp bulbs
To remove the headlamp bulb:
1. Make sure headlamp switch is in OFF position, then open the hood.
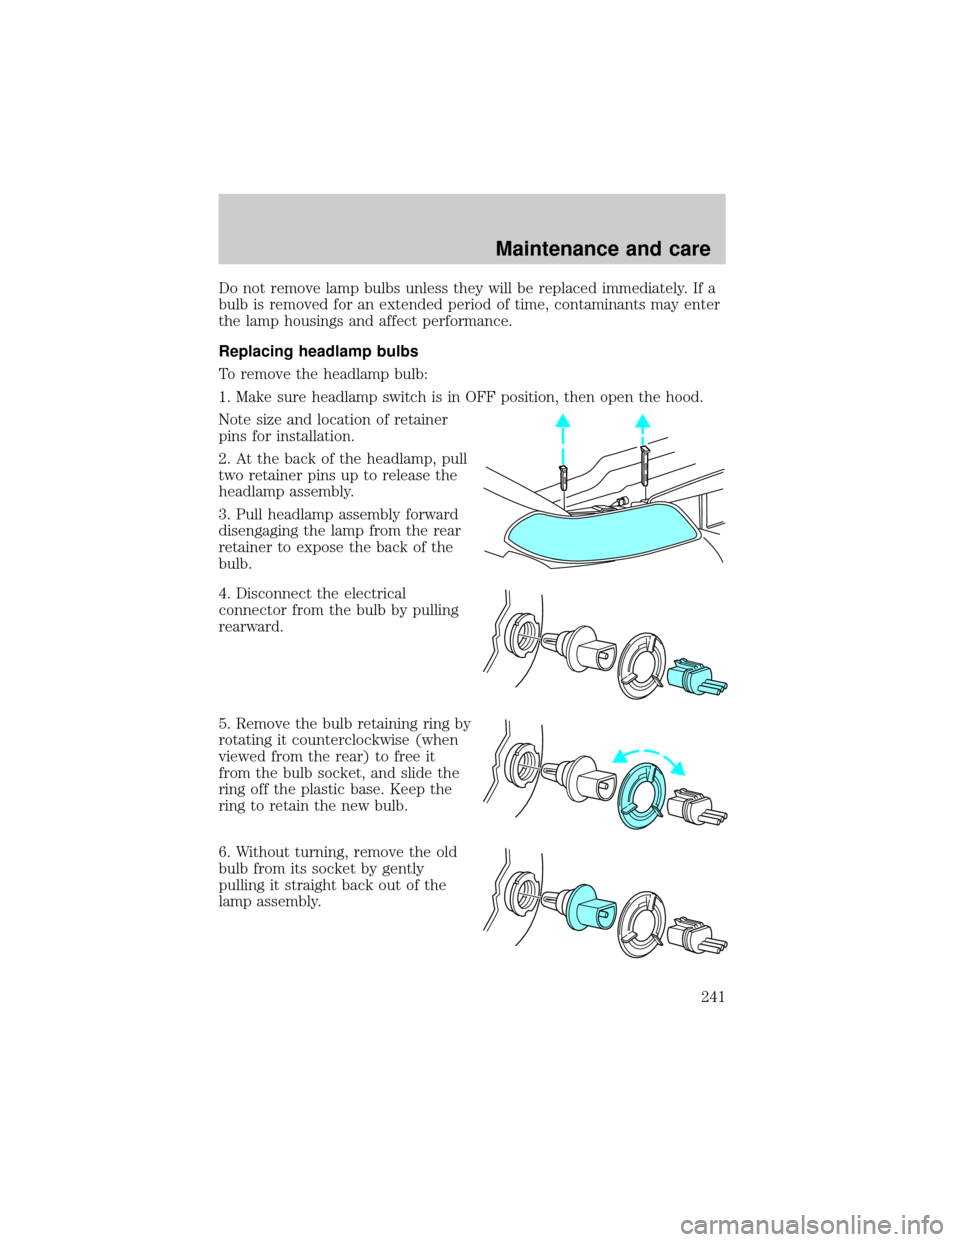
Note size and location of retainer
pins for installation.
2. At the back of the headlamp, pull
two retainer pins up to release the
headlamp assembly.
3. Pull headlamp assembly forward
disengaging the lamp from the rear
retainer to expose the back of the
bulb.
4. Disconnect the electrical
connector from the bulb by pulling
rearward.
5. Remove the bulb retaining ring by
rotating it counterclockwise (when
viewed from the rear) to free it
from the bulb socket, and slide the
ring off the plastic base. Keep the
ring to retain the new bulb.
6. Without turning, remove the old
bulb from its socket by gently
pulling it straight back out of the
lamp assembly.
Maintenance and care
241
Page 242 of 280

To install the new bulb:
Handle a halogen headlamp bulb carefully and keep out of
children's reach. Grasp the bulb only by its plastic base and do
not touch the glass. The oil from your hand could cause the bulb to
break the next time the headlamps are operated.
1. With the flat side of the new bulb's plastic base facing upward, insert
the glass end of the bulb into the lamp assembly. Turn the bulb left or
right to align the grooves in the plastic base with the tabs in the lamp
assembly. When the grooves are aligned, push the bulb into the lamp
assembly until the plastic base contacts the rear of the lamp assembly.
2. Install the bulb retaining ring over the plastic base until it contacts the
rear of the socket by rotating clockwise until you feel a ªstop.º
3. Connect the electrical connector into the rear of the plastic base until
it snaps, locking it into position.
4. Install the headlamp on vehicle by aligning the lamp with the rear
retainer, push rearward and secure with two retainer pins.
5. Turn the headlamps on and make sure they work properly. If the
headlamp was correctly aligned before you changed the bulb, you should
not need to align it again.
Maintenance and care
242
Page 243 of 280

Replacing front parking/turn signal bulbs
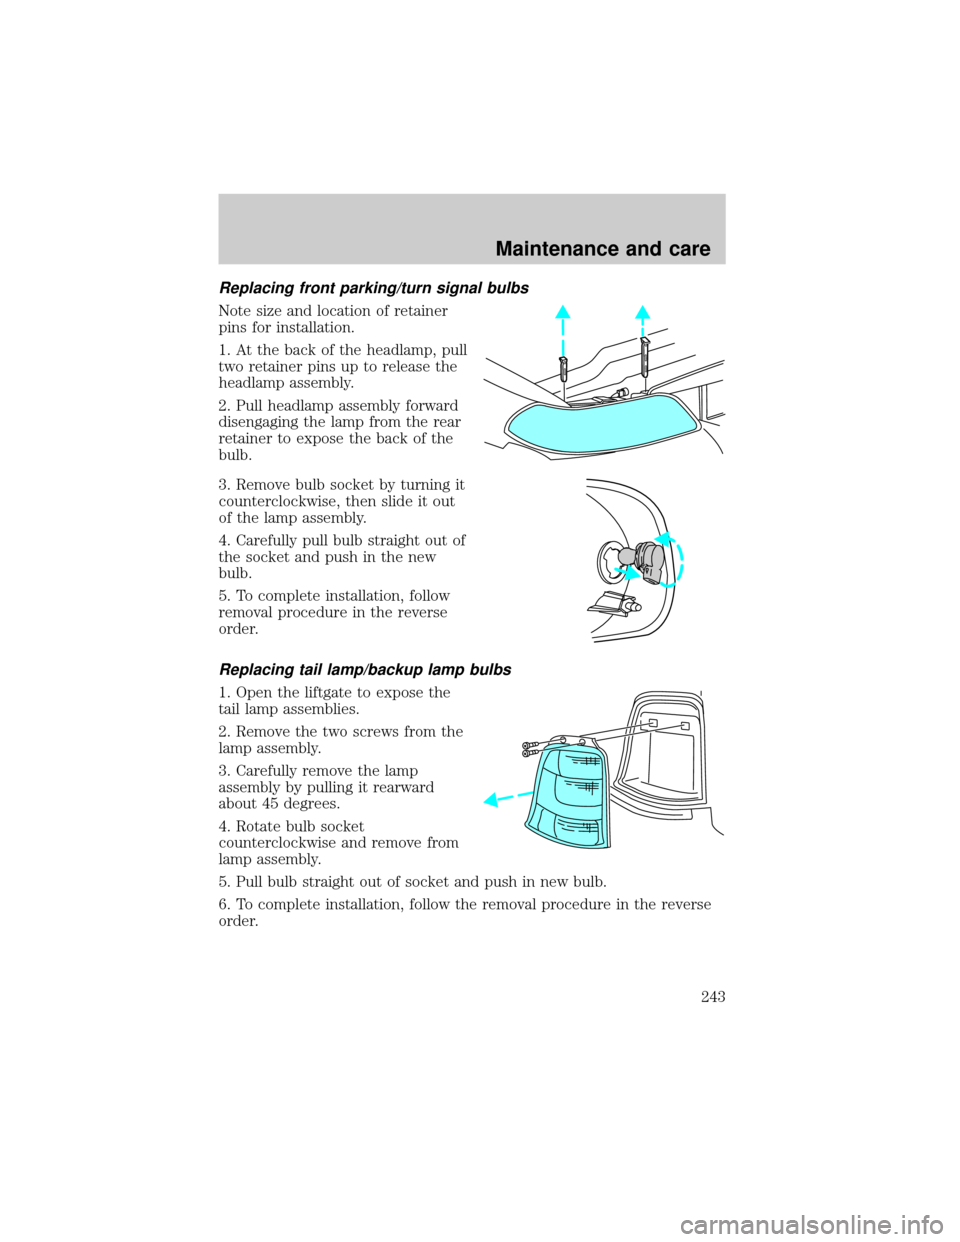
Note size and location of retainer
pins for installation.
1. At the back of the headlamp, pull
two retainer pins up to release the
headlamp assembly.
2. Pull headlamp assembly forward
disengaging the lamp from the rear
retainer to expose the back of the
bulb.
3. Remove bulb socket by turning it
counterclockwise, then slide it out
of the lamp assembly.
4. Carefully pull bulb straight out of
the socket and push in the new
bulb.
5. To complete installation, follow
removal procedure in the reverse
order.
Replacing tail lamp/backup lamp bulbs
1. Open the liftgate to expose the
tail lamp assemblies.
2. Remove the two screws from the
lamp assembly.
3. Carefully remove the lamp
assembly by pulling it rearward
about 45 degrees.
4. Rotate bulb socket
counterclockwise and remove from
lamp assembly.
5. Pull bulb straight out of socket and push in new bulb.
6. To complete installation, follow the removal procedure in the reverse
order.
Maintenance and care
243
Page 244 of 280
Replacing license plate lamp bulbs
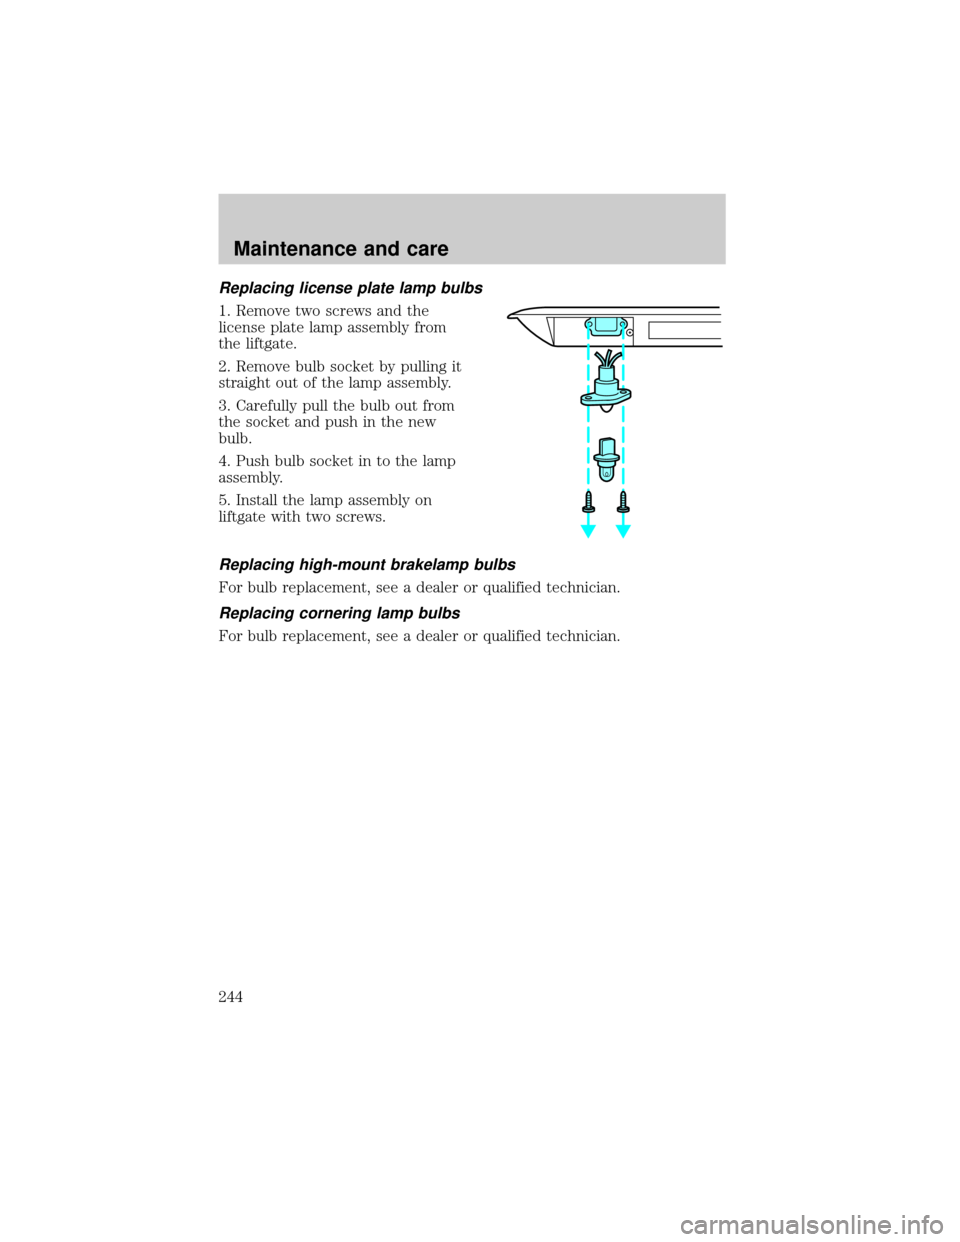
1. Remove two screws and the
license plate lamp assembly from
the liftgate.
2. Remove bulb socket by pulling it
straight out of the lamp assembly.
3. Carefully pull the bulb out from
the socket and push in the new
bulb.
4. Push bulb socket in to the lamp
assembly.
5. Install the lamp assembly on
liftgate with two screws.
Replacing high-mount brakelamp bulbs
For bulb replacement, see a dealer or qualified technician.
Replacing cornering lamp bulbs
For bulb replacement, see a dealer or qualified technician.
Maintenance and care
244
Page 245 of 280
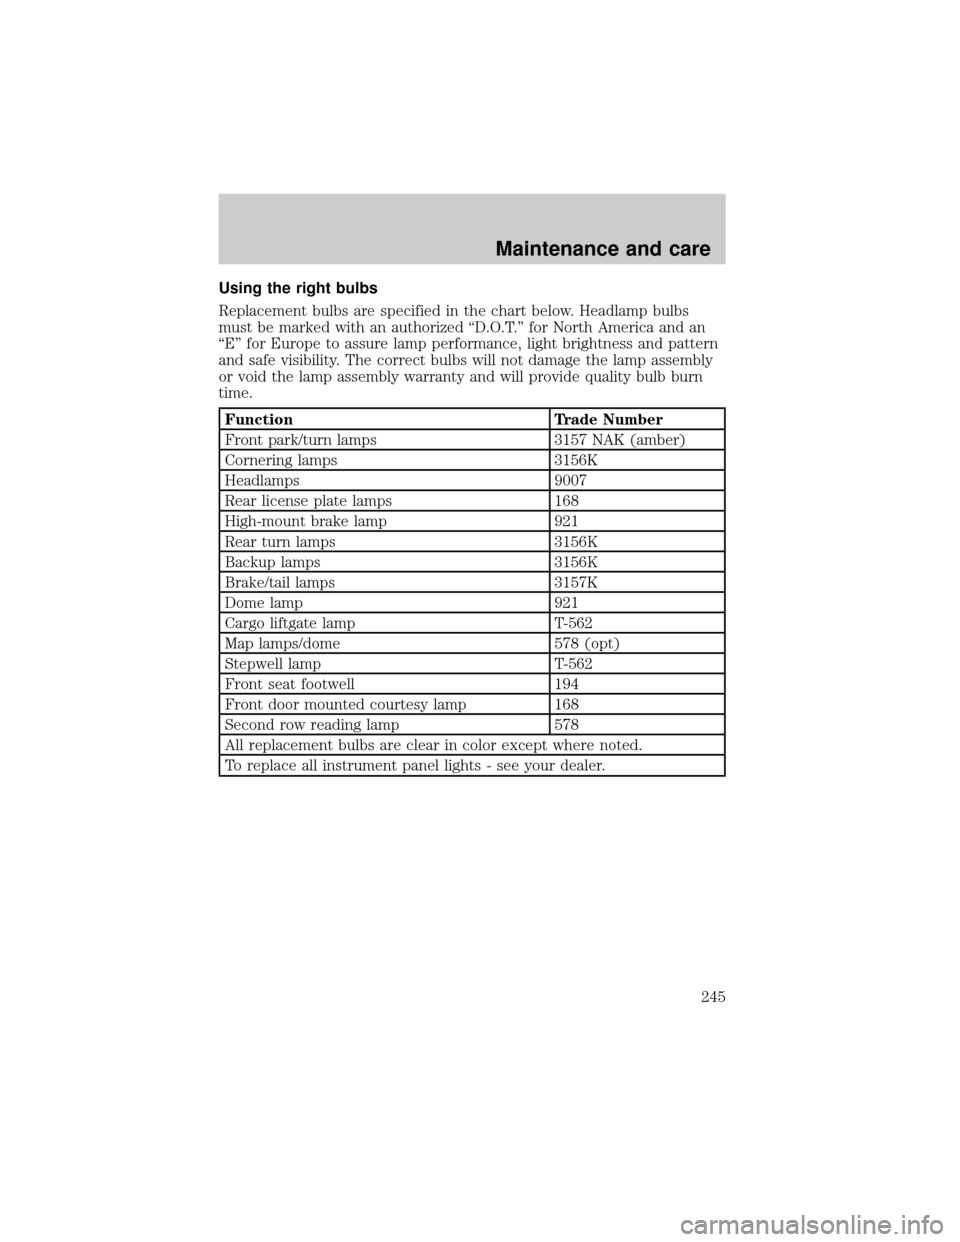
Using the right bulbs
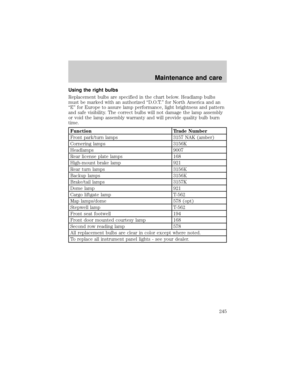
Replacement bulbs are specified in the chart below. Headlamp bulbs
must be marked with an authorized ªD.O.T.º for North America and an
ªEº for Europe to assure lamp performance, light brightness and pattern
and safe visibility. The correct bulbs will not damage the lamp assembly
or void the lamp assembly warranty and will provide quality bulb burn
time.
Function Trade Number
Front park/turn lamps 3157 NAK (amber)
Cornering lamps 3156K
Headlamps 9007
Rear license plate lamps 168
High-mount brake lamp 921
Rear turn lamps 3156K
Backup lamps 3156K
Brake/tail lamps 3157K
Dome lamp 921
Cargo liftgate lamp T-562
Map lamps/dome 578 (opt)
Stepwell lamp T-562
Front seat footwell 194
Front door mounted courtesy lamp 168
Second row reading lamp 578
All replacement bulbs are clear in color except where noted.
To replace all instrument panel lights - see your dealer.
Maintenance and care
245
Page 246 of 280

AIMING THE HEADLAMPS
Your vehicle is equipped with a Vehicle Headlamp Aim Device (VHAD)
on each headlamp body. Each headlamp may be properly aimed in the
horizontal direction (left/right) and the vertical position (up/down).
A non-zero bubble reading does not necessarily indicate out-of-aim
headlamps. If your vehicle is not positioned on a level surface, the slope
will be included in the level indicator. Therefore, vertical headlamp
adjustment should be performed only when beam direction appears to be
incorrect.
You will need one E8 Torx socket to make the adjustments.
If the vehicle has been in an accident, the vehicle's front structure
should be properly aligned before aiming the headlamps.
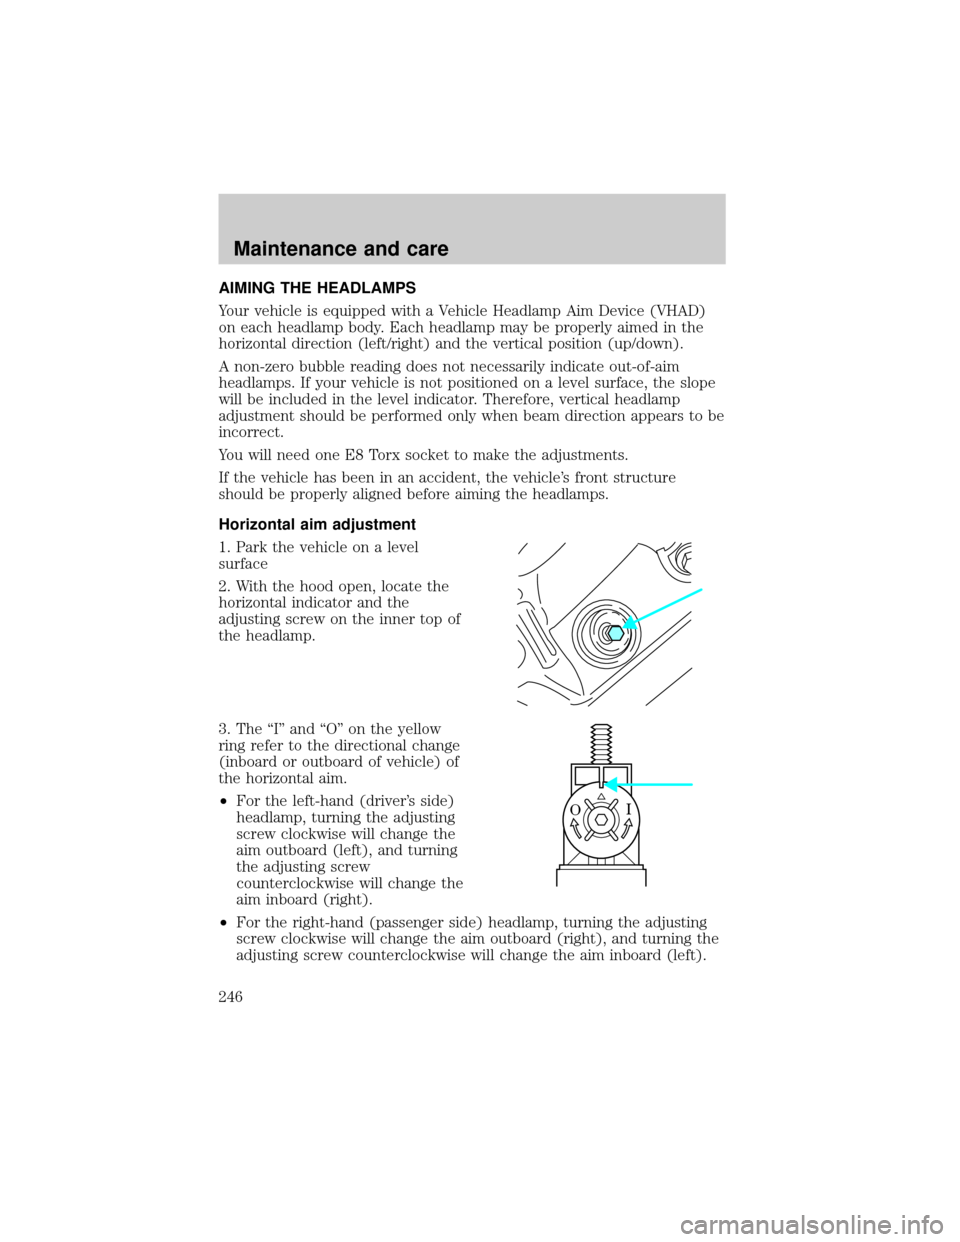
Horizontal aim adjustment
1. Park the vehicle on a level
surface
2. With the hood open, locate the
horizontal indicator and the
adjusting screw on the inner top of
the headlamp.
3. The ªIº and ªOº on the yellow
ring refer to the directional change
(inboard or outboard of vehicle) of
the horizontal aim.
²For the left-hand (driver's side)
headlamp, turning the adjusting
screw clockwise will change the
aim outboard (left), and turning
the adjusting screw
counterclockwise will change the
aim inboard (right).
²For the right-hand (passenger side) headlamp, turning the adjusting
screw clockwise will change the aim outboard (right), and turning the
adjusting screw counterclockwise will change the aim inboard (left).
I O
Maintenance and care
246
Page 247 of 280
4. Use an E8 Torx socket to turn the horizontal adjusting screw until the
ª0º mark on the yellow dial lines up with the reference mark on the
marker (as shown) when viewed directly from above.
5. When the horizontal aim has been adjusted, close the hood.
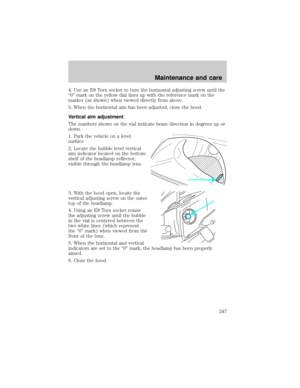
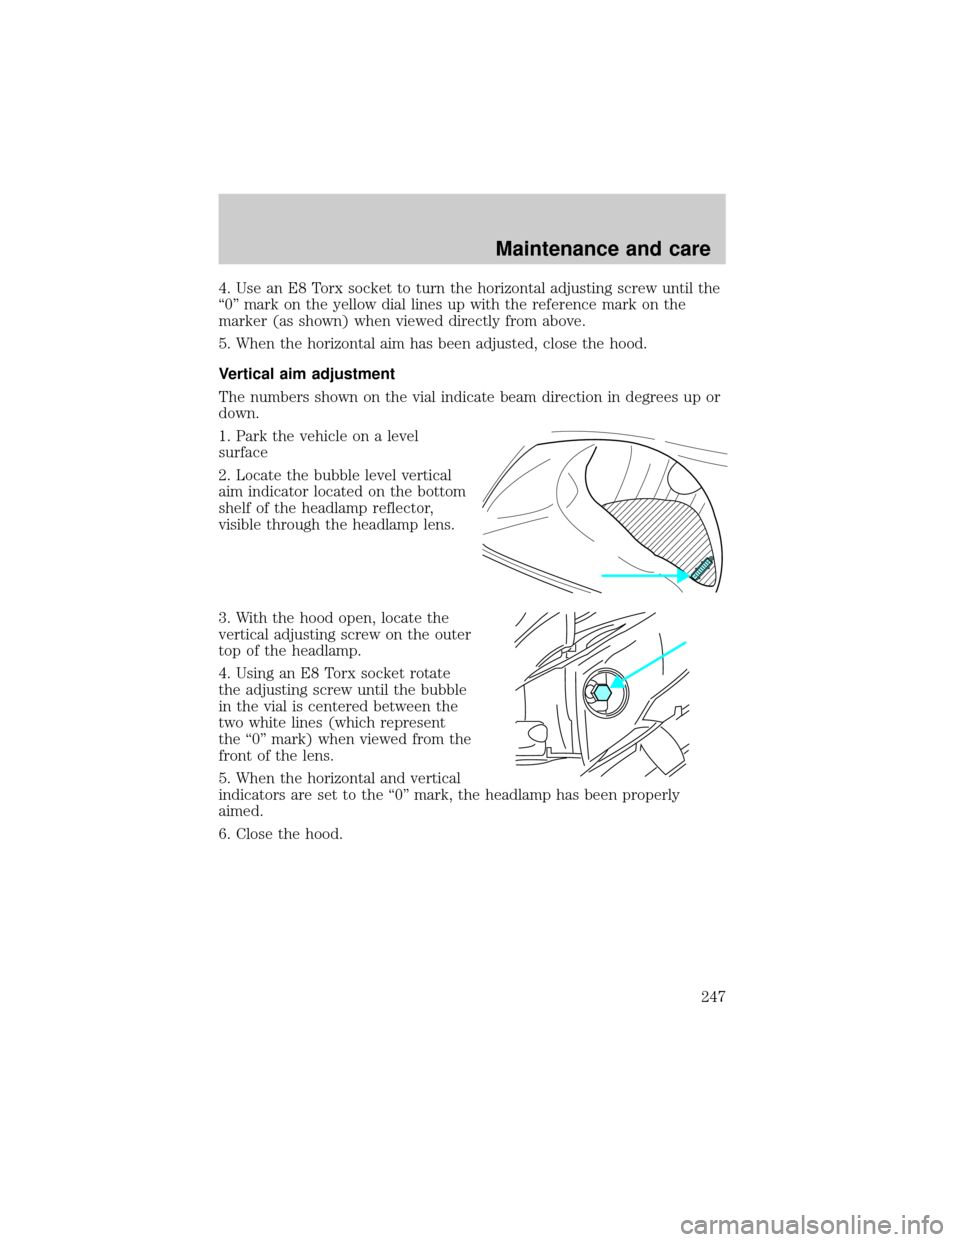
Vertical aim adjustment
The numbers shown on the vial indicate beam direction in degrees up or
down.
1. Park the vehicle on a level
surface
2. Locate the bubble level vertical
aim indicator located on the bottom
shelf of the headlamp reflector,
visible through the headlamp lens.
3. With the hood open, locate the
vertical adjusting screw on the outer
top of the headlamp.
4. Using an E8 Torx socket rotate
the adjusting screw until the bubble
in the vial is centered between the
two white lines (which represent
the ª0º mark) when viewed from the
front of the lens.
5. When the horizontal and vertical
indicators are set to the ª0º mark, the headlamp has been properly
aimed.
6. Close the hood.
DU
Maintenance and care
247
Page 248 of 280

CLEANING AND CARING FOR YOUR VEHICLE
Refer to the Customer Assistance chapter for a list of Ford-approved
cleaners, polishes and waxes.
Washing your vehicle
Wash your vehicle regularly with
cold or lukewarm water. Never use
strong detergents or soap. If your
vehicle is particularly dirty, use a
quality car wash detergent. Always
use a clean sponge, washing glove
or similar device and plenty of water
for best results. To avoid spots,
avoid washing when the hood is still
warm, immediately after or during
exposure to strong sunlight.
During winter months, it is especially important to wash the vehicle on a
regular basis. Large quantities of dirt and road salt are difficult to
remove and also cause damage to the vehicle.
Any gasoline spilled on the vehicle or deposits such as bird droppings
should be washed and sponged off as soon as possible. Deposits not
removed promptly can cause damage to the vehicle's paintwork.
Remove any exterior accessories, such as antennas, before entering a car
wash. If you have wax applied to the vehicle at a commercial car wash, it
is recommended that you clean the wiper blades and windshield as
described inCleaning the wiper blades and windshield.
After washing, apply the brakes several times to dry them.
Waxing your vehicle
Waxing your vehicle on a regular basis will reduce minor scratches and
paint damage.
Wax when water stops beading on the surface. This could be every three
or four months, depending on operating conditions.
Use only carnauba or synthetic-based waxes. Use a cleaning fluid with a
clean cloth to remove any bugs before waxing your vehicle. Use tar
remover to remove any tar spots.
Avoid getting wax on the windshield, or on any surfaces which appear
coarse or bumpy. If you have wax applied at a commercial car wash, it is
Maintenance and care
248