2000 DODGE NEON torque
[x] Cancel search: torquePage 1054 of 1285
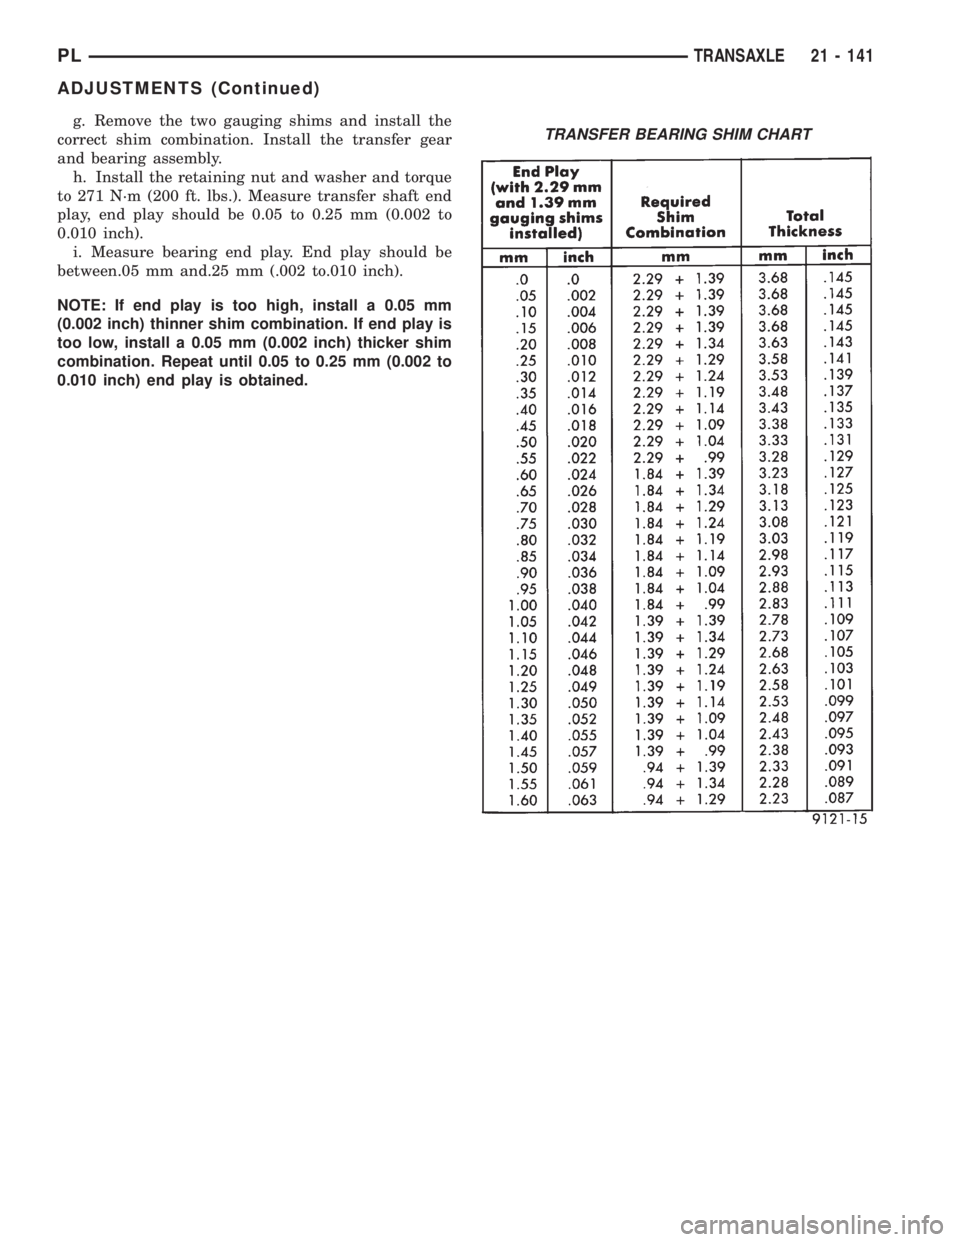
g. Remove the two gauging shims and install the
correct shim combination. Install the transfer gear
and bearing assembly.
h. Install the retaining nut and washer and torque
to 271 N´m (200 ft. lbs.). Measure transfer shaft end
play, end play should be 0.05 to 0.25 mm (0.002 to
0.010 inch).
i. Measure bearing end play. End play should be
between.05 mm and.25 mm (.002 to.010 inch).
NOTE: If end play is too high, install a 0.05 mm
(0.002 inch) thinner shim combination. If end play is
too low, install a 0.05 mm (0.002 inch) thicker shim
combination. Repeat until 0.05 to 0.25 mm (0.002 to
0.010 inch) end play is obtained.TRANSFER BEARING SHIM CHART
PLTRANSAXLE 21 - 141
ADJUSTMENTS (Continued)
Page 1063 of 1285
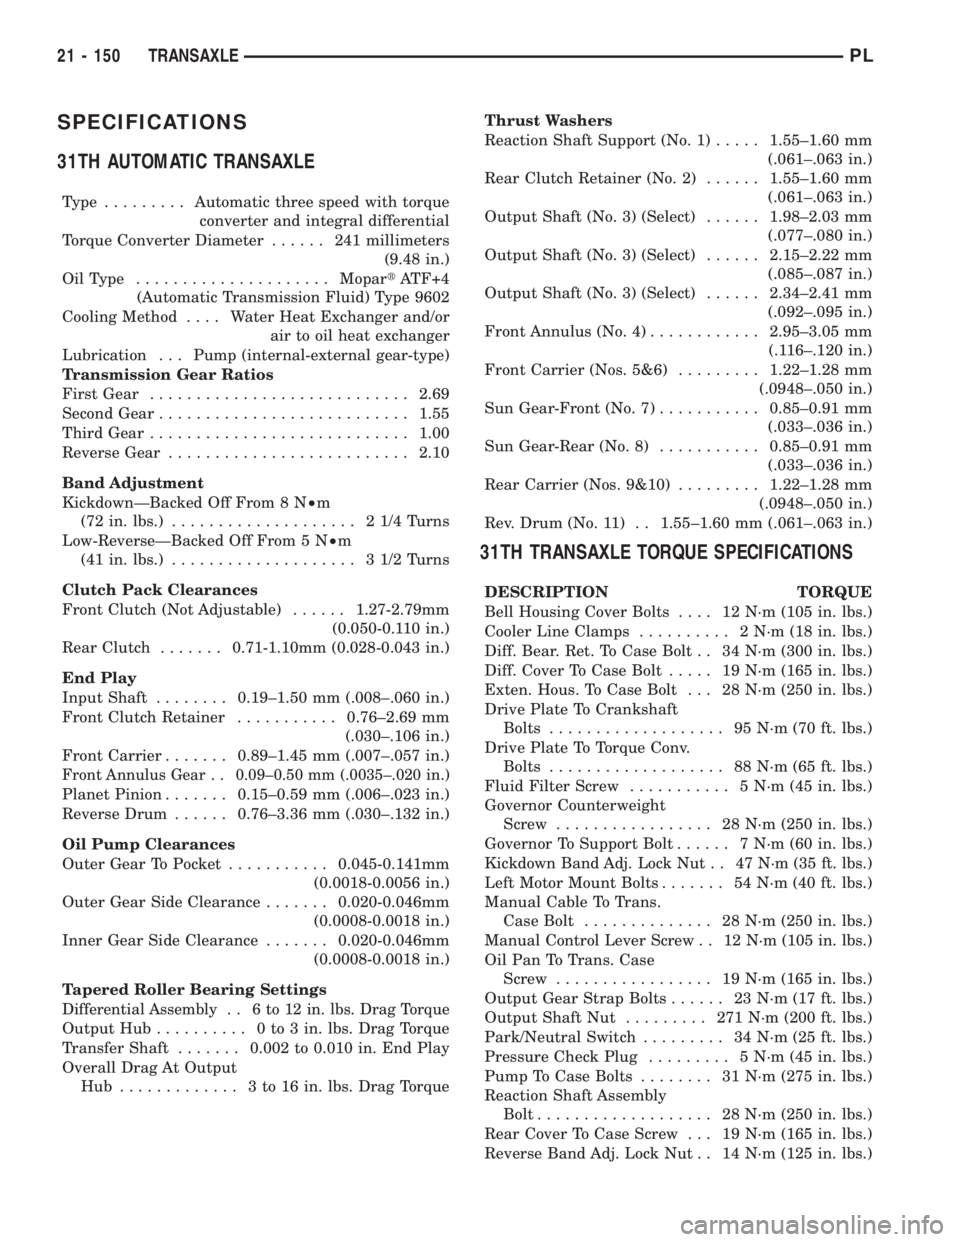
SPECIFICATIONS
31TH AUTOMATIC TRANSAXLE
Type .........Automatic three speed with torque
converter and integral differential
Torque Converter Diameter...... 241millimeters
(9.48 in.)
OilType .....................MopartATF+4
(Automatic Transmission Fluid) Type 9602
Cooling Method.... Water Heat Exchanger and/or
air to oil heat exchanger
Lubrication . . . Pump (internal-external gear-type)
Transmission Gear Ratios
First Gear............................2.69
Second Gear...........................1.55
Third Gear............................1.00
Reverse Gear..........................2.10
Band Adjustment
KickdownÐBacked Off From 8 N²m
(72 in. lbs.).................... 21/4Turns
Low-ReverseÐBacked Off From 5 N²m
(41 in. lbs.).................... 31/2Turns
Clutch Pack Clearances
Front Clutch (Not Adjustable)......1.27-2.79mm
(0.050-0.110 in.)
Rear Clutch.......0.71-1.10mm (0.028-0.043 in.)
End Play
Input Shaft........0.19±1.50 mm (.008±.060 in.)
Front Clutch Retainer...........0.76±2.69 mm
(.030±.106 in.)
Front Carrier.......0.89±1.45 mm (.007±.057 in.)
Front Annulus Gear . . 0.09±0.50 mm (.0035±.020 in.)
Planet Pinion.......0.15±0.59 mm (.006±.023 in.)
Reverse Drum......0.76±3.36 mm (.030±.132 in.)
Oil Pump Clearances
Outer Gear To Pocket...........0.045-0.141mm
(0.0018-0.0056 in.)
Outer Gear Side Clearance.......0.020-0.046mm
(0.0008-0.0018 in.)
Inner Gear Side Clearance.......0.020-0.046mm
(0.0008-0.0018 in.)
Tapered Roller Bearing Settings
Differential Assembly . . 6 to 12 in. lbs. Drag Torque
Output Hub.......... 0to3in.lbs. Drag Torque
Transfer Shaft.......0.002 to 0.010 in. End Play
Overall Drag At Output
Hub ............. 3to16in.lbs. Drag TorqueThrust Washers
Reaction Shaft Support (No. 1).....1.55±1.60 mm
(.061±.063 in.)
Rear Clutch Retainer (No. 2)......1.55±1.60 mm
(.061±.063 in.)
Output Shaft (No. 3) (Select)......1.98±2.03 mm
(.077±.080 in.)
Output Shaft (No. 3) (Select)......2.15±2.22 mm
(.085±.087 in.)
Output Shaft (No. 3) (Select)......2.34±2.41 mm
(.092±.095 in.)
Front Annulus (No. 4)............2.95±3.05 mm
(.116±.120 in.)
Front Carrier (Nos. 5&6).........1.22±1.28 mm
(.0948±.050 in.)
Sun Gear-Front (No. 7)...........0.85±0.91 mm
(.033±.036 in.)
Sun Gear-Rear (No. 8)...........0.85±0.91 mm
(.033±.036 in.)
Rear Carrier (Nos. 9&10).........1.22±1.28 mm
(.0948±.050 in.)
Rev. Drum (No. 11) . . 1.55±1.60 mm (.061±.063 in.)
31TH TRANSAXLE TORQUE SPECIFICATIONS
DESCRIPTION TORQUE
Bell Housing Cover Bolts.... 12N´m(105 in. lbs.)
Cooler Line Clamps.......... 2N´m(18in.lbs.)
Diff. Bear. Ret. To Case Bolt . . 34 N´m (300 in. lbs.)
Diff. Cover To Case Bolt..... 19N´m(165 in. lbs.)
Exten. Hous. To Case Bolt . . . 28 N´m (250 in. lbs.)
Drive Plate To Crankshaft
Bolts................... 95N´m(70ft.lbs.)
Drive Plate To Torque Conv.
Bolts................... 88N´m(65ft.lbs.)
Fluid Filter Screw........... 5N´m(45in.lbs.)
Governor Counterweight
Screw................. 28N´m(250 in. lbs.)
Governor To Support Bolt...... 7N´m(60in.lbs.)
Kickdown Band Adj. Lock Nut . . 47 N´m (35 ft. lbs.)
Left Motor Mount Bolts....... 54N´m(40ft.lbs.)
Manual Cable To Trans.
Case Bolt.............. 28N´m(250 in. lbs.)
Manual Control Lever Screw . . 12 N´m (105 in. lbs.)
Oil Pan To Trans. Case
Screw................. 19N´m(165 in. lbs.)
Output Gear Strap Bolts...... 23N´m(17ft.lbs.)
Output Shaft Nut......... 271N´m(200 ft. lbs.)
Park/Neutral Switch......... 34N´m(25ft.lbs.)
Pressure Check Plug......... 5N´m(45in.lbs.)
Pump To Case Bolts........ 31N´m(275 in. lbs.)
Reaction Shaft Assembly
Bolt................... 28N´m(250 in. lbs.)
Rear Cover To Case Screw . . . 19 N´m (165 in. lbs.)
Reverse Band Adj. Lock Nut . . 14 N´m (125 in. lbs.)
21 - 150 TRANSAXLEPL
Page 1064 of 1285
DESCRIPTION TORQUE
Reverse Band Shaft Plug...... 7N´m(60in.lbs.)
Ring Gear Screw............ 95N´m(70ft.lbs.)
Speedo. To Ext. Hous. Screw . . . 7 N´m (60 in. lbs.)
Sprag Ret. To Transfer Case
Bolt................... 28N´m(250 in. lbs.)
Starter To Trans. Bell Bolts . . . 54 N´m (40 ft. lbs.)
Stirrup Strap Ret. Bolts..... 23N´m(200 in. lbs.)
Trans. To Cyl. Block Bolt...... 95N´m(70ft.lbs.)
Transfer Shaft Nut........ 271N´m(200 ft. lbs.)
Transfer Gear Strap Bolts..... 23N´m(17ft.lbs.)
Valve Body Assy. To Case
Bolts.................. 12N´m(105 in. lbs.)
Valve Body Screw............ 5N´m(45in.lbs.)
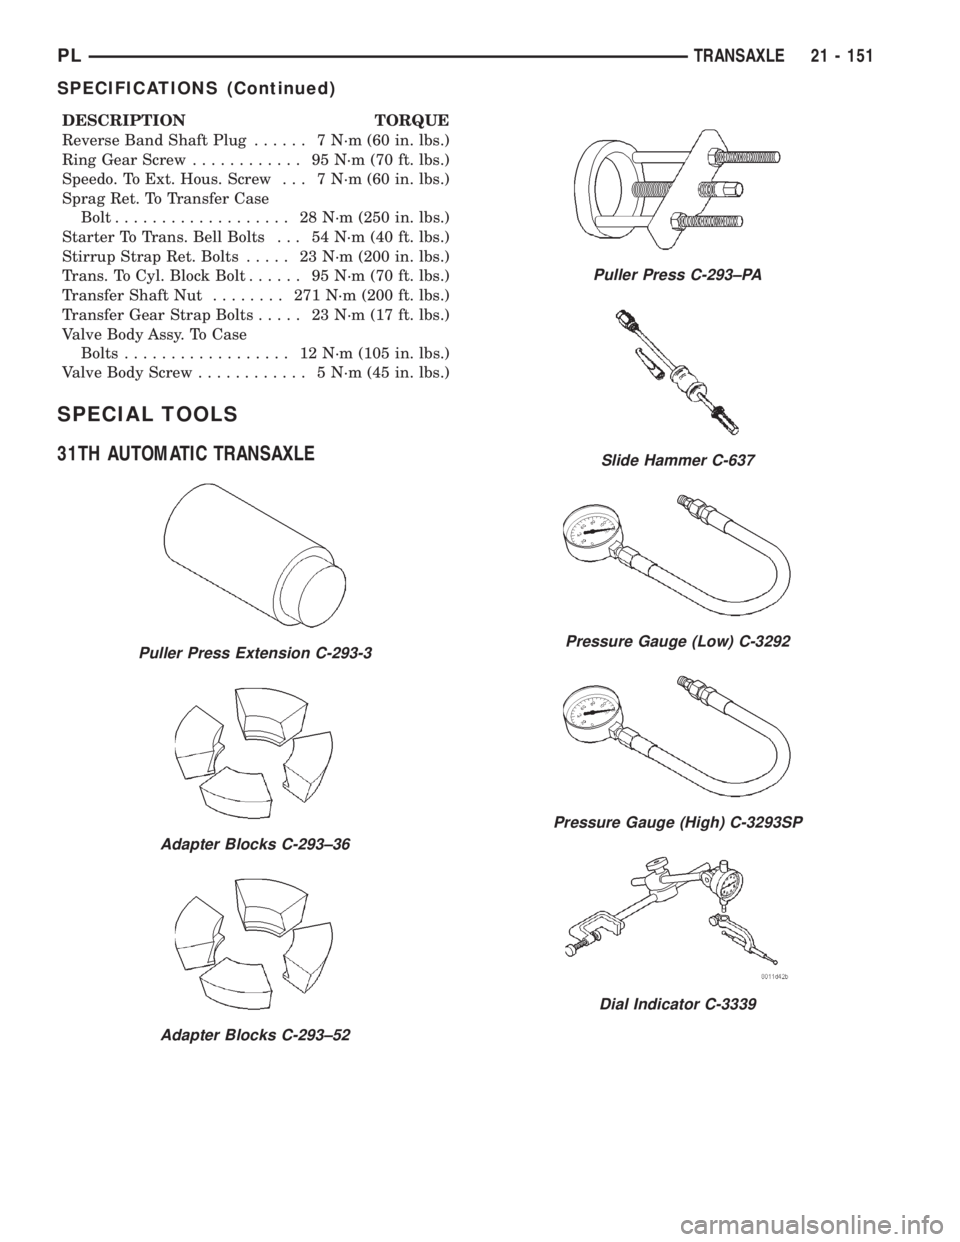
SPECIAL TOOLS
31TH AUTOMATIC TRANSAXLE
Puller Press Extension C-293-3
Adapter Blocks C-293±36
Adapter Blocks C-293±52
Puller Press C-293±PA
Slide Hammer C-637
Pressure Gauge (Low) C-3292
Pressure Gauge (High) C-3293SP
Dial Indicator C-3339
PLTRANSAXLE 21 - 151
SPECIFICATIONS (Continued)
Page 1065 of 1285
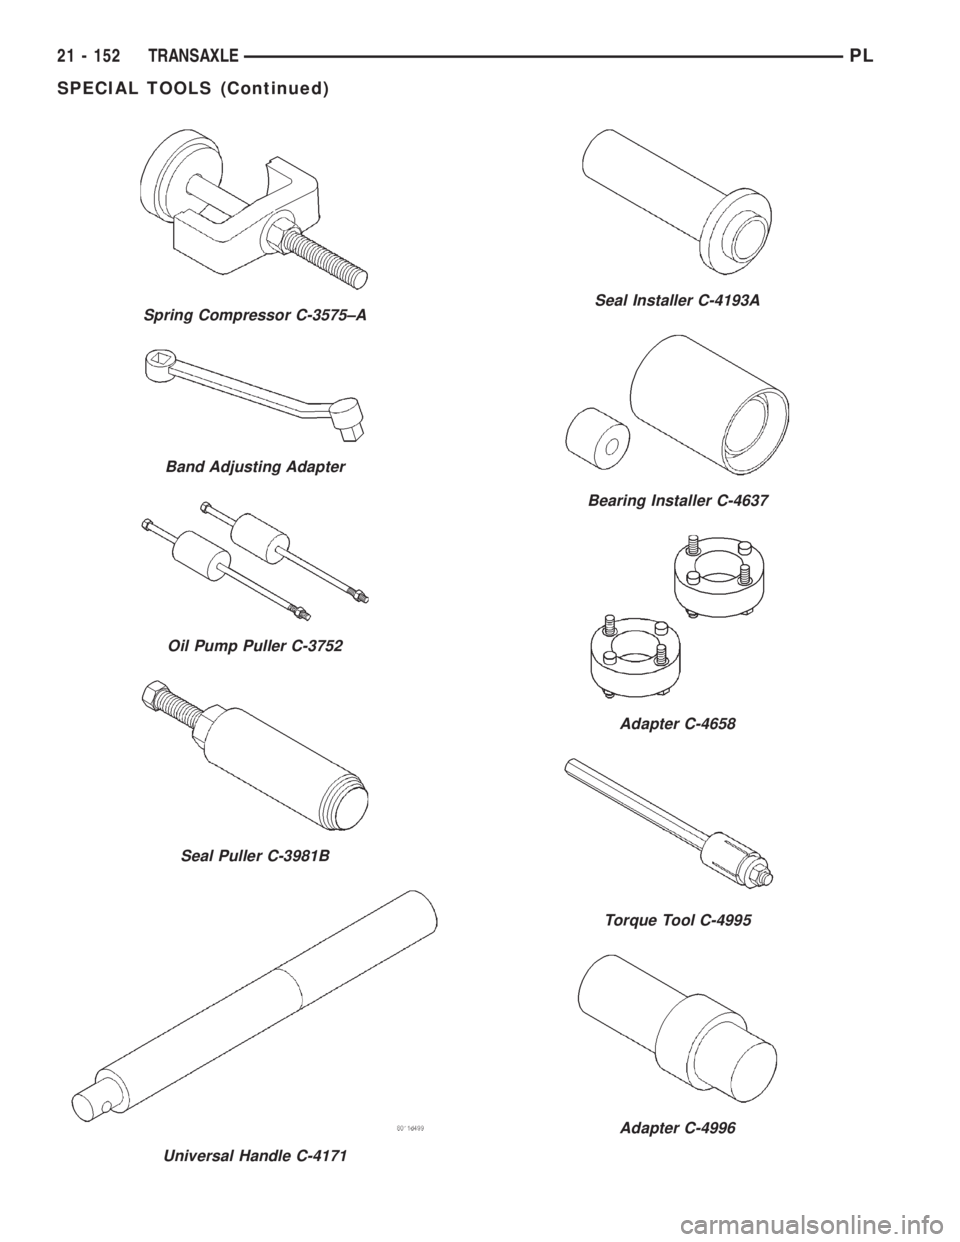
Spring Compressor C-3575±A
Band Adjusting Adapter
Oil Pump Puller C-3752
Seal Puller C-3981B
Universal Handle C-4171
Seal Installer C-4193A
Bearing Installer C-4637
Adapter C-4658
Torque Tool C-4995
Adapter C-4996
21 - 152 TRANSAXLEPL
SPECIAL TOOLS (Continued)
Page 1076 of 1285
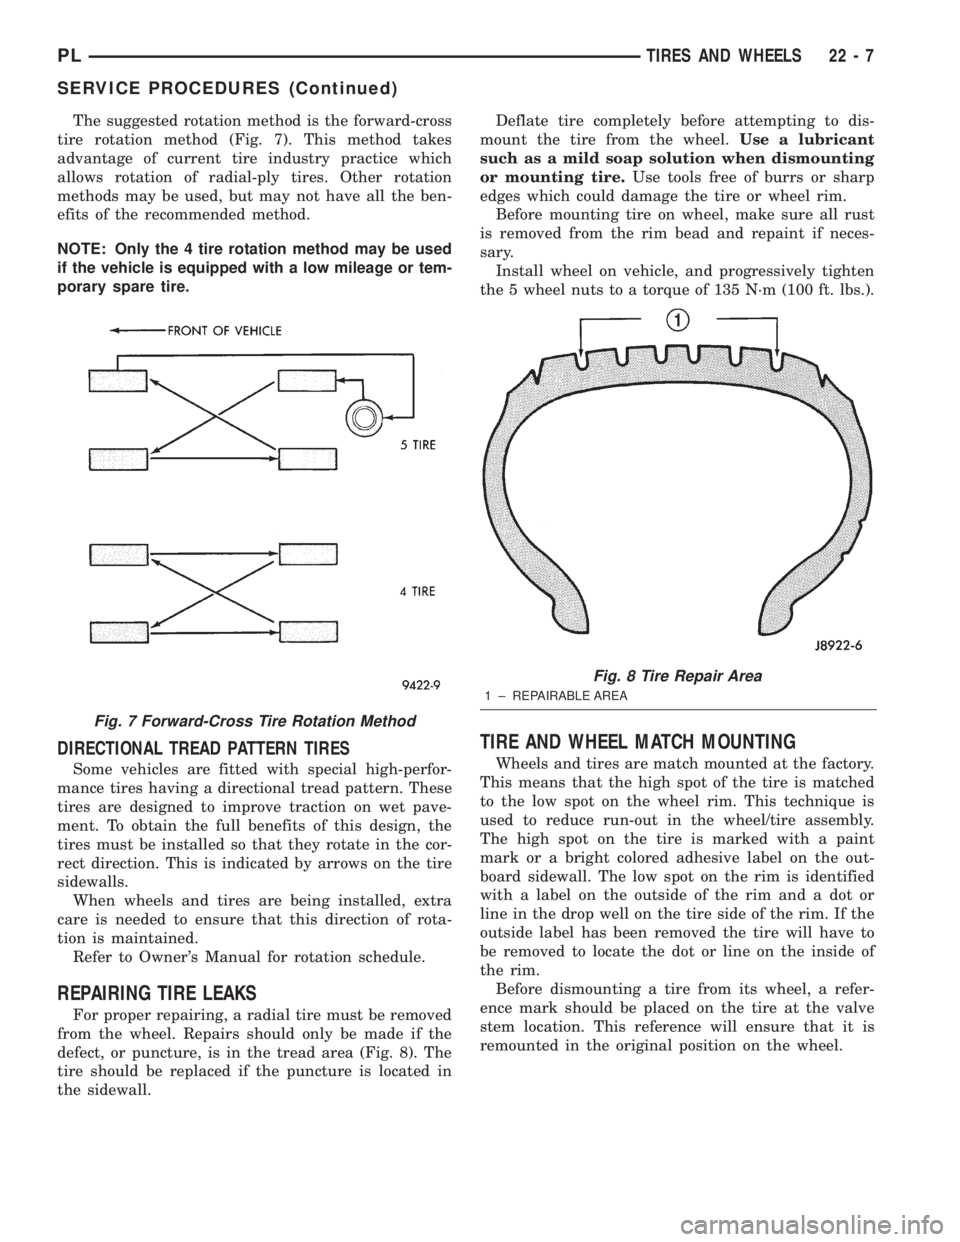
The suggested rotation method is the forward-cross
tire rotation method (Fig. 7). This method takes
advantage of current tire industry practice which
allows rotation of radial-ply tires. Other rotation
methods may be used, but may not have all the ben-
efits of the recommended method.
NOTE: Only the 4 tire rotation method may be used
if the vehicle is equipped with a low mileage or tem-
porary spare tire.
DIRECTIONAL TREAD PATTERN TIRES
Some vehicles are fitted with special high-perfor-
mance tires having a directional tread pattern. These
tires are designed to improve traction on wet pave-
ment. To obtain the full benefits of this design, the
tires must be installed so that they rotate in the cor-
rect direction. This is indicated by arrows on the tire
sidewalls.
When wheels and tires are being installed, extra
care is needed to ensure that this direction of rota-
tion is maintained.
Refer to Owner's Manual for rotation schedule.
REPAIRING TIRE LEAKS
For proper repairing, a radial tire must be removed
from the wheel. Repairs should only be made if the
defect, or puncture, is in the tread area (Fig. 8). The
tire should be replaced if the puncture is located in
the sidewall.Deflate tire completely before attempting to dis-
mount the tire from the wheel.Use a lubricant
such as a mild soap solution when dismounting
or mounting tire.Use tools free of burrs or sharp
edges which could damage the tire or wheel rim.
Before mounting tire on wheel, make sure all rust
is removed from the rim bead and repaint if neces-
sary.
Install wheel on vehicle, and progressively tighten
the 5 wheel nuts to a torque of 135 N´m (100 ft. lbs.).
TIRE AND WHEEL MATCH MOUNTING
Wheels and tires are match mounted at the factory.
This means that the high spot of the tire is matched
to the low spot on the wheel rim. This technique is
used to reduce run-out in the wheel/tire assembly.
The high spot on the tire is marked with a paint
mark or a bright colored adhesive label on the out-
board sidewall. The low spot on the rim is identified
with a label on the outside of the rim and a dot or
line in the drop well on the tire side of the rim. If the
outside label has been removed the tire will have to
be removed to locate the dot or line on the inside of
the rim.
Before dismounting a tire from its wheel, a refer-
ence mark should be placed on the tire at the valve
stem location. This reference will ensure that it is
remounted in the original position on the wheel.
Fig. 7 Forward-Cross Tire Rotation Method
Fig. 8 Tire Repair Area
1 ± REPAIRABLE AREA
PLTIRES AND WHEELS 22 - 7
SERVICE PROCEDURES (Continued)
Page 1081 of 1285
pilot hole and bolt circle of the wheel should be the
same as the original wheel.
WARNING: FAILURE TO USE EQUIVALENT
REPLACEMENT WHEELS MAY ADVERSELY AFFECT
THE SAFETY AND HANDLING OF THE VEHICLE.
USED WHEELS ARE NOT RECOMMENDED. THE
SERVICE HISTORY OF THE WHEEL MAY HAVE
INCLUDED SEVERE TREATMENT OR VERY HIGH
MILEAGE. THE RIM COULD FAIL WITHOUT WARN-
ING.
TIRE AND WHEEL RUNOUT
NOTE: Runout should always be measured off the
vehicle and on a suitable balance machine.
Radial run out is the difference between the high
and low points on the outer edge of the tire or wheel.
Lateral run out is the total side±to±side wobble of
the tire or wheel.
Radial run out of more than 1.5 mm (.060 inch)
measured at the center line of the tread may cause
the vehicle to shake.
Lateral run out of more than 2.0 mm (.080 inch)
measured at the side of the tire as close to the tread
as possible may cause the vehicle to shake.
Sometimes radial run out can be reduced by relo-
cating the wheel and tire on the wheel studs (See
Method 1). If this does not reduce run out to an
acceptable level, the tire can be rotated on the wheel.
(See Method 2).
METHOD 1 (RELOCATE WHEEL ON HUB)
Check accuracy of the wheel mounting surface;
adjust wheel bearings.
Drive vehicle a short distance to eliminate tire flat
spotting from a parked position.
Verify all wheel nuts are tightened and properly
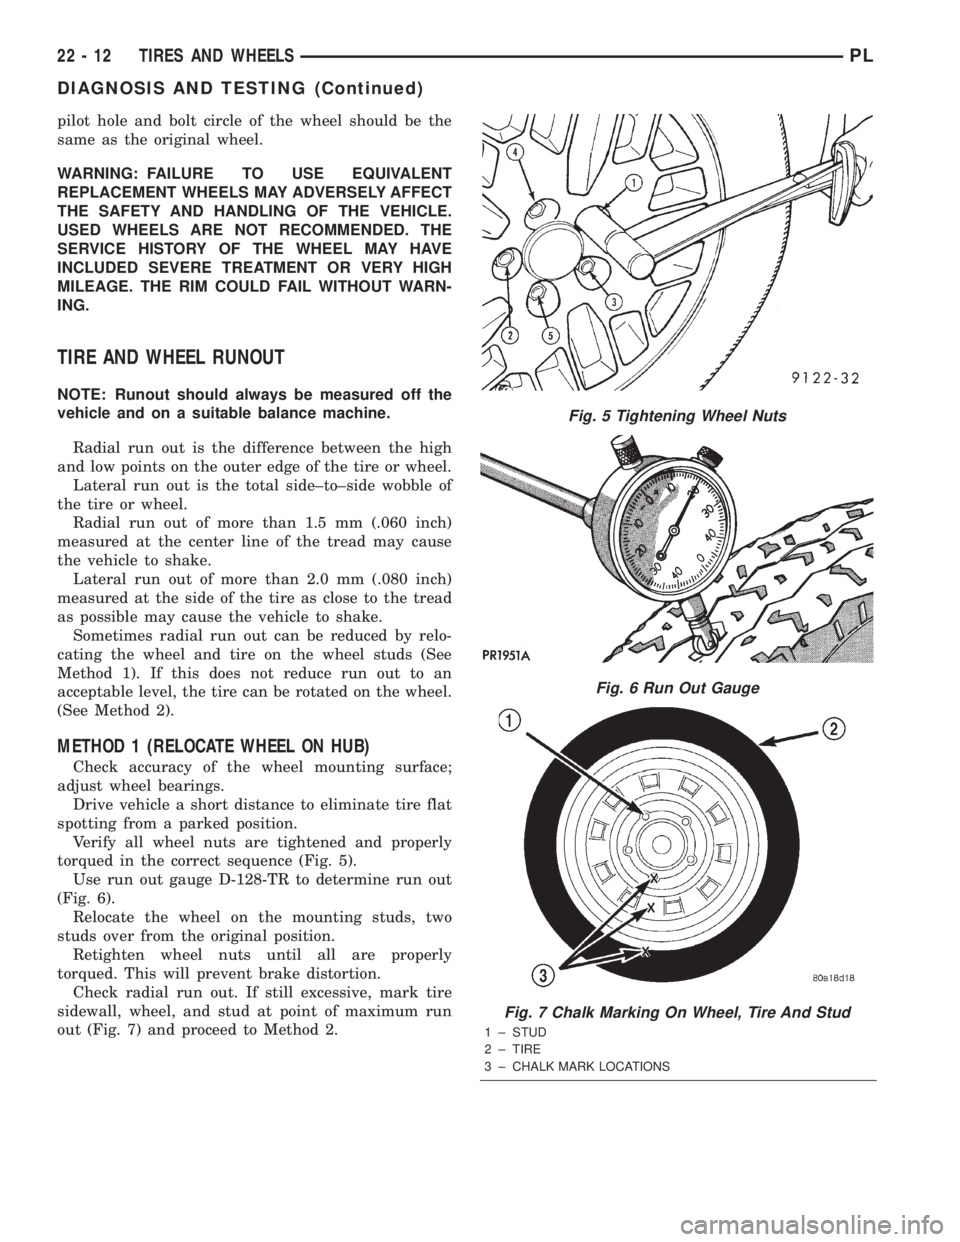
torqued in the correct sequence (Fig. 5).
Use run out gauge D-128-TR to determine run out
(Fig. 6).
Relocate the wheel on the mounting studs, two
studs over from the original position.
Retighten wheel nuts until all are properly
torqued. This will prevent brake distortion.
Check radial run out. If still excessive, mark tire
sidewall, wheel, and stud at point of maximum run
out (Fig. 7) and proceed to Method 2.
Fig. 5 Tightening Wheel Nuts
Fig. 6 Run Out Gauge
Fig. 7 Chalk Marking On Wheel, Tire And Stud
1 ± STUD
2 ± TIRE
3 ± CHALK MARK LOCATIONS
22 - 12 TIRES AND WHEELSPL
DIAGNOSIS AND TESTING (Continued)
Page 1085 of 1285
(3) When flange on retaining nut is past the 2
retaining tabs on the wheel cover, remove retaining
nut from wheel cover by pushing or pulling from hole
in wheel cover.
INSTALL
(1) Install retaining nut in hole of wheel cover
with retaining nut flange positioned under the large
retaining flange (Fig. 13).
(2) Push on hex of retaining nut forcing the retain-
ing nut flange past the 2 small retaining tabs in
wheel cover.
TIRE AND WHEEL ASSEMBLY
CAST WHEEL
REMOVAL
(1) Raise the vehicle. Refer to HOISTING in the
LUBRICATION AND MAINTENANCE section.
(2) Remove the wheel mounting nuts from the
studs.
(3) Remove the tire and wheel assembly from the
hub.
INSTALLATION
CAUTION: Installing the wheel mounting nuts with-
out having good metal-to-mental contact between
the back of the wheel and the hub mounted brake
disc or drum could cause the wheel to bind and
eventually cause loosening of the wheel mounting
nuts.
(1) Install the tire and wheel assembly on the hub
studs against the hub mounted brake disc or drum
using the hub pilot as a guide.
CAUTION: When installing the tire and wheel
assembly, never use oil or grease on studs or nuts.
(2) Install and lightly tighten the wheel mounting
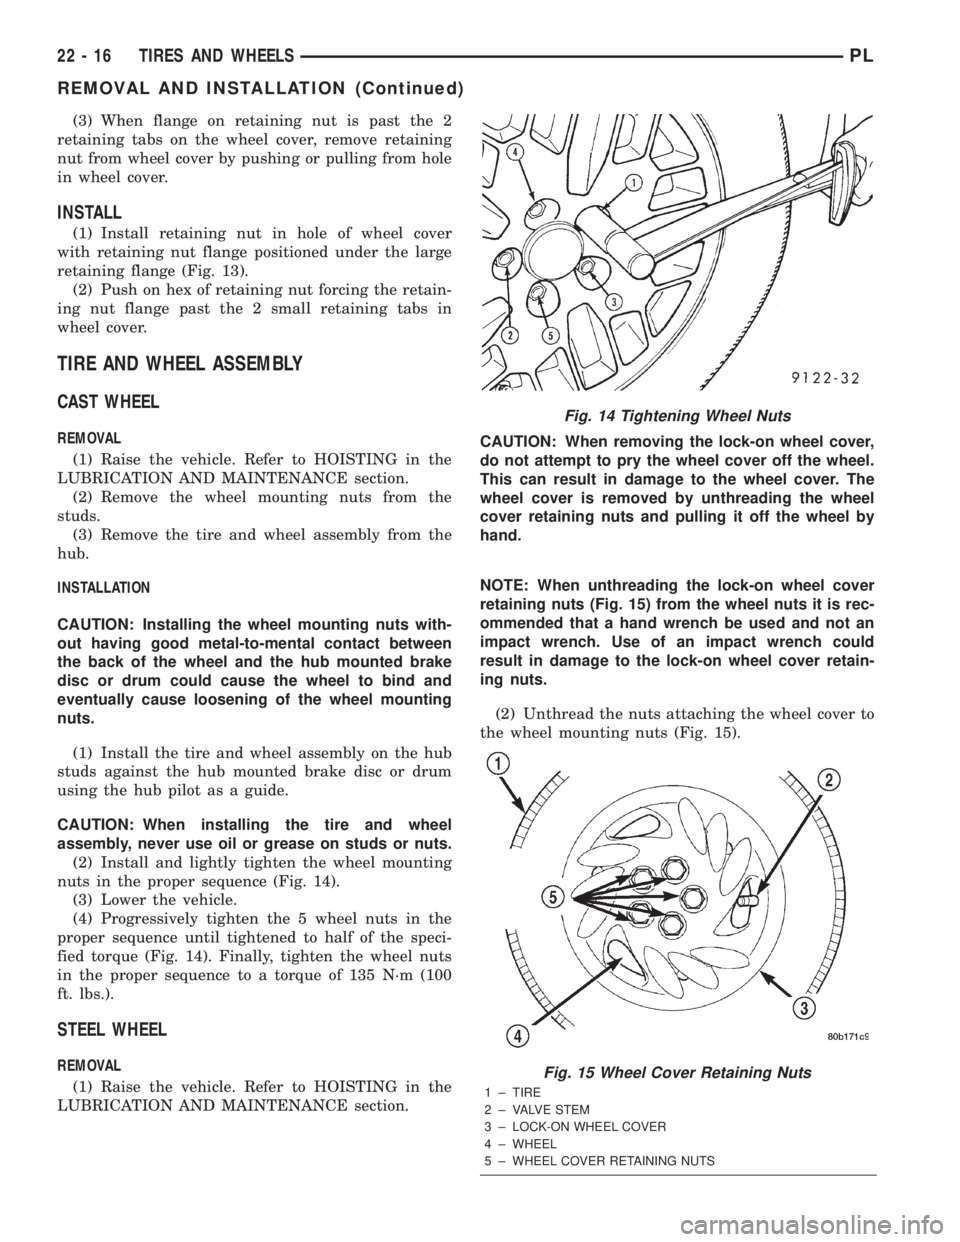
nuts in the proper sequence (Fig. 14).
(3) Lower the vehicle.
(4) Progressively tighten the 5 wheel nuts in the
proper sequence until tightened to half of the speci-
fied torque (Fig. 14). Finally, tighten the wheel nuts
in the proper sequence to a torque of 135 N´m (100
ft. lbs.).
STEEL WHEEL
REMOVAL
(1) Raise the vehicle. Refer to HOISTING in the
LUBRICATION AND MAINTENANCE section.CAUTION: When removing the lock-on wheel cover,
do not attempt to pry the wheel cover off the wheel.
This can result in damage to the wheel cover. The
wheel cover is removed by unthreading the wheel
cover retaining nuts and pulling it off the wheel by
hand.
NOTE: When unthreading the lock-on wheel cover
retaining nuts (Fig. 15) from the wheel nuts it is rec-
ommended that a hand wrench be used and not an
impact wrench. Use of an impact wrench could
result in damage to the lock-on wheel cover retain-
ing nuts.
(2) Unthread the nuts attaching the wheel cover to
the wheel mounting nuts (Fig. 15).
Fig. 14 Tightening Wheel Nuts
Fig. 15 Wheel Cover Retaining Nuts
1 ± TIRE
2 ± VALVE STEM
3 ± LOCK-ON WHEEL COVER
4 ± WHEEL
5 ± WHEEL COVER RETAINING NUTS
22 - 16 TIRES AND WHEELSPL
REMOVAL AND INSTALLATION (Continued)
Page 1086 of 1285
(3) Grasp the wheel cover and pull straight out-
ward. This will remove the wheel cover from the
wheel.
(4) Remove the wheel mounting nuts from the
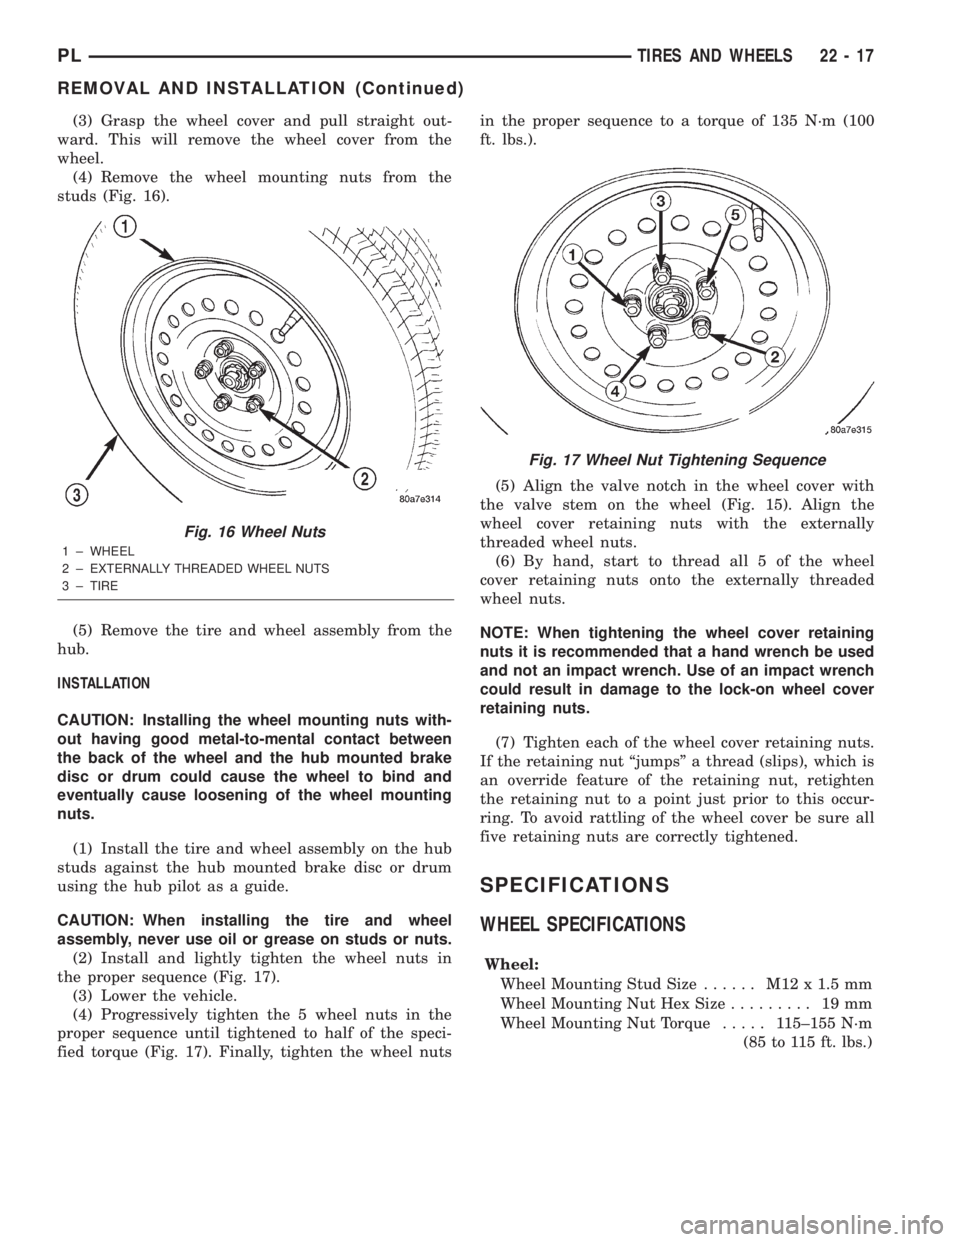
studs (Fig. 16).
(5) Remove the tire and wheel assembly from the
hub.
INSTALLATION
CAUTION: Installing the wheel mounting nuts with-
out having good metal-to-mental contact between
the back of the wheel and the hub mounted brake
disc or drum could cause the wheel to bind and
eventually cause loosening of the wheel mounting
nuts.
(1) Install the tire and wheel assembly on the hub
studs against the hub mounted brake disc or drum
using the hub pilot as a guide.
CAUTION: When installing the tire and wheel
assembly, never use oil or grease on studs or nuts.
(2) Install and lightly tighten the wheel nuts in
the proper sequence (Fig. 17).
(3) Lower the vehicle.
(4) Progressively tighten the 5 wheel nuts in the
proper sequence until tightened to half of the speci-
fied torque (Fig. 17). Finally, tighten the wheel nutsin the proper sequence to a torque of 135 N´m (100
ft. lbs.).
(5) Align the valve notch in the wheel cover with
the valve stem on the wheel (Fig. 15). Align the
wheel cover retaining nuts with the externally
threaded wheel nuts.
(6) By hand, start to thread all 5 of the wheel
cover retaining nuts onto the externally threaded
wheel nuts.
NOTE: When tightening the wheel cover retaining
nuts it is recommended that a hand wrench be used
and not an impact wrench. Use of an impact wrench
could result in damage to the lock-on wheel cover
retaining nuts.
(7) Tighten each of the wheel cover retaining nuts.
If the retaining nut ªjumpsº a thread (slips), which is
an override feature of the retaining nut, retighten
the retaining nut to a point just prior to this occur-
ring. To avoid rattling of the wheel cover be sure all
five retaining nuts are correctly tightened.
SPECIFICATIONS
WHEEL SPECIFICATIONS
Wheel:
Wheel Mounting Stud Size...... M12x1.5mm
Wheel Mounting Nut Hex Size......... 19mm
Wheel Mounting Nut Torque..... 115±155 N´m
(85 to 115 ft. lbs.)
Fig. 16 Wheel Nuts
1 ± WHEEL
2 ± EXTERNALLY THREADED WHEEL NUTS
3 ± TIRE
Fig. 17 Wheel Nut Tightening Sequence
PLTIRES AND WHEELS 22 - 17
REMOVAL AND INSTALLATION (Continued)