Page 1 of 38
 LHD
Fachkenntnisse sind Voraussetzung.
BMW Parts and Accessories – Installation Instruction
Xenon lights with automatic headl")
Xenon-Licht mit automatischer Leuchtweitenregulierung
für BMW X5 (E 53) LHD
Fachkenntnisse sind Voraussetzung.
BMW Parts and Accessories – Installation Instruction
Xenon lights with automatic headlight adjustment control systemfor the BMW X5 (E 53), LHD
Instructions de montage des pièces et des accessoires BMW
Eclairage au xénon avec réglage automatique de la portée des pharespour BMW X5 (E 53) à direction à gauche
BMW Onderdelen en accessoires – Montagehandleiding
Xenon-licht met automatisch instelling van de koplampenvoor BMW X5 (E 53) LHD
BMW Delar och tillbehör – Monteringsanvisning
Xenonljus med automatisk ljusbreddsregleringför BMW X5 (E 53) vänsterstyrd
Ricambi e accessori BMW – Istruzioni di montaggio
Luci allo xeno con regolatore automatico della profondità d'illuminazioneper BMW X5 (E 53) LHD
BMW piezas y accesorios – instrucciones de montaje
Luces de Xenón con regulación automática del alcance de las luces
para BMW X5 (E 53) VVI
Peças e Acessórios BMW – Instruções de Montagem
Luz de xénon com regulação automática do alcance dos faróispara os modelos BMW X5 (E 53) de volante à esquerda
Best.-Nr. 01 29 0 007 010 XI/99 Printed in Germany
Teile und Zubehör - Einbauanleitung
F 53 0054 EVA
Page 2 of 38

Inhalt Seite
1 Wichtige Hinweise . . . . . . . . . . . . . . . . . . . . . . . . . . . . . . . . . . 1-1
2 Einbau . . . . . . . . . . . . . . . . . . . . . . . . . . . . . . . . . . . . . . . . . . 2-1
3 Stromlaufplan . . . . . . . . . . . . . . . . . . . . . . . . . . . . . . . . . . . . . 3-1
Contents Page
1 Important notes . . . . . . . . . . . . . . . . . . . . . . . . . . . . . . . . . . . . 1-3
2 Installation . . . . . . . . . . . . . . . . . . . . . . . . . . . . . . . . . . . . . . . . 2-5
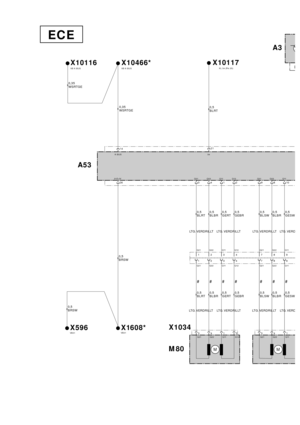
3 Circuit diagrams . . . . . . . . . . . . . . . . . . . . . . . . . . . . . . . . . . . 3-1
Sommaire Page
1 Recommandations importantes . . . . . . . . . . . . . . . . . . . . . . . . 1-5
2 Montage . . . . . . . . . . . . . . . . . . . . . . . . . . . . . . . . . . . . . . . . . 2-9
3Schémas des connexions . . . . . . . . . . . . . . . . . . . . . . . . . . . . 3-1
Inhoudsopgave Blz
1 Belangrijke aanwijzingen . . . . . . . . . . . . . . . . . . . . . . . . . . . . . 1-7
2 Montage . . . . . . . . . . . . . . . . . . . . . . . . . . . . . . . . . . . . . . . . . 2-13
3 Schakelschema’s . . . . . . . . . . . . . . . . . . . . . . . . . . . . . . . . . . . 3-1
Innehåll Sida
1 Viktig information . . . . . . . . . . . . . . . . . . . . . . . . . . . . . . . . . . . 1-9
2 Montering . . . . . . . . . . . . . . . . . . . . . . . . . . . . . . . . . . . . . . . . 2-17
3 Kopplingsscheman . . . . . . . . . . . . . . . . . . . . . . . . . . . . . . . . . 3-1
Indice Pagina
1 Avvertenze importanti . . . . . . . . . . . . . . . . . . . . . . . . . . . . . . . 1-11
2 Montaggio . . . . . . . . . . . . . . . . . . . . . . . . . . . . . . . . . . . . . . . . 2-21
3 Schemi elettrici . . . . . . . . . . . . . . . . . . . . . . . . . . . . . . . . . . . . 3-1
Indice Página
1 Indicaciones importantes . . . . . . . . . . . . . . . . . . . . . . . . . . . . . 1-13
2 Instalación . . . . . . . . . . . . . . . . . . . . . . . . . . . . . . . . . . . . . . . . 2-25
3 Plano de conexiones . . . . . . . . . . . . . . . . . . . . . . . . . . . . . . . . 3-1
Indice Página
1 Informações importantes . . . . . . . . . . . . . . . . . . . . . . . . . . . . . 1-15
2 Montagem . . . . . . . . . . . . . . . . . . . . . . . . . . . . . . . . . . . . . . . . 2-29
3 Esquema de ligações . . . . . . . . . . . . . . . . . . . . . . . . . . . . . . . 3-1
Page 3 of 38

Installation time approx. 7.5 hours.
The installation times may differ depending on the condition of the car and the")
EN/1-3
1. Important information
(Only for use within the BMW dealer organisation.)
Installation time approx. 7.5 hours.
The installation times may differ depending on the condition of the car and the equipment in it.
This retrofit system may only be installed with a headlight cleaning system.
All servicing, repair, installation and adjustment work on cars is conducted on your own responsibility.
All work is to be completed using the latest BMW
–Repair instructions,–Circuit diagrams,
–Service manuals,–Work instructions,
–Diagnostics manuals
in a rational sequence using the prescribed tools (special tools) and pursuant to the relevant health and safety
regulations.
Safety notes
An optional equipment wiring harness is used on the E53. This means that if a car is fitted as standard with at
least one of the following pieces of special equipment (SA), the other modules (MD) for the special equipment on
this level will also be integrated in the vehicle wiring harness.
The modules for the special equipment for the lower levels will then also be available.
Example: If a car is fitted with SA 536 (auxiliary heating system), all models on level 3, level 2 and level 1 will be
available.
Level 2
SA 235 (MD AHM) (trailer hitch)
SA 502 (MD SRA)
SA 508 (MD PDC)
SA 609 (MD navigation system)
SA 624 to 629 (US SA 640 (MS car telephone / radio)
Level 3
SA 248 (MD steering wheel heating system)
SA 261 (MD rear airbag)
SA 265 (MD RDC) (tyre pressure control module)
SA 461 (MD backrest heating system in the rear)
SA 496 (MD seat heating system in the rear)
SA 533 (MD rear air conditioning)
SA 536 (MD auxiliary heating system)
Level 4
SA 220 (MS single axle level control)
Level 5
SA 522 (MD automatic headlight adjustment control system / xenon lights)
Safety information
These installation instructions are only valid for LHD cars.
All lock nuts are to be replaced.
All tightening torque values are to be taken from the current repair instructions and must be observed at all times.
Ensure that cables and other lines are not kinked or damaged when they are being installed in the car and that
they do not impair the freedom of movement of other components.
If the specified pins or chambers are already in use, bridges, double crimps or parallel end stops are to be used.
Do not use so-called ”Scotchlock connectors" since they may cause faults in the vehicle's electrical system.
Page 4 of 38
1-4/EN
Tools and equipment required
Philips screwdriver
Straight slot screwdriver
Sockets, sizes 8 mm and 10 mm
Ring spanner, size 10 mm
Open-ended spanner, size 9 mm
Torque wrench
1/2 inch reversible ratchet
1/2 inch extension
1/2 inch sockets, sizes 16 mm, 17 mm and 19 mm
1/4 inch reversible ratchet
1/4 inch extension
1/4 inch sockets, sizes 7 mm, 8 mm and 10 mm
Angle cutter
Crimping pliers
Anti-corrosive paint
Drill with drill bits
To r c h
Page 5 of 38

2. Installation
Contents.................................................................................................................................Pa g e
2.1 Preparation ............................................................................................................................. 2-6
2.2 To install the level sensor at the front right .............................................................................. 2-7
2.3 To install the level sensor at the rear right................................................................................ 2-7
2.4 Connection overview of the xenon wiring harness (ECE cars only) .......................................... 2-36
2.5 To install the xenon wiring harness (ECE cars only) ................................................................. 2-49
2.6 Connection overview of the xenon wiring harness (US cars only) ............................................ 2-81
2.7 To install the xenon wiring harness (US cars only) ................................................................... 2-101
2.8 To remove the manual headlight adjustment control system (ECE cars only)........................... 2-133
2.9 To install the xenon headlights ................................................................................................ 2-133
2.10 To affix the warning sticker ...................................................................................................... 2-133
2.11 To assemble the car ................................................................................................................ 2-133
2.12 Coding .................................................................................................................................... 2-133
2.13 Function test ........................................................................................................................... 2-133
2.14 To adjust the xenon headlights ................................................................................................2-134
EN/2-5
Page 6 of 38
2.1 Preparation
Print out the error memory.
Disconnect the battery.
Remove the door sill strips on the right-hand side.
Remove the bottom A pillar trim on the right-hand side.
Remove the glove box.
Remove the footwell trim on the right-hand side.
Remove the air guide in front of the module holder.
Remove the B pillar trims on the right-hand side.
Remove the front passenger seat.
Remove the cable covers in the right-hand sill area.
Remove the backrest side section on the right-hand side and the rear seat bench.
Remove the boot cover.
Remove the spare wheel.
Remove the wheel wrench mounting.
Remove the cover from the electrics box in the engine compartment.
Remove the air filter casing.
Remove the halogen headlights and holders.
Remove the wheels at the front right and rear right.
Only on cars without a standard navigation system (see section 1) or on US cars:
Remove the A pillar trim on the left-and side.
Remove the cover for the pedals and steering column.
2-6/EN
Page 7 of 38

Fold out folded page 2-33.
All lock nuts are to be replaced. All tightening torque values are to be taken from the current repair
instructions and must be observed at all times.
2.2 To install the level sensor at the front right
Cars with an air suspension front axle already have a level sensor. This is to be replaced with the level
sensor supplied with the parts kit.
A
Only for cars without an air suspension front axle.
Mounting points for the level sensor at the front right:
The holder with the fitted level sensor is to be installed using the mounting screw (1) on the control arm (3).
The hole (2) is used as a locking device
The angle joint is mounted on the control arm (3).
B
Only for cars without an air suspension front axle.
Install the level sensor (4) on the holder (6) using two Allen bolts, M5 x 10 (5).
See the position of the locking device (7) and the threaded sleeve (see magnified view).
C
Only for cars without an air suspension front axle.
Remove the nut SW16 mm from the mounting screw (1) on the control arm (3) and pull out the mounting screw (1).
Position the holder (6) with the level sensor (4) and secure the control arm (3) with the mounting screw (1) and the
lock nut SW 16 mm supplied in the parts kit.
Install the angle joint (8) on the control arm (3) and secure it with a nut SW10 mm.
Connect the angle joint (8) to the lever on the level sensor (4) and secure it with a nut SW10 mm (9).
Only for cars with an air suspension front axle.
Undo the nut SW10 mm (9) and release the angle joint (8). remove the level sensor (4) in the car (see Figure B)
and replace it with the one supplied in the parts kit.
2.3 To install the level sensor at the rear right
Only for cars without a level control system.
D
Mounting points for the level sensor at the rear right:
The holder with the fitted level sensor and the threaded plate is to be installed on the holes (10). Fit the clip
on the holder (11) on the rear axle swinging arm and secure the control rod.
E
Install the level sensor (12) on the holder (14) using two Allen bolts, M5 x 10 (13).
See the position of the threaded sleeve (see magnified view).
F
Fit the threaded plate (15) into the holes (10) in the frame from the rear.
G
Fit the holder (14) wit the level sensor (12) on to the thread and the journal of the threaded plate and secure
it with a lock nut SW 10 mm (16).
Place the clip (17) on the holder (11) for the rear axle swinging arm.
Connect the lever on the level sensor (12) to the holder (11) for the rear axle swinging arm using the control rod
(18). Secure the control rod (18) with the lock nuts SW 10 mm (19 and 20).
EN/2-7
Page 8 of 38
Only for cars with an air suspension front axle.
G
Disconnect the connection plug from the level sensor (12).
Undo the nut SW 10 mm (20) and release the control rod (18).
Undo the nut SW 10 mm (16) and remove the holder (14) with the level sensor (12).
Replace the level sensor fitted in the car with the level sensor supplied with the parts kit.
See the position of the threaded sleeve (see magnified view).
The installation work is to be completed using new lock nuts SW 10 mm (16 and 20), in reverse order.
Do not reconnect the connection plug yet.
2-8/EN


.
Undo the nut SW 10 mm (20) and release the control rod (18).
Undo the nut SW 10 mm (16) an")