2000 AUDI ALLROAD clock setting
[x] Cancel search: clock settingPage 117 of 306

CONTROLS AND EQUIPMENT---------------------
Instrument cluster
Pos. see page
1 - Engine oil temperature gauge ... 117
2 - Tachometer ...... ........... .. 117
with digital clock and date display 117
3- Warning I ind icator lights ..... .. 122
4 - Engine coolant temperature gauge 118
5- Fuel gauge
119 Pos.
6 · Speedometer
with odometer,
trip odometer display ... .
7 - Vo ltmeter ............ .
8 - Set I check knob for see
page
119
12 0
12 0
Setting the clock . . . . . .
118
Auto -check system ............ 140
Clock and Odometer lighting .... 12 0
Service indicator . . . . . . . . . . . . . . 121 Pos.
see page
9 - Driver information system
Auto-C heck System display . . . . 138
Outside air temperature display .
137
Trip computer display . . . . . . . . 146
Selector lever position display . .
1 07
Radio frequency display ........ 138
Service interval display . . . . . . 121
1 0 -Reset knob for
Trip odometer ......•.. _ ..... .. 120
Service indicator . . . . . . . . . . . . 121
Page 119 of 306

CONTROLS AND
EQUIPMENT-----------------------------------------
Setting the time I date
• Pull the knob to set the hour. The hour
display will flash. Set the desired hour dis
play by turning the knob clockwise or coun
terclockwise.
• To set the minutes, pull the knob out
as often as needed to make the minutes dis
play flash. You can then set the minutes dis
play by turning the knob clockwise or coun
terclockwise.
• To set the date, pull the knob out as
often as needed to make the day, month or
year display flash. You can then set the day,
month or year display by turning the knob
clockwise or counterclockwise.
Yo ur clock will be set once the display stops
flashing after you operate the setting knob.
118 Changing
time zones
If you enter a new time zone, simply change
the hour display to the correct time -see
"Setting the time I date".
Tu rning the date display on and off
• Pull out the knob as often as needed to
make the date display flash.
o Turn the knob counterclockwise to deac
tivate the display, or clockwise to activate it.
The setting will be accepted as soon as the
display stop flashing after you operate the
setti ng knob.
3 - Warning and indicator lights
See page 122. 4
- Engine coolant -¥
-
temperature gauge
The needle in the coolant temperature
gauge will indicate the temperature of the
coolant when the ignition is switched on.
Engine cold
Avoid high engine speeds and heavy
throttle when the needle is still at the left of
the dial.
Normal temperature
During normal running, the needle will re
main somewhere in the middle of the dial.
If the engine is working hard at high outside
temperatures, the needle may also go fur
ther to the right, but this Is no cause for
concern as long as the coolant tem
perature warning light does not
flash.
Page 121 of 306

CONTROLS AND
EQUIPMEN T--------------------
Odometer
The odometer indicates the distance driven.
USA models:
Miles
Canada models: Kilometres
On the trip odometer, the last digit indicates
1 /,0 of a mile or 1 00 meters.
Reset knob for trip odometer
To record a distance, reset the trip odome
ter by pressing the knob until the display re
turns to zero -see illustrat ion.
12 0 When
the ignition is off, the display can be
ill umin ated by pressing the test knob for the
Auto-Check System. See page 116, posi
tion 8. The display switches off automati
cally after about 15 seconds.
Also the display will remain illuminated for
abo �t 30 seconds after you open the driv
er's door.
Defect message
If there is a defect in the instrument cluster,
"dEF" will be displayed continuously in the
trip odometer display area. Have this prob
lem corrected as soon as possible by an au
thorized Audi Dealer.
7 - Vo ltmeter
The voltmeter indicates the voltage for the
vehicle's total electrical system, which
should normally be between 12 and
14 volts. If the display drops below 12 volts
when the engine is running, have the power
supply (battery and alternator) checked by
an authorized Audi Dealer. See also
pages 127 and 143.
The voltage may fall below 8 volts while the
engine is being started. 8
- Set I Check knob
Setting the clock ...• ... .
Auto-ch eck system
Odometer lighting .
Service indicator .. 118
14 0
12 0
121
9 - Driver information system
Auto-C heck System display . . . . . ... 138
Outside air temperature display .... 137
Tr ip computer display . . . . . . . . 146
Selector lever position display ....... 1 07
Radio frequency display . . . . . . 138
Service interval display . . . . . . . . . . .
121
10 -Reset knob
Reset knob for trip odometer . .... .. 12 0
Service indicator . . . . . .. . . . . . . 121
Page 136 of 306

Go
back to a higher menu level
After obtaining information or making a set
ting, if you wish to return to the next higher
menu level, rotate the button to move the
selection arrow to Back and then press the
butt on. Example
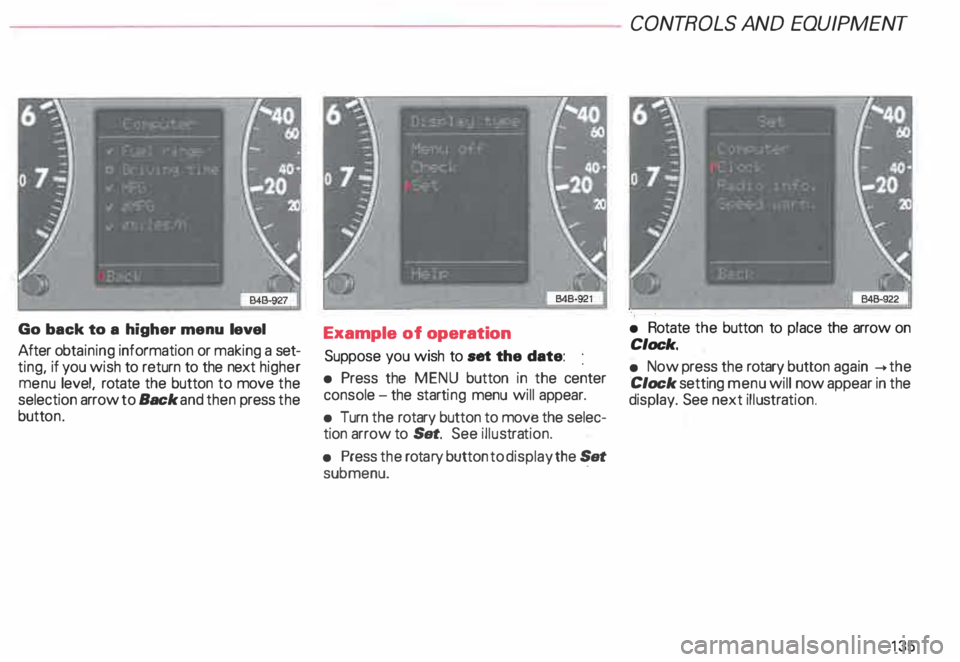
of operation
Suppose you wish to set the date:
• Press the MENU button in the center
console -the starti ng menu will appear.
• Turn the rotary button to move the selec
tion arrow to Set. See illustra tion.
• Press the rota ry button to display the Set
submenu. · CONT
ROLS AND EQUIPMENT
• Rotate the button to place the arrow on
Clock.
• Now press the rotary button again __.the
Clock setting menu will now appear in the
display. See next illustra tion.
135
Page 137 of 306

CONT
ROLS AND EQUIPMENT---------------------
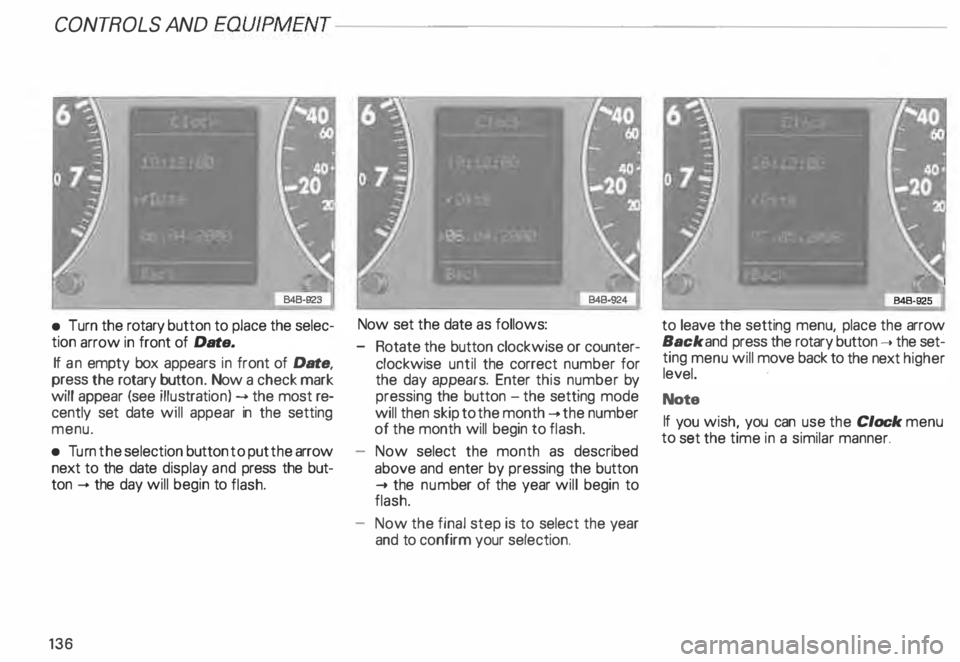
•
Turn the rotary button to place the selec
tion arrow in front of Date.
If an empty box appears in front of Date,
press the rotary button. Now a check mark
will appear (see illustrati on) --> the most re
cently set date will appear in the setting
menu.
• Turn the selection button to put the arrow
next to the date display and press the but
ton -+ the day will begin to flash.
136 Now set
the date as follows:
- Rotate the button clockwise or counter
clockwise until the correct number for
the day appears. Enter this number by
pressing the button -the setting mode
will then skip to the month -+ the number
of the month will begin to flash.
Now select the month as described
above and enter by pressing the button
..... the num ber of the year will begin to
flash.
Now the final step is to select the year
and to confirm your selection. to
leave the setting menu, place the arrow
Back and press the rotary button ..... the set�
ting menu will move back to the next higher
level.
Note
If you wish, you can use the Clock menu
to set the time in a similar manner.
Page 298 of 306

c
Capacities ...• ••.•. .......• o o 287
Care of
-e xterior . 212
-i nterior . . 217
Cargo net . .
89
earphone . . •
• . . • • 190
Catalytic converter •
. . . • • o 197
CB radios . . . . . . . . . . . . . . . . • . . . 189
CD changer . . . . . . . . . . . . . . . . . . . 184
Central locking system .. ... . 0 • • 59
- Rear lid . . . . . . . . . . . . • . . . • . • . 63
Changing a wheel . . . . . . . .. o • • 267
Changing engine oil . . . . . . . . • 236
Checking engine oil level . . . . . . . 235
Child restra int anc horages . . . . . . . 53
Child safety ... ........... .. ... 44
Child safety lock for rear doors . . . 62
Child seat bench . . . . 92
Child seats
- Booster seats . . . . . . • • • • • . . 48
-C onvertible seats .. • .. o •• 47
- Infant seats . . . . .
. .. ... .. . 45
-O lder children . . . • . . . . . . . . 49 Chime
...
Ciga rette lighter
Cleaning 57,
113, 14 9
18 1
- Engine compartment ..... . 219
217
-
Glass ............. ... .. . .
- Inside of vehicle . . . . 217
- Leather upholstery . . . . . . . 217
-O utside of vehicle .... . • .. 212
- Safety belts . . . . . . . . . . . . . . . 218
-W indows· . . . . . . . . . . . • . . . . 215
Cleaning and protection . . . . . . . . 212
Clima te controls . . . . . . . . .... o • 16 2
Clock .. .. . .. .. . .. .. .. .. .. .
117
Coat hooks . . . . . . . . . . . . . . • . •
179
Com partment for Service
Literature Wallet ......... .... 18 3 .,)
Convenient entry function . . . . . . 1 01
Convertible locking retractor .... . 51
Convertible seats......... . ... 47
Coolant temperature gauge . . . . . 118
Cooling system . . . . . . . .
238
- Expansion tank 0 • • • • • • • • • 239
Cruise control . . . . 15
8
Cup holder . . . . . . . . . • . • . . • . . 182
Curb weight . . . . . . . . _. . . . ... 289 ALP
HABETICAL INDEX
D
Dashboard ...... •••• .••.• .... 8
Data . . . . . . . o • • • • • • • • • • • • • 286
Date display . . . . . .
• .. 0 • 117
Daytime running lights .
148
Deflated full size spare tire ..... 266
Defrosting windows . . . . . . . • . . . 151
Difficult operating conditions . . . . 262
Digital clock . . . . . . . . . . . . . . . . . 117
Dimensions . . . . . . . . . . . . . . . . . . 288
Doors ....................... 0. 59
Driver information system . . . . . . 130
-C alling up the menu ....... . 131
- Display types . . . . . . . . . • . • 133
- Entering settings . . . . • . • . . . 134
- Menu display . . . . . . . • • • . . . 131
- Navigation display ..... _ . . . . 130
Driving economically . . . . 19
5
Dri ving in foreign countries . . . . . 292
Driving on slopes . . . . . . . . . . . . . 200
Driving under difficult conditions
262
Driving with Four-Wheel Drive . . 207
Dupl icate key ....... .... ....... 57
297