1999 SUZUKI GRAND VITARA Temperature
[x] Cancel search: TemperaturePage 41 of 656

1B-16 AIR CONDITIONING (OPTIONAL)
SYSTEM CIRCUIT
Terminal arrangement of A/C controller
Terminal arrangement of ECM
A: To “FRONT BLOW” fuse 1. Front blower motor relay 6. Dual (refrigerant) pressure switch 11. Condenser cooling fan motor
B: To “REAR DEFG” fuse 2. Front blower motor 7. A/C thermistor (evaporator temperature sensor) 12. A/C controller
C: To “IG METER” fuse 3. Front blower motor resistor 8. Compressor relay 13. ECM
D: To “A/C” fuse 4. Front blower motor switch 9. Compressor
5. A/C switch 10. Condenser cooling fan motor relay
5V
12V12V
12V5V
12V
5V
AC-A-1
AC-A-7
AC-A-4
AC-B-2
AC-B-1
AC-A-16AC-A-9
AC-A-2 AC-A-13
E61-8
E61-17
E61-22
A
DBBC
1
2
3
4
7 865
1011912
13
12 12
3
45 6 7 8 9 101112131415 16 AC-B
AC-A
87
22 23
34
3565
16 17
25
262
1
8 9
20
212
1
8 9
21
22 1 2 3 4 5 6
9
24 25 26 27 28 29 30 31 32 3310 11
12 13 14 15 16 17 18 19 20 211 2 3 4
7 8 9
10 11 12 13 14 15
18 19 20 21 22 23 243 4 5 6 7
10 11 12 13 14 15 16 17 18 19
22 23 24 25 26
27 283 4 5 6 7
10 11 12 13 14 15 16 19 18 2017
23
24 25 26 27 29 28 30 E61 C51-3 C51-1 C51-2
Page 42 of 656

AIR CONDITIONING (OPTIONAL) 1B-17
A/C CONTROLLER VOLTAGE VALUES TABLE
Terminal Wire CircuitMeasurement
groundNormal value Condition
AC-A-1BLK/
WHTController main
power supplyGround to
engine (Fig B)10 – 14 VIgnition switch ON with engine
stopped
AC-A-2BLK/
YELController main
groundGround to body
(Fig A)–0.4 – 0 V Engine running
AC-A-4 ORNRefrigerant
(dual) pressure
switch inputGround to
engine (Fig B)0 – 1 VRefrigerant pressure within 225
kpa (2.3 kg/cm
2, 32.7 psi) to
2548 kpa (26 kg/cm
2, 370 psi)
with engine running
10 – 14 VRefrigerant pressure below 196
kpa (2.0 kg/cm
2, 28 psi) or above
3140 kpa (32 kg/cm
2, 455 psi)
with engine running
AC-A-7GRN/
BLKA/C switch and/
or defroster
switch inputGround to
engine (Fig B)8 – 14 VBlower fan motor switch or A/C or
defroster switch OFF with engine
running
0 – 1.5 VBlower fan motor switch and A/C
or defroster switch ON with
engine running
AC-A-9GRY/
WHTSignal input from
ECM (A/C ON
permission sig-
nal)Ground to
engine (Fig B)10 – 14 V Approve of A/C ON
0 – 1 V A/C ON forbid
AC-A-13YEL/
BLKSignal output to
ECM (A/C ON
request signal)Ground to
engine (Fig B)0 – 1.5 VBlower fan motor switch and A/C
or defroster switch ON with
engine running at A/C evaporator
temperature sensor temperature
input more than approx. 2.5 °C
(less than 2.5 V (5840 Ω)) and
refrigerant pressure switch is ON
10 – 14 VExcept the above-mentioned with
engine running
AC-A-16 PNKCompressor
magnet clutch
relay outputGround to
engine (Fig B)0 – 1 VBlower fan motor switch and A/C
or defroster switch ON with
engine running at A/C evaporator
temperature sensor temperature
input more than approx. 2.5 °C
(less than 2.5 V (5840 Ω)), refrig-
erant pressure switch ON and
signal input from ECM ON
10 – 14 VExcept the above-mentioned with
engine running
AC-B-1BLU/
YELSensor groundGround to body
(Fig A)–0.4 – 0 V Engine running
Page 43 of 656

1B-18 AIR CONDITIONING (OPTIONAL)
Terminal Wire CircuitMeasurement
groundNormal value Condition
AC-B-2WHT/
BLKA/C evaporator
temperature
sensor (A/C
evaporator ther-
mistor) inputGround to
engine (Fig B)1.8 V
(3520 Ω)A/C evaporator temperature sen-
sor temperature at approx. 15 °C
(59 °F) with engine running
2.51 V
(5.855 Ω)A/C evaporator temperature sen-
sor temperature at approx. 4.5 °C
(34 °F) with engine running
If the temperature is less than
approx. 4.5 °C, in this case com-
pressor and condenser fan
should be stop (come back at
more than approx. 6.1 °C (less
than 5403 Ω, 2.4 V))
E61-8GRY/
WHTSignal output to
A/C controller
(A/C ON permis-
sion signal)Ground to
engine (Fig C)10 – 14 VRequired A/C ON (terminal AC-
A13) at engine running with nor-
mal condition (refer to “INSPEC-
TION OF ECM AND ITS
CIRCUIT” in Section 6E)
0 – 1 VExcept the above-mentioned with
engine running
In this case compressor should
be stop
E61-17YEL/
BLKSignal input from
A/C controller
(A/C ON request
signal)Ground to
engine (Fig C)0 – 1.5 V Require A/C ON
10 – 14 V Turn off the A/C
E61-22YEL/
BLUCondenser cool-
ing fan motor
relay outputGround to
engine (Fig C)0 – 1 VBlower fan motor switch and A/C
or defroster switch ON with
engine running at A/C evaporator
temperature sensor temperature
input more than approx. 2.5 °C
(less than 2.5 V (5840 Ω)), refrig-
erant pressure switch ON and
signal input from ECM ON
Engine coolant temperature sen-
sor more than 113 °C (236 °F)
with engine running
10 – 14 VExcept the above-mentioned with
engine running
Page 44 of 656
AIR CONDITIONING (OPTIONAL) 1B-19
Refrigerant Recovery, Evacuation and Charging
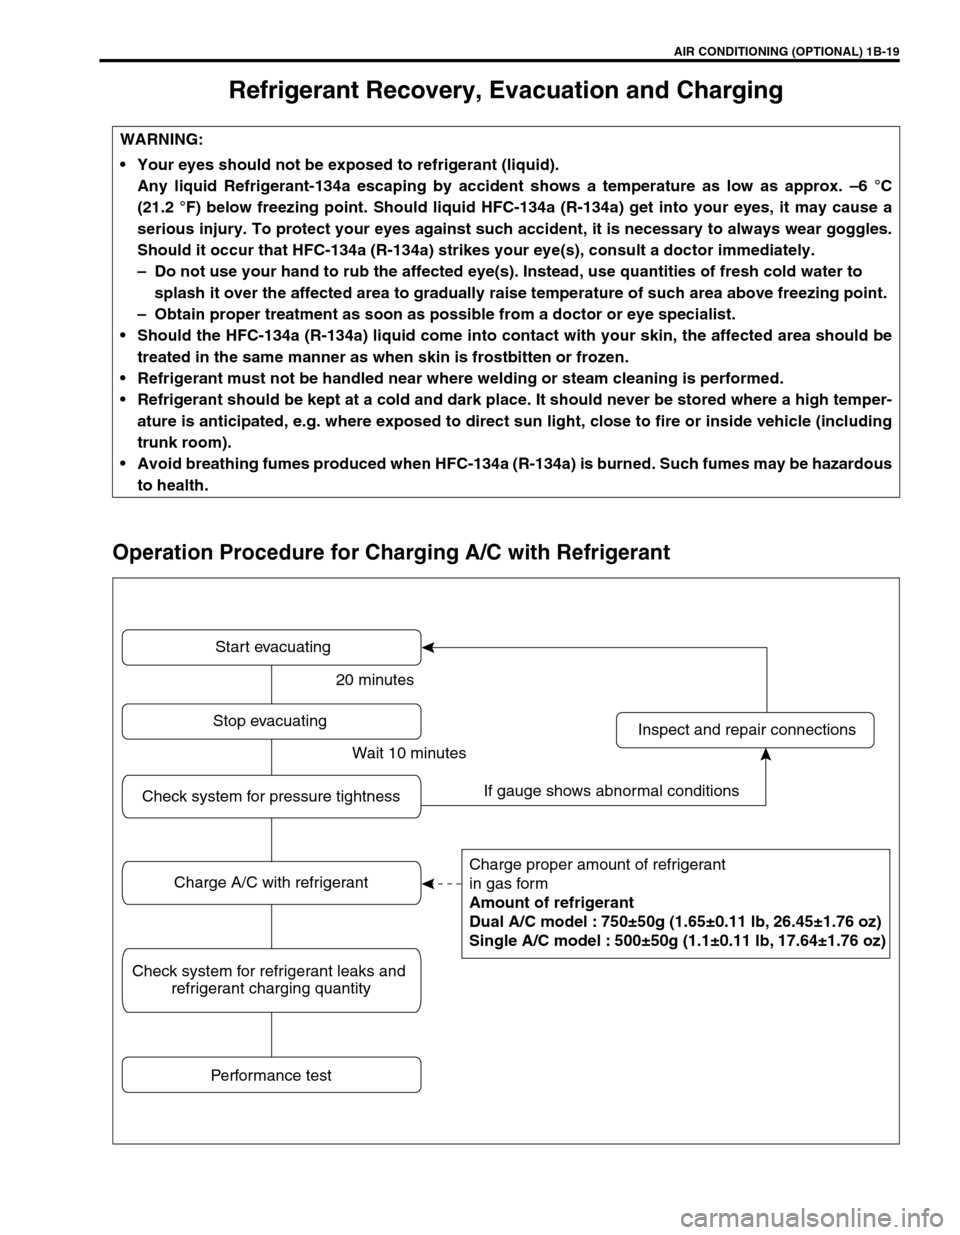
Operation Procedure for Charging A/C with Refrigerant
WARNING:
Your eyes should not be exposed to refrigerant (liquid).
Any liquid Refrigerant-134a escaping by accident shows a temperature as low as approx. –6 °C
(21.2 °F) below freezing point. Should liquid HFC-134a (R-134a) get into your eyes, it may cause a
serious injury. To protect your eyes against such accident, it is necessary to always wear goggles.
Should it occur that HFC-134a (R-134a) strikes your eye(s), consult a doctor immediately.
–Do not use your hand to rub the affected eye(s). Instead, use quantities of fresh cold water to
splash it over the affected area to gradually raise temperature of such area above freezing point.
–Obtain proper treatment as soon as possible from a doctor or eye specialist.
Should the HFC-134a (R-134a) liquid come into contact with your skin, the affected area should be
treated in the same manner as when skin is frostbitten or frozen.
Refrigerant must not be handled near where welding or steam cleaning is performed.
Refrigerant should be kept at a cold and dark place. It should never be stored where a high temper-
ature is anticipated, e.g. where exposed to direct sun light, close to fire or inside vehicle (including
trunk room).
Avoid breathing fumes produced when HFC-134a (R-134a) is burned. Such fumes may be hazardous
to health.
Start evacuating
Charge proper amount of refrigerant
in gas form
Amount of refrigerant
Dual A/C model : 750±50g (1.65±0.11 lb, 26.45±1.76 oz)
Single A/C model : 500±50g (1.1±0.11 lb, 17.64±1.76 oz)
Inspect and repair connections Stop evacuating
Performance test
Check system for pressure tightness
Charge A/C with refrigerant
Check system for refrigerant leaks and
refrigerant charging quantity
20 minutes
Wait 10 minutes
If gauge shows abnormal conditions
Page 49 of 656
1B-24 AIR CONDITIONING (OPTIONAL)
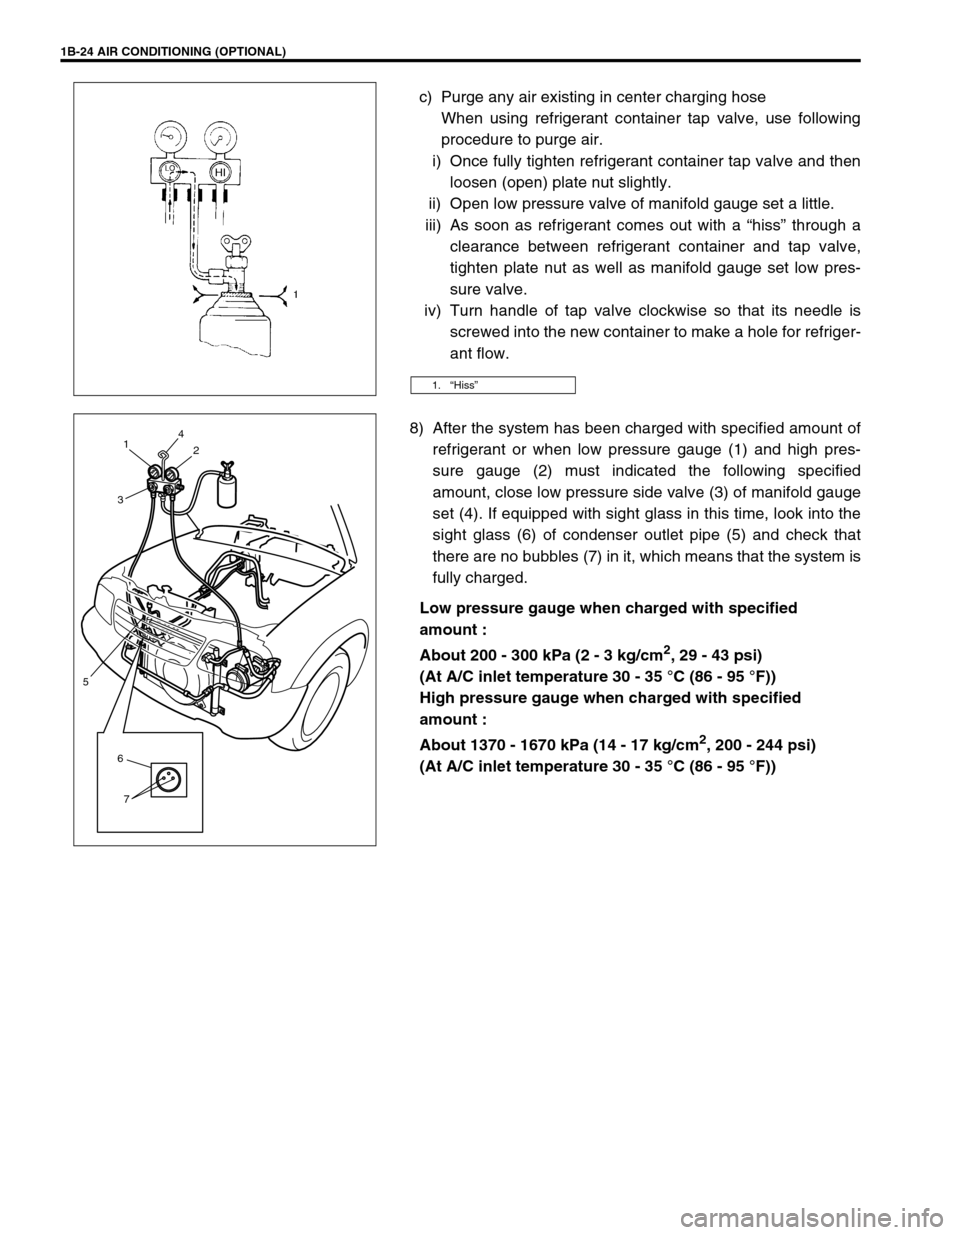
c) Purge any air existing in center charging hose
When using refrigerant container tap valve, use following
procedure to purge air.
i) Once fully tighten refrigerant container tap valve and then
loosen (open) plate nut slightly.
ii) Open low pressure valve of manifold gauge set a little.
iii) As soon as refrigerant comes out with a “hiss” through a
clearance between refrigerant container and tap valve,
tighten plate nut as well as manifold gauge set low pres-
sure valve.
iv) Turn handle of tap valve clockwise so that its needle is
screwed into the new container to make a hole for refriger-
ant flow.
8) After the system has been charged with specified amount of
refrigerant or when low pressure gauge (1) and high pres-
sure gauge (2) must indicated the following specified
amount, close low pressure side valve (3) of manifold gauge
set (4). If equipped with sight glass in this time, look into the
sight glass (6) of condenser outlet pipe (5) and check that
there are no bubbles (7) in it, which means that the system is
fully charged.
Low pressure gauge when charged with specified
amount :
About 200 - 300 kPa (2 - 3 kg/cm
2, 29 - 43 psi)
(At A/C inlet temperature 30 - 35 °C (86 - 95 °F))
High pressure gauge when charged with specified
amount :
About 1370 - 1670 kPa (14 - 17 kg/cm
2, 200 - 244 psi)
(At A/C inlet temperature 30 - 35 °C (86 - 95 °F))
1.“Hiss”
6
7
5
4
2 1
3
Page 50 of 656
AIR CONDITIONING (OPTIONAL) 1B-25
On-Vehicle Service
Precaution
When servicing air conditioning system, the following rules must be observed.
Piping
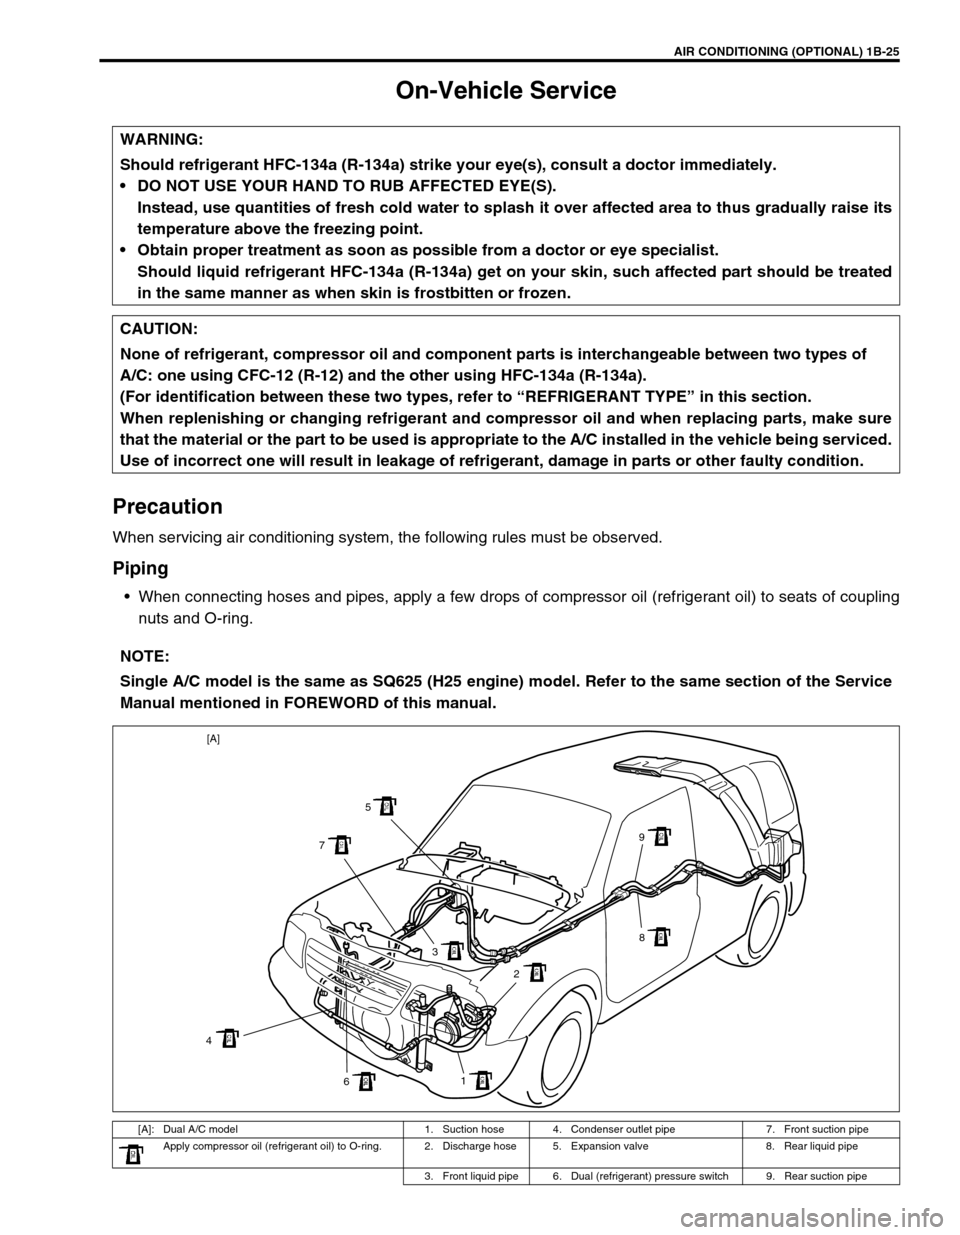
When connecting hoses and pipes, apply a few drops of compressor oil (refrigerant oil) to seats of coupling
nuts and O-ring. WARNING:
Should refrigerant HFC-134a (R-134a) strike your eye(s), consult a doctor immediately.
DO NOT USE YOUR HAND TO RUB AFFECTED EYE(S).
Instead, use quantities of fresh cold water to splash it over affected area to thus gradually raise its
temperature above the freezing point.
Obtain proper treatment as soon as possible from a doctor or eye specialist.
Should liquid refrigerant HFC-134a (R-134a) get on your skin, such affected part should be treated
in the same manner as when skin is frostbitten or frozen.
CAUTION:
None of refrigerant, compressor oil and component parts is interchangeable between two types of
A/C: one using CFC-12 (R-12) and the other using HFC-134a (R-134a).
(For identification between these two types, refer to “REFRIGERANT TYPE” in this section.
When replenishing or changing refrigerant and compressor oil and when replacing parts, make sure
that the material or the part to be used is appropriate to the A/C installed in the vehicle being serviced.
Use of incorrect one will result in leakage of refrigerant, damage in parts or other faulty condition.
NOTE:
Single A/C model is the same as SQ625 (H25 engine) model. Refer to the same section of the Service
Manual mentioned in FOREWORD of this manual.
[A]: Dual A/C model 1. Suction hose 4. Condenser outlet pipe 7. Front suction pipe
Apply compressor oil (refrigerant oil) to O-ring. 2. Discharge hose 5. Expansion valve 8. Rear liquid pipe
3. Front liquid pipe 6. Dual (refrigerant) pressure switch 9. Rear suction pipe
1
6 43 75
9
8
2 [A]
Page 53 of 656
1B-28 AIR CONDITIONING (OPTIONAL)
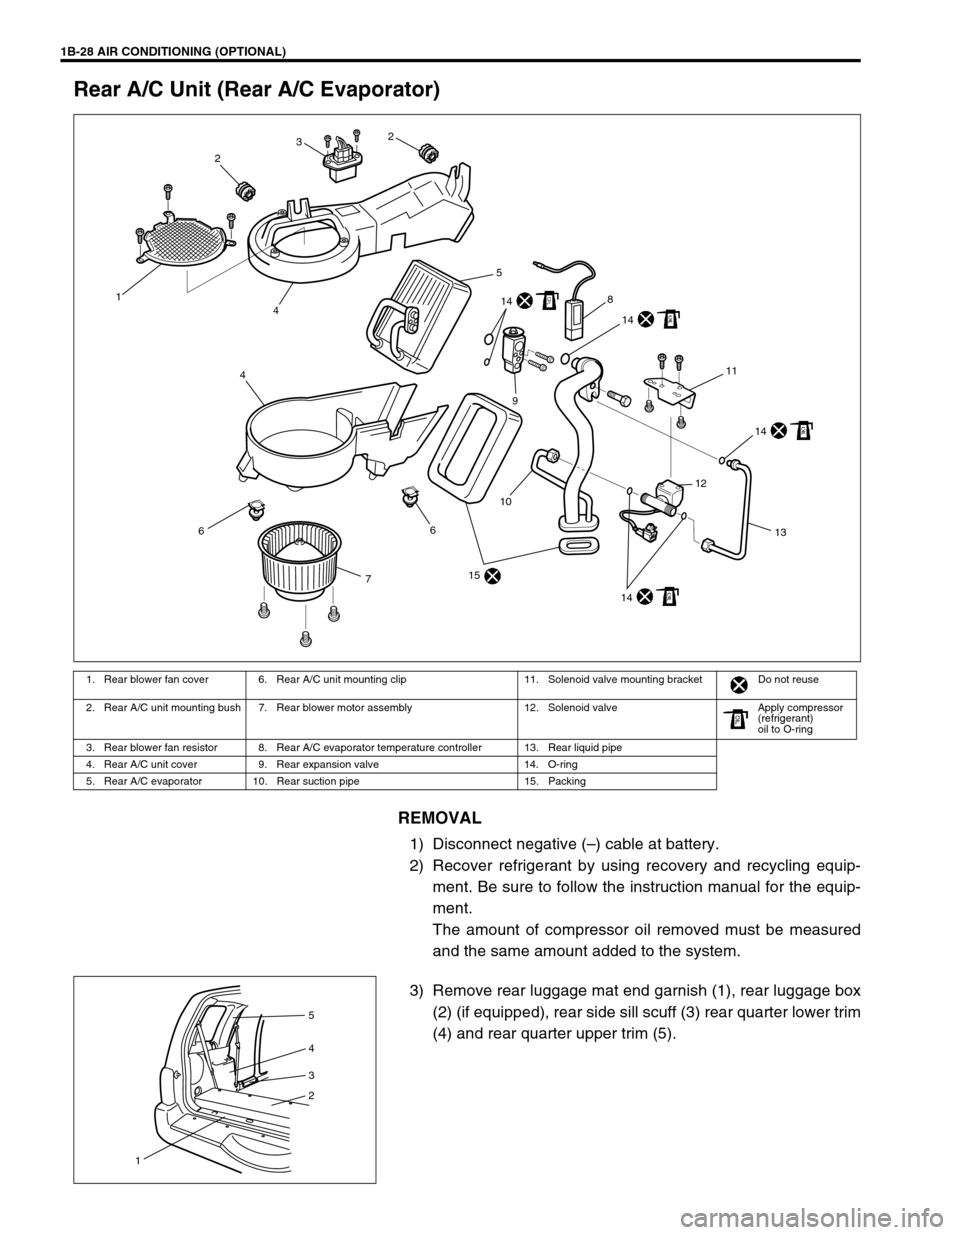
Rear A/C Unit (Rear A/C Evaporator)
REMOVAL
1) Disconnect negative (–) cable at battery.
2) Recover refrigerant by using recovery and recycling equip-
ment. Be sure to follow the instruction manual for the equip-
ment.
The amount of compressor oil removed must be measured
and the same amount added to the system.
3) Remove rear luggage mat end garnish (1), rear luggage box
(2) (if equipped), rear side sill scuff (3) rear quarter lower trim
(4) and rear quarter upper trim (5).
1. Rear blower fan cover 6. Rear A/C unit mounting clip 11. Solenoid valve mounting bracket Do not reuse
2. Rear A/C unit mounting bush 7. Rear blower motor assembly 12. Solenoid valve Apply compressor
(refrigerant)
oil to O-ring
3. Rear blower fan resistor 8. Rear A/C evaporator temperature controller 13. Rear liquid pipe
4. Rear A/C unit cover 9. Rear expansion valve 14. O-ring
5. Rear A/C evaporator 10. Rear suction pipe 15. Packing
6
7
15
10
14
12
13
14
14
14
11
8
9
4
6
5
41
232
5
4
3
2
1
Page 54 of 656
AIR CONDITIONING (OPTIONAL) 1B-29
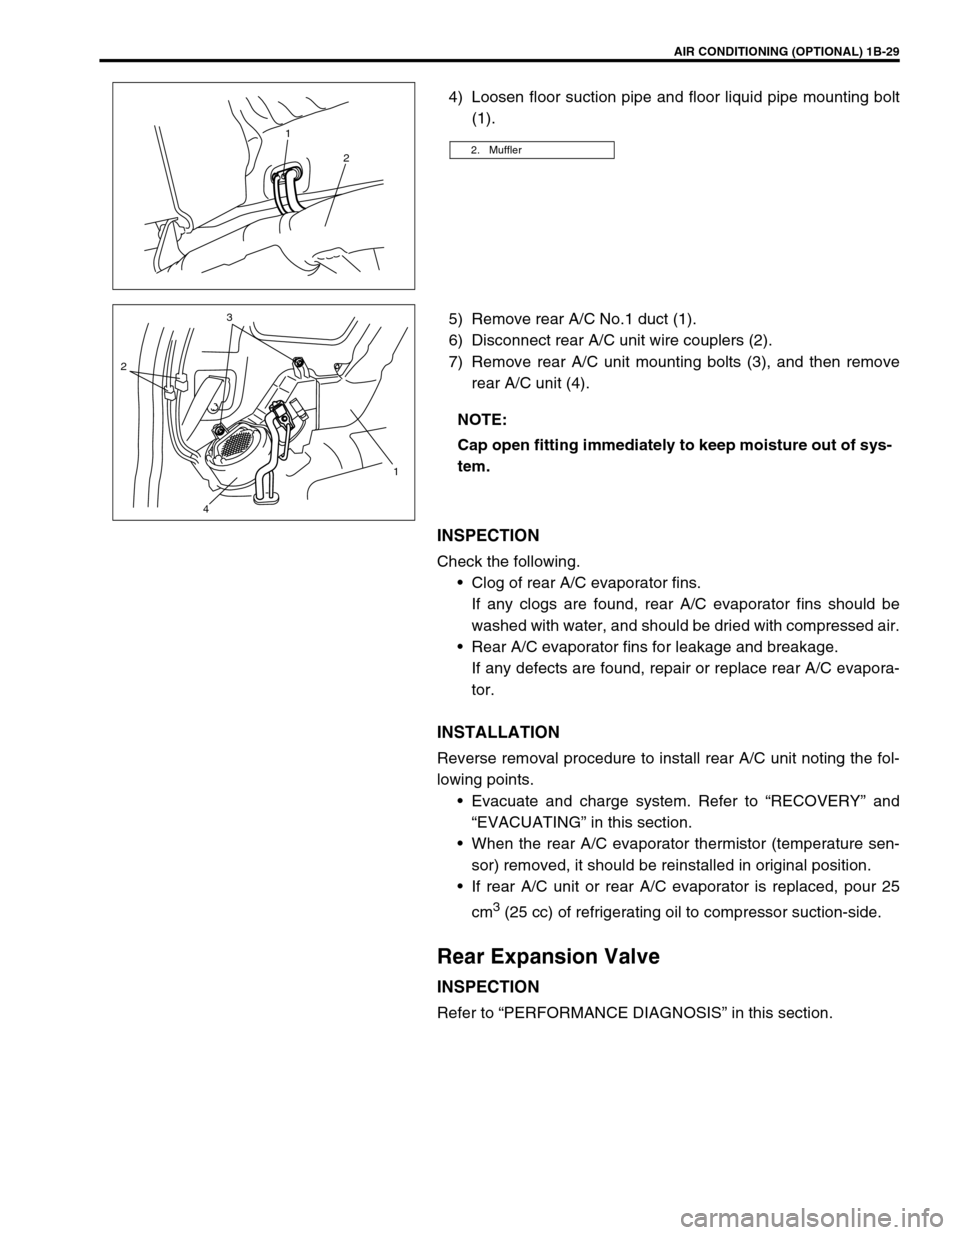
4) Loosen floor suction pipe and floor liquid pipe mounting bolt
(1).
5) Remove rear A/C No.1 duct (1).
6) Disconnect rear A/C unit wire couplers (2).
7) Remove rear A/C unit mounting bolts (3), and then remove
rear A/C unit (4).
INSPECTION
Check the following.
Clog of rear A/C evaporator fins.
If any clogs are found, rear A/C evaporator fins should be
washed with water, and should be dried with compressed air.
Rear A/C evaporator fins for leakage and breakage.
If any defects are found, repair or replace rear A/C evapora-
tor.
INSTALLATION
Reverse removal procedure to install rear A/C unit noting the fol-
lowing points.
Evacuate and charge system. Refer to “RECOVERY” and
“EVACUATING” in this section.
When the rear A/C evaporator thermistor (temperature sen-
sor) removed, it should be reinstalled in original position.
If rear A/C unit or rear A/C evaporator is replaced, pour 25
cm
3 (25 cc) of refrigerating oil to compressor suction-side.
Rear Expansion Valve
INSPECTION
Refer to “PERFORMANCE DIAGNOSIS” in this section.
2. Muffler
1
2
NOTE:
Cap open fitting immediately to keep moisture out of sys-
tem.
23
1
4