Page 1095 of 1456
22. Airdam Skirt
A: REMOVAL AND INSTALLATION
1) Remove airdam skirt mounting bolts and clips.
B5M0418
2) Installation is in the reverse order of removal.
23. Rear Under Spoiler
A: REMOVAL AND INSTALLATION
1) Remove tapping screws and clips.
B5M0419
2) Installation is in the reverse order of removal.
NOTE:
I12 tapping screws are used for Sedan.
I14 tapping screws are used for Wagon.
64
5-1[W22A0]SERVICE PROCEDURE
22. Airdam Skirt
Page 1096 of 1456
22. Airdam Skirt
A: REMOVAL AND INSTALLATION
1) Remove airdam skirt mounting bolts and clips.
B5M0418
2) Installation is in the reverse order of removal.
23. Rear Under Spoiler
A: REMOVAL AND INSTALLATION
1) Remove tapping screws and clips.
B5M0419
2) Installation is in the reverse order of removal.
NOTE:
I12 tapping screws are used for Sedan.
I14 tapping screws are used for Wagon.
64
5-1[W22A0]SERVICE PROCEDURE
22. Airdam Skirt
Page 1097 of 1456

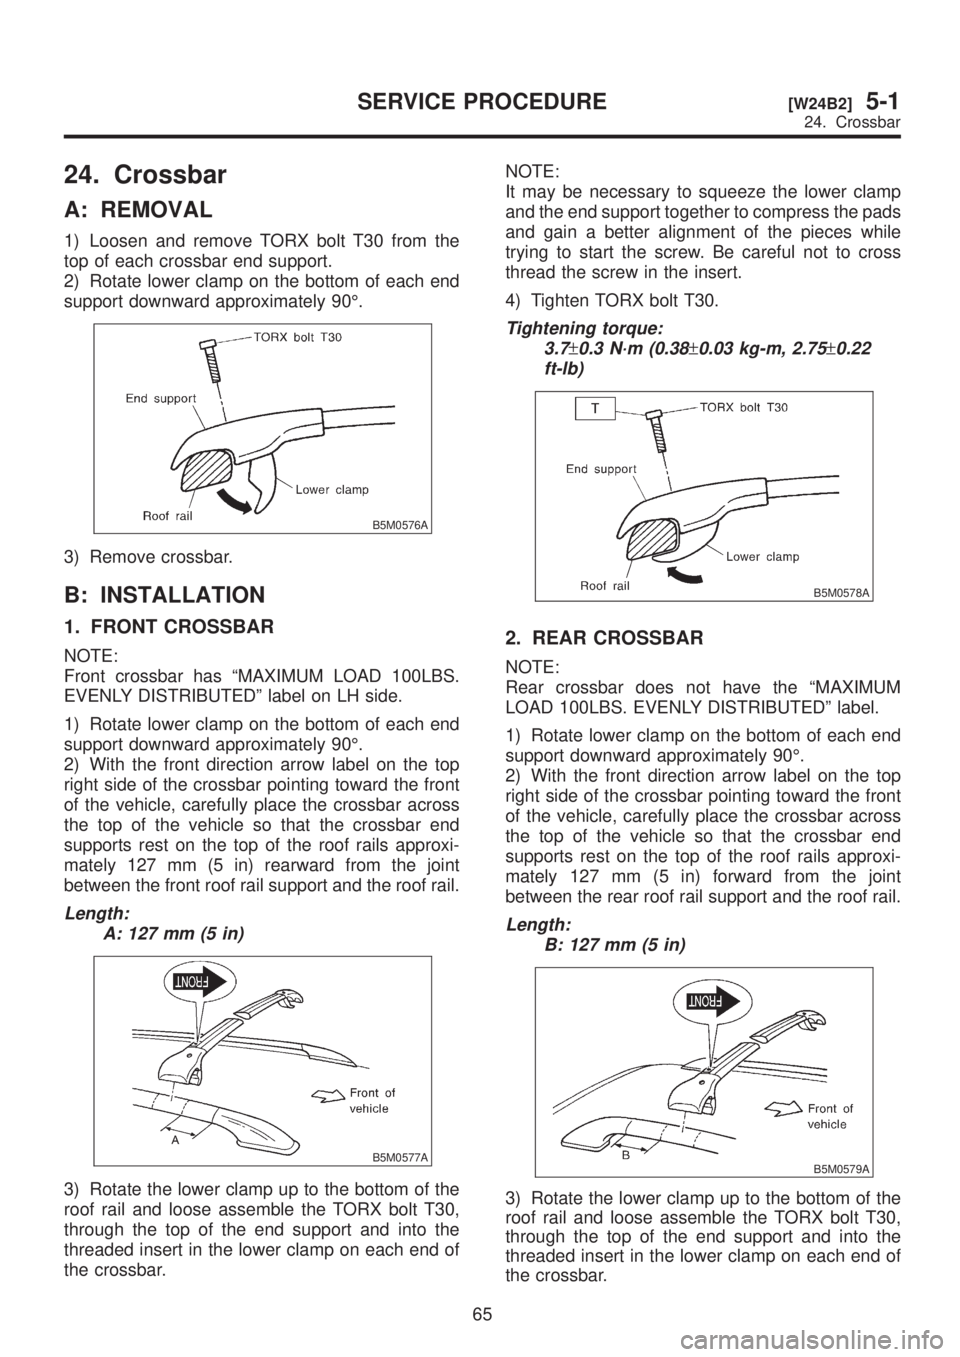
24. Crossbar
A: REMOVAL
1) Loosen and remove TORX bolt T30 from the
top of each crossbar end support.
2) Rotate lower clamp on the bottom of each end
support downward approximately 90É.
B5M0576A
3) Remove crossbar.
B: INSTALLATION
1. FRONT CROSSBAR
NOTE:
Front crossbar has ªMAXIMUM LOAD 100LBS.
EVENLY DISTRIBUTEDº label on LH side.
1) Rotate lower clamp on the bottom of each end
support downward approximately 90É.
2) With the front direction arrow label on the top
right side of the crossbar pointing toward the front
of the vehicle, carefully place the crossbar across
the top of the vehicle so that the crossbar end
supports rest on the top of the roof rails approxi-
mately 127 mm (5 in) rearward from the joint
between the front roof rail support and the roof rail.
Length:
A: 127 mm (5 in)
B5M0577A
3) Rotate the lower clamp up to the bottom of the
roof rail and loose assemble the TORX bolt T30,
through the top of the end support and into the
threaded insert in the lower clamp on each end of
the crossbar.NOTE:
It may be necessary to squeeze the lower clamp
and the end support together to compress the pads
and gain a better alignment of the pieces while
trying to start the screw. Be careful not to cross
thread the screw in the insert.
4) Tighten TORX bolt T30.
Tightening torque:
3.7
±0.3 N´m (0.38±0.03 kg-m, 2.75±0.22
ft-lb)
B5M0578A
2. REAR CROSSBAR
NOTE:
Rear crossbar does not have the ªMAXIMUM
LOAD 100LBS. EVENLY DISTRIBUTEDº label.
1) Rotate lower clamp on the bottom of each end
support downward approximately 90É.
2) With the front direction arrow label on the top
right side of the crossbar pointing toward the front
of the vehicle, carefully place the crossbar across
the top of the vehicle so that the crossbar end
supports rest on the top of the roof rails approxi-
mately 127 mm (5 in) forward from the joint
between the rear roof rail support and the roof rail.
Length:
B: 127 mm (5 in)
B5M0579A
3) Rotate the lower clamp up to the bottom of the
roof rail and loose assemble the TORX bolt T30,
through the top of the end support and into the
threaded insert in the lower clamp on each end of
the crossbar.
65
[W24B2]5-1SERVICE PROCEDURE
24. Crossbar
Page 1102 of 1456
1. Front Door
B5M0052B
(1) Gusset
(2) Weatherstrip (Outer)
(3) Stabilizer (Outer)
(4) Stabilizer (Inner)
(5) Protector
(6) Stopper
(7) Knock pin(8) Checker
(9) Sealing cover
(10) Door panel
(11) Lower hinge
(12) Upper hinge
(13) Door sash (Rear)
(14) Door sash (Front)Tightening torque: N´m (kg-m, ft-lb)
T1:
7.4±2.0 (0.75±0.2, 5.4±1.4)
T2:13±3 (1.3±0.3, 9.4±2.2)
T3:25±3 (2.5±0.3, 18.1±2.2)
T4:29±5 (3.0±0.5, 21.7±3.6)
3
[C100]5-2COMPONENT PARTS
1. Front Door
Page 1103 of 1456
2. Rear Door
B5M0466B
(1) Weatherstrip (Outer)
(2) Stabilizer (Outer)
(3) Stabilizer (Inner)
(4) Stopper
(5) Knock pin
(6) Checker
(7) Seating cover(8) Door panel
(9) Lower hinge
(10) Upper hinge
(11) Door sash (Rear)
(12) Door sash (Front)
(13) Rear door catcherTightening torque: N´m (kg-m, ft-lb)
T1:
7.4±2.0 (0.75±0.2, 5.4±1.4)
T2:14±4 (1.4±0.4, 10.1±2.9)
T3:25±3 (2.5±0.3, 18.1±2.2)
T4:29±5 (3.0±0.5, 21.7±3.6)
T5:37±10 (3.8±1.0, 27.5±7.2)
4
5-2[C200]COMPONENT PARTS
2. Rear Door
Page 1104 of 1456
3. Fixed Glass
B5M0502A
(1) Windshield glass
(2) Dam rubber
(3) Molding(4) Locate pin
(5) Fastener
(6) Garnish(7) Rear window glass
(8) Rear quarter glass
5
[C300]5-2COMPONENT PARTS
3. Fixed Glass
Page 1106 of 1456
5. Rear Door Glass
B5M0055B
(1) Glass
(2) Regulator and motor ASSY
(3) Regulator handle (Except power
window)(4) Retainer spring
(5) Regulator ASSYTightening torque: N´m (kg-m, ft-lb)
T:
7.4±2.0 (0.75±0.2, 5.4±1.4)
7
[C500]5-2COMPONENT PARTS
5. Rear Door Glass
Page 1107 of 1456
6. Rear Gate and Glass
B5M0056B
(1) Rear gate
(2) Key cylinder
(3) Outer handle
(4) Door lock actuator
(5) Striker
(6) Latch
(7) Glass pin(8) Glass
(9) Buffer
(10) Stopper
(11) Gas stay
(12) Hinge
(13) Rear gate handleTightening torque: N´m (kg-m, ft-lb)
T1:
4.4±1.5 (0.45±0.15, 3.3±1.1)
T2:7.4±2.0 (0.75±0.2, 5.4±1.4)
T3:13±3 (1.3±0.3, 9.4±2.2)
T4:14±4 (1.4±0.4, 10.1±2.9)
T5:25±5 (2.5±0.5, 18.1±3.6)
8
5-2[C600]COMPONENT PARTS
6. Rear Gate and Glass