1999 SUBARU LEGACY engine
[x] Cancel search: enginePage 524 of 1456

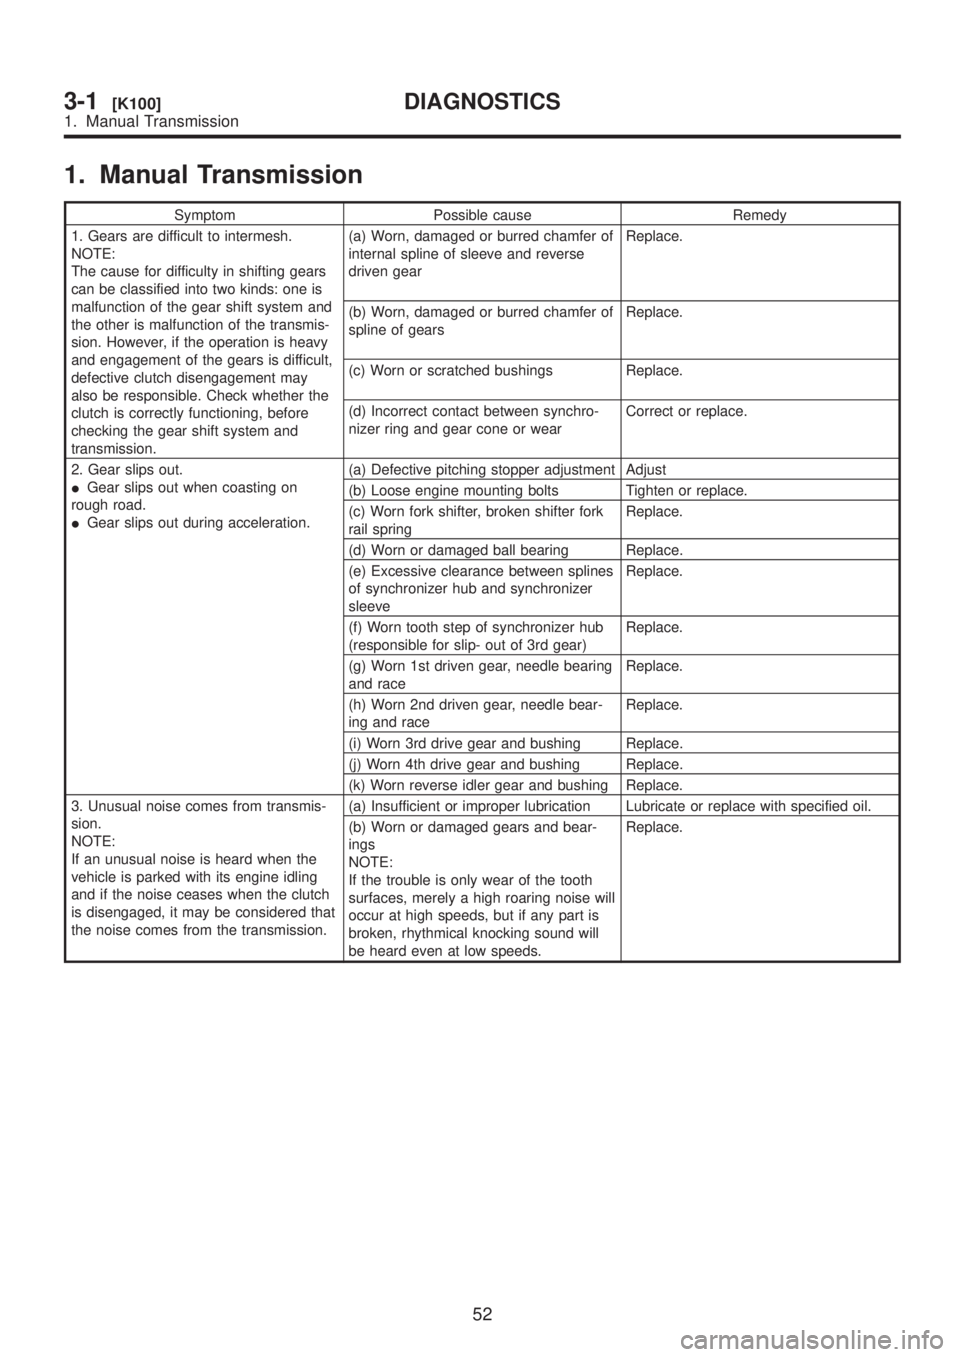
1. Manual Transmission
Symptom Possible cause Remedy
1. Gears are difficult to intermesh.
NOTE:
The cause for difficulty in shifting gears
can be classified into two kinds: one is
malfunction of the gear shift system and
the other is malfunction of the transmis-
sion. However, if the operation is heavy
and engagement of the gears is difficult,
defective clutch disengagement may
also be responsible. Check whether the
clutch is correctly functioning, before
checking the gear shift system and
transmission.(a) Worn, damaged or burred chamfer of
internal spline of sleeve and reverse
driven gearReplace.
(b) Worn, damaged or burred chamfer of
spline of gearsReplace.
(c) Worn or scratched bushings Replace.
(d) Incorrect contact between synchro-
nizer ring and gear cone or wearCorrect or replace.
2. Gear slips out.
IGear slips out when coasting on
rough road.
IGear slips out during acceleration.(a) Defective pitching stopper adjustment Adjust
(b) Loose engine mounting bolts Tighten or replace.
(c) Worn fork shifter, broken shifter fork
rail springReplace.
(d) Worn or damaged ball bearing Replace.
(e) Excessive clearance between splines
of synchronizer hub and synchronizer
sleeveReplace.
(f) Worn tooth step of synchronizer hub
(responsible for slip- out of 3rd gear)Replace.
(g) Worn 1st driven gear, needle bearing
and raceReplace.
(h) Worn 2nd driven gear, needle bear-
ing and raceReplace.
(i) Worn 3rd drive gear and bushing Replace.
(j) Worn 4th drive gear and bushing Replace.
(k) Worn reverse idler gear and bushing Replace.
3. Unusual noise comes from transmis-
sion.
NOTE:
If an unusual noise is heard when the
vehicle is parked with its engine idling
and if the noise ceases when the clutch
is disengaged, it may be considered that
the noise comes from the transmission.(a) Insufficient or improper lubrication Lubricate or replace with specified oil.
(b) Worn or damaged gears and bear-
ings
NOTE:
If the trouble is only wear of the tooth
surfaces, merely a high roaring noise will
occur at high speeds, but if any part is
broken, rhythmical knocking sound will
be heard even at low speeds.Replace.
52
3-1[K100]DIAGNOSTICS
1. Manual Transmission
Page 525 of 1456

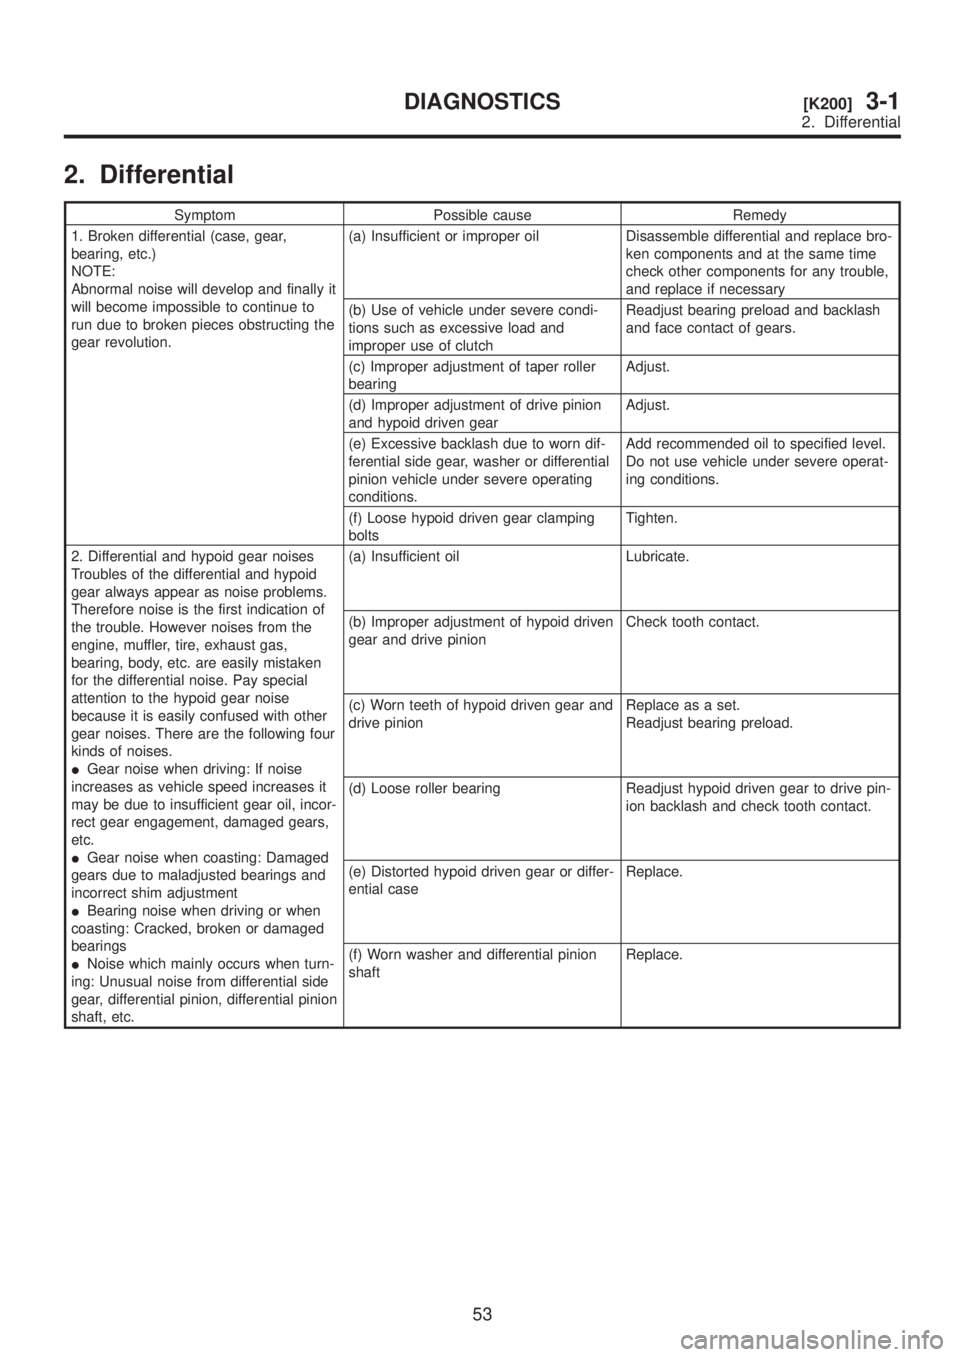
2. Differential
Symptom Possible cause Remedy
1. Broken differential (case, gear,
bearing, etc.)
NOTE:
Abnormal noise will develop and finally it
will become impossible to continue to
run due to broken pieces obstructing the
gear revolution.(a) Insufficient or improper oil Disassemble differential and replace bro-
ken components and at the same time
check other components for any trouble,
and replace if necessary
(b) Use of vehicle under severe condi-
tions such as excessive load and
improper use of clutchReadjust bearing preload and backlash
and face contact of gears.
(c) Improper adjustment of taper roller
bearingAdjust.
(d) Improper adjustment of drive pinion
and hypoid driven gearAdjust.
(e) Excessive backlash due to worn dif-
ferential side gear, washer or differential
pinion vehicle under severe operating
conditions.Add recommended oil to specified level.
Do not use vehicle under severe operat-
ing conditions.
(f) Loose hypoid driven gear clamping
boltsTighten.
2. Differential and hypoid gear noises
Troubles of the differential and hypoid
gear always appear as noise problems.
Therefore noise is the first indication of
the trouble. However noises from the
engine, muffler, tire, exhaust gas,
bearing, body, etc. are easily mistaken
for the differential noise. Pay special
attention to the hypoid gear noise
because it is easily confused with other
gear noises. There are the following four
kinds of noises.
IGear noise when driving: If noise
increases as vehicle speed increases it
may be due to insufficient gear oil, incor-
rect gear engagement, damaged gears,
etc.
IGear noise when coasting: Damaged
gears due to maladjusted bearings and
incorrect shim adjustment
IBearing noise when driving or when
coasting: Cracked, broken or damaged
bearings
INoise which mainly occurs when turn-
ing: Unusual noise from differential side
gear, differential pinion, differential pinion
shaft, etc.(a) Insufficient oil Lubricate.
(b) Improper adjustment of hypoid driven
gear and drive pinionCheck tooth contact.
(c) Worn teeth of hypoid driven gear and
drive pinionReplace as a set.
Readjust bearing preload.
(d) Loose roller bearing Readjust hypoid driven gear to drive pin-
ion backlash and check tooth contact.
(e) Distorted hypoid driven gear or differ-
ential caseReplace.
(f) Worn washer and differential pinion
shaftReplace.
53
[K200]3-1DIAGNOSTICS
2. Differential
Page 528 of 1456

Automatic
transmis-
sionTransmis-
sionSelector positionP (Park)Transmission in
neutral, output mem-
ber immovable, and
engine start possible
R (Reverse)Transmission in
reverse for backing
N (Neutral)Transmission in
neutral, and engine
start possible
D (Drive)Automatic gear
change
1st
¬
®2nd¬
®3rd¬
®4th
3 (3rd)Automatic gear
change
1st
¬
®2nd¬
®3rd
¬4th
2 (2nd)2nd gear locked
(Deceleration pos-
sible 4th®3rd®
2nd)
1 (1st)1st gear locked
(Deceleration pos-
sible 4th®3rd®
2nd®1st)
Control method Hydraulic remote control
Oil pumpType Trochoid constant-displacement pump
Driving method Driven by engine
Number of teethInner rotor 9
Outer rotor 10
Hydraulic
controlTypeElectronic/hydraulic control [Four forward speed changes by electri-
cal signals of vehicle speed and accelerator (throttle) opening]
Fluid Dexron II or Dexron III type Automatic transmission fluid
Fluid capacity2200 cc 8.4 Ð 8.7(8.9 Ð 9.2 US qt, 7.4 Ð 7.7 Imp qt)
2500 cc 9.3 Ð 9.6(9.8 Ð 10.1 US qt, 8.2 Ð 8.4 Imp qt)
Lubrica-
tionLubrication system Forced feed lubrication with oil pump
Oil Automatic transmission fluid (above mentioned.)
Cooling Cooling system Liquid-cooled cooler incorporated in radiator
HarnessInhibitor switch 12 poles
Transmission harness 17 poles
TransferTransfer clutch Hydraulic multi-plate clutch
Plate number of transfer clutchDrive plate & driven
plate2200 cc 4
2500 cc 5
Control method Electronic, hydraulic type
LubricantThe same Automatic Transmission
Fluid used in automatic transmission.
1st reduction gear ratio 1.000 (53/53)
3
[S1A0]3-2SPECIFICATIONS AND SERVICE DATA
1. Automatic Transmission and Differential
Page 552 of 1456

1. General
A: PRECAUTION
When disassembling or assembling the automatic
transmission, observe the following instructions.
1) Workshop
Provide a place that is clean and free from dust.
Principally the conventional workshop is suitable
except for a dusty place. In a workshop where
grinding work, etc. which produces fine particles is
done, make independent place divided by the vinyl
curtain or the equivalent.
2) Work table
The size of 1 x 1.5 m (40 x 60 in) is large enough
to work, and it is more desirable that its surface be
covered with flat plate like iron plate which is not
rusted too much.
3) Cleaning of exterior
(1) Clean the exterior surface of transmission
with steam and/or kerosene prior to
disassembly, however it should be noted that
vinyl tape be placed on the air breather or oil
level gauge to prevent infiltration of the steam
into the transmission and also the cleaning job
be done away from the place of disassembly
and assembly.
(2) Partial cleaning will do, depending on the
extent of disassembly (such as when disassem-
bly is limited to some certain parts).
4) Disassembly, assembly and cleaning
(1) Disassemble and assemble the transmis-
sion while inspecting the parts in accordance
with the Diagnostics.
(2) During job, do not use gloves. Do not clean
the parts with rags: Use chamois or nylon cloth.
(3) Pay special attention to the air to be used
for cleaning. Get the moisture and the dust rid
of the air as much as possible. Be careful not to
scratch or dent any part while checking for
proper operation with an air gun.
(4) Complete the job from cleaning to comple-
tion of assembly as continuously and speedily
as possible in order to avoid occurrence of sec-
ondary troubles caused by dust. When stopping
the job unavoidably cover the parts with clean
chamois or nylon cloth to keep them away from
any dust.
(5) Use kerosene, white gasoline or the equiva-
lent as washing fluid. Use always new fluid for
cleaning the automatic transmission parts and
never reuse. The used fluid is usable in disas-
semble and assemble work of engine and
manual transmission.
(6) Although the cleaning should be done by
dipping into the washing fluid or blowing of the
pressurized washing fluid, the dipping is more
desirable. (Do not rub with a brush.) Assemblethe parts immediately after the cleaning without
exposure to the air for a while. Besides in case
of washing rubber parts, perform the job quickly
not to dip them into the washing fluid for long
time.
(7) Apply the automatic transmission fluid
(ATF) onto the parts immediately prior to
assembly, and the specified tightening torque
should be observed carefully.
(8) Use vaseline if it is necessary to hold parts
in the position when assembling.
(9) Drain ATF and differential gear oil into a
saucer so that the conditions of fluid and oil can
be inspected.
(10) Do not support axle drive shaft, stator
shaft, input shaft or various pipes when moving
transmission from one place to another.
(11) Always discard old oil seals and O-ring,
and install new ones.
(12) Always discard old oil seals and O-ring,
and install new ones.
(13) Be sure to replace parts which are
damaged, worn, scratched, discolored, etc.
B: INSPECTION
1. ATF LEVEL
1) Raise ATF temperature to 60 to 80ÉC (140 to
176ÉF) from 40 to 60ÉC (104 to 140ÉF) (when cold)
by driving a distance of 5 to 10 km (3 to 6 miles).
NOTE:
The level of ATF varies with fluid temperature. Pay
attention to the fluid temperature when checking oil
level.
B3M1020A
2) Make sure the vehicle is level. After selecting all
positions (P, R, N, D, 3, 2, 1), set the selector lev-
eler in ªPº range. Measure fluid level with the
engine idling.
NOTE:
After running, idle the engine for one or two min-
utes before measurement.
3) If the fluid level is below the center between
upper and lower marks, add the recommended
ATF until the fluid level is found within the specified
27
[W1B1]3-2SERVICE PROCEDURE
1. General
Page 553 of 1456

range (above the center between upper and lower
marks). When the transmission is hot, the level
should be above the center of upper and lower
marks, and when it is cold, the level should be
found below the center of these two marks.
CAUTION:
IUse care not to exceed the upper limit level.
IATF level varies with temperature. Remem-
ber that the addition of fluid to the upper limit
mark when the transmission is cold will result
in the overfilling of fluid.
4) Fluid temperature rising speed
IBy idling the engine
Time for temperature rise to 60ÉC (140ÉF) with
atmospheric temperature of 0ÉC (32ÉF): More than
25 minutes
Time for temperature rise to 30ÉC (86ÉF) with
atmospheric temperature of 0ÉC (32ÉF): Approx. 8
minutes
IBy running the vehicle
Time for temperature rise to 60ÉC (140ÉF) with
atmospheric temperature of 0ÉC (32ÉF): More than
10 minutes
5) Method for checking fluid level upon delivery or
at periodic inspection
Check fluid level after a warm-up run of approx. 10
minutes. During the warm-up period, the automatic
transmission functions can also be checked.
2. DIFFERENTIAL GEAR OIL LEVEL
1) Ensure the vehicle is in safe condition.
NOTE:
Do not check the oil level nor add oil to the case
with the front end of the vehicle jacked-up; this will
result in an incorrect reading of the oil level.
2) Check whether the oil level is between the
upper (F) and lower (L) marks. If it is below the
lower limit mark, add oil until the level reaches the
upper mark.
G3M0283
3. OIL LEAKAGE
It is difficult to accurately determine the precise
position of a oil leak, since the surrounding area
also becomes wet with oil. The places where oil
seals and gaskets are used are as follows:
1) Jointing portion of the case
ITransmission case and oil pump housing joint-
ing portion
ITorque converter clutch case and oil pump
housing jointing portion
ITransmission case and extension case jointing
portion
B3M1021
2) Torque converter clutch case
IEngine crankshaft oil seal
ITorque converter clutch impeller sleeve oil seal
IATF cooler pipe connector
ITorque converter clutch
ITorque converter clutch case
IAxle shaft oil seal
IO-ring on the outside diameter of axle shaft oil
seal holder
IO-ring on the differential oil gauge
IDifferential oil drain plug
ILocation of steel balls
B3M1022
28
3-2[W1B2]SERVICE PROCEDURE
1. General
Page 568 of 1456

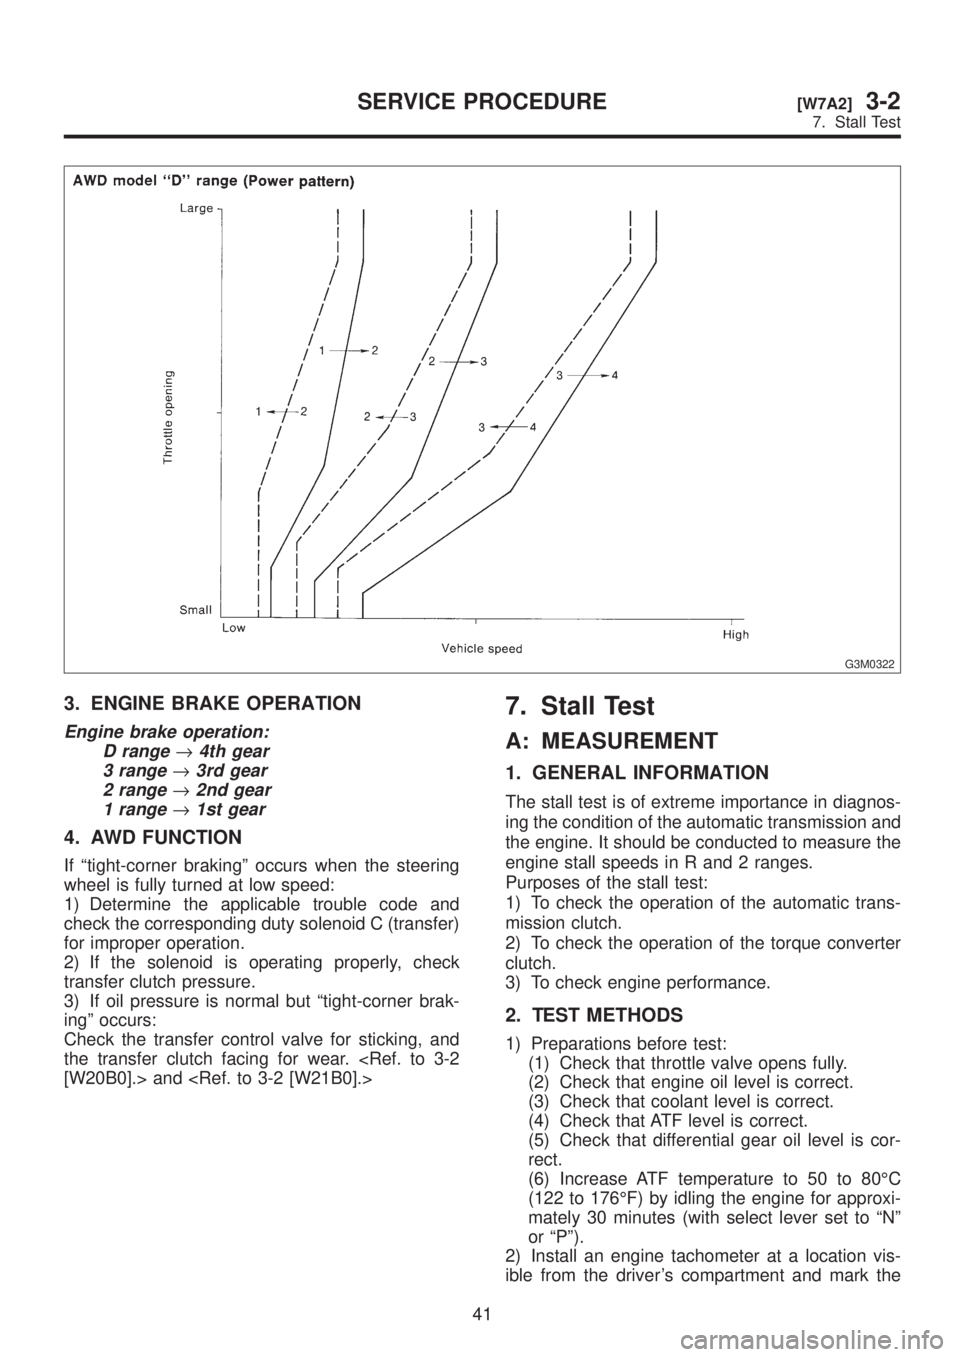
G3M0322
3. ENGINE BRAKE OPERATION
Engine brake operation:
D range
®4th gear
3 range
®3rd gear
2 range
®2nd gear
1 range
®1st gear
4. AWD FUNCTION
If ªtight-corner brakingº occurs when the steering
wheel is fully turned at low speed:
1) Determine the applicable trouble code and
check the corresponding duty solenoid C (transfer)
for improper operation.
2) If the solenoid is operating properly, check
transfer clutch pressure.
3) If oil pressure is normal but ªtight-corner brak-
ingº occurs:
Check the transfer control valve for sticking, and
the transfer clutch facing for wear.
7. Stall Test
A: MEASUREMENT
1. GENERAL INFORMATION
The stall test is of extreme importance in diagnos-
ing the condition of the automatic transmission and
the engine. It should be conducted to measure the
engine stall speeds in R and 2 ranges.
Purposes of the stall test:
1) To check the operation of the automatic trans-
mission clutch.
2) To check the operation of the torque converter
clutch.
3) To check engine performance.
2. TEST METHODS
1) Preparations before test:
(1) Check that throttle valve opens fully.
(2) Check that engine oil level is correct.
(3) Check that coolant level is correct.
(4) Check that ATF level is correct.
(5) Check that differential gear oil level is cor-
rect.
(6) Increase ATF temperature to 50 to 80ÉC
(122 to 176ÉF) by idling the engine for approxi-
mately 30 minutes (with select lever set to ªNº
or ªPº).
2) Install an engine tachometer at a location vis-
ible from the driver's compartment and mark the
41
[W7A2]3-2SERVICE PROCEDURE
7. Stall Test
Page 569 of 1456

G3M0322
3. ENGINE BRAKE OPERATION
Engine brake operation:
D range
®4th gear
3 range
®3rd gear
2 range
®2nd gear
1 range
®1st gear
4. AWD FUNCTION
If ªtight-corner brakingº occurs when the steering
wheel is fully turned at low speed:
1) Determine the applicable trouble code and
check the corresponding duty solenoid C (transfer)
for improper operation.
2) If the solenoid is operating properly, check
transfer clutch pressure.
3) If oil pressure is normal but ªtight-corner brak-
ingº occurs:
Check the transfer control valve for sticking, and
the transfer clutch facing for wear.
7. Stall Test
A: MEASUREMENT
1. GENERAL INFORMATION
The stall test is of extreme importance in diagnos-
ing the condition of the automatic transmission and
the engine. It should be conducted to measure the
engine stall speeds in R and 2 ranges.
Purposes of the stall test:
1) To check the operation of the automatic trans-
mission clutch.
2) To check the operation of the torque converter
clutch.
3) To check engine performance.
2. TEST METHODS
1) Preparations before test:
(1) Check that throttle valve opens fully.
(2) Check that engine oil level is correct.
(3) Check that coolant level is correct.
(4) Check that ATF level is correct.
(5) Check that differential gear oil level is cor-
rect.
(6) Increase ATF temperature to 50 to 80ÉC
(122 to 176ÉF) by idling the engine for approxi-
mately 30 minutes (with select lever set to ªNº
or ªPº).
2) Install an engine tachometer at a location vis-
ible from the driver's compartment and mark the
41
[W7A2]3-2SERVICE PROCEDURE
7. Stall Test
Page 570 of 1456

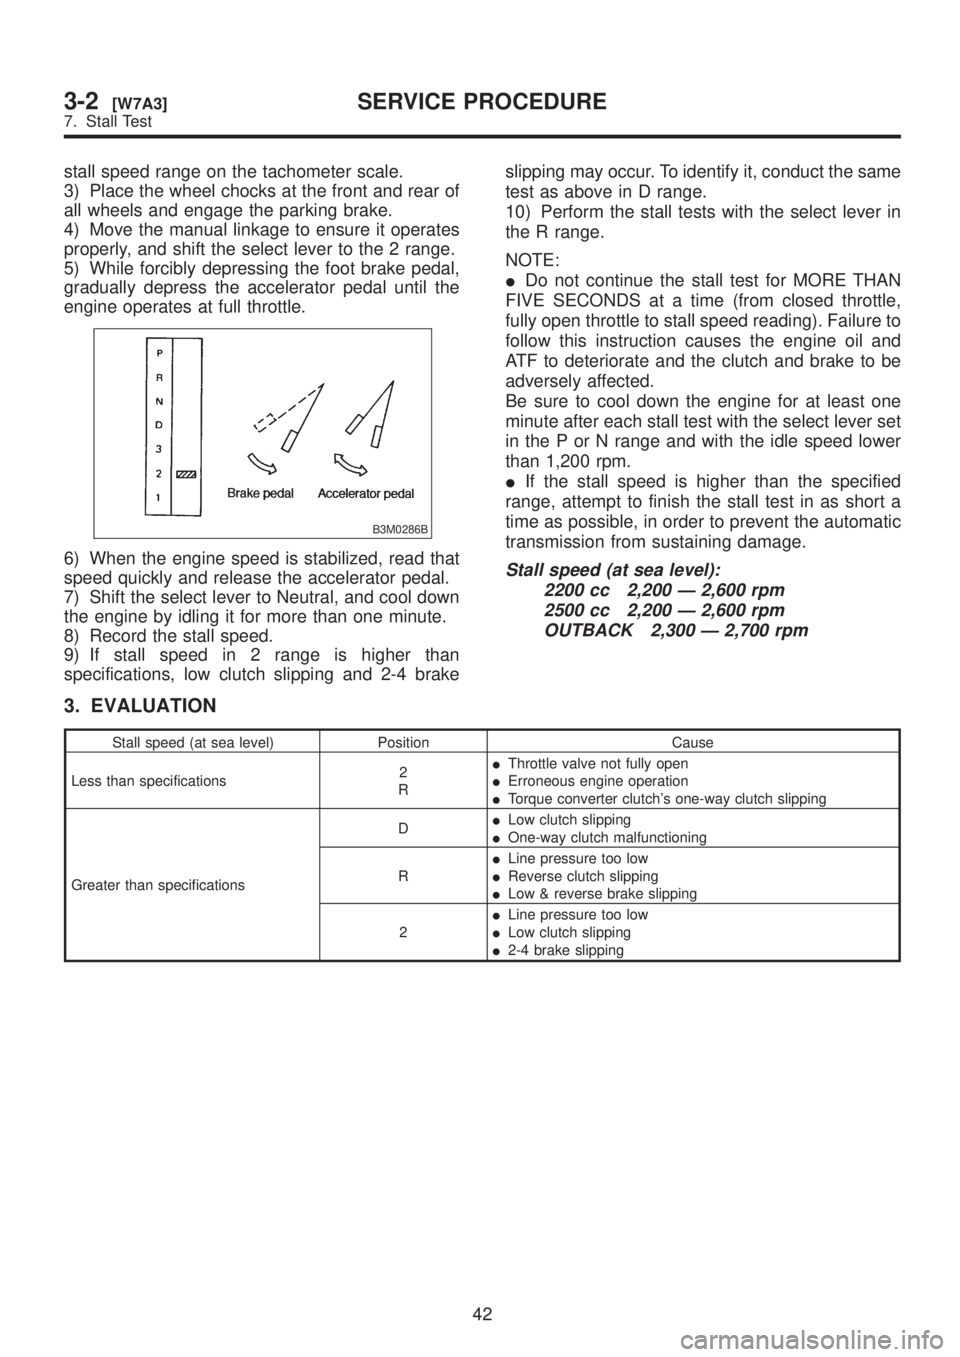
stall speed range on the tachometer scale.
3) Place the wheel chocks at the front and rear of
all wheels and engage the parking brake.
4) Move the manual linkage to ensure it operates
properly, and shift the select lever to the 2 range.
5) While forcibly depressing the foot brake pedal,
gradually depress the accelerator pedal until the
engine operates at full throttle.
B3M0286B
6) When the engine speed is stabilized, read that
speed quickly and release the accelerator pedal.
7) Shift the select lever to Neutral, and cool down
the engine by idling it for more than one minute.
8) Record the stall speed.
9) If stall speed in 2 range is higher than
specifications, low clutch slipping and 2-4 brakeslipping may occur. To identify it, conduct the same
test as above in D range.
10) Perform the stall tests with the select lever in
the R range.
NOTE:
IDo not continue the stall test for MORE THAN
FIVE SECONDS at a time (from closed throttle,
fully open throttle to stall speed reading). Failure to
follow this instruction causes the engine oil and
ATF to deteriorate and the clutch and brake to be
adversely affected.
Be sure to cool down the engine for at least one
minute after each stall test with the select lever set
in the P or N range and with the idle speed lower
than 1,200 rpm.
IIf the stall speed is higher than the specified
range, attempt to finish the stall test in as short a
time as possible, in order to prevent the automatic
transmission from sustaining damage.Stall speed (at sea level):
2200 cc 2,200 Ð 2,600 rpm
2500 cc 2,200 Ð 2,600 rpm
OUTBACK 2,300 Ð 2,700 rpm
3. EVALUATION
Stall speed (at sea level) Position Cause
Less than specifications2
RIThrottle valve not fully open
IErroneous engine operation
ITorque converter clutch's one-way clutch slipping
Greater than specificationsDILow clutch slipping
IOne-way clutch malfunctioning
RILine pressure too low
IReverse clutch slipping
ILow & reverse brake slipping
2ILine pressure too low
ILow clutch slipping
I2-4 brake slipping
42
3-2[W7A3]SERVICE PROCEDURE
7. Stall Test