Page 257 of 345
10) If any mechanism does not function properly,
loosen bolts (C) and (D), slide seat as required,
insert all lock plate pawls into holes in slide rail
brackets, and tighten bolts (C) and (D) in that
order.
11) Install bolt cover on rear end of slide rail.
12) Install headrest on backrest.
NOTE:
Tighten bolts in the designated order.2. Rear Seat
A: REMOVAL AND INSTALLATION
1. CUSHION
1) Remove bolts securing hinges (located at front
of cushion) to body.
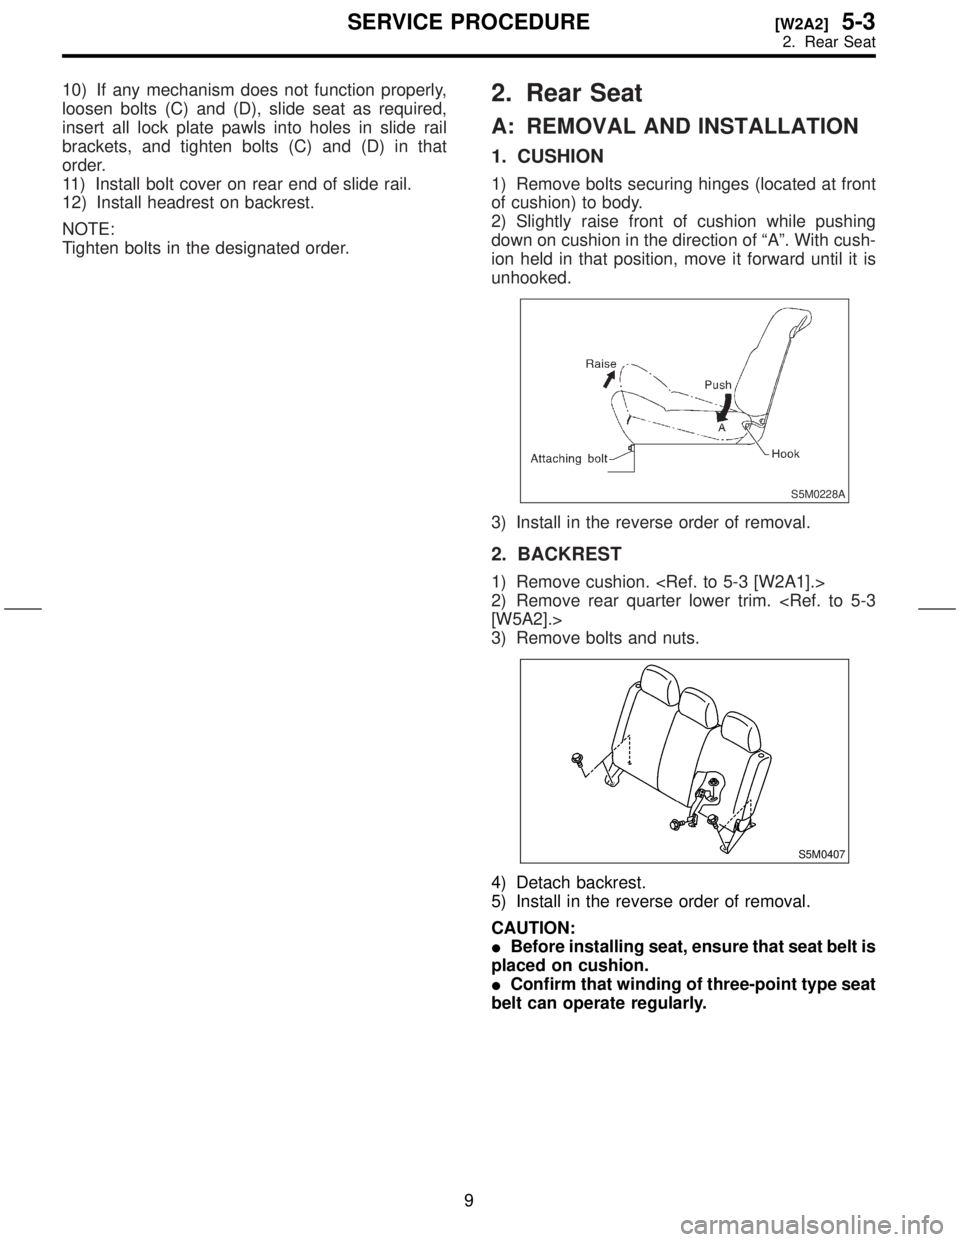
2) Slightly raise front of cushion while pushing
down on cushion in the direction of ªAº. With cush-
ion held in that position, move it forward until it is
unhooked.
S5M0228A
3) Install in the reverse order of removal.
2. BACKREST
1) Remove cushion.
2) Remove rear quarter lower trim.
[W5A2].>
3) Remove bolts and nuts.
S5M0407
4) Detach backrest.
5) Install in the reverse order of removal.
CAUTION:
IBefore installing seat, ensure that seat belt is
placed on cushion.
IConfirm that winding of three-point type seat
belt can operate regularly.
9
[W2A2]5-3SERVICE PROCEDURE
2. Rear Seat
Page 259 of 345
3. Front Seat Belt
A: REMOVAL AND INSTALLATION
WARNING:
Replace front seat belt worn by occupants of a
vehicle that has been in a serious accident. The
entire assembly should be replaced even if
damage is not obvious.
1. OUTER BELT
1) Remove anchor cover.
2) Remove shoulder anchor bolt (A).
3) Remove center pillar cover (B).
[W5A1].>
S5M0231B
4) Remove center lower pillar trim panel.
5-3 [W5A1].>
5) Remove webbing guide.
S5M0233
G5M0653
6) Remove lap anchor bolt.
7) Remove belt retractor and outer belt.
S5M0232
8) Install in the reverse order of removal.
CAUTION:
IThe left and right ELR's are not mutually
interchangeable because different sensors are
used.
IBe careful not to twist belts during installa-
tion.
2. INNER BELT
1) Disconnect connector.
2) Remove anchor bolt and then detach inner belt.
S5M0234
3) Install in the reverse order of removal.
10
5-3[W3A0]SERVICE PROCEDURE
3. Front Seat Belt
Page 260 of 345
![SUBARU FORESTER 1999 Service Repair Manual 3. ADJUSTABLE SHOULDER ANCHOR
1) Remove shoulder anchor bolt. <Ref. to 5-3
[W3A1].>
2) Remove center pillar cover. <Ref. to 5-3
[W5A1].>
3) Remove center pillar upper trim. <Ref. to 5-3
[W5A1].>
4) Re](/manual-img/17/57427/w960_57427-259.png "SUBARU FORESTER 1999 Service Repair Manual 3. ADJUSTABLE SHOULDER ANCHOR
1) Remove shoulder anchor bolt. <Ref. to 5-3
[W3A1].>
2) Remove center pillar cover. <Ref. to 5-3
[W5A1].>
3) Remove center pillar upper trim. <Ref. to 5-3
[W5A1].>
4) Re")
3. ADJUSTABLE SHOULDER ANCHOR
1) Remove shoulder anchor bolt.
[W3A1].>
2) Remove center pillar cover.
[W5A1].>
3) Remove center pillar upper trim.
[W5A1].>
4) Remove adjustable shoulder anchor assembly.
S5M0235
5) Install in the reverse order of removal.
4. Rear Seat Belt
A: REMOVAL AND INSTALLATION
WARNING:
Replace rear seat belt worn by occupants of a
vehicle that has been in a serious accident. The
entire assembly should be replaced even if
damage is not obvious.
1. OUTER BELT (OUTSIDE)
1) Remove rear cushion.
2) Remove rear backrest.
3) Remove rear quarter upper trim and rear quar-
ter lower trim.
4) Remove anchor cover and then remove anchor
bolt.
5) Remove bolt and nut and then detach outer belt
assembly.
S5M0236
6) Install in the reverse order of removal.
NOTE:
Ensure that seat belt is properly reeled on and off
after installation of ELR.
CAUTION:
IBe extremely careful not to confuse center
seat anchor plate with outer seat anchor plate
during installation.
IEnsure that seat belts are free from twisting
after installation.
IEnsure that tongues, buckles and belts are
properly placed on seat.
11
[W4A1]5-3SERVICE PROCEDURE
4. Rear Seat Belt
Page 261 of 345
![SUBARU FORESTER 1999 Service Repair Manual 3. ADJUSTABLE SHOULDER ANCHOR
1) Remove shoulder anchor bolt. <Ref. to 5-3
[W3A1].>
2) Remove center pillar cover. <Ref. to 5-3
[W5A1].>
3) Remove center pillar upper trim. <Ref. to 5-3
[W5A1].>
4) Re](/manual-img/17/57427/w960_57427-260.png "SUBARU FORESTER 1999 Service Repair Manual 3. ADJUSTABLE SHOULDER ANCHOR
1) Remove shoulder anchor bolt. <Ref. to 5-3
[W3A1].>
2) Remove center pillar cover. <Ref. to 5-3
[W5A1].>
3) Remove center pillar upper trim. <Ref. to 5-3
[W5A1].>
4) Re")
3. ADJUSTABLE SHOULDER ANCHOR
1) Remove shoulder anchor bolt.
[W3A1].>
2) Remove center pillar cover.
[W5A1].>
3) Remove center pillar upper trim.
[W5A1].>
4) Remove adjustable shoulder anchor assembly.
S5M0235
5) Install in the reverse order of removal.
4. Rear Seat Belt
A: REMOVAL AND INSTALLATION
WARNING:
Replace rear seat belt worn by occupants of a
vehicle that has been in a serious accident. The
entire assembly should be replaced even if
damage is not obvious.
1. OUTER BELT (OUTSIDE)
1) Remove rear cushion.
2) Remove rear backrest.
3) Remove rear quarter upper trim and rear quar-
ter lower trim.
4) Remove anchor cover and then remove anchor
bolt.
5) Remove bolt and nut and then detach outer belt
assembly.
S5M0236
6) Install in the reverse order of removal.
NOTE:
Ensure that seat belt is properly reeled on and off
after installation of ELR.
CAUTION:
IBe extremely careful not to confuse center
seat anchor plate with outer seat anchor plate
during installation.
IEnsure that seat belts are free from twisting
after installation.
IEnsure that tongues, buckles and belts are
properly placed on seat.
11
[W4A1]5-3SERVICE PROCEDURE
4. Rear Seat Belt
Page 262 of 345
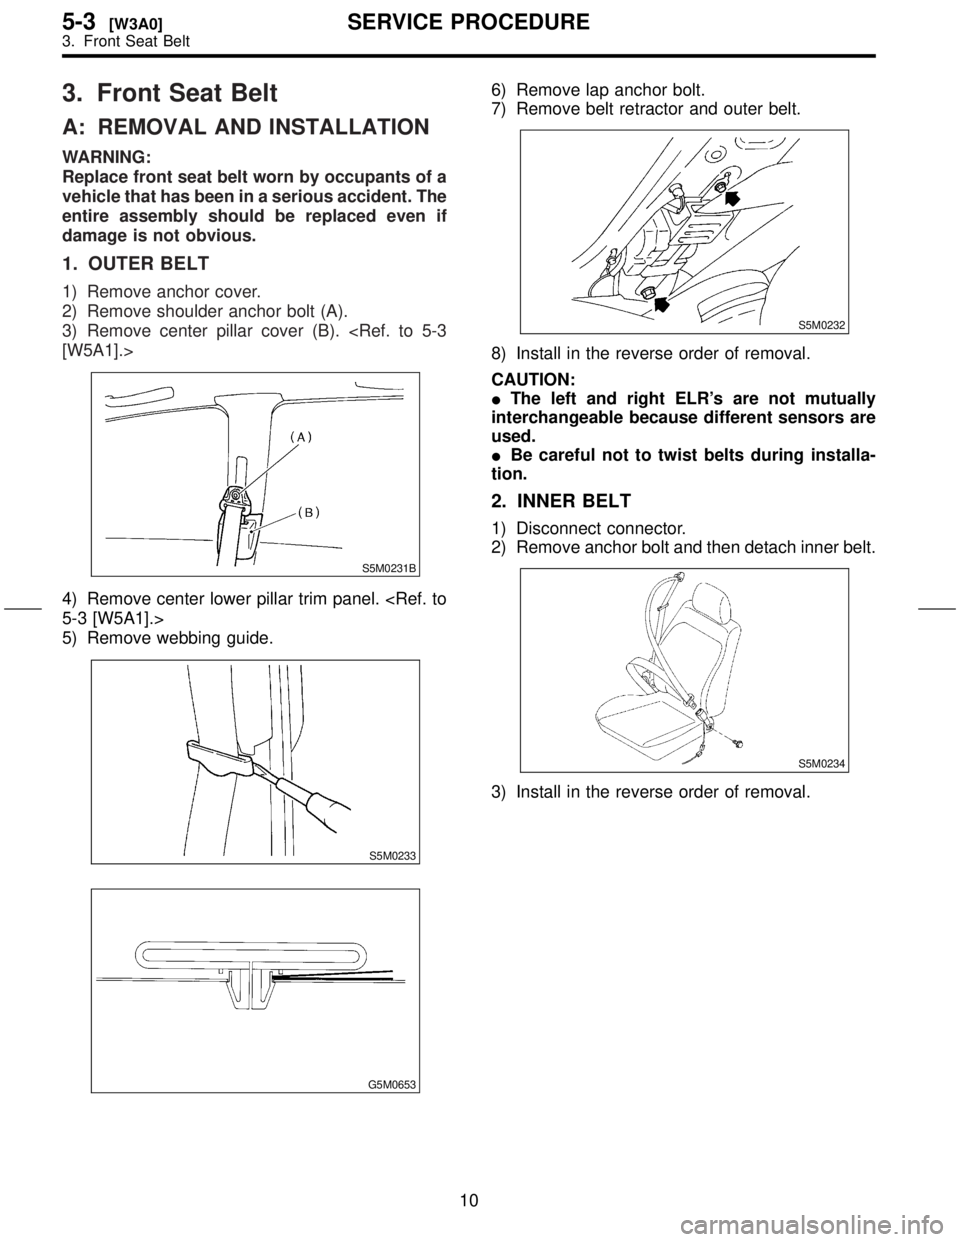
2. INNER BELT
1) Remove rear cushion.
2) Remove bolts and then remove inner belt.
S5M0408
3) Install in the reverse order of removal.
3. ADJUSTABLE SHOULDER ANCHOR
1) Remove anchor cover (A) and anchor (B).
2) Remove rear quarter upper trim.
[W5A2].>
3) Remove adjustable shoulder anchor (C).
S5M0409A
4) Install in the reverse order of removal.
4. OUTER BELT (CENTER)
1) Remove rear end of roof trim, then hang down
roof trim.
2) Remove cover (A), then pass the tongue (B)
from roof trim hole.
S5M0410A
3) Loosen bolts and then detach outer belt center.
S5M0411
4) Install in the reverse order of removal.
NOTE:
Ensure that seat belt is properly reeled on and off
after installation of ELR.
12
5-3[W4A2]SERVICE PROCEDURE
4. Rear Seat Belt
Page 263 of 345
5. Inner Trim Panel
A: REMOVAL AND INSTALLATION
1. FRONT SECTION
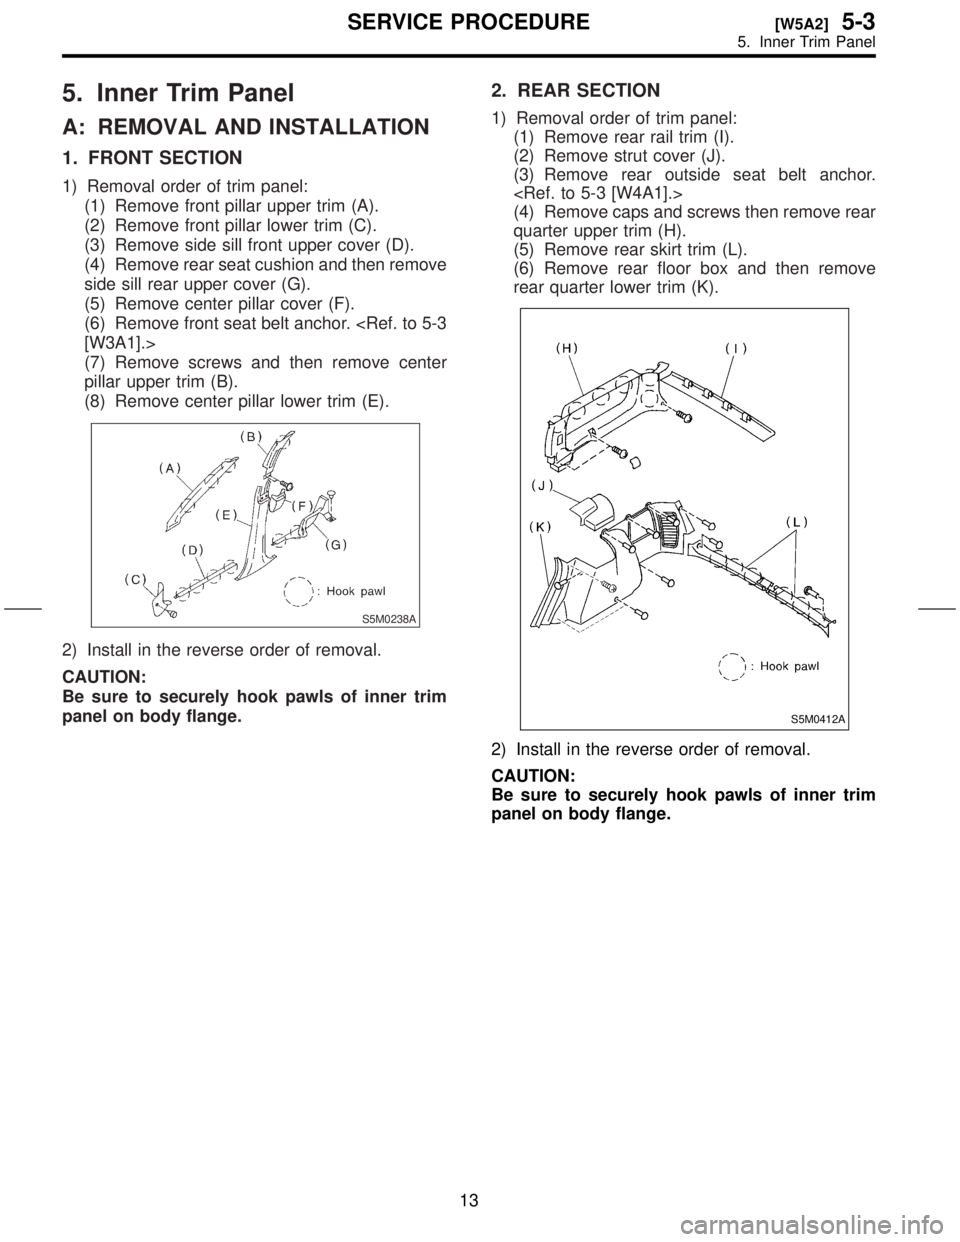
1) Removal order of trim panel:
(1) Remove front pillar upper trim (A).
(2) Remove front pillar lower trim (C).
(3) Remove side sill front upper cover (D).
(4) Remove rear seat cushion and then remove
side sill rear upper cover (G).
(5) Remove center pillar cover (F).
(6) Remove front seat belt anchor.
[W3A1].>
(7) Remove screws and then remove center
pillar upper trim (B).
(8) Remove center pillar lower trim (E).
S5M0238A
2) Install in the reverse order of removal.
CAUTION:
Be sure to securely hook pawls of inner trim
panel on body flange.
2. REAR SECTION
1) Removal order of trim panel:
(1) Remove rear rail trim (I).
(2) Remove strut cover (J).
(3) Remove rear outside seat belt anchor.
(4) Remove caps and screws then remove rear
quarter upper trim (H).
(5) Remove rear skirt trim (L).
(6) Remove rear floor box and then remove
rear quarter lower trim (K).
S5M0412A
2) Install in the reverse order of removal.
CAUTION:
Be sure to securely hook pawls of inner trim
panel on body flange.
13
[W5A2]5-3SERVICE PROCEDURE
5. Inner Trim Panel
Page 264 of 345
![SUBARU FORESTER 1999 Service Repair Manual 3. FLOOR SECTION
1) Removal order of floor mat:
(1) Remove front seats. <Ref. to 5-3 [W1A0].>
(2) Remove rear seat cushion. <Ref. to 5-3
[W2A1].>
(3) Remove console box, depending on the
specification](/manual-img/17/57427/w960_57427-263.png "SUBARU FORESTER 1999 Service Repair Manual 3. FLOOR SECTION
1) Removal order of floor mat:
(1) Remove front seats. <Ref. to 5-3 [W1A0].>
(2) Remove rear seat cushion. <Ref. to 5-3
[W2A1].>
(3) Remove console box, depending on the
specification")
3. FLOOR SECTION
1) Removal order of floor mat:
(1) Remove front seats.
(2) Remove rear seat cushion.
[W2A1].>
(3) Remove console box, depending on the
specifications.
(4) Remove front pillar lower trim panel.
to 5-3 [W5A1].>
(5) Remove center pillar lower trim panel.
to 5-3 [W5A1].>
(6) Remove side sill cover.
[W5A1].>
(7) Remove clips from floor mat.
NOTE:
When pulling out edge, do not pull mat alone; pull
mat together with edge. Pry off two steel clips on
side sill front cover and one on side sill rear cover
using screwdriver.
(8) Remove mat hook.
(9) Remove mat from toe board area.
(10) Remove mat from rear heater duct.
(11) Roll mat, and take it out of opened rear
door.
S5M0240
(12) Install in the reverse order of removal.
NOTE:
ISecure mat firmly with hook and velcro tape.
IInsert mat edge firmly into the groove of side sill
cover.
2) Removal order of rear floor box:(1) Remove clips and then detach rear floor
boxes.
S5M0241
(2) Install in the reverse order of removal.
4. ROOF TRIM
1) Remove head console.
S5M0243
2) Remove sunvisor and assist rail.
3) Remove front pillar upper trim and center pillar
upper trim , rear quarter
upper trim and rear rail trim.
4) Detach sunroof garnish (A). (Sunroof equipped
model)
S5M0305B
5) Using ST, remove clips.
ST 925580000 PULLER
14
5-3[W5A3]SERVICE PROCEDURE
5. Inner Trim Panel
Page 265 of 345
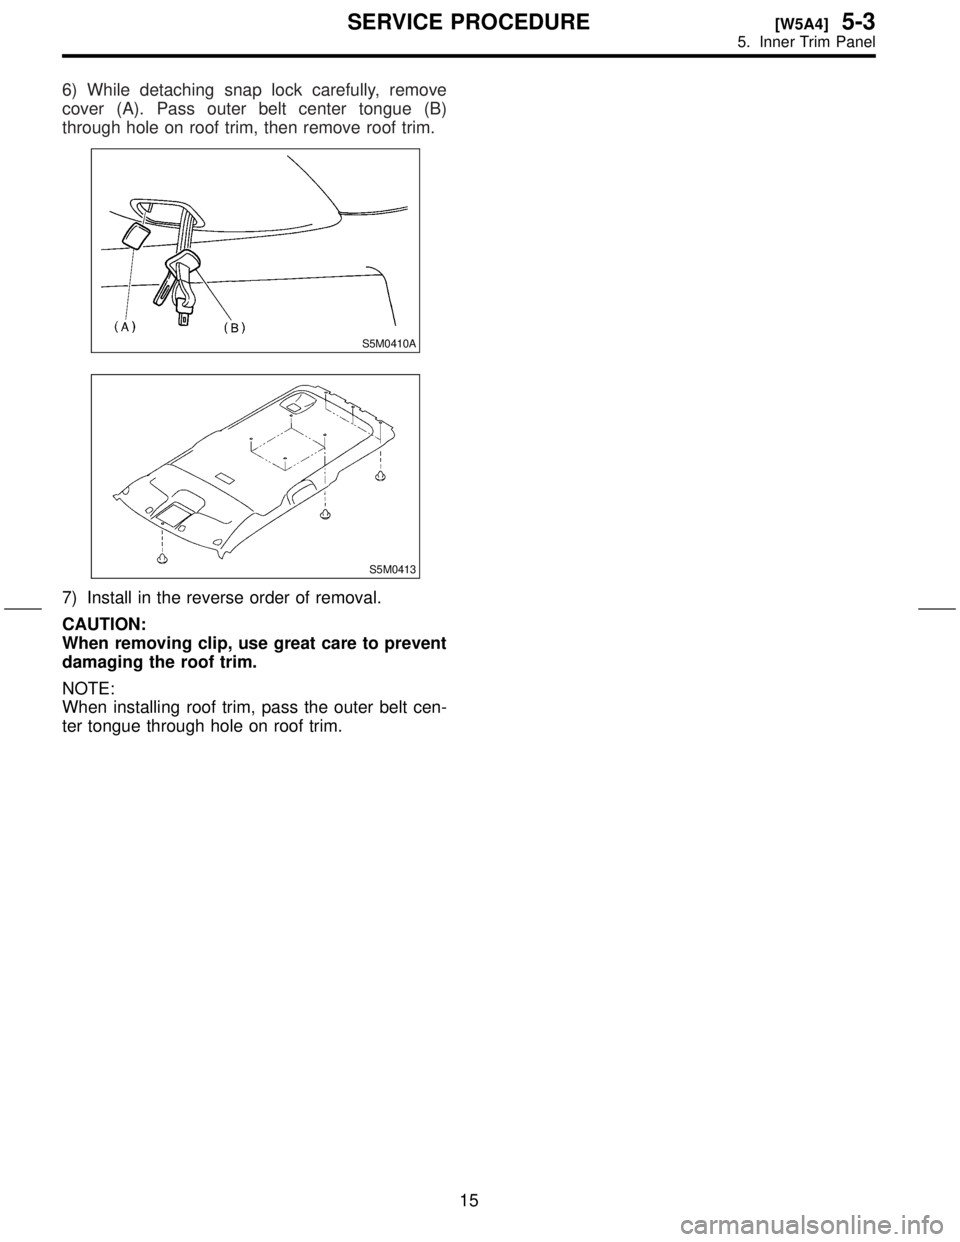
6) While detaching snap lock carefully, remove
cover (A). Pass outer belt center tongue (B)
through hole on roof trim, then remove roof trim.
S5M0410A
S5M0413
7) Install in the reverse order of removal.
CAUTION:
When removing clip, use great care to prevent
damaging the roof trim.
NOTE:
When installing roof trim, pass the outer belt cen-
ter tongue through hole on roof trim.
15
[W5A4]5-3SERVICE PROCEDURE
5. Inner Trim Panel
![SUBARU FORESTER 1999 Service Repair Manual 2. INNER BELT
1) Remove rear cushion. <Ref. to 5-3 [W2A1].>
2) Remove bolts and then remove inner belt.
S5M0408
3) Install in the reverse order of removal.
3. ADJUSTABLE SHOULDER ANCHOR
1) Remove anch](/manual-img/17/57427/w960_57427-261.png "SUBARU FORESTER 1999 Service Repair Manual 2. INNER BELT
1) Remove rear cushion. <Ref. to 5-3 [W2A1].>
2) Remove bolts and then remove inner belt.
S5M0408
3) Install in the reverse order of removal.
3. ADJUSTABLE SHOULDER ANCHOR
1) Remove anch")