1999 NISSAN PICK-UP engine coolant
[x] Cancel search: engine coolantPage 467 of 666
CAUTION:
lWhen installing sliding parts (bearings, pistons, etc.),
lubricate contacting surfaces with new engine oil.
lPlace removed parts such as bearings and bearing caps
in their proper order and direction.
lWhen installing connecting rod nuts and main bearing
cap bolts, apply new engine oil to threads and seating
surfaces.
lDo not allow any magnetic materials to contact the ring
gear teeth of flywheel or drive plate.
Disassembly
PISTON AND CRANKSHAFT
1. Place engine on a work stand.
2. Drain coolant and oil.
3. Remove oil pan.
4. Remove timing chain. Refer to ªRemovalº in ªTIMING
CHAINº (EM-2015).
5. Remove water pump.
6. Remove cylinder head.
7. Remove pistons with connecting rods.
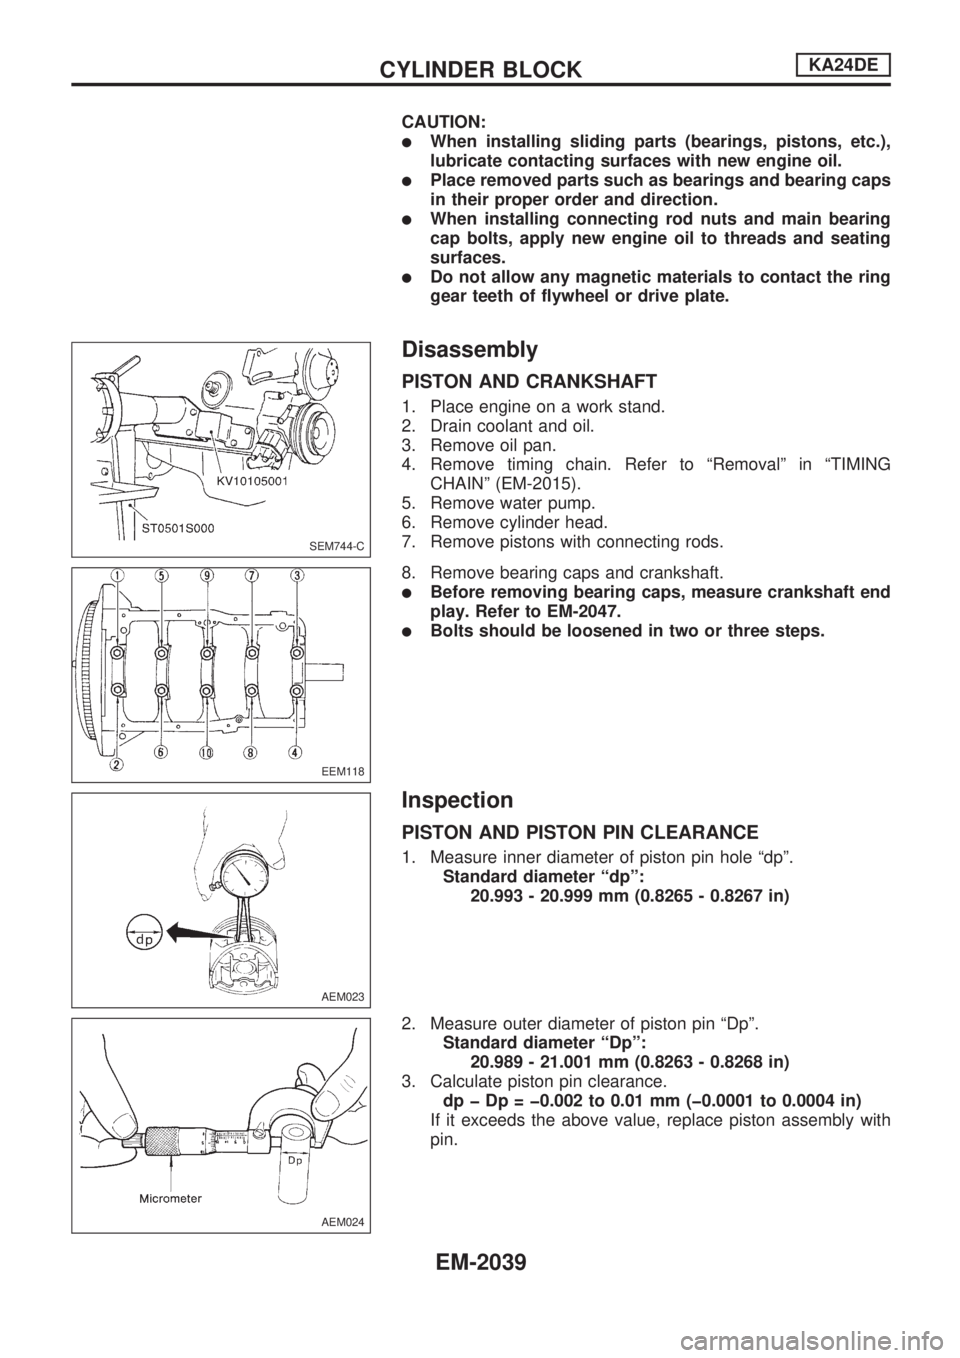
8. Remove bearing caps and crankshaft.
lBefore removing bearing caps, measure crankshaft end
play. Refer to EM-2047.
lBolts should be loosened in two or three steps.
Inspection
PISTON AND PISTON PIN CLEARANCE
1. Measure inner diameter of piston pin hole ªdpº.
Standard diameter ªdpº:
20.993 - 20.999 mm (0.8265 - 0.8267 in)
2. Measure outer diameter of piston pin ªDpº.
Standard diameter ªDpº:
20.989 - 21.001 mm (0.8263 - 0.8268 in)
3. Calculate piston pin clearance.
dp þ Dp = þ0.002 to 0.01 mm (þ0.0001 to 0.0004 in)
If it exceeds the above value, replace piston assembly with
pin.
SEM744-C
EEM118
AEM023
AEM024
CYLINDER BLOCKKA24DE
EM-2039
Page 488 of 666
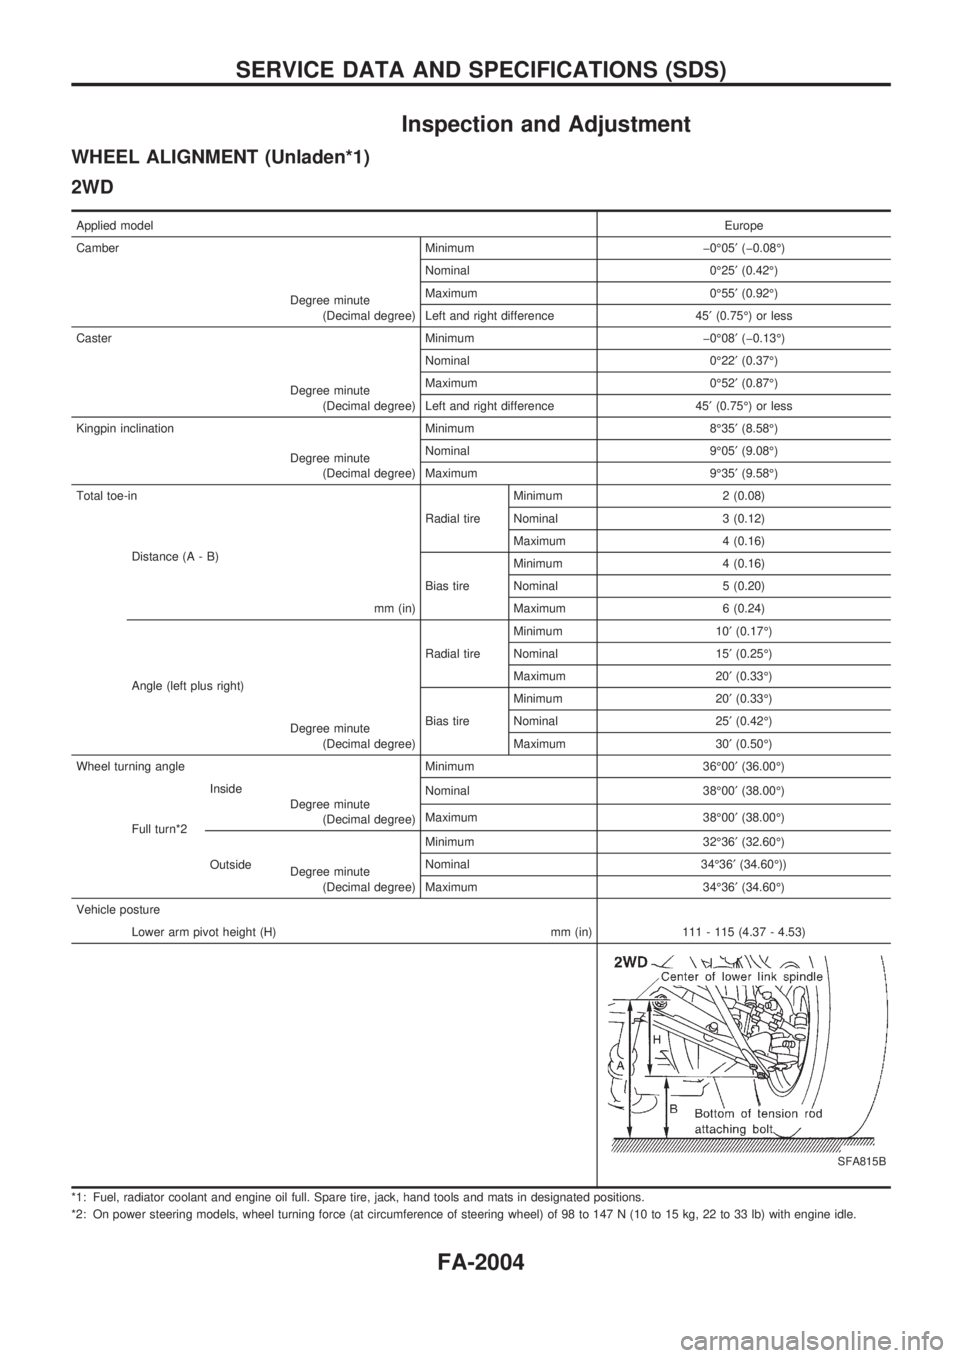
Inspection and Adjustment
WHEEL ALIGNMENT (Unladen*1)
2WD
Applied modelEurope
Camber Minimum þ0É05¢(þ0.08É)
Degree minute
(Decimal degree)Nominal 0É25¢(0.42É)
Maximum 0É55¢(0.92É)
Left and right difference 45¢(0.75É) or less
Caster Minimum þ0É08¢(þ0.13É)
Degree minute
(Decimal degree)Nominal 0É22¢(0.37É)
Maximum 0É52¢(0.87É)
Left and right difference 45¢(0.75É) or less
Kingpin inclination Minimum 8É35¢(8.58É)
Degree minute
(Decimal degree)Nominal 9É05¢(9.08É)
Maximum 9É35¢(9.58É)
Total toe-in
Radial tireMinimum 2 (0.08)
Distance (A - B)
mm (in)Nominal 3 (0.12)
Maximum 4 (0.16)
Bias tireMinimum 4 (0.16)
Nominal 5 (0.20)
Maximum 6 (0.24)
Angle (left plus right)
Degree minute
(Decimal degree)Radial tireMinimum 10¢(0.17É)
Nominal 15¢(0.25É)
Maximum 20¢(0.33É)
Bias tireMinimum 20¢(0.33É)
Nominal 25¢(0.42É)
Maximum 30¢(0.50É)
Wheel turning angle Minimum 36É00¢(36.00É)
Full turn*2Inside
Degree minute
(Decimal degree)Nominal 38É00¢(38.00É)
Maximum 38É00¢(38.00É)
OutsideMinimum 32É36¢(32.60É)
Degree minute
(Decimal degree)Nominal 34É36¢(34.60É))
Maximum 34É36¢(34.60É)
Vehicle posture
Lower arm pivot height (H) mm (in) 111 - 115 (4.37 - 4.53)
SFA815B
*1: Fuel, radiator coolant and engine oil full. Spare tire, jack, hand tools and mats in designated positions.
*2: On power steering models, wheel turning force (at circumference of steering wheel) of 98 to 147 N (10 to 15 kg, 22 to 33 lb) with engine idle.
SERVICE DATA AND SPECIFICATIONS (SDS)
FA-2004
Page 496 of 666
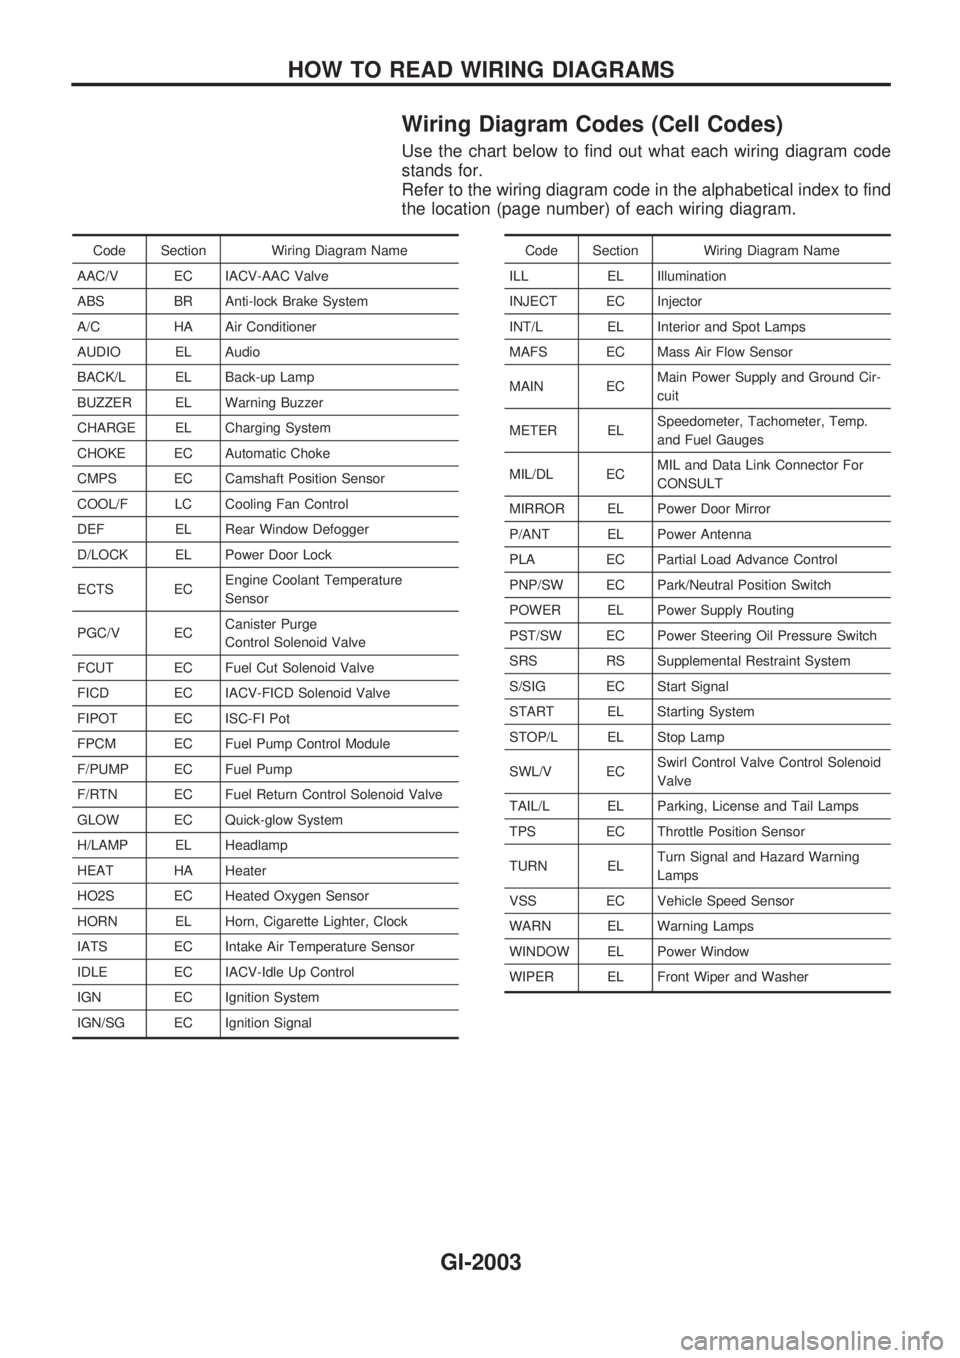
Wiring Diagram Codes (Cell Codes)
Use the chart below to find out what each wiring diagram code
stands for.
Refer to the wiring diagram code in the alphabetical index to find
the location (page number) of each wiring diagram.
Code Section Wiring Diagram Name
AAC/V EC IACV-AAC Valve
ABS BR Anti-lock Brake System
A/C HA Air Conditioner
AUDIO EL Audio
BACK/L EL Back-up Lamp
BUZZER EL Warning Buzzer
CHARGE EL Charging System
CHOKE EC Automatic Choke
CMPS EC Camshaft Position Sensor
COOL/F LC Cooling Fan Control
DEF EL Rear Window Defogger
D/LOCK EL Power Door Lock
ECTS ECEngine Coolant Temperature
Sensor
PGC/V ECCanister Purge
Control Solenoid Valve
FCUT EC Fuel Cut Solenoid Valve
FICD EC IACV-FICD Solenoid Valve
FIPOT EC ISC-FI Pot
FPCM EC Fuel Pump Control Module
F/PUMP EC Fuel Pump
F/RTN EC Fuel Return Control Solenoid Valve
GLOW EC Quick-glow System
H/LAMP EL Headlamp
HEAT HA Heater
HO2S EC Heated Oxygen Sensor
HORN EL Horn, Cigarette Lighter, Clock
IATS EC Intake Air Temperature Sensor
IDLE EC IACV-Idle Up Control
IGN EC Ignition System
IGN/SG EC Ignition SignalCode Section Wiring Diagram Name
ILL EL Illumination
INJECT EC Injector
INT/L EL Interior and Spot Lamps
MAFS EC Mass Air Flow Sensor
MAIN ECMain Power Supply and Ground Cir-
cuit
METER ELSpeedometer, Tachometer, Temp.
and Fuel Gauges
MIL/DL ECMIL and Data Link Connector For
CONSULT
MIRROR EL Power Door Mirror
P/ANT EL Power Antenna
PLA EC Partial Load Advance Control
PNP/SW EC Park/Neutral Position Switch
POWER EL Power Supply Routing
PST/SW EC Power Steering Oil Pressure Switch
SRS RS Supplemental Restraint System
S/SIG EC Start Signal
START EL Starting System
STOP/L EL Stop Lamp
SWL/V ECSwirl Control Valve Control Solenoid
Valve
TAIL/L EL Parking, License and Tail Lamps
TPS EC Throttle Position Sensor
TURN ELTurn Signal and Hazard Warning
Lamps
VSS EC Vehicle Speed Sensor
WARN EL Warning Lamps
WINDOW EL Power Window
WIPER EL Front Wiper and Washer
HOW TO READ WIRING DIAGRAMS
GI-2003
Page 523 of 666
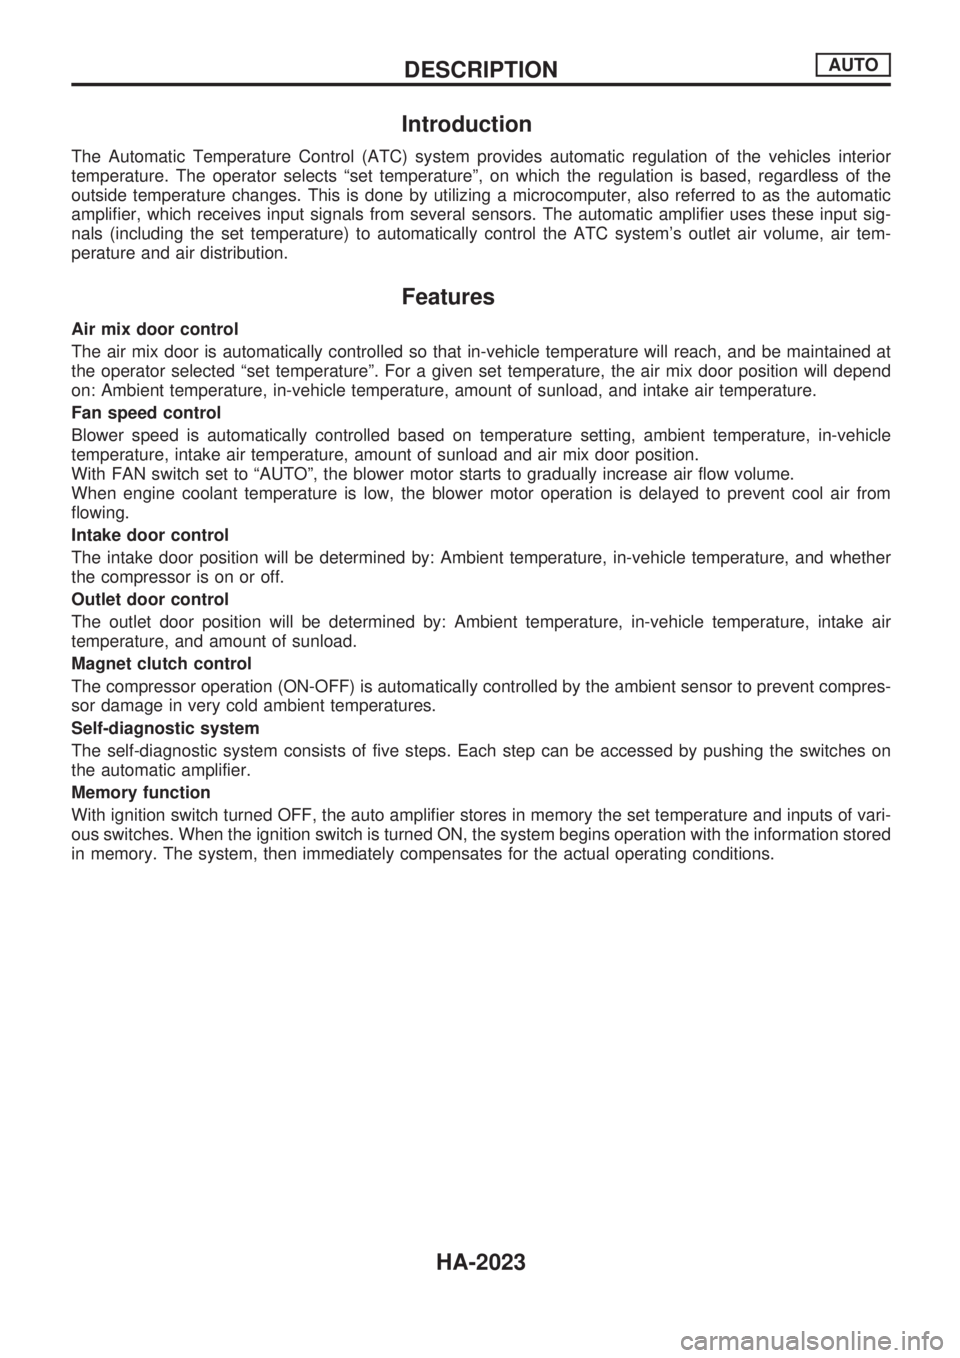
Introduction
The Automatic Temperature Control (ATC) system provides automatic regulation of the vehicles interior
temperature. The operator selects ªset temperatureº, on which the regulation is based, regardless of the
outside temperature changes. This is done by utilizing a microcomputer, also referred to as the automatic
amplifier, which receives input signals from several sensors. The automatic amplifier uses these input sig-
nals (including the set temperature) to automatically control the ATC system's outlet air volume, air tem-
perature and air distribution.
Features
Air mix door control
The air mix door is automatically controlled so that in-vehicle temperature will reach, and be maintained at
the operator selected ªset temperatureº. For a given set temperature, the air mix door position will depend
on: Ambient temperature, in-vehicle temperature, amount of sunload, and intake air temperature.
Fan speed control
Blower speed is automatically controlled based on temperature setting, ambient temperature, in-vehicle
temperature, intake air temperature, amount of sunload and air mix door position.
With FAN switch set to ªAUTOº, the blower motor starts to gradually increase air flow volume.
When engine coolant temperature is low, the blower motor operation is delayed to prevent cool air from
flowing.
Intake door control
The intake door position will be determined by: Ambient temperature, in-vehicle temperature, and whether
the compressor is on or off.
Outlet door control
The outlet door position will be determined by: Ambient temperature, in-vehicle temperature, intake air
temperature, and amount of sunload.
Magnet clutch control
The compressor operation (ON-OFF) is automatically controlled by the ambient sensor to prevent compres-
sor damage in very cold ambient temperatures.
Self-diagnostic system
The self-diagnostic system consists of five steps. Each step can be accessed by pushing the switches on
the automatic amplifier.
Memory function
With ignition switch turned OFF, the auto amplifier stores in memory the set temperature and inputs of vari-
ous switches. When the ignition switch is turned ON, the system begins operation with the information stored
in memory. The system, then immediately compensates for the actual operating conditions.
DESCRIPTIONAUTO
HA-2023
Page 563 of 666
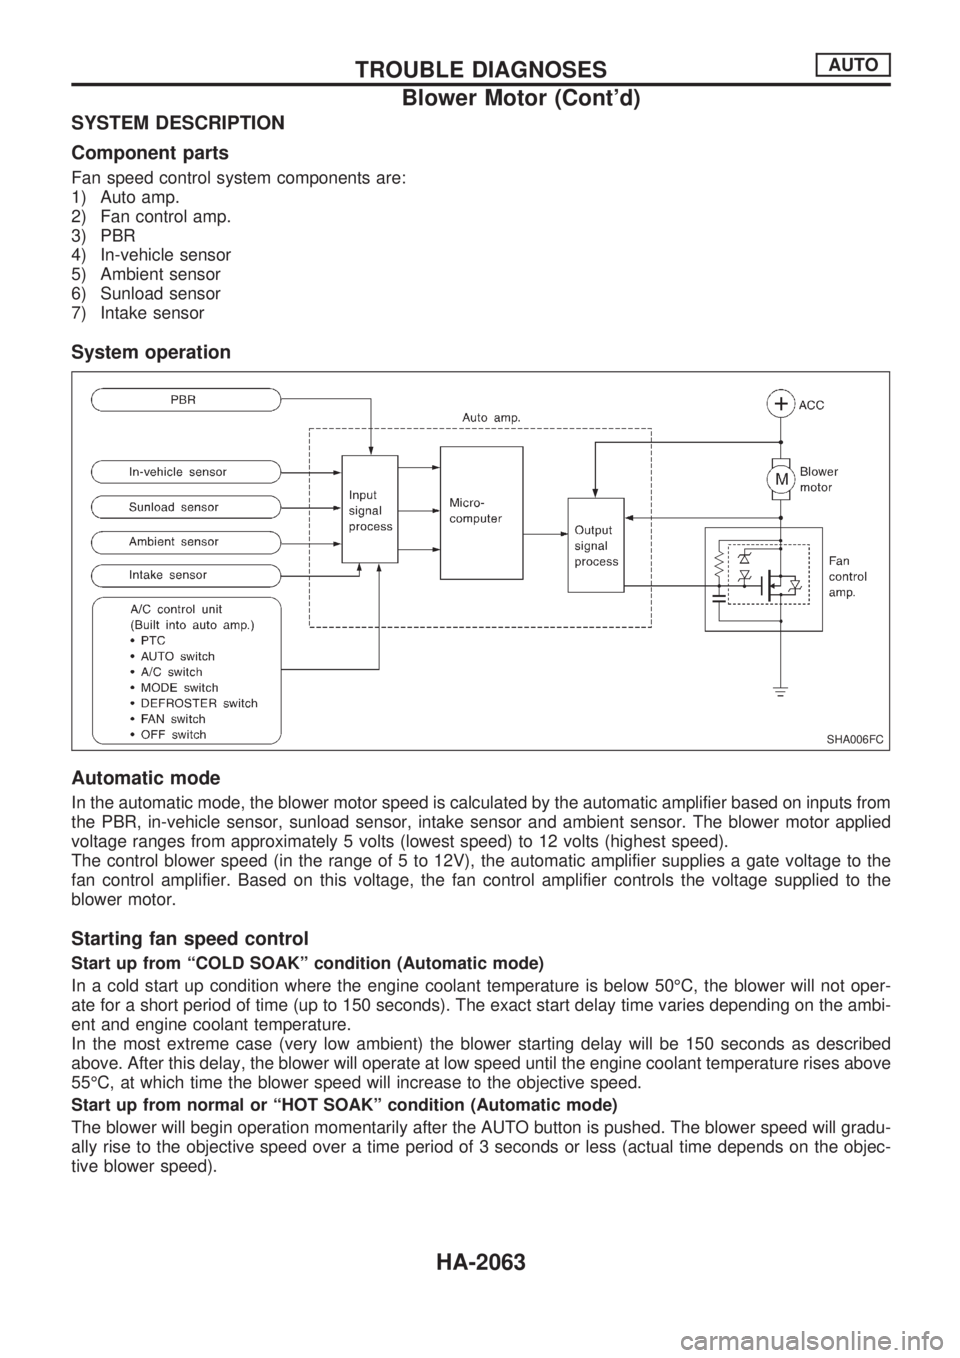
SYSTEM DESCRIPTION
Component parts
Fan speed control system components are:
1) Auto amp.
2) Fan control amp.
3) PBR
4) In-vehicle sensor
5) Ambient sensor
6) Sunload sensor
7) Intake sensor
System operation
Automatic mode
In the automatic mode, the blower motor speed is calculated by the automatic amplifier based on inputs from
the PBR, in-vehicle sensor, sunload sensor, intake sensor and ambient sensor. The blower motor applied
voltage ranges from approximately 5 volts (lowest speed) to 12 volts (highest speed).
The control blower speed (in the range of 5 to 12V), the automatic amplifier supplies a gate voltage to the
fan control amplifier. Based on this voltage, the fan control amplifier controls the voltage supplied to the
blower motor.
Starting fan speed control
Start up from ªCOLD SOAKº condition (Automatic mode)
In a cold start up condition where the engine coolant temperature is below 50ÉC, the blower will not oper-
ate for a short period of time (up to 150 seconds). The exact start delay time varies depending on the ambi-
ent and engine coolant temperature.
In the most extreme case (very low ambient) the blower starting delay will be 150 seconds as described
above. After this delay, the blower will operate at low speed until the engine coolant temperature rises above
55ÉC, at which time the blower speed will increase to the objective speed.
Start up from normal or ªHOT SOAKº condition (Automatic mode)
The blower will begin operation momentarily after the AUTO button is pushed. The blower speed will gradu-
ally rise to the objective speed over a time period of 3 seconds or less (actual time depends on the objec-
tive blower speed).
SHA006FC
TROUBLE DIAGNOSESAUTO
Blower Motor (Cont'd)
HA-2063
Page 598 of 666
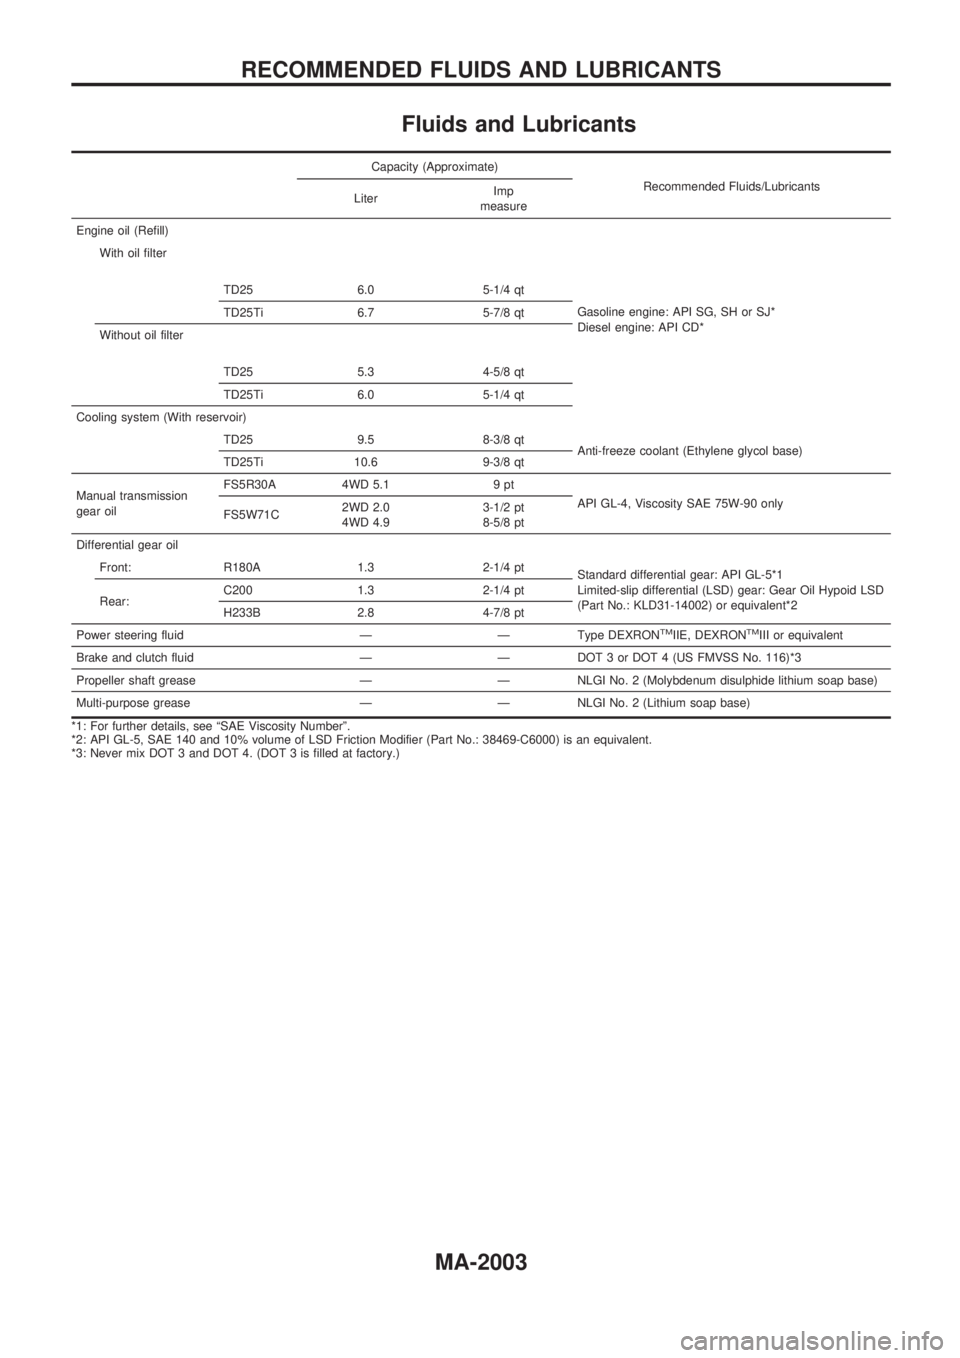
Fluids and Lubricants
Capacity (Approximate)
Recommended Fluids/Lubricants
LiterImp
measure
Engine oil (Refill)
With oil filter
TD25 6.0 5-1/4 qt
Gasoline engine: API SG, SH or SJ*
Diesel engine: API CD* TD25Ti 6.7 5-7/8 qt
Without oil filter
TD25 5.3 4-5/8 qt
TD25Ti 6.0 5-1/4 qt
Cooling system (With reservoir)
TD25 9.5 8-3/8 qt
Anti-freeze coolant (Ethylene glycol base)
TD25Ti 10.6 9-3/8 qt
Manual transmission
gear oilFS5R30A 4WD 5.1 9 pt
API GL-4, Viscosity SAE 75W-90 only
FS5W71C2WD 2.0
4WD 4.93-1/2 pt
8-5/8 pt
Differential gear oil
Front: R180A 1.3 2-1/4 pt
Standard differential gear: API GL-5*1
Limited-slip differential (LSD) gear: Gear Oil Hypoid LSD
(Part No.: KLD31-14002) or equivalent*2 Rear:C200 1.3 2-1/4 pt
H233B 2.8 4-7/8 pt
Power steering fluid Ð Ð Type DEXRON
TMIIE, DEXRONTMIII or equivalent
Brake and clutch fluid Ð Ð DOT 3 or DOT 4 (US FMVSS No. 116)*3
Propeller shaft grease Ð Ð NLGI No. 2 (Molybdenum disulphide lithium soap base)
Multi-purpose grease Ð Ð NLGI No. 2 (Lithium soap base)
*1: For further details, see ªSAE Viscosity Numberº.
*2: API GL-5, SAE 140 and 10% volume of LSD Friction Modifier (Part No.: 38469-C6000) is an equivalent.
*3: Never mix DOT 3 and DOT 4. (DOT 3 is filled at factory.)
RECOMMENDED FLUIDS AND LUBRICANTS
MA-2003