Page 51 of 247

3. The supplemental air bag warning light
does not come on at all.
Unless checked and repaired, the supplemen-
tal restraint system may not function properly.
For additional details on the Supplemental
restraint system (Supplemental air bag sys-
tem), see the ``Seats, restraints and supple-
mental air bag systems'' section of this
manual
WARNING
If the supplemental air bag warning
light is on, it could mean that the air
bag will not operate in an accident.
Passenger supplemental air
bag OFF indicator light
The passenger supplemental air bag is
equipped with an ON/OFF switch. The
switch is located in the center of the instru-
ment panel, near the ashtray. When the
switch is turned to the ON position, the
passenger supplemental air bag is enabled
and could inflate in a frontal collision. When
the switch is turned to the OFF position, the
passenger supplemental air bag is disabled
and will not inflate in a frontal collision. Thepassenger supplemental air bag OFF indi-
cator light on the instrument panel illumi-
nates when the passenger supplemental air
bag ON/OFF switch is turned to the OFF
position. The driver's side supplemental air
bag always remains enabled and is not
affected by the passenger supplemental air
bag ON/OFF switch. The key for the pas-
senger supplemental air bag ON/OFF
switch should not be left in the switch.
Remove the key after turning the switch in
the desired position. Do not leave a key in
the switch. See ªPassenger supplemental
air bag ON/OFF switch and lightº in Section
1 for details.
Engine oil pressure warning
light
This light warns of low engine oil pressure. If
the light flickers or comes on during normal
driving, pull off the road in a safe area, stop
the engineimmediatelyand call an autho-
rized NISSAN dealer.
The oil pressure warning light is not
designed to indicate a low oil level. Use
the dipstick to check the oil level.See
``Engine oil'' in the ``Do-it-yourself'' section
of this manual.
CAUTION
Running the engine with the oil pres-
sure warning light on could cause seri-
ous damage to the engine almost im-
mediately. Turn off the engine as soon
as it is safe to do so.
Charge warning light
If this light comes on while the engine is
running, it may indicate a problem with the
charging system. Turn the engine off and
check the generator belt. If the belt is loose,
broken, missing or if the light remains on, see
an authorized NISSAN dealer immediately.
CAUTION
Do not continue driving if the belt is
loose, broken or missing.
Low fuel warning light
(if so equipped)
This light comes on when the fuel in the tank
is low. Refuel as soon as it is convenient,
preferably before the fuel gauge reaches E
(Empty).
Instruments and controls
2-9
ZX
Page 57 of 247

Lighting
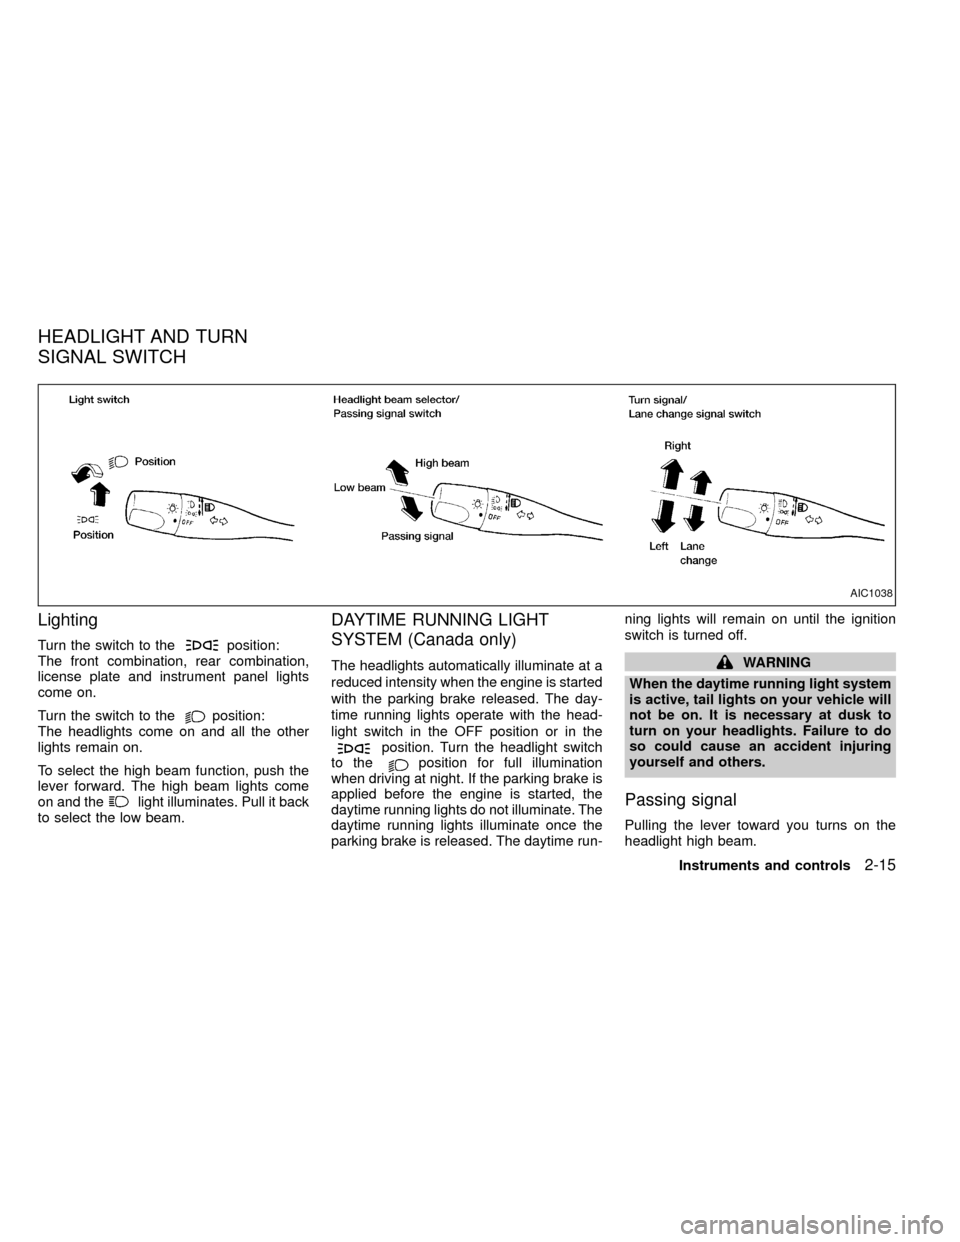
Turn the switch to theposition:
The front combination, rear combination,
license plate and instrument panel lights
come on.
Turn the switch to the
position:
The headlights come on and all the other
lights remain on.
To select the high beam function, push the
lever forward. The high beam lights come
on and the
light illuminates. Pull it back
to select the low beam.
DAYTIME RUNNING LIGHT
SYSTEM (Canada only)
The headlights automatically illuminate at a
reduced intensity when the engine is started
with the parking brake released. The day-
time running lights operate with the head-
light switch in the OFF position or in the
position. Turn the headlight switch
to theposition for full illumination
when driving at night. If the parking brake is
applied before the engine is started, the
daytime running lights do not illuminate. The
daytime running lights illuminate once the
parking brake is released. The daytime run-ning lights will remain on until the ignition
switch is turned off.
WARNING
When the daytime running light system
is active, tail lights on your vehicle will
not be on. It is necessary at dusk to
turn on your headlights. Failure to do
so could cause an accident injuring
yourself and others.
Passing signal
Pulling the lever toward you turns on the
headlight high beam.
AIC1038
HEADLIGHT AND TURN
SIGNAL SWITCH
Instruments and controls2-15
ZX
Page 59 of 247
The ignition switch must be in the ON position
for the wipers or washer to be activated. Push
the lever down to operate the wipers, and pull
the lever toward you to operate the washer.
Operating the washer automatically cycles
the wipers several times.
Intermittent wiper operation can be adjusted
from 1 to 19 seconds by turning the time
control knob (Type C only).
CAUTION
IDo not operate the washer continu-
ously for more than 30 seconds.
IDo not operate the washer if the
reservoir tank is empty.
WARNING
In freezing temperatures the washer
solution may freeze on the windshield
and obscure your vision which may
lead to an accident. Warm the wind-
shield with the defroster before you
wash the windshield.The instrument brightness control operates
when the light switch is in the
orposition.
Turn the control to adjust the brightness of
the instrument panel lights.
AIC1084
AIC1023
WINDSHIELD WIPER AND
WASHER SWITCHINSTRUMENT BRIGHTNESS
CONTROL
Instruments and controls2-17
ZX
Page 61 of 247
WARNING
The cigarette lighter should not be
used while driving so that full attention
may be given to the driving operation.
CAUTION
The cigarette lighter socket is a power
source for the cigarette lighter element
only. The use of the cigarette lighter
socket as a power source for any other
accessory is not recommended.
POWER POINT (if so equipped)
There is a power point for powering acces-
sories mounted in the instrument panel. It is
rated at 12 Volts 120 Watts maximum.
AIC1041
Instruments and controls2-19
ZX
Page 64 of 247

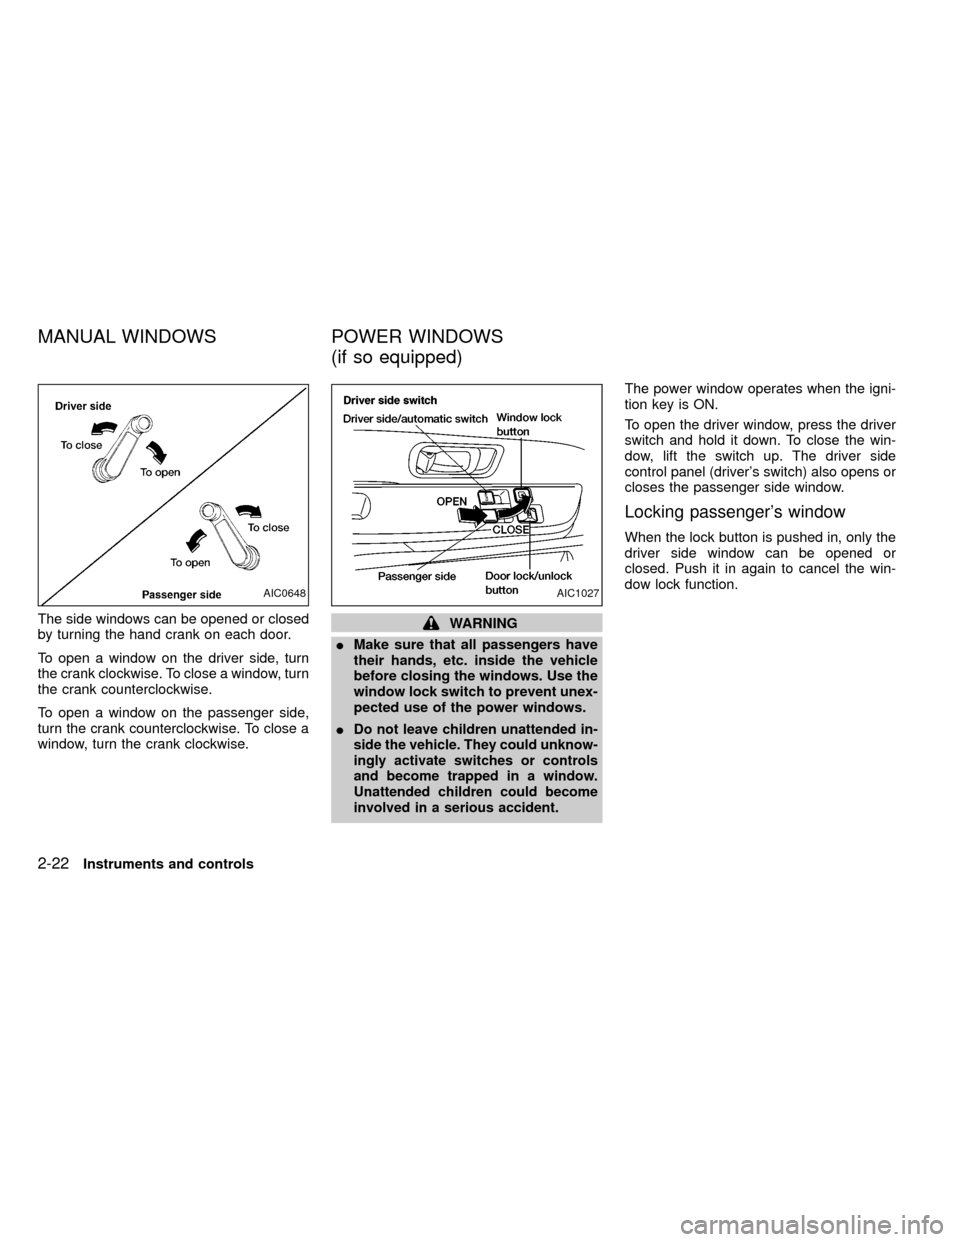
The side windows can be opened or closed
by turning the hand crank on each door.
To open a window on the driver side, turn
the crank clockwise. To close a window, turn
the crank counterclockwise.
To open a window on the passenger side,
turn the crank counterclockwise. To close a
window, turn the crank clockwise.WARNING
IMake sure that all passengers have
their hands, etc. inside the vehicle
before closing the windows. Use the
window lock switch to prevent unex-
pected use of the power windows.
I
Do not leave children unattended in-
side the vehicle. They could unknow-
ingly activate switches or controls
and become trapped in a window.
Unattended children could become
involved in a serious accident.
The power window operates when the igni-
tion key is ON.
To open the driver window, press the driver
switch and hold it down. To close the win-
dow, lift the switch up. The driver side
control panel (driver's switch) also opens or
closes the passenger side window.
Locking passenger's window
When the lock button is pushed in, only the
driver side window can be opened or
closed. Push it in again to cancel the win-
dow lock function.
AIC0648AIC1027
MANUAL WINDOWS POWER WINDOWS
(if so equipped)
2-22Instruments and controls
ZX
Page 68 of 247
Removing the sunroof
WARNING
Do not remove the sunroof while driv-
ing so that full attention may be given
to the driving operation.
1. Remove the sun shade.
2. Tilt the sunroof up.
3. Push the knobs located on each end of
the handle and push the sunroof up-
wards to disengage the handle linkage.
4. Pull the sunroof up from outside of thevehicle until it is perpendicular to the roof
panel.
5. Slide the sunroof to the left and remove
it.
Installing the sunroof
1. While placing the sunroof perpendicular
to the roof panel, position the sunroof
and engage the retainer with the hinge.
2. Slide the sunroof to the right until the red
mark on the hinge disappears.
3. Carefully lower the sunroof, making sure
it is centered with in the roof opening.
4. Push the knobs located on each end of
the handle and engage the handle link-
age.
Be sure the sunroof is securely installed.
SIC0072SIC0073
2-26Instruments and controls
ZX
Page 76 of 247
device must accept any interference re-
ceived including interference that may
cause undesired operation of the device.
WARNING
IMake sure the hood is completely
closed and latched before driving.
Failure to do so could cause the
hood to fly open and result in an
accident.
IIf you see steam or smoke coming
from the engine compartment, to
avoid injury do not open the hood.
1. Pull the hood lock release handle located
below the driver side instrument panel;
the hood then springs up slightly.2. Lift the lever at the front of the hood with
your fingertips and raise the hood.
3. Insert the support rod into the slot in the
front edge of the hood.
4. When closing the hood, reset the support
rod to its original position, lower the hood
to approximately 12 inches above the
latch and release it. This allows proper
engagement of the hood latch.
APD1036
HOOD RELEASE
3-8Pre-driving checks and adjustments
ZX
Page 119 of 247

Accelerator downshift
In D position
For rapid passing or hill climbing, while
driving fully depress the accelerator pedal to
the floor. This shifts the transmission down
into second gear or first gear, depending on
the vehicle speed.
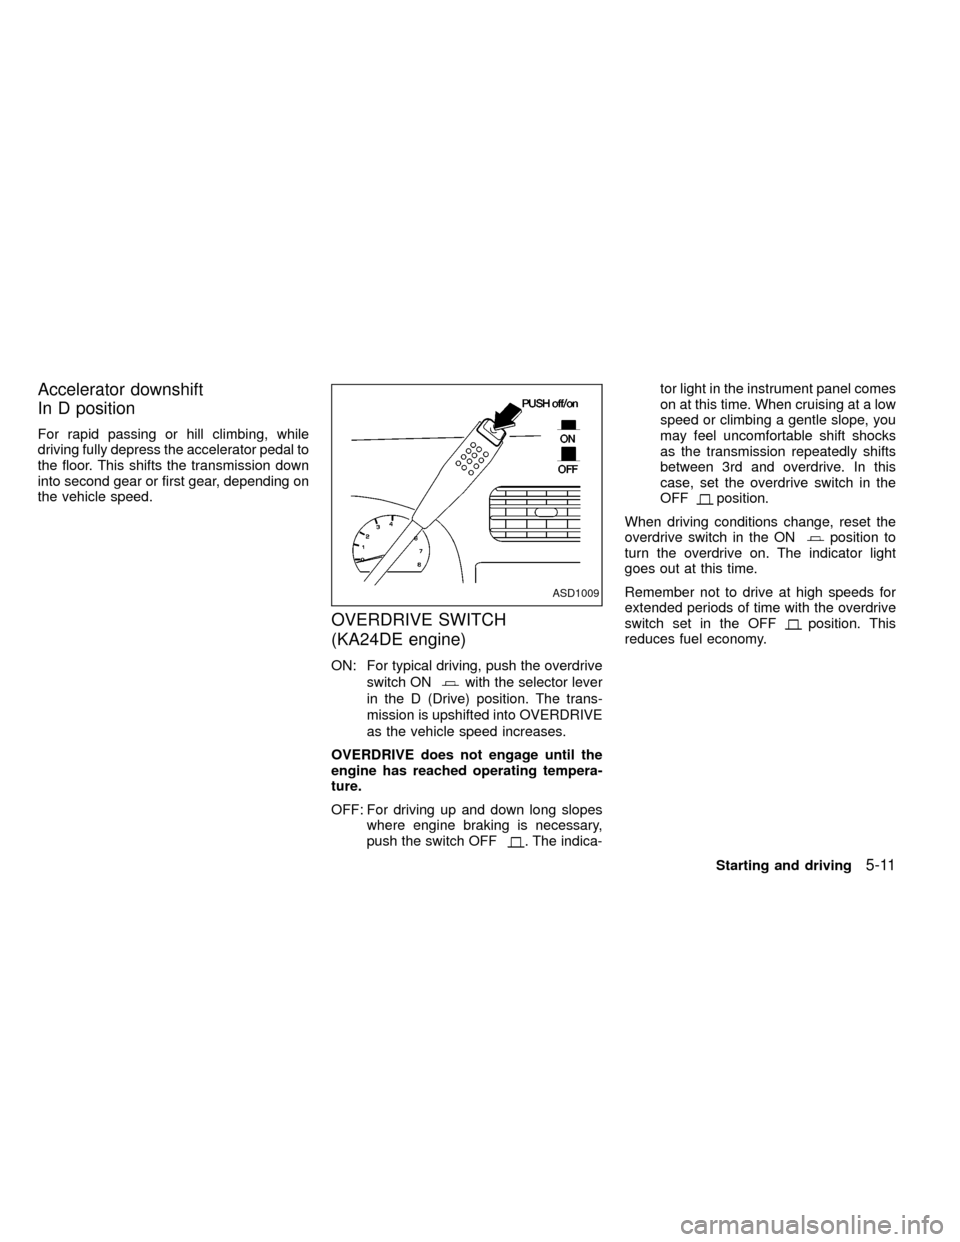
OVERDRIVE SWITCH
(KA24DE engine)
ON: For typical driving, push the overdrive
switch ON
with the selector lever
in the D (Drive) position. The trans-
mission is upshifted into OVERDRIVE
as the vehicle speed increases.
OVERDRIVE does not engage until the
engine has reached operating tempera-
ture.
OFF: For driving up and down long slopes
where engine braking is necessary,
push the switch OFF
. The indica-tor light in the instrument panel comes
on at this time. When cruising at a low
speed or climbing a gentle slope, you
may feel uncomfortable shift shocks
as the transmission repeatedly shifts
between 3rd and overdrive. In this
case, set the overdrive switch in the
OFF
position.
When driving conditions change, reset the
overdrive switch in the ON
position to
turn the overdrive on. The indicator light
goes out at this time.
Remember not to drive at high speeds for
extended periods of time with the overdrive
switch set in the OFF
position. This
reduces fuel economy.
ASD1009
Starting and driving5-11
ZX