1999 NISSAN FRONTIER buttons
[x] Cancel search: buttonsPage 30 of 247
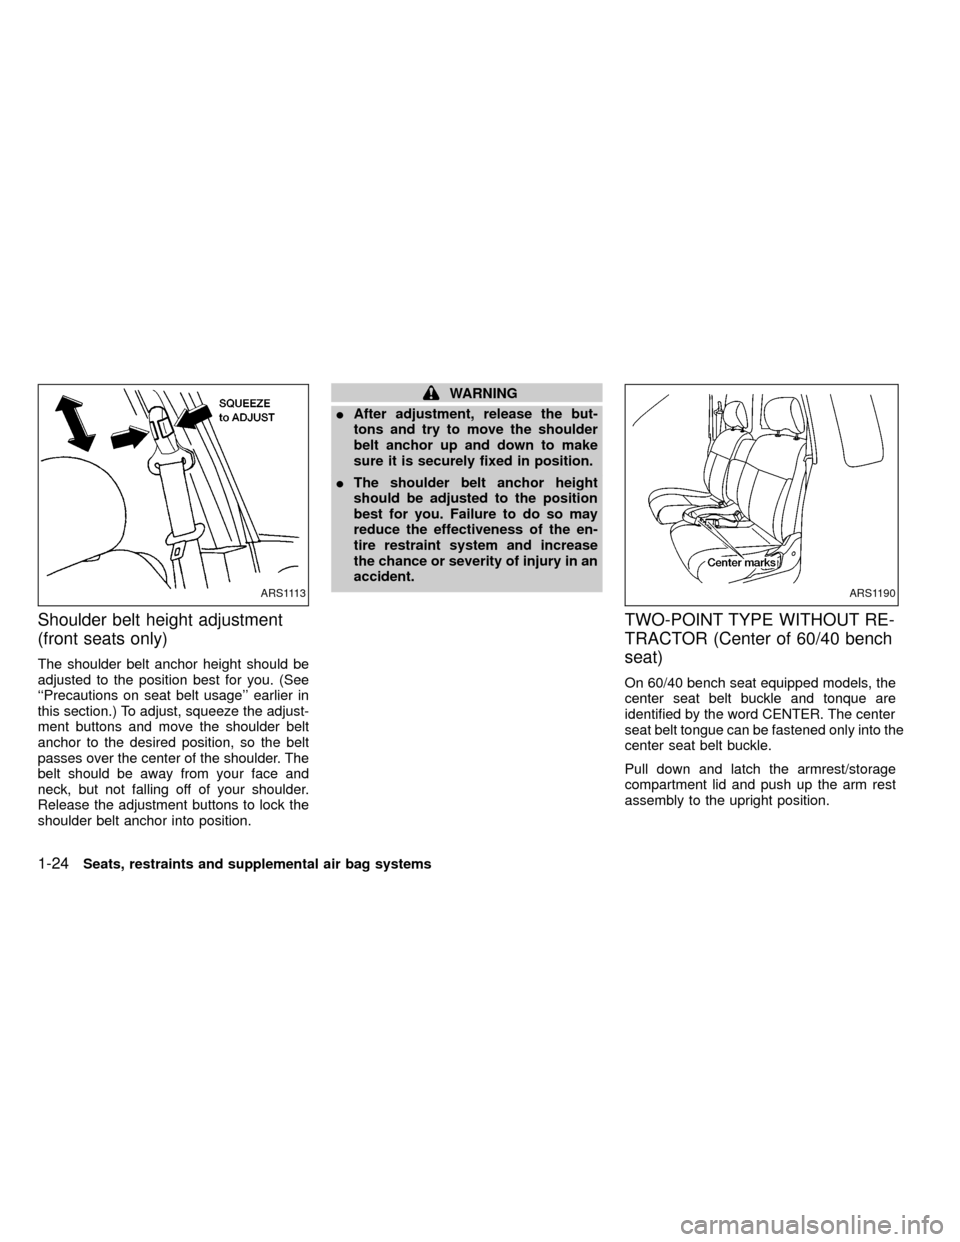
Shoulder belt height adjustment
(front seats only)
The shoulder belt anchor height should be
adjusted to the position best for you. (See
``Precautions on seat belt usage'' earlier in
this section.) To adjust, squeeze the adjust-
ment buttons and move the shoulder belt
anchor to the desired position, so the belt
passes over the center of the shoulder. The
belt should be away from your face and
neck, but not falling off of your shoulder.
Release the adjustment buttons to lock the
shoulder belt anchor into position.
WARNING
IAfter adjustment, release the but-
tons and try to move the shoulder
belt anchor up and down to make
sure it is securely fixed in position.
IThe shoulder belt anchor height
should be adjusted to the position
best for you. Failure to do so may
reduce the effectiveness of the en-
tire restraint system and increase
the chance or severity of injury in an
accident.
TWO-POINT TYPE WITHOUT RE-
TRACTOR (Center of 60/40 bench
seat)
On 60/40 bench seat equipped models, the
center seat belt buckle and tonque are
identified by the word CENTER. The center
seat belt tongue can be fastened only into the
center seat belt buckle.
Pull down and latch the armrest/storage
compartment lid and push up the arm rest
assembly to the upright position.
ARS1113ARS1190
1-24Seats, restraints and supplemental air bag systems
ZX
Page 56 of 247
if the vehicle is tampered with again. The
alarm can be shut off by unlocking a door
with the key or by pressing the
but-
tonon the multi-remote controller.
The alarm is activated by:
Iopening a door without using the key
(even if the door is unlocked by releasing
the door inside lock switch).
Iopening the hood.
How to stop the alarm
The alarm stops only by unlocking a door
with the key or by pressing thebutton
on the multi-remote controller.The alarm
does not stop if the ignition switch is turned
to ACC or ON position.
Silencing the horn beep feature
If desired, the horn beep feature can be
deactivated using the multi-remote controller.
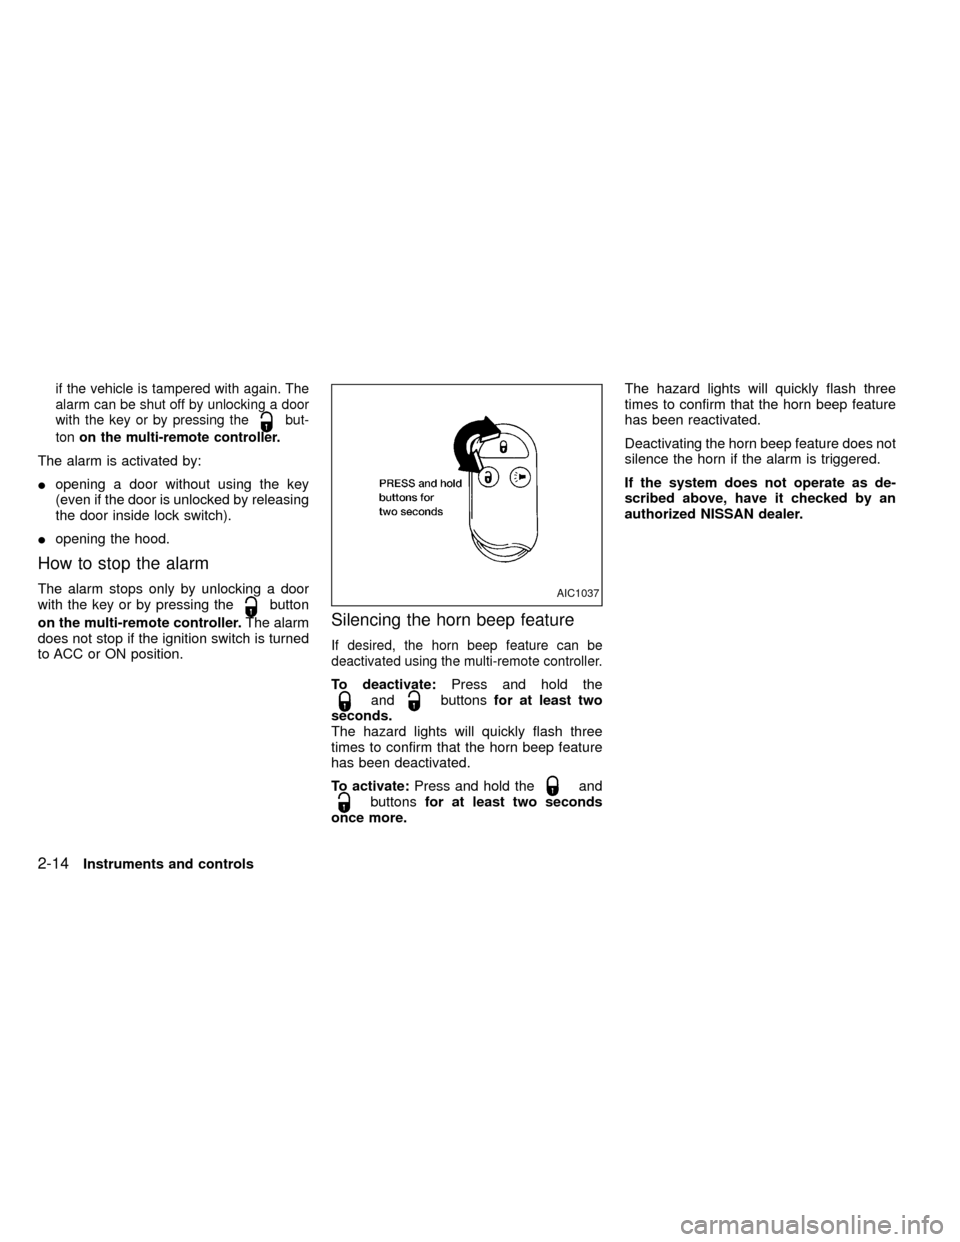
To deactivate:Press and hold theandbuttonsfor at least two
seconds.
The hazard lights will quickly flash three
times to confirm that the horn beep feature
has been deactivated.
To activate:Press and hold the
andbuttonsfor at least two seconds
once more.The hazard lights will quickly flash three
times to confirm that the horn beep feature
has been reactivated.
Deactivating the horn beep feature does not
silence the horn if the alarm is triggered.
If the system does not operate as de-
scribed above, have it checked by an
authorized NISSAN dealer.
AIC1037
2-14Instruments and controls
ZX
Page 96 of 247
Turn the ON×OFF/VOL control knob to ad-
just the volume.
Clock operation
Pressing the CLOCK button alternates the
clock and the radio/cassette tape options in
the display.
Clock set
Depressing the CLOCK and thebuttons
together sets hours. Depressing the CLOCK
and
buttons together sets minutes.
Clock priority mode
In this mode the clock is shown in the
display. If any radio or cassette tape func-
tions are activated, the radio (or cassette
tape) display illuminates for 10 seconds
then returns to the clock mode.
NOTE:
After clock adjustment, the radio is in the
clock priority mode.
Radio/Cassette tape priority mode
In this mode, the radio station illuminates in
the display during radio operation. During
cassette tape operation, TAPE illuminates in
the display.
Selecting the desired band
Push thebutton to change from AM
to FM1 or FM2 reception.
The FM stereo indicator, ST, illuminates dur-
ing FM stereo reception. When the stereo
broadcast signal is weak, the radio automati-
cally changes from stereo to monaural re-
ception.
TUNE buttons
WARNING
The radio should not be tuned while
driving in order that full attention may
be given to the driving operation.
Use the
andbuttons for
manual tuning. To move quickly through the
channels, hold either of the tune buttons
down for more than 1.5 seconds.
SEEK tuning
Push thetuning buttonfor less
than 1.5 seconds. SEEK tuning begins from
low to high frequencies and stops at the next
broadcasting station. Pushing the button
again continues the SEEK function. Once the
highest broadcasting station is reached, theradio continues in the SEEK mode at the
lowest broadcast station.
SCAN tuning
Push thetuning buttonfor more
than 1.5 seconds. SCAN illuminates in the
display window. SCAN tuning begins from
low to high frequencies and stops at each
broadcasting station for five seconds. Push-
ing the button again during this five second
period stops SCAN tuning and the radio
remains tuned to that station.
4-12Heater, air conditioner and audio systems
ZX
Page 97 of 247
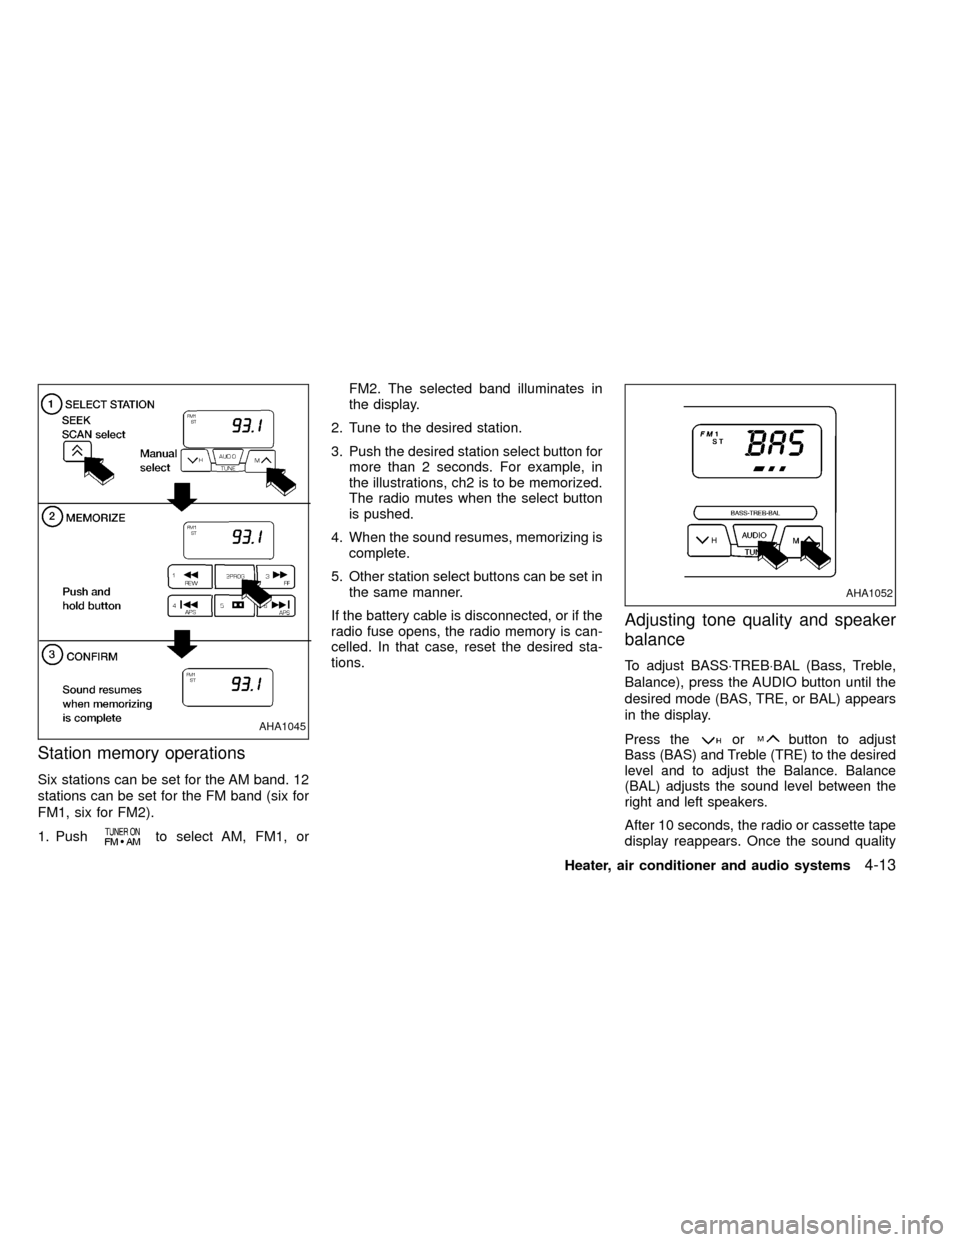
Station memory operations
Six stations can be set for the AM band. 12
stations can be set for the FM band (six for
FM1, six for FM2).
1. Push
to select AM, FM1, orFM2. The selected band illuminates in
the display.
2. Tune to the desired station.
3. Push the desired station select button for
more than 2 seconds. For example, in
the illustrations, ch2 is to be memorized.
The radio mutes when the select button
is pushed.
4. When the sound resumes, memorizing is
complete.
5. Other station select buttons can be set in
the same manner.
If the battery cable is disconnected, or if the
radio fuse opens, the radio memory is can-
celled. In that case, reset the desired sta-
tions.
Adjusting tone quality and speaker
balance
To adjust BASS×TREB×BAL (Bass, Treble,
Balance), press the AUDIO button until the
desired mode (BAS, TRE, or BAL) appears
in the display.
Press theorbutton to adjust
Bass (BAS) and Treble (TRE) to the desired
level and to adjust the Balance. Balance
(BAL) adjusts the sound level between the
right and left speakers.
After 10 seconds, the radio or cassette tape
display reappears. Once the sound quality
AHA1045
AHA1052
Heater, air conditioner and audio systems4-13
ZX
Page 101 of 247
When no CD or tape is loaded, the radio
comes on. Pushing the ON×OFF/VOL con-
trol knob button again turns the system off.
Turn the ON×OFF/VOL control knob to ad-
just the volume.
Clock operation
Pressing the clock button alternates the
clock and the radio/cassette/CD player op-
tions in the display.
Clock set
Depressing the clock andbuttons to-
gether sets hours. Depressing the clock and
buttons together sets minutes.
Clock priority mode
In this mode the clock is shown in the
display. If any radio, cassette or CD func-
tions are activated, the radio, cassette or
CD display illuminates for 10 seconds then
returns to the clock mode.
NOTE:
After clock adjustment, the radio is in the
clock priority mode.
FM-AM band select button
Push thebutton to change from AM to
FM1 or FM2 reception.
The FM stereo indicator, ST, illuminates
during FM stereo reception. When the ste-
reo broadcast signal is weak, the radio
automatically changes from stereo to mon-
aural reception.
TUNE/DISC buttons
WARNING
The radio should not be tuned while
driving in order that full attention may
be given to the driving operation.
Use the
andbuttons for manual
tuning. To move quickly through the chan-
nels, hold either of the tuning buttons down.
SEEK/SCAN buttons
SEEK tuning
Push the SEEK/SCAN tuning buttonorfor less than 1.5 seconds. SEEK tuning
begins from low to high frequencies or high
to low frequencies, depending on which but-
ton is pressed, and stops at the next broad-
casting station. If using the
buttononce the highest broadcasting station is
reached, the radio continues in the SEEK
mode at the lowest broadcasting station. If
using the
button once the lowest broad-
casting station is reached, the radio contin-
ues in the SEEK mode at the highest broad-
casting station.
SCAN tuning
Push the SEEK/SCAN tuning buttonorfor more than 1.5 seconds. SCAN illu-
minates in the display window, and the radio
station blinks. SCAN tuning begins from low
to high frequencies or from high to low
frequencies, depending on which button is
pressed. SCAN tuning stops at each broad-
casting station for five seconds. Pushing the
button again during this five second period
stops SCAN tuning and the radio remains
tuned to that station.
Heater, air conditioner and audio systems4-17
ZX
Page 102 of 247
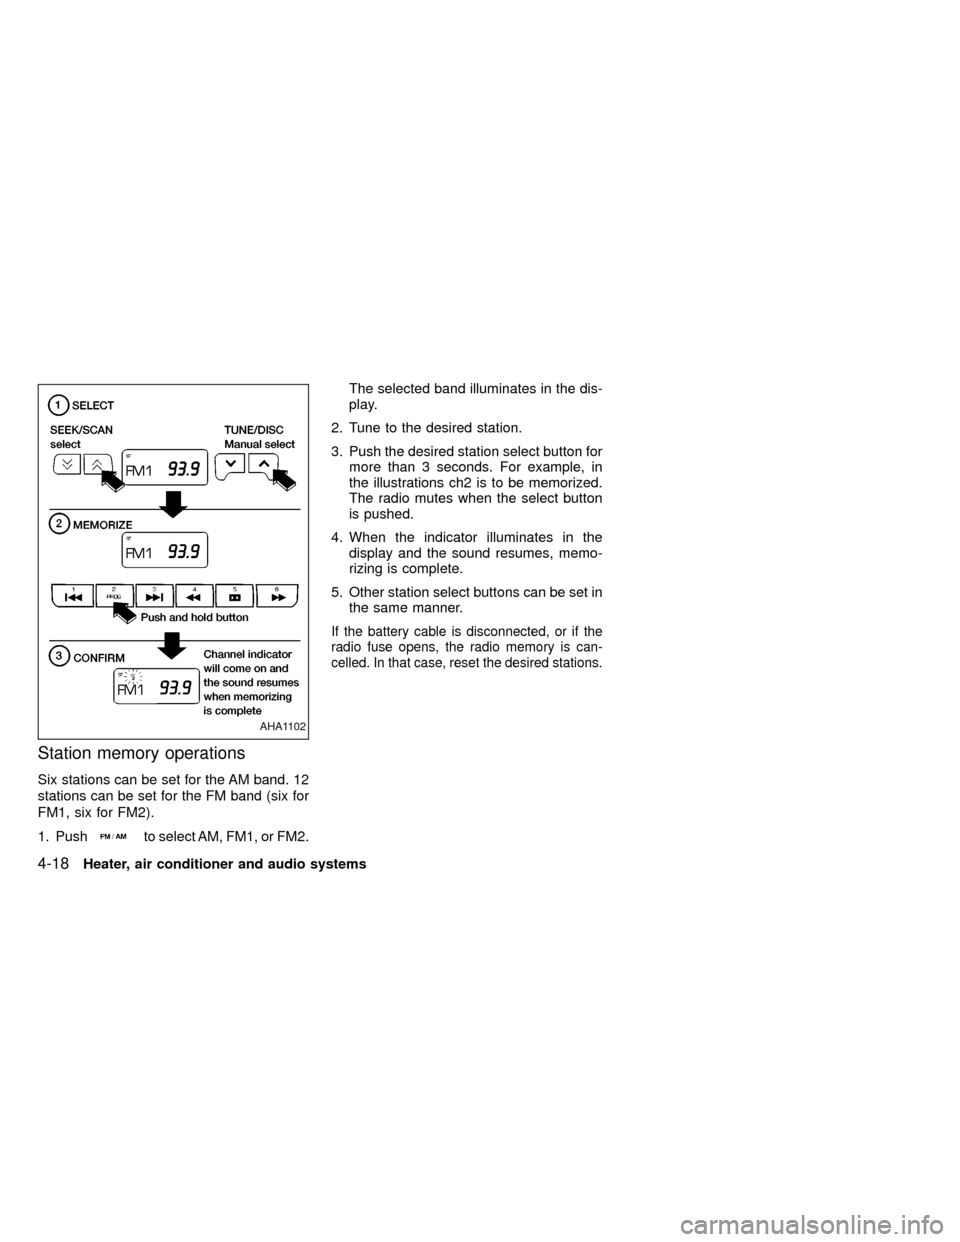
Station memory operations
Six stations can be set for the AM band. 12
stations can be set for the FM band (six for
FM1, six for FM2).
1. Push
to select AM, FM1, or FM2.The selected band illuminates in the dis-
play.
2. Tune to the desired station.
3. Push the desired station select button for
more than 3 seconds. For example, in
the illustrations ch2 is to be memorized.
The radio mutes when the select button
is pushed.
4. When the indicator illuminates in the
display and the sound resumes, memo-
rizing is complete.
5. Other station select buttons can be set in
the same manner.
If the battery cable is disconnected, or if the
radio fuse opens, the radio memory is can-
celled. In that case, reset the desired stations.
AHA1102
4-18Heater, air conditioner and audio systems
ZX
Page 103 of 247
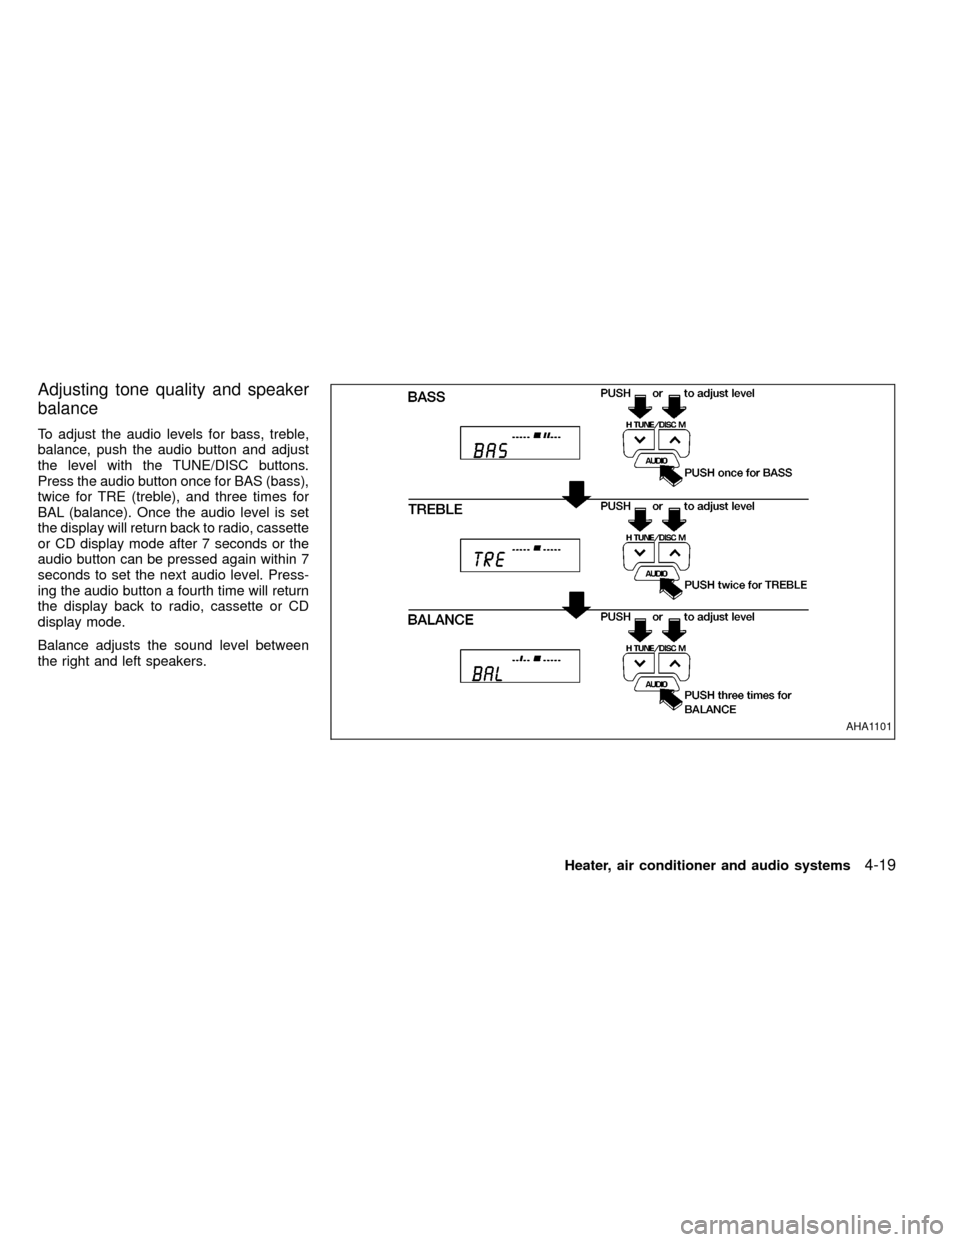
Adjusting tone quality and speaker
balance
To adjust the audio levels for bass, treble,
balance, push the audio button and adjust
the level with the TUNE/DISC buttons.
Press the audio button once for BAS (bass),
twice for TRE (treble), and three times for
BAL (balance). Once the audio level is set
the display will return back to radio, cassette
or CD display mode after 7 seconds or the
audio button can be pressed again within 7
seconds to set the next audio level. Press-
ing the audio button a fourth time will return
the display back to radio, cassette or CD
display mode.
Balance adjusts the sound level between
the right and left speakers.
AHA1101
Heater, air conditioner and audio systems4-19
ZX
Page 104 of 247
CASSETTE TAPE OPERATION
Turn the ignition key to the ACC or ON
position, and carefully insert a cassette tape
into the tape door. The cassette tape auto-
matically pulls into the player. The word
TAPE illuminates in the display.
CAUTION
Do not force the cassette tape into the
tape door. This could cause player
damage.
ITo maintain good quality sound,
NISSAN recommends using cassette
tapes of 60 minutes or shorter in
length.
ICassette tapes should be removed
from the player when not in use. Store
cassettes in their protective cases
and away from direct sunlight, heat,
dust, moisture or magnetic sources.
IDirect sunlight can cause the cassette
to become deformed. The use of de-
formed cassettes may cause the cas-
sette to jam in the player.
IDo not use cassettes that have peel-
ing or loose labels. If used, the labelcould jam in the player.
IIf a cassette has loose tape, insert a
pencil through one of the cassette
hubs and rewind the tape firmly.
Loose tape may cause jamming and
wavering sound quality.
IOver a period of time, the playback
head, capstan and pinch roller may
gather a tape coating residue as the
tape is played. This residue accumu-
lation can cause a weak or wavering
sound and should be removed peri-
odically with a head cleaning tape. If
the residue is not removed periodi-
cally, the player may need to be disas-
sembled for cleaning.
PLAY/STOP TAPE button
When thebutton is pushed with the
system turned off and a tape loaded, the
system comes on and the tape plays.
The word tape illuminates.
When the
button is pushed with either
the radio or compact disc turned on and a
tape loaded, the compact disc or the radio
turns off and the tape plays.
While the tape is playing, pushing the
button stops tape play. Pushing thebutton again resumes tape play.
FF (fast forward) and REW (rewind)
buttons
Push thebutton to fast forward the
tape. Push thebutton to rewind the
tape. Either REW or FF illuminates in the
display. To stop the FF or REW function,
press the
,,orbuttons.
Automatic Program Search (APS)
FF and REW buttons
When thebutton is pushed while the
tape is being played, the tape runs quickly,
stops, then plays the next selection from the
beginning. Push the
button several
times to skip several selections. Each time
the button is pushed, the tape fast forwards
one additional selection. This number ap-
pears in the display window. The tape can
be fast forwarded through up to nine selec-
tions. (for example: 7 in the display indi-
cates that the
button has been
pushed seven times to skip forward through
seven selections).
When the
button is pushed, the se-
lection being played starts again from the
4-20Heater, air conditioner and audio systems
ZX