1999 LAND ROVER DISCOVERY ECO mode
[x] Cancel search: ECO modePage 1203 of 1529

AIR CONDITIONING
82-14DESCRIPTION AND OPERATION
Display outputs
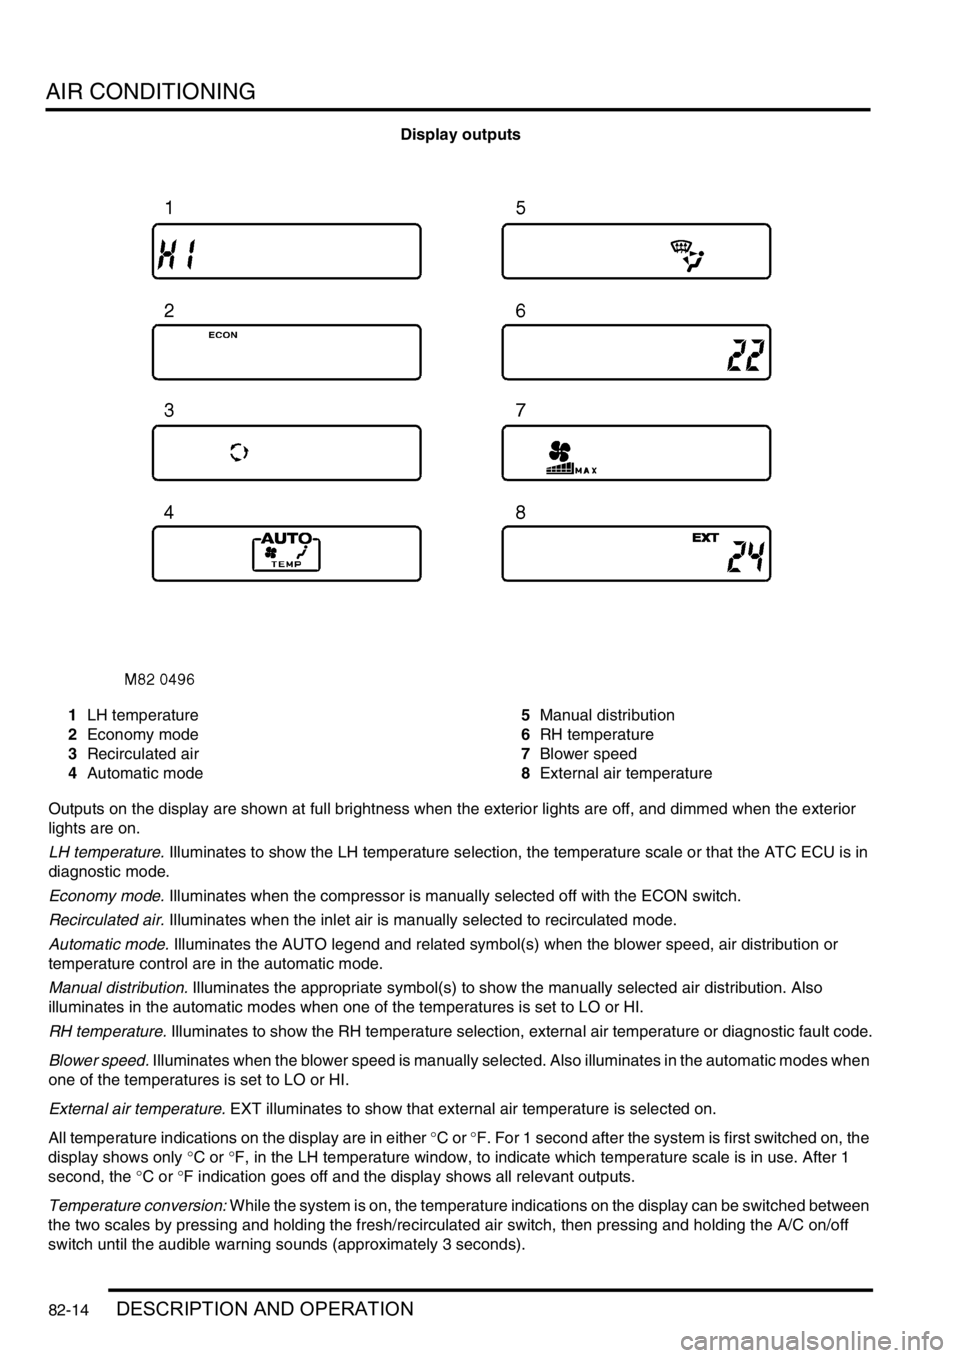
1LH temperature
2Economy mode
3Recirculated air
4Automatic mode5Manual distribution
6RH temperature
7Blower speed
8External air temperature
Outputs on the display are shown at full brightness when the exterior lights are off, and dimmed when the exterior
lights are on.
LH temperature. Illuminates to show the LH temperature selection, the temperature scale or that the ATC ECU is in
diagnostic mode.
Economy mode. Illuminates when the compressor is manually selected off with the ECON switch.
Recirculated air. Illuminates when the inlet air is manually selected to recirculated mode.
Automatic mode. Illuminates the AUTO legend and related symbol(s) when the blower speed, air distribution or
temperature control are in the automatic mode.
Manual distribution. Illuminates the appropriate symbol(s) to show the manually selected air distribution. Also
illuminates in the automatic modes when one of the temperatures is set to LO or HI.
RH temperature. Illuminates to show the RH temperature selection, external air temperature or diagnostic fault code.
Blower speed. Illuminates when the blower speed is manually selected. Also illuminates in the automatic modes when
one of the temperatures is set to LO or HI.
External air temperature. EXT illuminates to show that external air temperature is selected on.
All temperature indications on the display are in either °C or °F. For 1 second after the system is first switched on, the
display shows only °C or °F, in the LH temperature window, to indicate which temperature scale is in use. After 1
second, the °C or °F indication goes off and the display shows all relevant outputs.
Temperature conversion: While the system is on, the temperature indications on the display can be switched between
the two scales by pressing and holding the fresh/recirculated air switch, then pressing and holding the A/C on/off
switch until the audible warning sounds (approximately 3 seconds).
Page 1205 of 1529

AIR CONDITIONING
82-16DESCRIPTION AND OPERATION
Operation
General
While the system is on, the ATC ECU operates the refrigerant system and the inlet air, blower speed, air temperature
and air distribution functions to produce the conditions requested on the control panel. When the system is first
switched on, the ATC ECU resumes the control outputs in use when the system was last switched off. If conditions
have changed, or a different mode is selected to switch the system on, the control outputs are then changed to
produce the required new settings.
The system operates in automatic, economy and defrost modes, with manual overrides of the inlet air source, blower
speed and air distribution. The air temperature is automatically controlled in all operating modes.
In the automatic mode, the ATC ECU operates the system to warm-up or cool down the cabin to establish and
maintain the temperature selections on the control panel, while directing the air to those outlets most comfortable for
the occupant(s). If a difference between the LH and RH temperature selections causes a conflict of the required inlet
air source, blower speed or air distribution settings, priority is given to achieving the temperature requested on the
driver's side of the control panel.
The ATC ECU enters the economy mode when the refrigerant compressor is selected off while the system is in the
automatic mode, which reduces the load on the engine. Economy mode operation is similar to the automatic mode,
but without the ability to cool the cabin if the ambient temperature is higher than the temperature selections made on
the control panel, or to dehumidify the air in the cabin.
In the defrost mode, the ATC ECU sets the inlet air source to fresh air, the blower to maximum speed, the air
distribution to windscreen and side windows, and outputs signals to the BCU to operate the rear window heater and
(where fitted) the windscreen heater. The BCU starts or, if the heaters are already on, resets the heater timers and
energises the rear window and windscreen heaters for a complete on cycle.
Air temperature control
To determine the amount of heat or cooling required by the cabin, the ATC ECU uses the sensor inputs and the
temperatures selected on the control panel to calculate target air outlet temperatures for the driver's and the front
passenger's side of the heater assembly. The ATC ECU then signals the servo motors controlling the respective blend
flaps in the heater assembly to move to the flaps to the appropriate position. The target temperatures are constantly
updated and, in the automatic mode, also used in further calculations to determine the inlet air source, the blower
speed and the air distribution.
Inlet air control
The inlet air source is automatically controlled while the system is off or on. While the system is on, the inlet air source
can also be manually controlled to give timed recirculated air or latched recirculated air.
While the system is off, the ATC ECU uses vehicle speed to determine the inlet air source. With the vehicle at rest,
the inlet air source is set to recirculated air. When vehicle speed reaches 17.5 mph (28 km/h), the inlet air source
changes to fresh air. The inlet air source then remains at fresh air until the vehicle speed decreases to 5 mph (8 km/
h), when it returns to recirculated air.
While the system is on, the ATC ECU uses the LH and RH temperature selections, vehicle speed, ambient air
temperature and coolant temperature to determine the inlet air source. In the automatic mode:
lIf one temperature selection is set to LO and one is set to a specific temperature or HI, the inlet air is set to
recirculated air.
lIf one temperature selection is set to HI and one is set to a specific temperature or HI, the inlet air is set to fresh
air.
lWhen specific LH and RH temperature selections are set, the inlet air source remains at fresh air except when
the air distribution function is set to face level only or face level and footwell outlets. If the air distribution function
is set to face level only or face level and footwell outlets, at 56 mph (90 km/h) the inlet air source changes to
recirculated air (to exclude ram effect, which becomes excessive at speed). When the vehicle speed decreases
to 37.5 mph (60 km/h), the inlet air source returns to fresh air.
In the defrost mode, the inlet air source is set to fresh air except at low ambient air and coolant temperatures. If, within
5 minutes of the ignition being switched on, the vehicle speed is less than 5 mph (8 km/h) while the external air
temperature is −16 °C (3 °F) or less and the heater coolant temperature is −10 °C (14 °F) or less, then the inlet air
source is automatically set to the timed recirculated air mode. The timed recirculated air mode is cancelled
immediately the vehicle speed reaches 8 km/h or more .
Page 1206 of 1529

AIR CONDITIONING
DESCRIPTION AND OPERATION 82-17
Timed recirculated air
The timed recirculated air mode sets the inlet air source to recirculated air for 5 ± 1 minutes, after which it automatically
reverts to fresh air. Timed recirculated air can be manually selected:
lIn the automatic mode, by pressing the fresh/recirculated air switch for 1.5 seconds or more; the audible warning
sounds twice.
lIn the economy or defrost modes, by pressing the fresh/recirculated air switch for less than 1.5 seconds; the
audible warning sounds once.
Latched recirculated air
The inlet air source can be latched to recirculated air:
lIn the automatic mode, by pressing the fresh/recirculated air switch for less than 1.5 seconds; the audible
warning sounds once.
lIn the economy or defrost modes, by pressing the fresh/recirculated air switch for 1.5 seconds or more; the
audible warning sounds twice.
Blower control
The ATC ECU operates a blower relay, power transistor and power relay to run the blower at one of 31 stepped
speeds. All speed steps are available in the automatic modes of blower control. In the manual mode, speed steps 3,
10, 16, 22 and 31 are used to provide slow, three intermediate and fast blower speeds. The ATC ECU energises the
blower relay and modulates the power transistor to operate the blower for speed steps 1 to 30. For speed step 31, the
ATC ECU energises the power relay, which switches the earth side of the blower motor direct to earth, bypassing the
power transistor.
In the automatic, economy and defrost modes, blower speed is corrected for vehicle speed to compensate for the
increase in ram effect on the inlet air as the vehicle speed increases. Correction begins at approximately 50 km/h,
when blower speed is progressively decreased as vehicle speed increases, until a maximum decrease of 13 steps
occurs at 123 km/h. Similarly, blower speed increases as vehicle speed decreases down to approximately 50 km/h.
In the automatic and economy modes, if the LH or RH temperature is set to LO or HI, the blower runs at maximum
speed with correction only for vehicle speed. If both the LH and RH outlet air temperatures are set to a specific
temperature, blower speed corrections are added to compensate for the heater coolant temperature, external air
temperature, and the solar load acting on the vehicle:
lDuring warm-up, the blower speed is set to 3 while the heater coolant temperature is below approximately 20 °C
(68 °F). From approximately 20 °C (68 °F), the blower speed is progressively increased as the coolant
temperature increases, until maximum speed is set at approximately 50 °C (122 °F).
lDuring cool down, blower speed is set to 3, for 5 seconds after the system is switched on. Over the following 6
seconds, the blower speed is progressively increased up to maximum speed.
lAs the temperature in the cabin approaches the selected temperatures, blower speed is progressively reduced
until, once the selected temperatures have been established, blower speed stabilises at approximately 6.
lSolar heating correction is employed when air distribution is set to face level or to face and footwells. The
correction progressively increases the blower speed, up to a maximum of 9 steps, with increasing values of solar
heating.
Page 1207 of 1529

AIR CONDITIONING
82-18DESCRIPTION AND OPERATION
Air distribution control
To control the air distribution within the cabin the ATC ECU signals the servo motor controlling the distribution flaps
in the heater assembly to move to the flaps to the appropriate position.
In the automatic and economy modes, if the LH or RH temperature selections are set to LO or HI, air distribution is
fixed as follows:
lIf one is set to LO and one is set to a specific temperature, to face level only.
lIf one is set to HI and one is set to a specific temperature, to footwells only.
lIf one is set to LO and one is set to HI, to face level and footwells.
When specific LH and RH temperature selections are set, air distribution is determined from the target air outlet
temperatures. For higher target air outlet temperatures, air distribution is set to footwells only. For lower target air
outlet temperatures, air distribution is set to face level only. For intermediate target air outlet temperatures, air
distribution is set to face level and footwells. When the air distribution is set to face level and footwells, the ATC ECU
varies the bias between the footwells and the face level outlets, in three stages, to provide a gradual transition of air
distribution from footwells only to face level only. The three stages of bias are also employed when the air distribution
is manually selected to face level and footwells.
During warm-up, the air distribution changes to face level and footwells for a period, then reverts to footwells only.
The period of air distribution at face level and footwells can be cancelled by pressing and holding the on/off and defrost
mode switches, then turning the ignition switch from off to on. Pressing and holding the AUTO and defrost switches,
then turning the ignition switch from off to on, restores the period of air distribution at face level and footwells.
Compressor control
To engage the compressor clutch, the ATC ECU outputs a compressor clutch request to the ECM, which then
energises the A/C compressor clutch relay. Compressor operation is governed by the evaporator outlet air
temperature, at one of two settings, dependent on the amount of cooling required. When more cooling is required, the
compressor clutch request is output if evaporator outlet air temperature increases to 4 °C (39 °F) and cancelled when
it decreases to 3 °C (37 °F). When less cooling is required, the compressor clutch request is output if evaporator outlet
air temperature increases to 11 °C (52 °F) and cancelled when it decreases to 10 °C (50 °F).
Engine cooling fan control
While the A/C system is on, operation of the electric engine cooling fan, to assist refrigerant condenser operation, is
determined by a combination of vehicle speed and external air temperature. When cooling fan operation is required,
the ATC ECU outputs a cooling fan request to the ECM, which then energises the cooling fan relay. The cooling fan
request is output if vehicle speed is 80 km/h or less while the external air temperature is 28 °C (82 °F) or more. The
request is cancelled, and the cooling fan switched off, if either the vehicle speed increases to 100 km/h, or the external
air temperature decreases to 25 °C (77 °F).
Default settings
If the battery power supply to the ATC ECU is disrupted for any reason, e.g. battery disconnected, the system reverts
to default settings when the battery power supply is restored. Default settings are:
lTemperature indications in °C (in some markets a conversion connector is fitted to the ATC ECU to change the
default temperature scale to °F).
lLH and RH outlet temperatures of 22 °C (72 °F).
laudible warning switched on.
lWarm-up air distribution (to face level and footwells) function switched on.
lIf the system is first switched on using the A/C on/off switch, the automatic mode is engaged, regardless of the
settings in use when the battery was disconnected.
Page 1232 of 1529

AIR CONDITIONING
REPAIRS 82-43
Evaporator and motor assembly - rear
$% 82.26.21
Remove
1.Depressurise air conditioning system.
+ AIR CONDITIONING, REFRIGERANT
RECOVERY, RECYCLING AND
RECHARGING, Refrigerant recovery,
recycling and recharging.
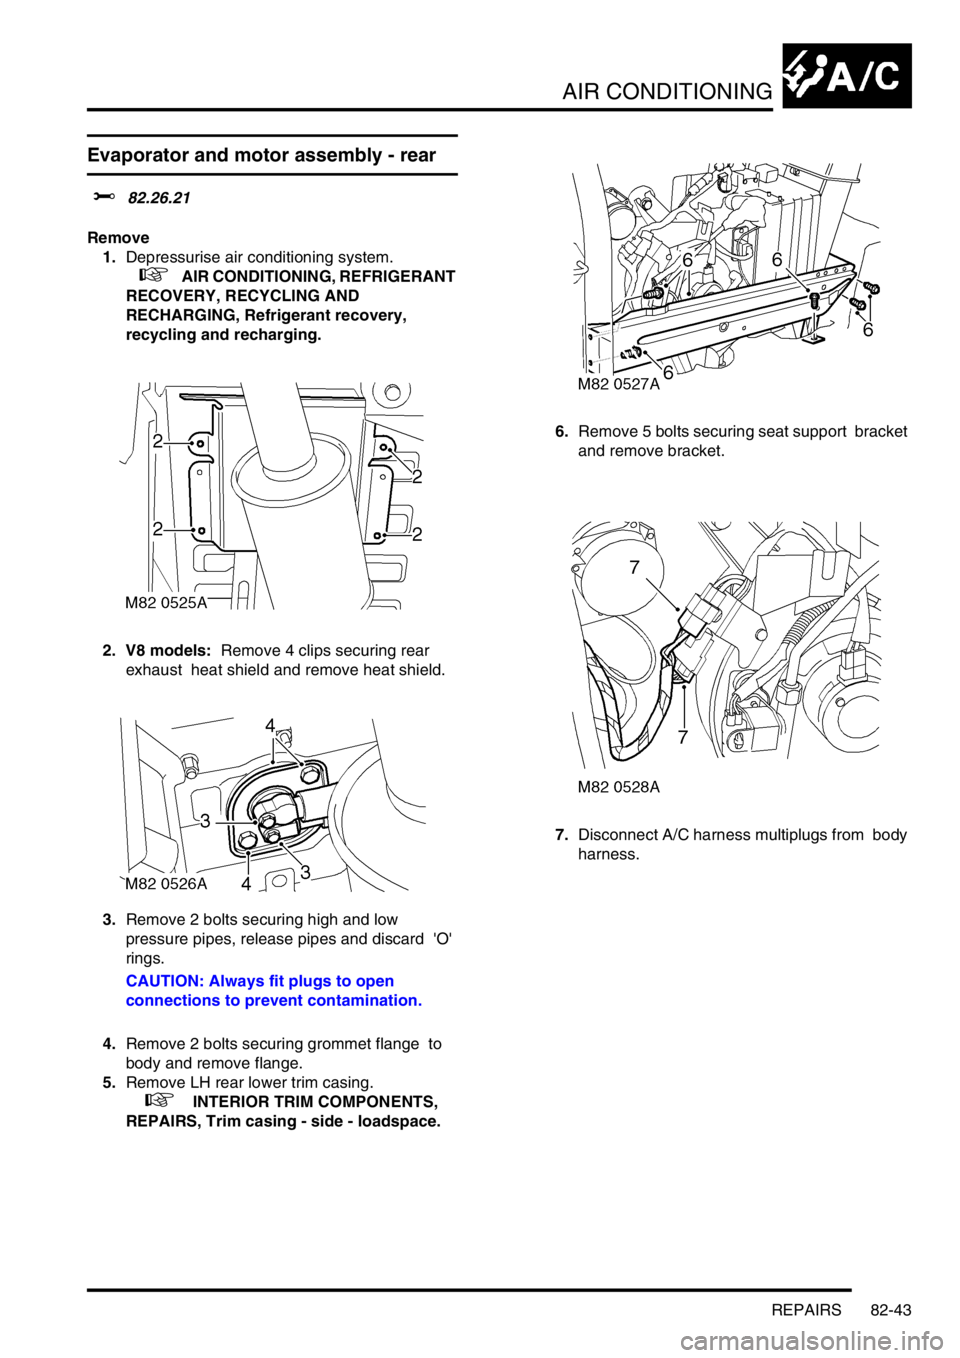
2. V8 models: Remove 4 clips securing rear
exhaust heat shield and remove heat shield.
3.Remove 2 bolts securing high and low
pressure pipes, release pipes and discard 'O'
rings.
CAUTION: Always fit plugs to open
connections to prevent contamination.
4.Remove 2 bolts securing grommet flange to
body and remove flange.
5.Remove LH rear lower trim casing.
+ INTERIOR TRIM COMPONENTS,
REPAIRS, Trim casing - side - loadspace.6.Remove 5 bolts securing seat support bracket
and remove bracket.
7.Disconnect A/C harness multiplugs from body
harness.
Page 1233 of 1529

AIR CONDITIONING
82-44REPAIRS
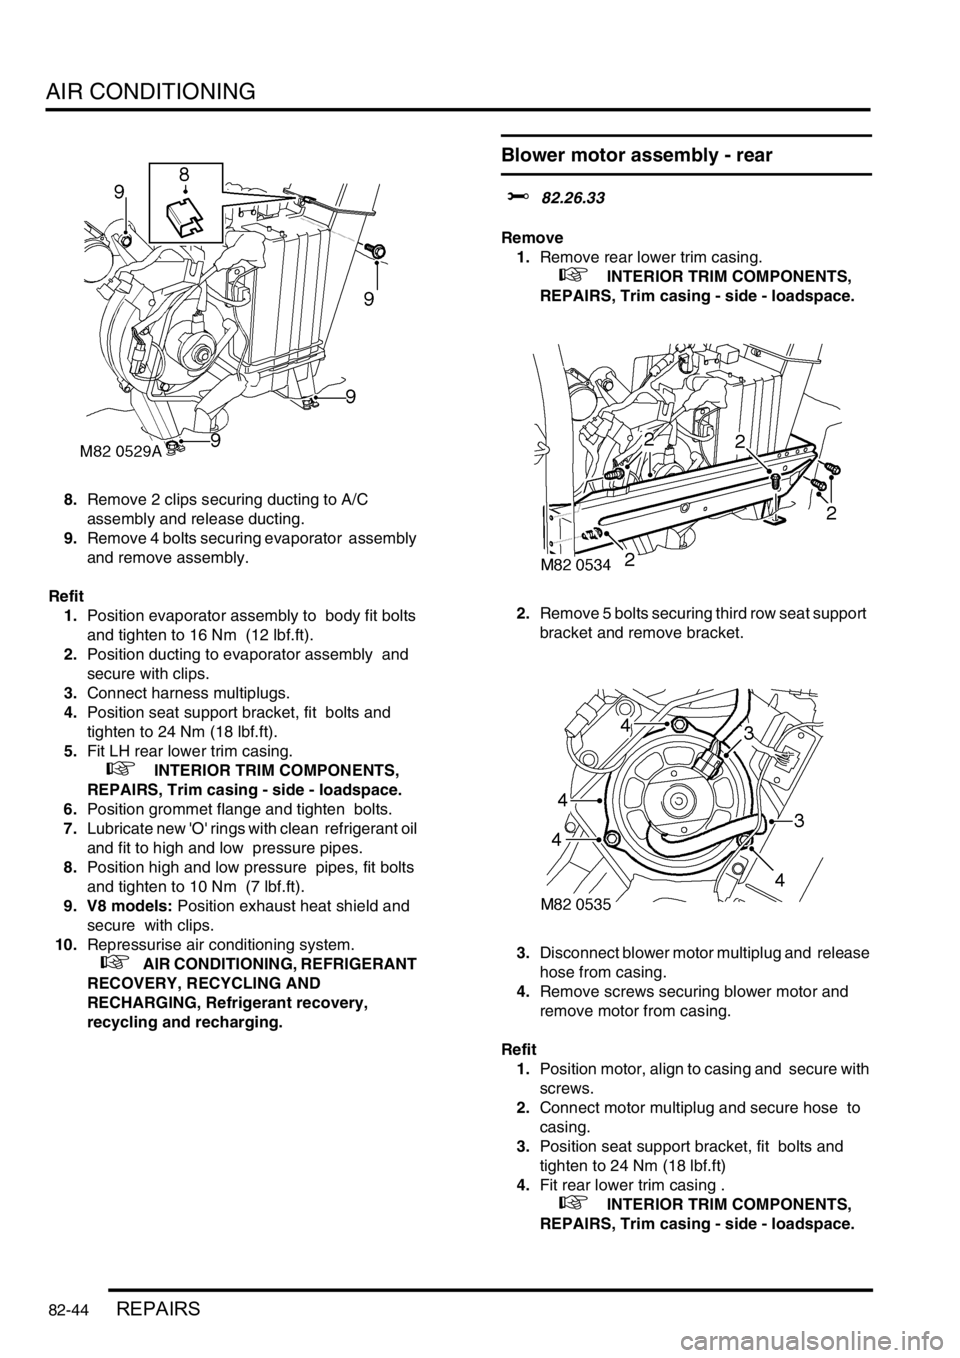
8.Remove 2 clips securing ducting to A/C
assembly and release ducting.
9.Remove 4 bolts securing evaporator assembly
and remove assembly.
Refit
1.Position evaporator assembly to body fit bolts
and tighten to 16 Nm (12 lbf.ft).
2.Position ducting to evaporator assembly and
secure with clips.
3.Connect harness multiplugs.
4.Position seat support bracket, fit bolts and
tighten to 24 Nm (18 lbf.ft).
5.Fit LH rear lower trim casing.
+ INTERIOR TRIM COMPONENTS,
REPAIRS, Trim casing - side - loadspace.
6.Position grommet flange and tighten bolts.
7.Lubricate new 'O' rings with clean refrigerant oil
and fit to high and low pressure pipes.
8.Position high and low pressure pipes, fit bolts
and tighten to 10 Nm (7 lbf.ft).
9. V8 models: Position exhaust heat shield and
secure with clips.
10.Repressurise air conditioning system.
+ AIR CONDITIONING, REFRIGERANT
RECOVERY, RECYCLING AND
RECHARGING, Refrigerant recovery,
recycling and recharging.
Blower motor assembly - rear
$% 82.26.33
Remove
1.Remove rear lower trim casing.
+ INTERIOR TRIM COMPONENTS,
REPAIRS, Trim casing - side - loadspace.
2.Remove 5 bolts securing third row seat support
bracket and remove bracket.
3.Disconnect blower motor multiplug and release
hose from casing.
4.Remove screws securing blower motor and
remove motor from casing.
Refit
1.Position motor, align to casing and secure with
screws.
2.Connect motor multiplug and secure hose to
casing.
3.Position seat support bracket, fit bolts and
tighten to 24 Nm (18 lbf.ft)
4.Fit rear lower trim casing .
+ INTERIOR TRIM COMPONENTS,
REPAIRS, Trim casing - side - loadspace.
Page 1253 of 1529

WIPERS AND WASHERS
84-18 DESCRIPTION AND OPERATION
Front flick wipe
Flick wipe operation will only activate when the following conditions are met:
lIgnition switch is in position I or II.
lFront flick switch is operated.
Pressing the flick wipe switch operates the front wiper motor at high speed. The front wiper motor operates as long
as the flick switch is activated. Releasing the flick switch causes the front wiper motor to run through the park switch
circuitry. The park switch only permits low speed operation. Thus if the flick switch is pressed and immediately
released, the wipers operate at low speed.
Rear intermittent wipe variable delay
The rear intermittent wipe variable delay operation allows the driver to adjust the interval between wipes to suit local
conditions. Rear variable delay operation only activates if the following conditions are met:
lIgnition switch in position I or II.
lFront wash/ wipe switch on intermittent.
lRear wipe switch is operated.
The BCU determines the desired delay interval based on the setting of the variable delay switch. The rear wash/ wipe
delay is nominally twice as long as that of the front. This information passes from the IDM to the rear wiper relay and
activates the rear wiper motor.
If the delay duration is decreased during operation of the rear wiper, the wipers immediately operate once and the
delay cycle is reset.
If the delay duration is increased during operation of the rear wiper, the delay cycle is automatically increased by the
BCU.
Reverse wiping
Reverse wiping operates the rear wiper motor when reverse gear is selected. The transmission must be in reverse
for longer then 0.5 seconds before reversing wipe activates. Reversing wipe activates if the following conditions are
met:
lIgnition switch is in position II.
lReverse gear is selected.
lRear wiper or front wipers operating.
If the rear wiper is active in any mode when reverse gear is selected, the rear wiper activates for 4 second. After 4
seconds the rear wiper operates in a delay operation at the same delay interval set by the variable delay switch until
reverse gear is deselected.
If the front wipers are operating on either low or high speed when reverse gear is selected, the rear wiper activates
continuously until reverse gear is deselected.
In order to enable reversing wipe functions, the BCU utilises the reversing light switch located within the transmission
to determine when reverse gear has been selected.
If the front intermittent wipe is active when reverse gear is selected, the rear wiper completes 2 cycles before operating
at the same intermittent delay as the front wipers.
Rear wipe
Rear wipe operation will only activate when the following conditions are met:
lIgnition switch is in position II.
lRear wipe switch is operated.
Operating the rear wiper switch provides an earth input to the BCU. The BCU tells the IDM to activate the rear wiper
relay, which provides battery voltage to the wiper motor through the normally closed contacts of the park switch.
Page 1275 of 1529

LIGHTING
86-2-2 ADJUSTMENTS
Headlamps beam alignment - from 03MY
$% 86.40.17
Check
1.Ensure vehicle is unladen and tyres are set at
the correct pressures.
2. Models with SLS: Ensure vehicle is at the
standard ride height.
3. Models without SLS: Set headlamp leveling
switch to zero.
4.Align beam setting equipment to headlamp.
5.Switch on headlamps. Headlamp setting 1.2%
below horizontal and parallel.
6.Align beam setting equipment to second
headlamp and repeat the check.
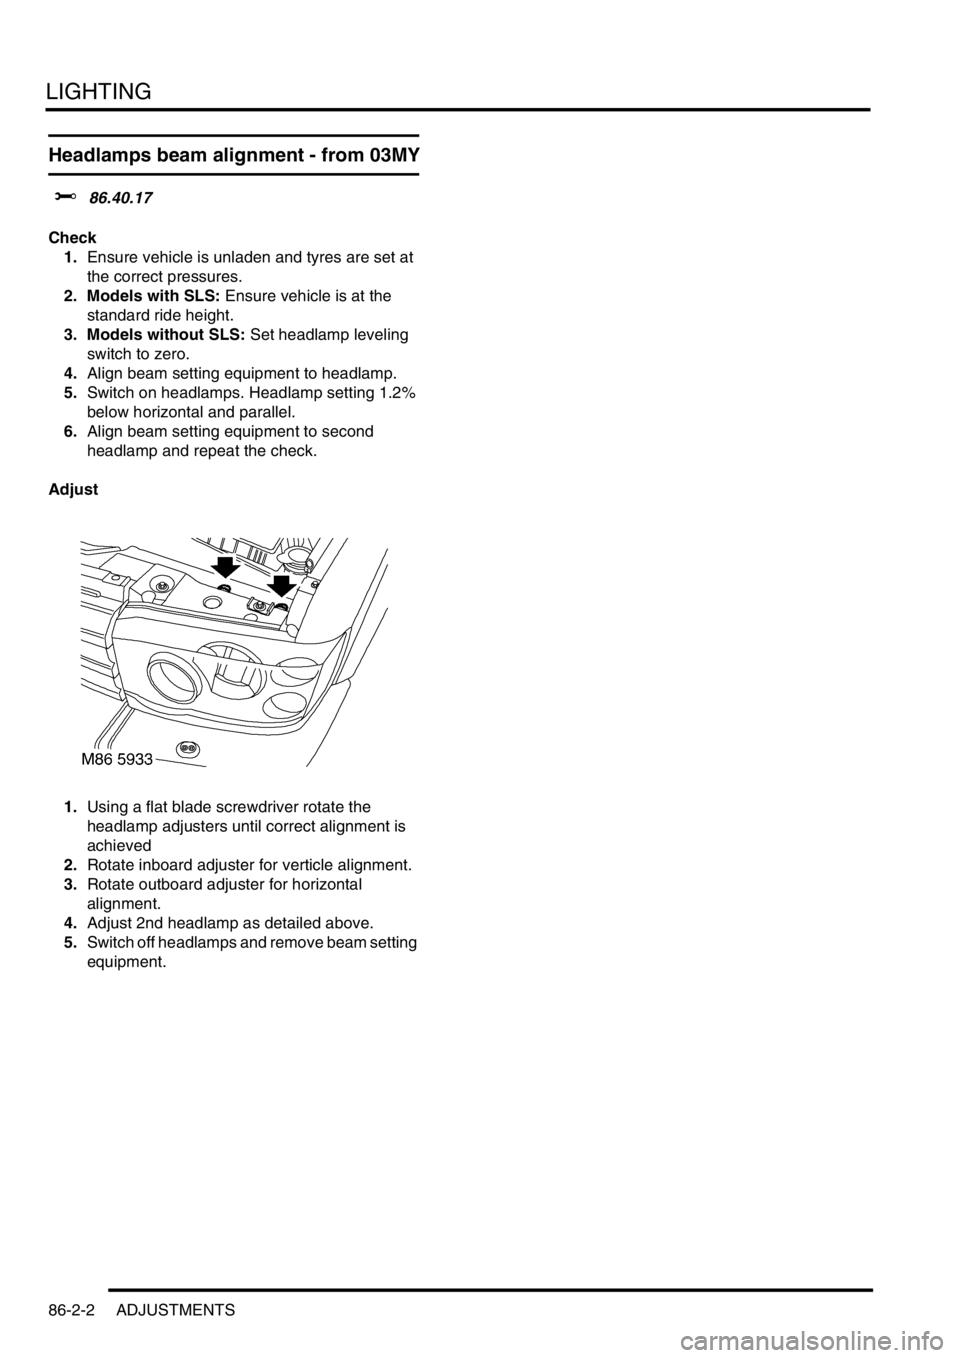
Adjust
1.Using a flat blade screwdriver rotate the
headlamp adjusters until correct alignment is
achieved
2.Rotate inboard adjuster for verticle alignment.
3.Rotate outboard adjuster for horizontal
alignment.
4.Adjust 2nd headlamp as detailed above.
5.Switch off headlamps and remove beam setting
equipment.