1999 HONDA ODYSSEY remote control
[x] Cancel search: remote controlPage 5 of 343

Your Vehicle at a Glance
*
:
To use the horn, press the pad around the "H" logo.
TRACTION CONTROL SYSTEM
(P.207) HEADLIGHTS/
TURN SIGNALS
(P.66/68)
HAZARD WARNING
LIGHTS
(P.70)
DIGITAL CLOCK
(P.117)
REAR WINDOW
DEFOGGER(P.71)
LIGHT CONTROL
SWITCH (P.125)
WINDSHIELD
WIPERS/WASHERS
(P.68/70)
CRUISE
CONTROL
(P.73)
HORN*
STEERING WHEEL
ADJUSTMENT (P.72)
POWER SLIDING
DOOR SWITCHES(P.90)
MIRROR
CONTROLS (P.115)
REMOTE AUDIO
CONTROLS
(P.179)
CRUISE
CONTROL
(P.73)
ProCarManuals.comMain Menu s t
Page 56 of 343

Instruments and Controls
This section gives information about
the controls and displays that
contribute to the daily operation of
your Honda. All the essential
controls are within easy reach.
Control Locations............................ 56
Indicator Lights................................ 57
Gauges.............................................. 62
Controls Near the Steering
Wheel........................................65
Headlights...................................
. 66
Automatic Lightin g
Off
Feature......................................67
Daytime Running Lights............. 67
Instrument Panel Brightness..... 67
Turn Signals................................. 68
Windshield Wipers.....................
. 68
Windshield Washers..................
. 70
Rear Windo w
Wiper and
Washer......................................70
Hazard Warning........................... 70
Rear Window Defogger.............. 71
Steering Wheel Adjustment....... 72
Steering Wheel Controls ................ 73
Cruise Control.............................. 73
Remote Audio Controls .............. 76
Keys and Locks................................ 76
Keys............................................... 76
Immobilizer System..................... 77
Ignition Switch............................. 78
Power Door Locks....................... 79
Remote Transmitter.................... 81Childproof Door Locks............... 85
Tailgate......................................... 85
Glove Box..................................... 87
Sliding Doors.................................... 88
Manual Sliding Doors.................. 88
Power Sliding Doors.................... 90
Important Safety Precautions.... 94
HomeLink Universal Transmitter.................................. 95
Seats.................................................. 99
Passenger Seating....................... 99
Seat Adjustments....................... 100
Driver's Seat Power
Adjustments........................... 102
Armrests..................................... 103
Head Restraints......................... 104
Third Seat Access...................... 105 Moving the Second Row Bucket Seat............................ 106
Removing the Bucket Seats in the Second Row................. 108
Removing the Bench Seat in the Second Row................. 109
Folding the Third Seat.............. 110
Power Windows............................. 113
Mirrors............................................ 115 Parking Brake................................ 116
Digital Clock................................... 117
Center Table................................... 117
Beverage Holder............................ 118
Sunglasses Holder......................... 120
Sun Visor......................................... 121
Vanity Mirror................................. 121 Rear Compartment........................ 122Center Pocket................................ 122
Coin Holder.................................... 122
Storage Box.................................... 123 Coat Hook....................................... 123
Accessory Power Sockets............. 124 Interior Lights................................ 125
Instruments and ControlsProCarManuals.comMain Menu s t
Page 77 of 343

Steering Wheel Controls, Keys and Locks
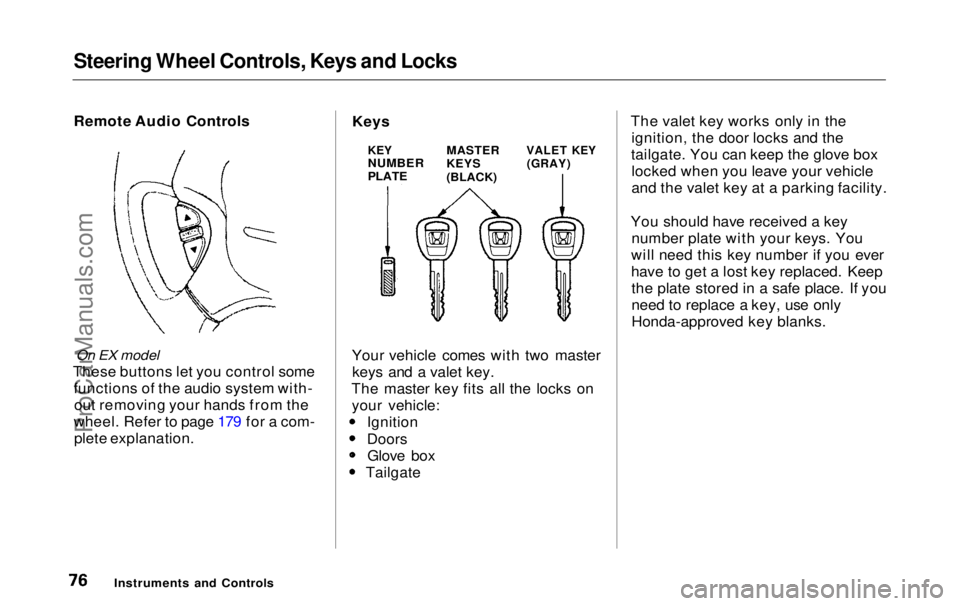
Remote Audio Controls
On EX model
These buttons let you control some functions of the audio system with-out removing your hands from the
wheel. Refer to page 179 for a com- plete explanation. Your vehicle comes with two master
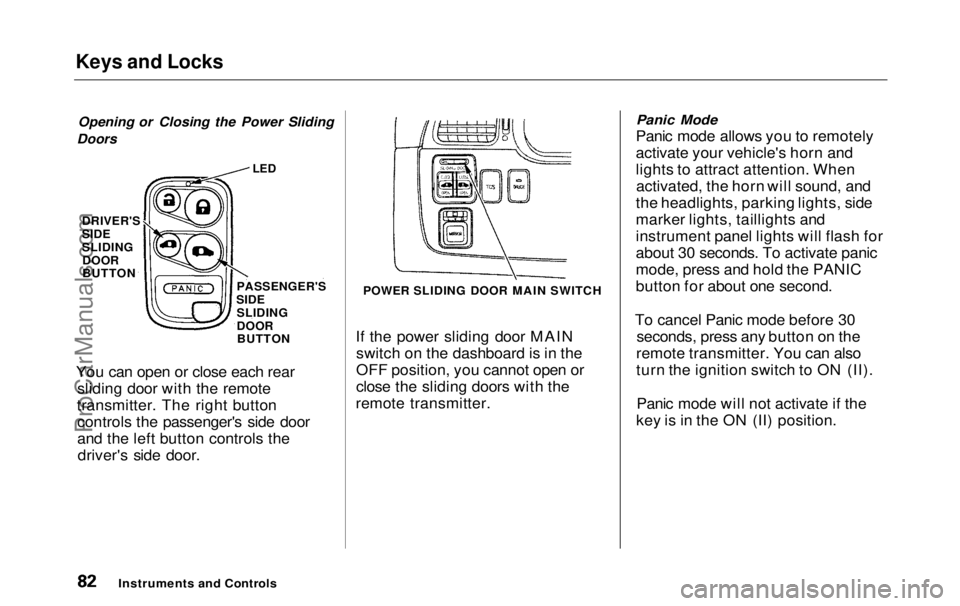
keys and a valet key.
The master key fits all the locks on your vehicle: Ignition
DoorsGlove box TailgateThe valet key works only in the
ignition, the door locks and the
tailgate. You can keep the glove box locked when you leave your vehicle
and the valet key at a parking facility.
You should have received a key number plate with your keys. You
will need this key number if you ever
have to get a lost key replaced. Keep the plate stored in a safe place. If you
need to replace a key, use only
Honda-approved key blanks.
Instruments and Controls
KEY
NUMBER
PLATE
MASTER
KEYS
(BLACK)
VALET KEY
(GRAY)
KeysProCarManuals.comMain Menu Table of Contents s t
Page 78 of 343

Keys and Locks
These keys contain electronic circuits that are activated by the
Immobilizer System. They will not
work to start the engine if the circuits are damaged. Protect the keys from direct
sunlight, high temperature, and
high humidity. Do not drop the keys or set heavy
objects on them.
Keep the keys away from liquids.
If they get wet, dry them immedi-
ately with a soft cloth.
The keys do not contain batteries. Do not try to take them apart.
Remote Transmitter
Some models also come with a
remote transmitter; see page 81 for
an explanation of its operation.
Immobilizer System
The Immobilizer System protects your vehicle from theft. A properly-coded master or valet key must be
used in the ignition switch for theengine to start. If an improperly-
coded key (or other device) is used,
the engine's fuel system is disabled.
When you turn the ignition switch to ON (II), the Immobilizer System
indicator should come on for a few seconds, then go out. If the indicator
starts to blink, it means the system does not recognize the coding of the
key. Turn the ignition switch to LOCK (0), remove the key, reinsert
it, and turn the switch to ON (II)
again.
The system may not recognize your
key's coding if any other immobilizer
key is near the ignition switch. To make sure the system recognizes the
key code, keep each immobilizer key on a separate ring.
If the system repeatedly does not
recognize the coding of your key, contact your Honda dealer.
This indicator will also blink several times when you turn the ignitionswitch from ON (II) to ACCESSORY (I) or LOCK (0).
Do not attempt to alter this system
or add other devices to it. Electrical
problems could result that may make
your vehicle undriveable.
If you have lost your key and you
cannot start the engine, contact your
Honda dealer.
Instruments and Controls CONTINUEDProCarManuals.comMain Menu Table of Contents s t
Page 82 of 343

Keys and Locks
Remote Transmitter
On EX model
You can lock and unlock your vehicle
with the remote transmitter. When you push the LOCK button, all doorsand the tailgate lock. The parking
lights, side marker lights, taillights
and instrument panel lights flash
once.
When you push the UNLOCK button
once, only the driver's door unlocks.
The remaining doors and the tailgate unlock when you push the button a second time. The parking lights, side
marker lights, taillights and
instrument panel lights flash twice
when you push the button the first
time.
When you press the UNLOCK button, the front and rear individual
map lights and the cargo area light,depending on their switch positions,
will come on (see page 125). If you do not open any door or the tailgate,
the lights stay on for about 10 seconds, then go out. If you relock
the doors and the tailgate with the
remote transmitter before 10
seconds have elapsed, the lights will
go off immediately. If you unlock the doors and the
tailgate with the remote transmitter,
but do not open any door or the
tailgate within 30 seconds, all doors
and the tailgate automatically relock.
You cannot lock the doors and the tailgate with the remote transmitter
if any door or the tailgate is not fully
closed. You cannot lock or unlock
the doors and the tailgate with the
key in the ignition switch.
CONTINUED
Instruments and Controls
LED
UNLOCK
BUTTON
LOCK
BUTTON
PANIC BUTTONProCarManuals.comMain Menu Table of Contents s t
Page 83 of 343

Keys and Locks
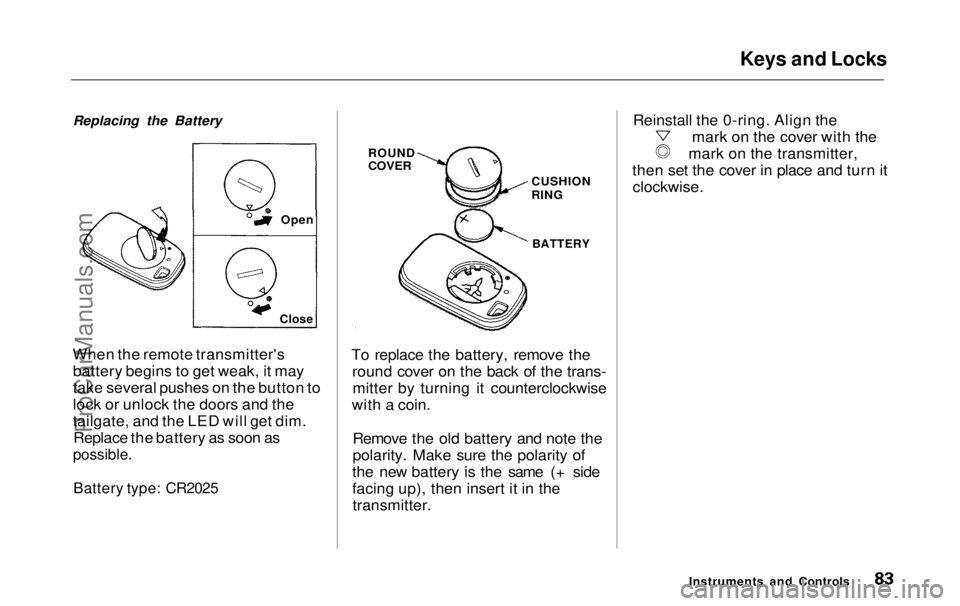
Opening or Closing the Power Sliding
Doors
If the power sliding door MAINswitch on the dashboard is in the
OFF position, you cannot open or
close the sliding doors with the
remote transmitter.
Panic Mode
Panic mode allows you to remotely
activate your vehicle's horn and
lights to attract attention. When activated, the horn will sound, and
the headlights, parking lights, side
marker lights, taillights and
instrument panel lights will flash for
about 30 seconds. To activate panic
mode, press and hold the PANIC
button for about one second.
To cancel Panic mode before 30 seconds, press any button on the
remote transmitter. You can also
turn the ignition switch to ON (II).
Panic mode will not activate if the
key is in the ON (II) position.
Instruments and Controls
You can open or close each rear
sliding door with the remote
transmitter. The right button controls the passenger's side door
and the left button controls thedriver's side door.
LED
PASSENGER'S
SIDE SLIDING
DOORBUTTON
DRIVER'S
SIDE
SLIDING
DOOR
BUTTON
POWER SLIDING DOOR MAIN SWITCHProCarManuals.comMain Menu Table of Contents s t
Page 84 of 343

Keys and Locks
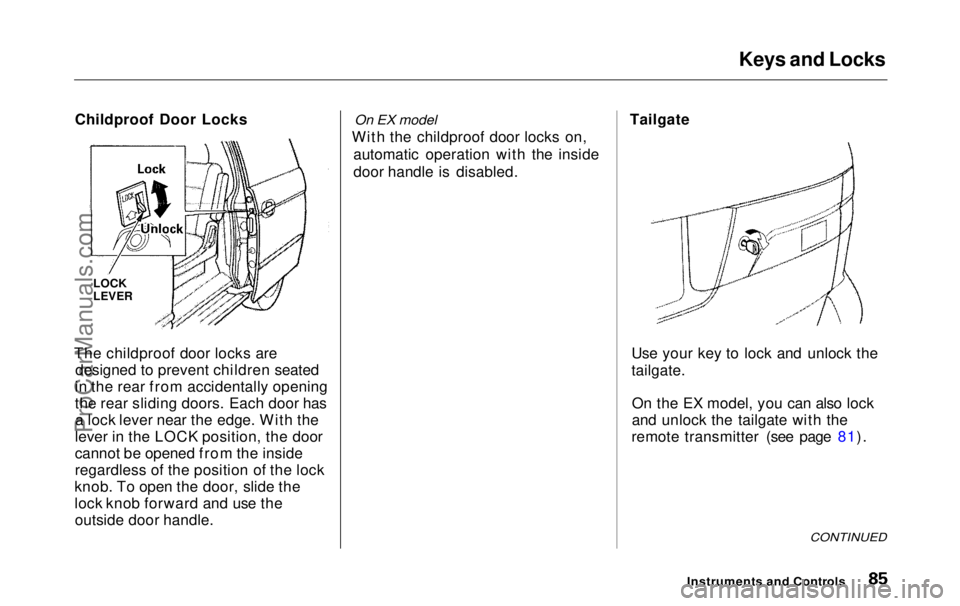
Replacing the Battery
When the remote transmitter's battery begins to get weak, it may
take several pushes on the button to
lock or unlock the doors and the
tailgate, and the LED will get dim.Replace the battery as soon as
possible.
Battery type: CR2025
To replace the battery, remove the
round cover on the back of the trans-mitter by turning it counterclockwise
with a coin.
Remove the old battery and note the
polarity. Make sure the polarity of
the new battery is the same (+ side
facing up), then insert it in the transmitter. Reinstall the 0-ring. Align the mark on the cover with the
mark on the transmitter,
then set the cover in place and turn it clockwise.
Instruments and Controls
Close
Open
ROUND
COVER
CUSHION
RING
BATTERYProCarManuals.comMain Menu Table of Contents s t
Page 86 of 343

Keys and Locks
Childproof Door Locks
The childproof door locks are designed to prevent children seated
in the rear from accidentally opening
the rear sliding doors. Each door has a lock lever near the edge. With the
lever in the LOCK position, the door
cannot be opened from the inside
regardless of the position of the lock
knob. To open the door, slide the
lock knob forward and use the outside door handle.
On EX model
With the childproof door locks on, automatic operation with the inside
door handle is disabled. Tailgate
Use your key to lock and unlock the
tailgate.On the EX model, you can also lock
and unlock the tailgate with the
remote transmitter (see page 81).
CONTINUED
Instruments and Controls
LOCK
LEVERProCarManuals.comMain Menu Table of Contents s t