1999 HONDA ODYSSEY seat adjustment
[x] Cancel search: seat adjustmentPage 56 of 343

Instruments and Controls
This section gives information about
the controls and displays that
contribute to the daily operation of
your Honda. All the essential
controls are within easy reach.
Control Locations............................ 56
Indicator Lights................................ 57
Gauges.............................................. 62
Controls Near the Steering
Wheel........................................65
Headlights...................................
. 66
Automatic Lightin g
Off
Feature......................................67
Daytime Running Lights............. 67
Instrument Panel Brightness..... 67
Turn Signals................................. 68
Windshield Wipers.....................
. 68
Windshield Washers..................
. 70
Rear Windo w
Wiper and
Washer......................................70
Hazard Warning........................... 70
Rear Window Defogger.............. 71
Steering Wheel Adjustment....... 72
Steering Wheel Controls ................ 73
Cruise Control.............................. 73
Remote Audio Controls .............. 76
Keys and Locks................................ 76
Keys............................................... 76
Immobilizer System..................... 77
Ignition Switch............................. 78
Power Door Locks....................... 79
Remote Transmitter.................... 81Childproof Door Locks............... 85
Tailgate......................................... 85
Glove Box..................................... 87
Sliding Doors.................................... 88
Manual Sliding Doors.................. 88
Power Sliding Doors.................... 90
Important Safety Precautions.... 94
HomeLink Universal Transmitter.................................. 95
Seats.................................................. 99
Passenger Seating....................... 99
Seat Adjustments....................... 100
Driver's Seat Power
Adjustments........................... 102
Armrests..................................... 103
Head Restraints......................... 104
Third Seat Access...................... 105 Moving the Second Row Bucket Seat............................ 106
Removing the Bucket Seats in the Second Row................. 108
Removing the Bench Seat in the Second Row................. 109
Folding the Third Seat.............. 110
Power Windows............................. 113
Mirrors............................................ 115 Parking Brake................................ 116
Digital Clock................................... 117
Center Table................................... 117
Beverage Holder............................ 118
Sunglasses Holder......................... 120
Sun Visor......................................... 121
Vanity Mirror................................. 121 Rear Compartment........................ 122Center Pocket................................ 122
Coin Holder.................................... 122
Storage Box.................................... 123 Coat Hook....................................... 123
Accessory Power Sockets............. 124 Interior Lights................................ 125
Instruments and ControlsProCarManuals.comMain Menu s t
Page 101 of 343
Seats
Seat Adjustments
See pages 12 — 13 for important safety
information and warnings about how to
properly position seats and seat-backs.
The EX model has a power adjustable driver's seat. All other
models have manual driver's seat
adjustments.
The front passenger's seat, and the seats in the second and third rows
adjust manually.
Make all seat adjustments before
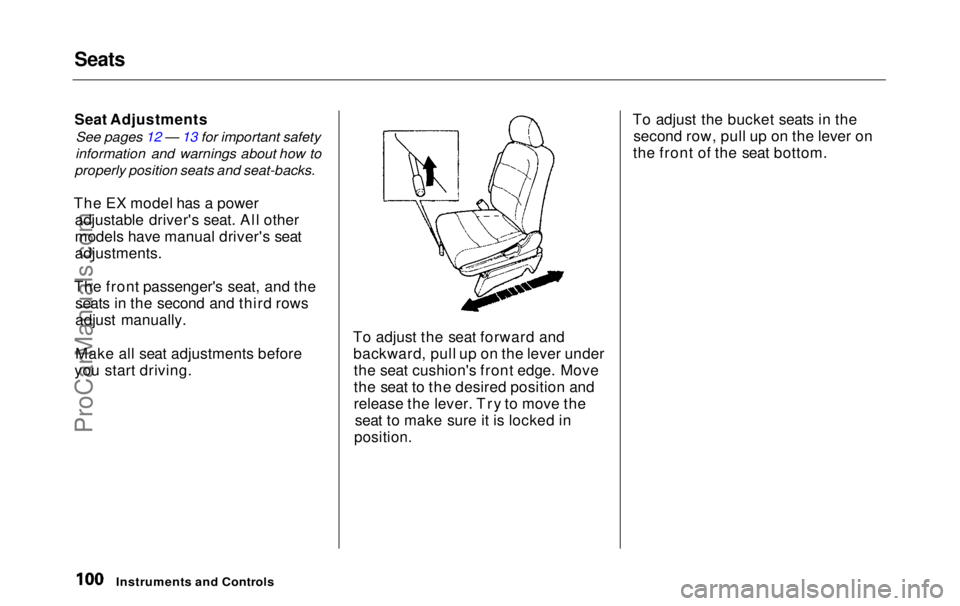
you start driving. To adjust the seat forward and
backward, pull up on the lever underthe seat cushion's front edge. Move
the seat to the desired position and
release the lever. Try to move the seat to make sure it is locked in
position.
To adjust the bucket seats in the
second row, pull up on the lever on
the front of the seat bottom.
Instruments and ControlsProCarManuals.comMain Menu Table of Contents s t
Page 103 of 343
Seats
Driver's Seat Power Adjustments
On EX model
See pages 12 — 13 for important safety
information and warnings about how to
properly position seats and seat-backs.
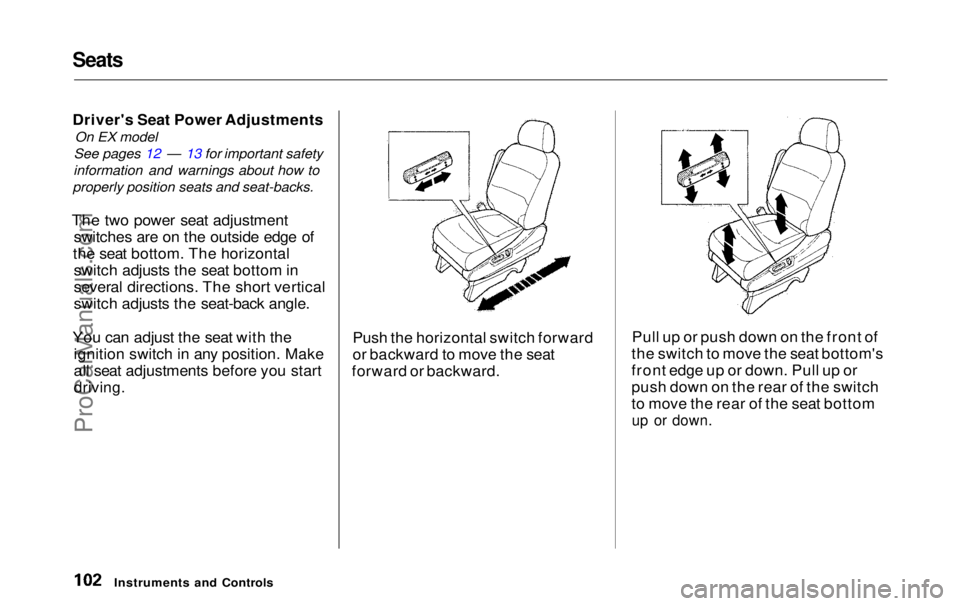
The two power seat adjustment switches are on the outside edge of
the seat bottom. The horizontal switch adjusts the seat bottom in
several directions. The short vertical
switch adjusts the seat-back angle.
You can adjust the seat with the ignition switch in any position. Make
all seat adjustments before you start
driving.
Push the horizontal switch forward
or backward to move the seat
forward or backward. Pull up or push down on the front of
the switch to move the seat bottom's
front edge up or down. Pull up or
push down on the rear of the switch
to move the rear of the seat bottom
up or down.
Instruments and ControlsProCarManuals.comMain Menu Table of Contents s t
Page 106 of 343
Seats
Third Seat Access
Convertible Second Row Bucket Seats
model
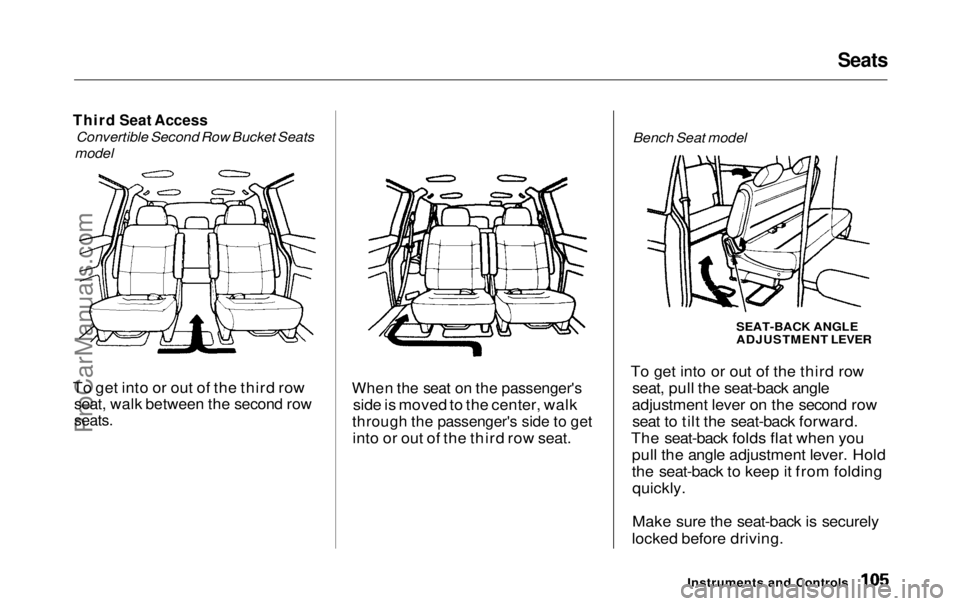
To get into or out of the third row
seat, walk between the second row
seats.
When the seat on the passenger's
side is moved to the center, walk
through the passenger's side to get
into or out of the third row seat. Bench Seat model
To get into or out of the third row seat, pull the seat-back angle
adjustment lever on the second row seat to tilt the seat-back forward.
The seat-back folds flat when you pull the angle adjustment lever. Hold
the seat-back to keep it from foldingquickly.
Make sure the seat-back is securely
locked before driving.
Instruments and ControlsSEAT-BACK ANGLE
ADJUSTMENT LEVERProCarManuals.comMain Menu Table of Contents s t
Page 109 of 343
Seats
Removing the Bucket Seats in the
Second Row
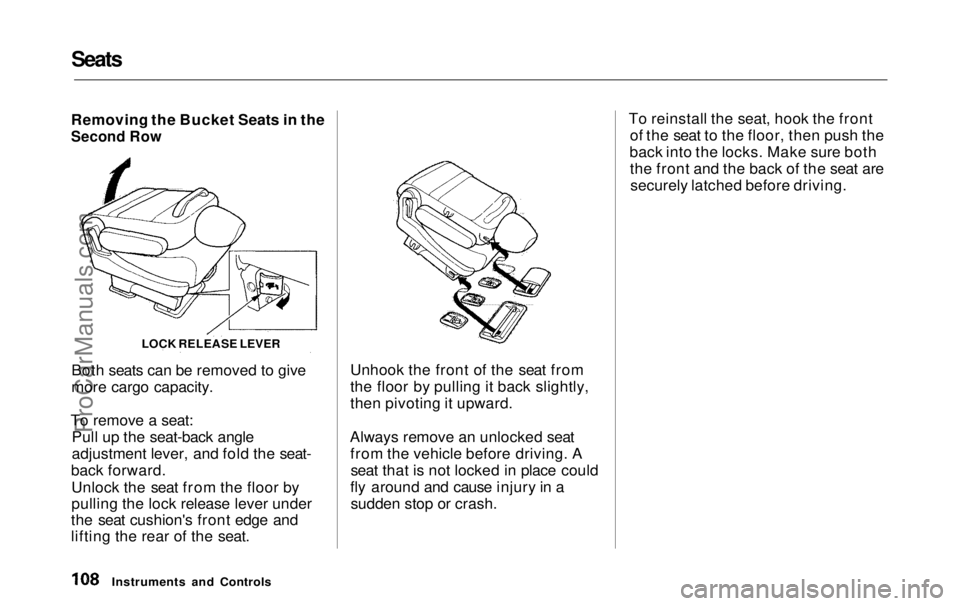
Both seats can be removed to give
more cargo capacity.
To remove a seat: Pull up the seat-back angle
adjustment lever, and fold the seat-
back forward.
Unlock the seat from the floor by
pulling the lock release lever under
the seat cushion's front edge and
lifting the rear of the seat. Unhook the front of the seat from
the floor by pulling it back slightly,
then pivoting it upward.
Always remove an unlocked seat from the vehicle before driving. Aseat that is not locked in place could
fly around and cause injury in a sudden stop or crash. To reinstall the seat, hook the front
of the seat to the floor, then push the
back into the locks. Make sure both the front and the back of the seat aresecurely latched before driving.
Instruments and Controls LOCK RELEASE LEVERProCarManuals.comMain Menu Table of Contents s t
Page 110 of 343
Seats
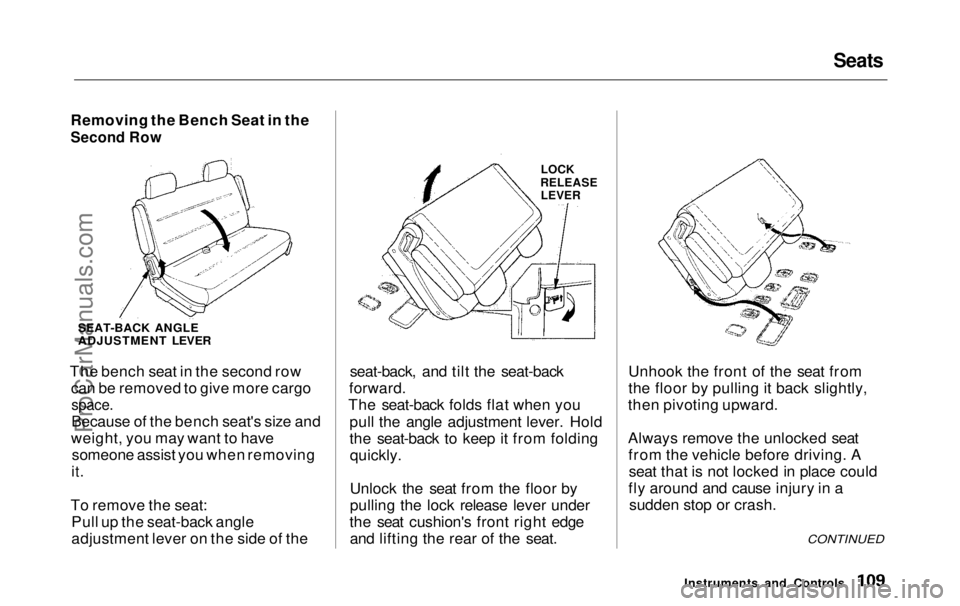
Removing the Bench Seat in the
Second Row
SEAT-BACK ANGLE
ADJUSTMENT LEVER
The bench seat in the second row can be removed to give more cargo
space.
Because of the bench seat's size and
weight, you may want to have someone assist you when removing
it.
To remove the seat: Pull up the seat-back angle
adjustment lever on the side of the
LOCK
RELEASE LEVER
seat-back, and tilt the seat-back
forward.
The seat-back folds flat when you
pull the angle adjustment lever. Hold
the seat-back to keep it from foldingquickly.
Unlock the seat from the floor by
pulling the lock release lever under
the seat cushion's front right edge and lifting the rear of the seat. Unhook the front of the seat from
the floor by pulling it back slightly,
then pivoting upward.
Always remove the unlocked seat from the vehicle before driving. Aseat that is not locked in place could
fly around and cause injury in a sudden stop or crash.
Instruments and Controls
CONTINUEDProCarManuals.comMain Menu Table of Contents s t
Page 197 of 343
Preparing to Drive
You should do the following checks and adjustments every day before
you drive your vehicle.
1. Make sure all windows, mirrors, and outside lights are clean and
unobstructed. Remove frost, snow, or ice.
2. Check that the hood and tailgate are fully closed.
3. Visually check the tires. If a tire looks low, use a gauge to check its
pressure.
4. Check that any items you may be carrying with you inside are storedproperly or fastened downsecurely. 5. Check the adjustment of the seat
(see page 100).
6. Check the adjustment of the inside and outside mirrors (see
page 115).
7. Check the adjustment of the steering wheel (see page 72 ).
8. Make sure the doors and tailgate are securely closed and locked.
9. Fasten your seat belt. Check that your passengers have fastenedtheir seat belts (see page 15). 10.Turn the ignition switch ON (II).
Check the indicator lights in the
instrument panel.
11.Start the engine (see page 197). 12. Check the gauges and indicator lights in the instrument panel (seepage 57).
DrivingProCarManuals.comMain Menu Table of Contents s t
Page 333 of 343

Index
Accessories and Modifications.... 189 Accessories................................. 189
Additional Safety Precaution.... 190Modifications............................. 190
ACCESSORY (Ignition Key Position)........................................ 79
Accessory Power Sockets............. 124
Adding Automatic Transmission
Fluid........................................ 243
Brake Fluid................................. 244
Engine Coolant........................... 237
Engine Oil................................... 233
Power Steering Fluid................. 245
Windshield Washer Fluid......... 242
Additional Information About Your Seat Belts........................ 45
Lap/Shoulder Belt....................... 45
Seat Belt Maintenance................ 47
Seat Belt System Components... 45
Additional Information About Your SRS................................... 48
Additional Safety Precautions.... 52
How the Automatic Seat Belt
Tensioners Work..................... 50
How the SRS Indicator
Works...................................... 50
How Your Airbags Work............ 48
SRS Components......................... 48
Additives, Engine Oil..................... 235
Adjustments Head Restraints......................... 104
Mirrors........................................ 115
Seats............................................ 100
Steering Wheel............................
72
Airbag (SRS)............................... 9
, 49
Air Cleaner Element...................... 246
Air Conditioning Filter.................. 256 Air Conditioning System.......130, 138 Maintenance............................... 255
Rear A/C Control......................
146
Usage..................................130 ,
138
Air Outlet
s
(Vents)................132, 138
Air Pressure, Tires........................ 25
7
Alcohol i n
Gasoline........................ 321
Aluminum Wheels, Cleaning........ 279
Antifreeze....................................... 237
Anti-lock Brakes (ABS) Indicator Light..................... 59, 206 Operation.................................... 205
Anti-theft, Audio System............... 180 Anti-theft Steering Column Lock .. 78
Appearance Care........................... 277
Armrests......................................... 103
Audio Controls, Remote................ 179
Audio System......................... 149, 161Automatic Seat Belt Tensioners.... 50
Automatic Lighting Off Feature.... 67
Automatic Speed Control................ 73
Automatic Transmission............... 198
Capacity, Fluid........................... 316
Checking Fluid Level................ 243
Shifting........................................199
Shift Lever Position Indicator.. 198 Shift Lever Positions................. 199
Shift Lock Release..................... 201
CONTINUEDProCarManuals.comMain Menu s t