1999 HONDA ODYSSEY brake fluid
[x] Cancel search: brake fluidPage 62 of 343
Indicator Lights
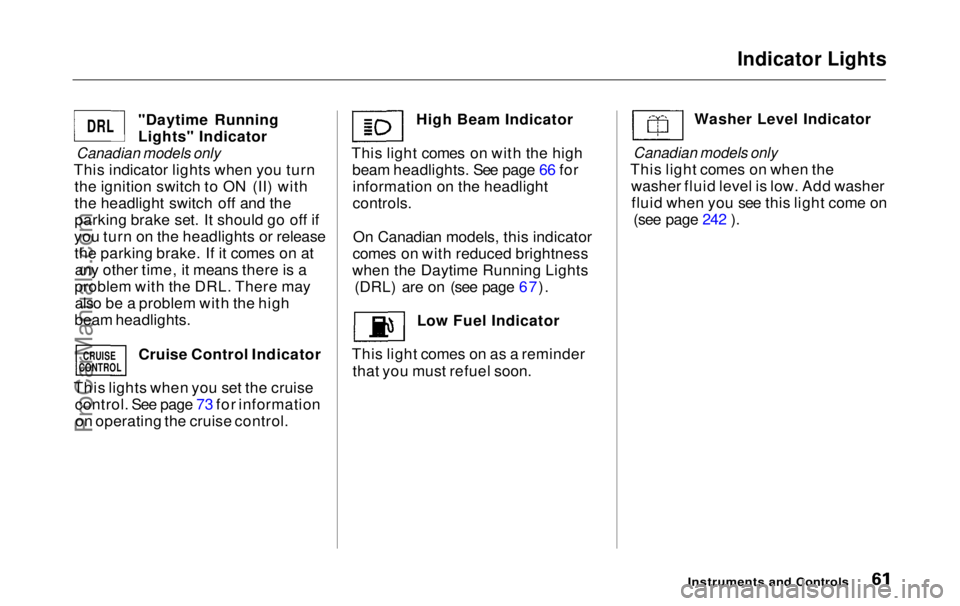
"Daytime Running
Lights" Indicator
Canadian models only
This indicator lights when you turn the ignition switch to ON (II) with
the headlight switch off and the
parking brake set. It should go off if
you turn on the headlights or release the parking brake. If it comes on atany other time, it means there is a
problem with the DRL. There may also be a problem with the high
beam headlights.
Cruise Control Indicator
This lights when you set the cruise control. See page 73 for informationon operating the cruise control. High Beam Indicator
This light comes on with the high beam headlights. See page 66 forinformation on the headlight
controls.
On Canadian models, this indicator
comes on with reduced brightness
when the Daytime Running Lights (DRL) are on (see page 67).
Low Fuel Indicator
This light comes on as a reminder that you must refuel soon. Washer Level Indicator
Canadian models only
This light comes on when the washer fluid level is low. Add washerfluid when you see this light come on (see page 242 ).
Instruments and Controls
DRL
CRUISE
CONTROL
ProCarManuals.comMain Menu Table of Contents s t
Page 211 of 343

Driving in Bad Weather
Rain, fog, and snow conditions re-quire a different driving technique
because of reduced traction and
visibility. Keep your vehicle well- maintained and exercise greater
caution when you need to drive in
bad weather. The cruise control should not be used in these condi-
tions.
Driving Technique — Always drive
slower than you would in dry
weather. It takes your vehicle longer to react, even in conditions that mayseem just barely damp. Applysmooth, even pressure to all the
controls. Abrupt steering wheel
movements or sudden, hard appli-
cation of the brakes can cause loss of control in wet weather. Be extra
cautious for the first few miles (kilometers) of driving while you
adjust to the change in driving
conditions. This is especially true in snow. A person can forget some
snow-driving techniques during the
summer months. Practice is needed
to relearn those skills.
Exercise extra caution when driving
in rain after a long dry spell. After
months of dry weather, the first
rains bring oil to the surface of the
roadway, making it slippery. Visibility — Being able to see
clearly in all directions and being
visible to other drivers are important in all weather conditions. This ismore difficult in bad weather. To beseen more clearly during daylight
hours, turn on your headlights.
Inspect your windshield wipers and
washers frequently. Keep the wind- shield washer reservoir full of the
proper fluid. Have the windshield
wiper blades replaced if they start to streak the windshield or leave parts
unwiped. Use the defroster and air conditioning to keep the windows
from fogging up on the inside (see
pages 135 and 144 ).
DrivingProCarManuals.comMain Menu Table of Contents s t
Page 220 of 343

Maintenance
This section explains why it is important to keep your vehicle well
maintained and to follow basic
maintenance safety precautions.
This section also includes Maintenance Schedules for normaldriving and severe driving conditions,
a Maintenance Record, and instruc-
tions for simple maintenance tasks
you may want to take care of yourself.
If you have the skills and tools to per-
form more complex maintenance tasks on your Honda, you may want
to purchase the Service Manual. See page 333 for information on how toobtain a copy, or see your Honda
dealer.
Maintenance Safety.......................
220
Important Safet
y
Precautions ..
221
Maintenance Schedule.................
.
222
Required Maintenance Record.... 229
Owner Maintenance Checks........ 231
Fluid Locations............................... 232
Engine Oil....................................... 233
Adding Oil................................... 233
Recommended Oil..................... 233
Synthetic Oil............................... 234
Additives..................................... 235
Changing the Oil and Filter...... 235
Cooling System.............................. 237
Adding Engine Coolant............. 237Replacing Engine Coolant........ 239
Windshield Washers..................... 242
Automatic Transmission Fluid..... 243
Brake Fluid..................................... 244
Brake System............................. 244
Power Steering............................... 245
Air Cleaner Element...................... 246
Hood Latch..................................... 248
Spark Plugs..................................... 248
Replacement............................... 248
Specifications............................. 250
Battery............................................ 251
Wiper Blades.................................. 253
Air Conditioning System............... 255
Air Conditioning Filter.................. 256
Drive Belts...................................... 256
Timing Belt..................................... 257
Tires................................................ 257 Inflation....................................... 257
Inspection................................... 259Maintenance............................... 260
Tire Rotation.............................. 260
Replacing Tires and Wheels.... 261
Wheels and Tires....................... 262 Winter Driving........................... 262
Snow Tires.............................. 263
Tire Chains............................. 263
Lights..............................................264
Headlight Aiming...................... 266
Replacing Bulbs......................... 266
Storing Your Vehicle..................... 275
MaintenanceProCarManuals.comMain Menu s t
Page 232 of 343
Owner Maintenance Checks
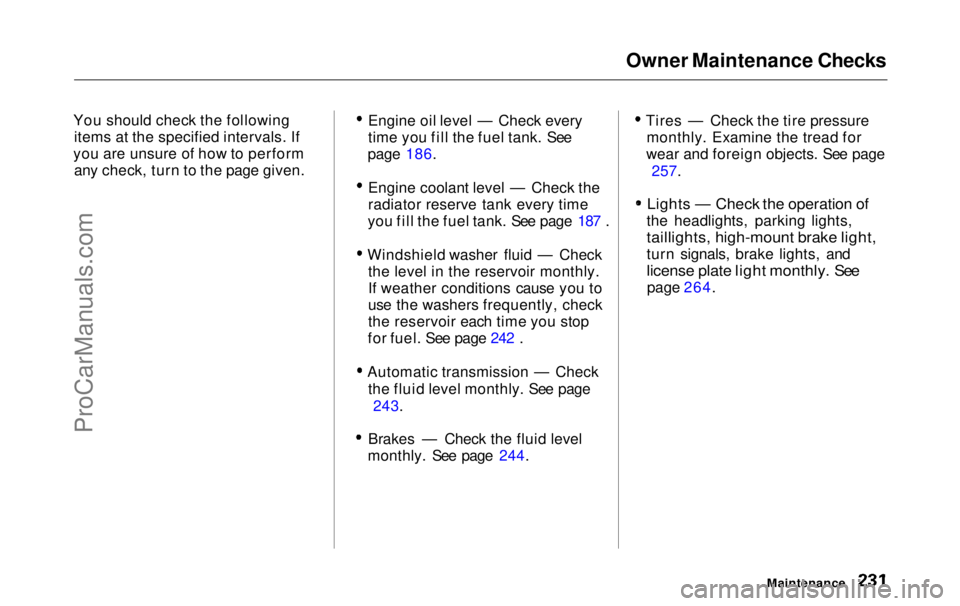
You should check the following items at the specified intervals. If
you are unsure of how to perform any check, turn to the page given. Engine oil level — Check every
time you fill the fuel tank. See
page 186.
Engine coolant level — Check the
radiator reserve tank every time
you fill the fuel tank. See page 187 .
Windshield washer fluid — Check the level in the reservoir monthly.
If weather conditions cause you to
use the washers frequently, check
the reservoir each time you stop
for fuel. See page 242 .
Automatic transmission — Check the fluid level monthly. See page 243.
Brakes — Check the fluid level
monthly. See page 244. Tires — Check the tire pressure
monthly. Examine the tread for
wear and foreign objects. See page
257.
Lights — Check the operation of
the headlights, parking lights,
taillights, high-mount brake light,
turn signals, brake lights, and
license plate light monthly. See
page 264.
MaintenanceProCarManuals.comMain Menu Table of Contents s t
Page 233 of 343
Fluid Locations
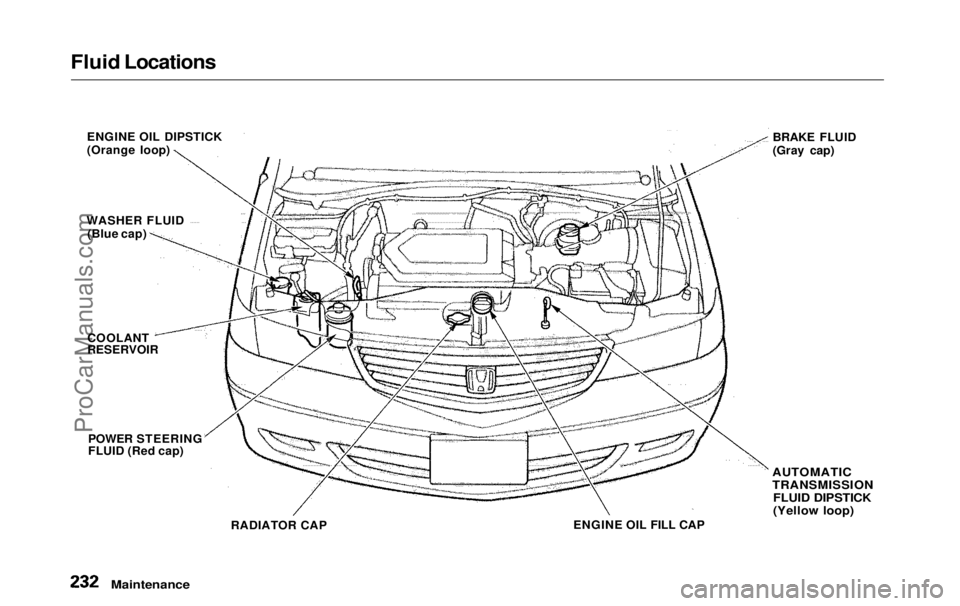
ENGINE OIL DIPSTICK
(Orange loop)
WASHER FLUID (Blue cap)
COOLANT
RESERVOIR
POWER STEERING
FLUID (Red cap) BRAKE FLUID
(Gray cap)
RADIATOR CAP ENGINE OIL FILL CAP
AUTOMATIC
TRANSMISSION
FLUID DIPSTICK
(Yellow loop)
MaintenanceProCarManuals.comMain Menu Table of Contents s t
Page 245 of 343
Brake Fluid
Check the fluid level in the brake
fluid reservoir monthly.
The brake fluid should be replaced according to the time and distance
recommendations in the mainte-
nance schedule. Always use Genuine Honda DOT 3
brake fluid. If it is not available, you should use only DOT 3 or DOT 4
fluid, from a sealed container, as a
temporary replacement. However,
the use of any non-Honda brake fluid can cause corrosion and decrease
the life of the system. Have the
brake system flushed and refilled
with Honda DOT 3 brake fluid as soon as possible.
Brake fluid marked DOT 5 is not
compatible with your vehicle's
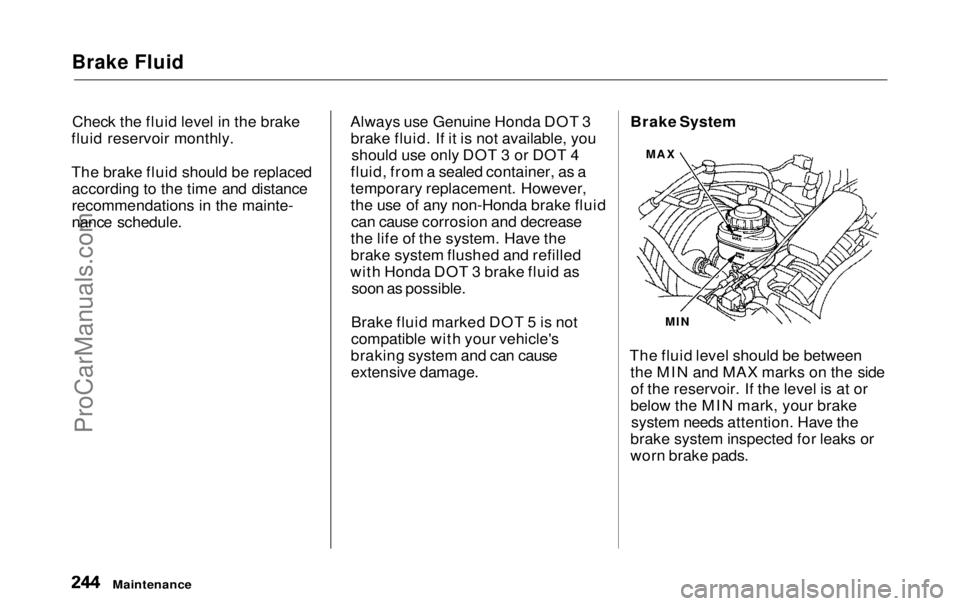
braking system and can cause extensive damage. Brake System
The fluid level should be between the MIN and MAX marks on the sideof the reservoir. If the level is at or
below the MIN mark, your brake system needs attention. Have the
brake system inspected for leaks or
worn brake pads.
Maintenance
MAX
MINProCarManuals.comMain Menu Table of Contents s t
Page 303 of 343
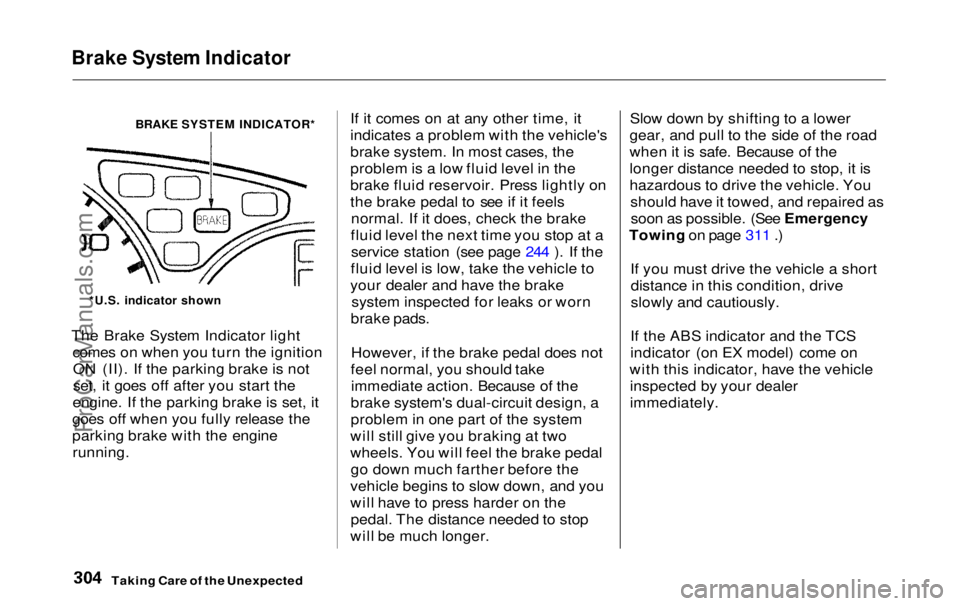
Brake System Indicator
BRAKE SYSTEM INDICATOR*
The Brake System Indicator light comes on when you turn the ignitionON (II). If the parking brake is not
set, it goes off after you start the
engine. If the parking brake is set, it
goes off when you fully release the
parking brake with the engine
running.
If it comes on at any other time, it
indicates a problem with the vehicle's
brake system. In most cases, the
problem is a low fluid level in the
brake fluid reservoir. Press lightly on
the brake pedal to see if it feels
normal. If it does, check the brake
fluid level the next time you stop at a service station (see page 244 ). If the
fluid level is low, take the vehicle to
your dealer and have the brake system inspected for leaks or worn
brake pads.
However, if the brake pedal does not
feel normal, you should take immediate action. Because of the
brake system's dual-circuit design, a
problem in one part of the system
will still give you braking at two
wheels. You will feel the brake pedal go down much farther before the
vehicle begins to slow down, and you
will have to press harder on the pedal. The distance needed to stop
will be much longer. Slow down by shifting to a lower
gear, and pull to the side of the road
when it is safe. Because of the
longer distance needed to stop, it is
hazardous to drive the vehicle. You should have it towed, and repaired assoon as possible. (See Emergency
Towing on page 311 .)
If you must drive the vehicle a shortdistance in this condition, drive
slowly and cautiously.
If the ABS indicator and the TCS
indicator (on EX model) come on
with this indicator, have the vehicle inspected by your dealer
immediately.
Taking Care of the Unexpected
*U.S. indicator shownProCarManuals.comMain Menu Table of Contents s t
Page 333 of 343

Index
Accessories and Modifications.... 189 Accessories................................. 189
Additional Safety Precaution.... 190Modifications............................. 190
ACCESSORY (Ignition Key Position)........................................ 79
Accessory Power Sockets............. 124
Adding Automatic Transmission
Fluid........................................ 243
Brake Fluid................................. 244
Engine Coolant........................... 237
Engine Oil................................... 233
Power Steering Fluid................. 245
Windshield Washer Fluid......... 242
Additional Information About Your Seat Belts........................ 45
Lap/Shoulder Belt....................... 45
Seat Belt Maintenance................ 47
Seat Belt System Components... 45
Additional Information About Your SRS................................... 48
Additional Safety Precautions.... 52
How the Automatic Seat Belt
Tensioners Work..................... 50
How the SRS Indicator
Works...................................... 50
How Your Airbags Work............ 48
SRS Components......................... 48
Additives, Engine Oil..................... 235
Adjustments Head Restraints......................... 104
Mirrors........................................ 115
Seats............................................ 100
Steering Wheel............................
72
Airbag (SRS)............................... 9
, 49
Air Cleaner Element...................... 246
Air Conditioning Filter.................. 256 Air Conditioning System.......130, 138 Maintenance............................... 255
Rear A/C Control......................
146
Usage..................................130 ,
138
Air Outlet
s
(Vents)................132, 138
Air Pressure, Tires........................ 25
7
Alcohol i n
Gasoline........................ 321
Aluminum Wheels, Cleaning........ 279
Antifreeze....................................... 237
Anti-lock Brakes (ABS) Indicator Light..................... 59, 206 Operation.................................... 205
Anti-theft, Audio System............... 180 Anti-theft Steering Column Lock .. 78
Appearance Care........................... 277
Armrests......................................... 103
Audio Controls, Remote................ 179
Audio System......................... 149, 161Automatic Seat Belt Tensioners.... 50
Automatic Lighting Off Feature.... 67
Automatic Speed Control................ 73
Automatic Transmission............... 198
Capacity, Fluid........................... 316
Checking Fluid Level................ 243
Shifting........................................199
Shift Lever Position Indicator.. 198 Shift Lever Positions................. 199
Shift Lock Release..................... 201
CONTINUEDProCarManuals.comMain Menu s t