Page 77 of 343
Steering Wheel Controls, Keys and Locks
Remote Audio Controls
On EX model
These buttons let you control some functions of the audio system with-out removing your hands from the
wheel. Refer to page 179 for a com- plete explanation. Your vehicle comes with two master
keys and a valet key.
The master key fits all the locks on your vehicle: Ignition
DoorsGlove box TailgateThe valet key works only in the
ignition, the door locks and the
tailgate. You can keep the glove box locked when you leave your vehicle
and the valet key at a parking facility.
You should have received a key number plate with your keys. You
will need this key number if you ever
have to get a lost key replaced. Keep the plate stored in a safe place. If you
need to replace a key, use only
Honda-approved key blanks.
Instruments and Controls
KEY
NUMBER
PLATE
MASTER
KEYS
(BLACK)
VALET KEY
(GRAY)
KeysProCarManuals.comMain Menu Table of Contents s t
Page 97 of 343

HomeLink Universal Transmitter
1. This step erases all previously learned
codes. Perform this step before
training the transmitter for the very
first time. Press and hold the two
outside buttons until the red light
in the transmitter flashes (approximately 20 seconds).
Release the buttons.
2. Hold the end of the garage door opener remote control 1 to 3
inches from the HomeLink
transmitter. Make sure you are
not blocking your view of the redlight in the transmitter.
3. Select the transmitter button you want to train.
4. Press the button on the remote control and the button on the
transmitter at the same time. Holddown both buttons. 5. The red light in the transmitter
should begin flashing. It will flashslowly at first, then rapidly.
6. When the red light flashes rapidly, release both buttons. The
transmitter should have learned
the code from the remote control.
7. Test the transmitter button by pushing it. It should operate the
garage door.
8. Repeat these steps to train the other two transmitter buttons to
operate any other remotely-
controlled devices around your
home (lighting, automatic gate, security system, etc.).
Canadian Owners:
The remote control you are training from may stop transmitting after twoseconds. This is not long enough for
the HomeLink transmitter to learn
the code. Release and press the
button on the remote control every
two seconds until the transmitter has
learned the code.
If you are programming the
transmitter to operate a garage door or gate, it is recommended that you
unplug the motor for that device during programming. Repeatedly
pressing the remote control button could burn out the motor.
The HomeLink transmitter stores the code in a permanent memory.
There should be no need to retrain the transmitter if your vehicle's
battery goes dead or is disconnected.
Instruments and ControlsProCarManuals.comMain Menu Table of Contents s t
Page 98 of 343

HomeLink Universal Transmitter
Retrainings Button
To train an already programmed transmitter button to operate a new
device:
1. Select the transmitter button you want to train.
2. Press and hold the transmitter button until the red light begins to
flash slowly (approximately 20
seconds).
3. While continuing to hold the transmitter button, place the
remote control for the device 1 to 3 inches from the HomeLink
transmitter.
4. Press and hold the button on the remote control. Hold both buttons
until the red light begins to flash
rapidly.
5. Release both buttons. The transmitter, should now be trained
to operate the device. Training With a Rolling Code
System
For security purposes, newer garage
door opening systems use a "rolling"
or variable code. If you know that
your garage door opener has a rolling code, or you have been
unable to train the transmitter afterseveral attempts, use the following
procedure. You will need someone to
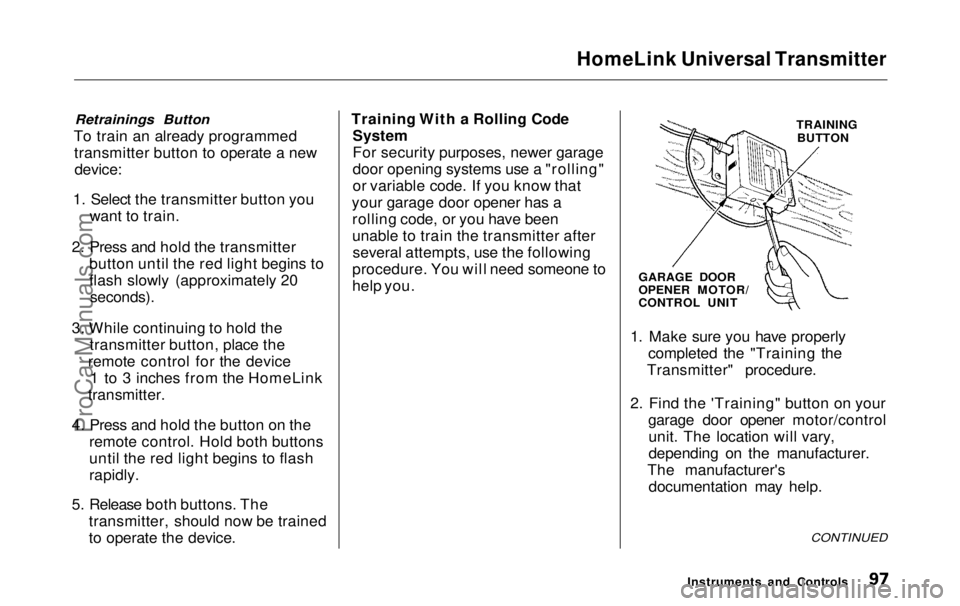
help you. TRAINING
BUTTON
GARAGE DOOR
OPENER MOTOR/
CONTROL UNIT
1. Make sure you have properly completed the "Training the
Transmitter" procedure.
2. Find the 'Training" button on your garage door opener motor/controlunit. The location will vary,
depending on the manufacturer.
The manufacturer's documentation may help.
CONTINUED
Instruments and ControlsProCarManuals.comMain Menu Table of Contents s t
Page 99 of 343

HomeLink Universal Transmitter
3. Press the Training button on the motor/control unit until the
Training light comes on, then release it.
4. Press and release the desired button on the HomeLink
transmitter.
5. Press and release the HomeLink transmitter button again. Thisshould turn off the training light
on the motor/control unit. (Some
systems may require you to press
and release the button three times.)
6. Press the transmitter button again. It should operate the garage door.
Erasing Codes
To erase the codes stored in all three buttons, press and hold the two outside buttons until the red light
begins to flash, then release the
buttons.
You should erase all three codes before selling the vehicle. As required by the FCC:
This device complies with Part 15 of the
FCC rules. Operation is subject to the
following two conditions: (1) This device
may not cause harmful interference, and (2) this device must accept any
interference received, including
interference that may cause undesired
operation.
This device complies with DOC
regulations in Canada.
Changes or modifications not expressly
approved by the party responsible for compliance could void the user's
authority to operate the equipment.
Instruments and ControlsProCarManuals.comMain Menu Table of Contents s t
Page 111 of 343
Seats
To reinstall the seat, hook the front of the seat to the floor, then push the
back into the locks. Make sure both
the front and the back of the seat are securely latched before driving. Folding the Third Seat
RELEASE BUTTON
To create more cargo space, you can fold the third seat into the floor
recess.
To fold the third seat:
1. Remove the head restraints by pushing the release buttons and
pulling the restraints out. 2. Store the head restraints in the
side cargo net. To install the side
cargo net, hook the four loops on
the net to the tabs on the left side
panel.
Instruments and ControlsProCarManuals.comMain Menu Table of Contents s t
Page 131 of 343

Heating and Cooling
On LX model
Proper use of the Heating and Cooling system can make the
interior dry and comfortable, and
keep the windows clear for best
visibility.
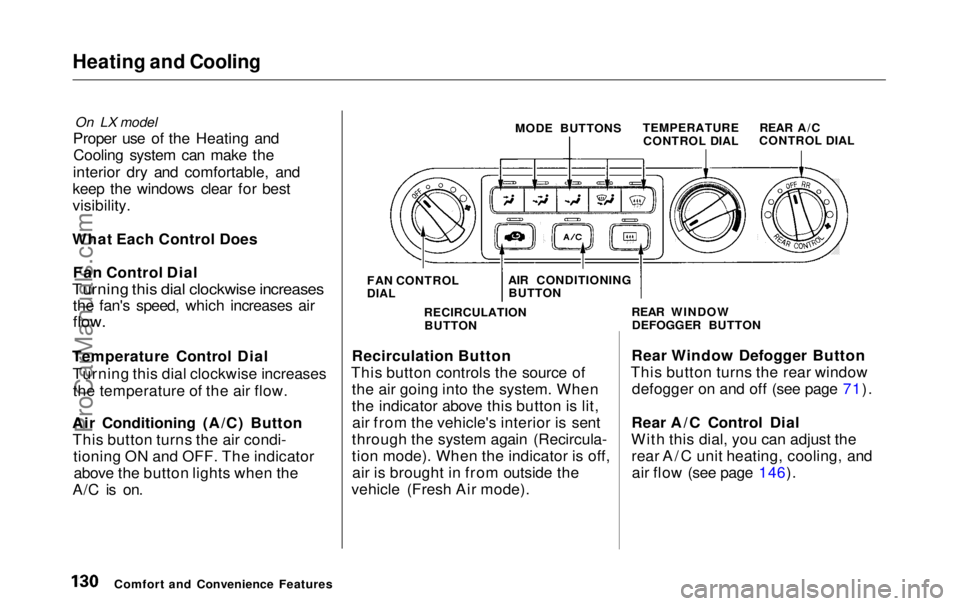
What Each Control Does Fan Control Dial
Turning this dial clockwise increases
the fan's speed, which increases air
flow.
Temperature Control Dial Turning this dial clockwise increasesthe temperature of the air flow.
Air Conditioning (A/C) Button This button turns the air condi- tioning ON and OFF. The indicatorabove the button lights when the
A/C is on. MODE BUTTONS
TEMPERATURE
CONTROL DIAL
Recirculation Button
This button controls the source of the air going into the system. When
the indicator above this button is lit,air from the vehicle's interior is sent
through the system again (Recircula-
tion mode). When the indicator is off, air is brought in from outside the
vehicle (Fresh Air mode). Rear Window Defogger Button
This button turns the rear window defogger on and off (see page 71).
Rear A/C Control Dial
With this dial, you can adjust the rear A/C unit heating, cooling, andair flow (see page 146).
Comfort and Convenience Features FAN CONTROL
DIAL
AIR CONDITIONING
BUTTON
RECIRCULATION BUTTON REAR WINDOW
DEFOGGER BUTTON REAR A/C
CONTROL DIALProCarManuals.comMain Menu Table of Contents s t
Page 132 of 343
Heating and Cooling
Mode Buttons
Use the MODE buttons to select the
vents the air flows from. Some air
will flow from the dashboard corner
vents in all modes. Air flows from the center
and corner vents in the dashboard. Air flow is divided between
the vents in the dashboard and the
floor vents. Air flows from the floor
vents.
Air flow is divided between
the floor vents and the defroster
vents at the base of the windshield. Air flows from the defroster
vents at the base of the windshield. When you select or
the system automatically switches to
Fresh Air mode and turns on the
A/C.
Comfort and Convenience FeaturesProCarManuals.comMain Menu Table of Contents s t
Page 134 of 343

Heating and Cooling
How to Use the System
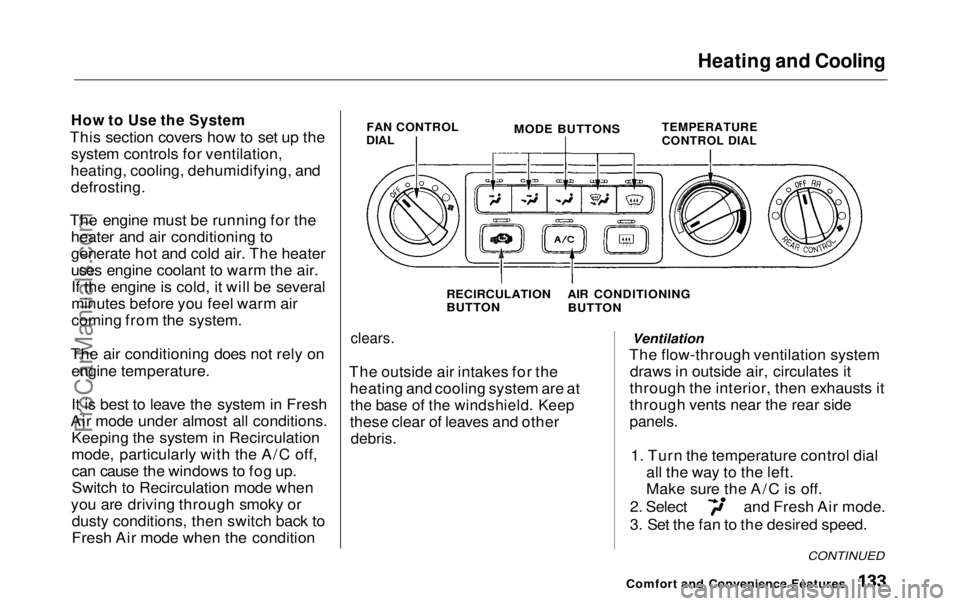
This section covers how to set up the system controls for ventilation,
heating, cooling, dehumidifying, and defrosting.
The engine must be running for the heater and air conditioning to
generate hot and cold air. The heater
uses engine coolant to warm the air.If the engine is cold, it will be several
minutes before you feel warm air
coming from the system.
The air conditioning does not rely on engine temperature.
It is best to leave the system in Fresh
Air mode under almost all conditions. Keeping the system in Recirculation
mode, particularly with the A/C off,can cause the windows to fog up.
Switch to Recirculation mode when
you are driving through smoky or dusty conditions, then switch back to
Fresh Air mode when the condition
FAN CONTROL
DIAL
MODE BUTTONS
TEMPERATURE
CONTROL DIAL
RECIRCULATION
BUTTON
clears.
The outside air intakes for the heating and cooling system are at
the base of the windshield. Keep
these clear of leaves and other
debris.
Ventilation
The flow-through ventilation system draws in outside air, circulates it
through the interior, then exhausts it
through vents near the rear side
panels.
1. Turn the temperature control dial all the way to the left.
Make sure the A/C is off. 2. Select and Fresh Air mode.
3. Set the fan to the desired speed.
Comfort and Convenience Features
CONTINUED
AIR CONDITIONING BUTTO
NProCarManuals.comMain Menu Table of Contents s t