1999 HONDA ODYSSEY gauge
[x] Cancel search: gaugePage 1 of 343

1999 Odyssey Online Reference Owner's Manual
Use these links (and links throughout this manual) to navigate through\
this reference.
For a printed owner's manual, click on authorized manuals or go to www.h\
elminc.com.
Contents
Introduction ........................................................................\
................................................................. i
A Few Words About Safety........................................................................\
.........................................ii
Your Vehicle at a Glanc e........................................................................\
............................................ .2
Driver and Passenger Safety ........................................................................\
......................................5
Proper use and care of your vehicle's seat belts, and Supplemental Restr\
aint System.
Instruments and Control s........................................................................\
.........................................55
Instrume nt panel indicator and gauge, and how to use dashboard and steering colu\
mn controls.
Comfort and Convenience Features ........................................................................\
......................129
How to operate the climate control system, the audio system, and other c\
onvenience features.
Before Driving........................................................................\
..........................................................181
What gasoline to use, how to break -in your new vehicle, and how to load luggage and other cargo.
Driving ........................................................................\
......................................................................195
The proper way to start the engine, shift the transmission, and park, pl\
us towing a trailer.
Maintenance........................................................................\
.............................................................219
The Maintenance Schedule shows you when you need to take you r vehicle to the dealer.
Appearance Car e........................................................................\
..................................................... .277
Tips on cleaning and protecting your vehicle. Things to look for if your\
vehicle ever needs body repairs.
Taking Care of the Unexpecte d........................................................................\
..............................285
This section covers several problems motorists sometimes experience, an d how to handle them.
Technical Informatio n........................................................................\
.............................................313
ID numbers, dimensions, capacities, and technical information.
Warranty and Customer Relations (U.S. and Canad a
)...............................................................
.327
A summary of the warranties covering your new Acura, and how to contact \
us.
Authorized Manu als (U.S. only)........................................................................\
..............................333
How to order manuals and other technical literature.
Index........................................................................\
.............................................................................. I
Service Information Summary
A summary of information you need when you pull up to the fuel pump.
Owner's Identification Form
ProCarManuals.com
Page 4 of 343

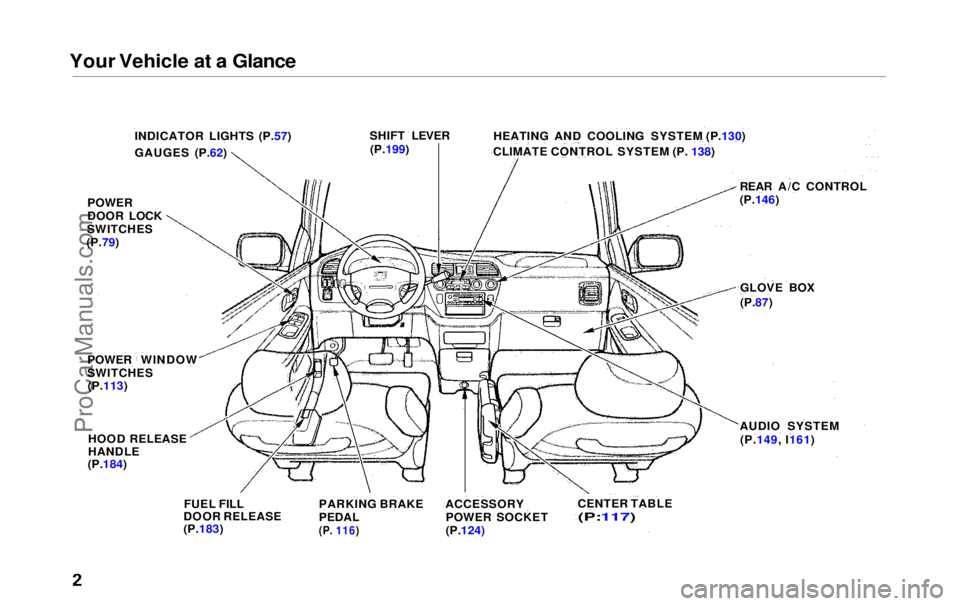
Your Vehicle at a Glance
INDICATOR LIGHTS (P.57)
GAUGES (P.62) HEATING AND COOLING SYSTEM (P.130)
CLIMATE CONTROL SYSTEM (P. 138)
SHIFT LEVER
(P.199)
REAR A/C CONTROL
(P.146)
GLOVE BOX
(P.87)
AUDIO SYSTEM (P.149, l161)
CENTER TABLE
(P:117)
ACCESSORY
POWER SOCKET
(P.124)
PARKING BRAKE
PEDAL
(P.
116)
FUEL FILL
DOOR RELEASE
(P.183)
HOOD RELEASE
HANDLE
(P.184)
POWER
DOOR LOCK
SWITCHES
(P.79)
POWER WINDOW
SWITCHES(P.113)ProCarManuals.comMain Menu s t
Page 56 of 343

Instruments and Controls
This section gives information about
the controls and displays that
contribute to the daily operation of
your Honda. All the essential
controls are within easy reach.
Control Locations............................ 56
Indicator Lights................................ 57
Gauges.............................................. 62
Controls Near the Steering
Wheel........................................65
Headlights...................................
. 66
Automatic Lightin g
Off
Feature......................................67
Daytime Running Lights............. 67
Instrument Panel Brightness..... 67
Turn Signals................................. 68
Windshield Wipers.....................
. 68
Windshield Washers..................
. 70
Rear Windo w
Wiper and
Washer......................................70
Hazard Warning........................... 70
Rear Window Defogger.............. 71
Steering Wheel Adjustment....... 72
Steering Wheel Controls ................ 73
Cruise Control.............................. 73
Remote Audio Controls .............. 76
Keys and Locks................................ 76
Keys............................................... 76
Immobilizer System..................... 77
Ignition Switch............................. 78
Power Door Locks....................... 79
Remote Transmitter.................... 81Childproof Door Locks............... 85
Tailgate......................................... 85
Glove Box..................................... 87
Sliding Doors.................................... 88
Manual Sliding Doors.................. 88
Power Sliding Doors.................... 90
Important Safety Precautions.... 94
HomeLink Universal Transmitter.................................. 95
Seats.................................................. 99
Passenger Seating....................... 99
Seat Adjustments....................... 100
Driver's Seat Power
Adjustments........................... 102
Armrests..................................... 103
Head Restraints......................... 104
Third Seat Access...................... 105 Moving the Second Row Bucket Seat............................ 106
Removing the Bucket Seats in the Second Row................. 108
Removing the Bench Seat in the Second Row................. 109
Folding the Third Seat.............. 110
Power Windows............................. 113
Mirrors............................................ 115 Parking Brake................................ 116
Digital Clock................................... 117
Center Table................................... 117
Beverage Holder............................ 118
Sunglasses Holder......................... 120
Sun Visor......................................... 121
Vanity Mirror................................. 121 Rear Compartment........................ 122Center Pocket................................ 122
Coin Holder.................................... 122
Storage Box.................................... 123 Coat Hook....................................... 123
Accessory Power Sockets............. 124 Interior Lights................................ 125
Instruments and ControlsProCarManuals.comMain Menu s t
Page 63 of 343

Gauges
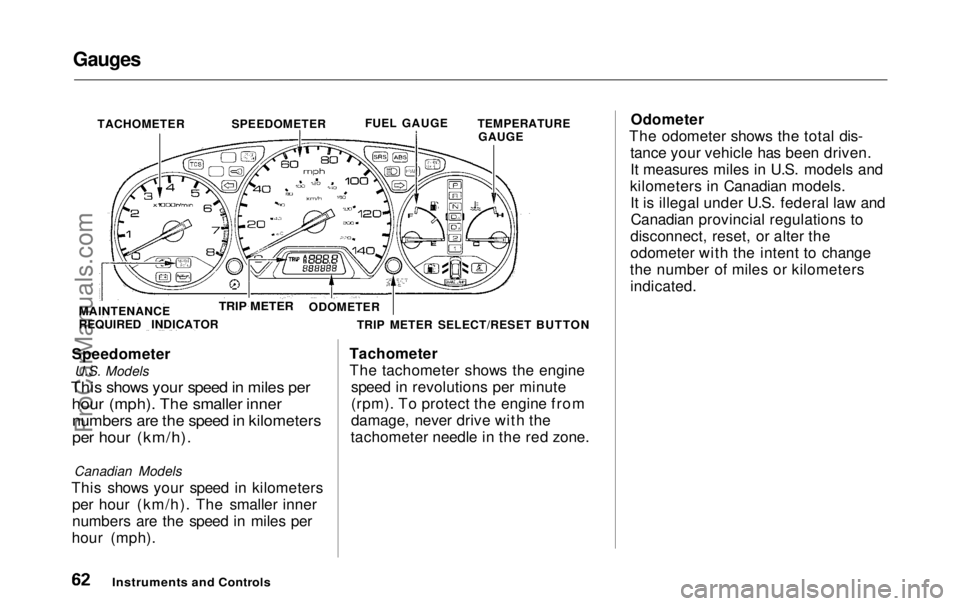
TACHOMETER SPEEDOMETERFUEL GAUGE
TEMPERATURE
GAUGE
Speedometer U.S. Models
This shows your speed in miles per
hour (mph). The smaller inner
numbers are the speed in kilometers
per hour (km/h).
Canadian Models
This shows your speed in kilometers per hour (km/h). The smaller inner
numbers are the speed in miles per
hour (mph). Tachometer
The tachometer shows the engine
speed in revolutions per minute
(rpm). To protect the engine from damage, never drive with the
tachometer needle in the red zone. Odometer
The odometer shows the total dis- tance your vehicle has been driven.
It measures miles in U.S. models and
kilometers in Canadian models. It is illegal under U.S. federal law andCanadian provincial regulations to
disconnect, reset, or alter the
odometer with the intent to change
the number of miles or kilometers indicated.
Instruments and Controls
TRIP METER SELECT/RESET BUTTON
ODOMETER
TRIP METER
MAINTENANCE
REQUIRED INDICATORProCarManuals.comMain Menu Table of Contents s t
Page 64 of 343

Gauges
Trip Meter
This meter shows the number of miles (U.S.) or kilometers (Canada)
driven since you last reset it.
There are two trip meters: Trip A and Trip B. Switch between these
displays by pressing the Select/
Reset button repeatedly. Each trip
meter works independently, so you
can keep track of two different
distances.
To reset a trip meter, display it and then press and hold the Select/Reset
button until the number resets to
"0.0".
Temperature Gauge
This shows the temperature of the
engine's coolant. During normal
operation, the pointer should rise
from the bottom white mark to about
the middle of the gauge. In severe driving conditions, such as very hot
weather or a long period of uphill driving, the pointer may rise to near
the upper white mark. If it reaches
the red (Hot) mark, pull safely to the side of the road. Turn to page 299 for
instructions and precautions on
checking the engine's cooling
system.
Fuel Gauge
This shows how much fuel you have. It is most accurate when the vehicle
is on level ground. It may show slightly more or less than the actual
amount when you are driving on
curvy or hilly roads.
The needle returns to the bottom after you turn off the ignition. The
gauge shows the fuel level reading immediately after you turn the
ignition switch back ON (II).
Instruments and ControlsProCarManuals.comMain Menu Table of Contents s t
Page 65 of 343

Gauges
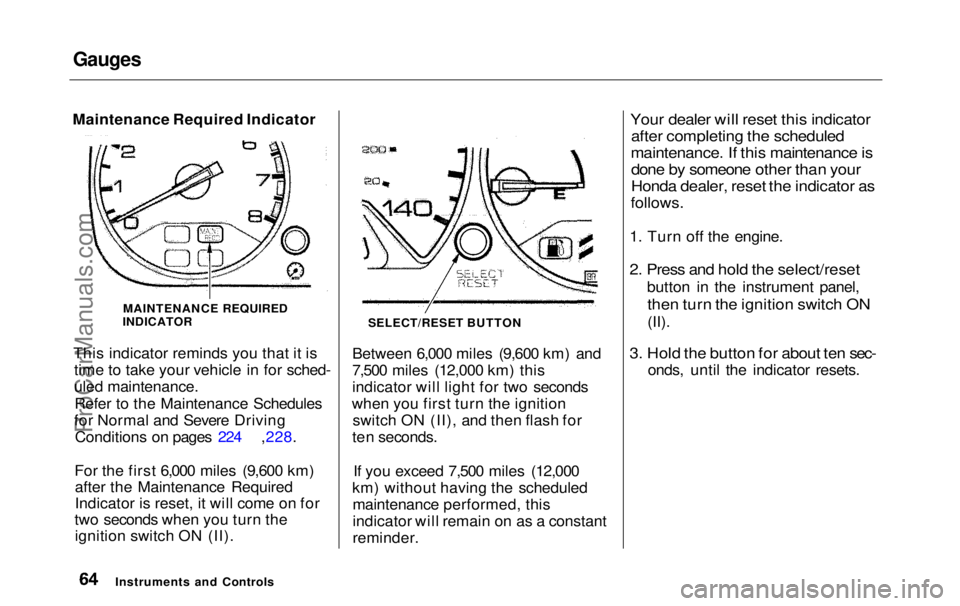
Maintenance Required Indicator
This indicator reminds you that it istime to take your vehicle in for sched-
uled maintenance.
Refer to the Maintenance Schedules
for Normal and Severe Driving Conditions on pages 224 ,228.
For the first 6,000 miles (9,600 km) after the Maintenance Required
Indicator is reset, it will come on for
two seconds when you turn the ignition switch ON (II). SELECT/RESET BUTTON
Between 6,000 miles (9,600 km) and
7,500 miles (12,000 km) this
indicator will light for two seconds
when you first turn the ignition switch ON (II), and then flash for
ten seconds.
If you exceed 7,500 miles (12,000
km) without having the scheduled maintenance performed, this
indicator will remain on as a constant
reminder.
Your dealer will reset this indicator
after completing the scheduled
maintenance. If this maintenance is
done by someone other than your
Honda dealer, reset the indicator as
follows.
1. Turn off the engine.
2. Press and hold the select/reset
button in the instrument panel,
then turn the ignition switch ON
(II).
3. Hold the button for about ten sec-
onds, until the indicator resets.
Instruments and Controls MAINTENANCE REQUIRED
INDICATORProCarManuals.comMain Menu Table of Contents s t
Page 73 of 343

Controls Near the Steering Wheel
Steering Wheel Adjustment
See page 19 for important safety
information about how to properly
position the steering wheel.
Make any steering wheel adjustment
before you start driving.
To adjust the steering wheel upwardor downward:
1. Push the lever under the steering column all the way down.
2. Move the steering wheel to the desired position, making sure the
wheel points toward your chest, not toward your face. Make sure
you can see the instrument panel gauges and the indicator lights. 3. Push the lever up to lock the
steering wheel in that position.
4. Make sure you have securely locked the steering wheel in place
by trying to move it up and down.
Instruments and Controls
Adjusting the steering wheel
position while driving may
cause you to lose control of the
vehicle and be seriously injured in a crash.
Adjust the steering wheel only
when the vehicle is stopped.ProCarManuals.comMain Menu Table of Contents s t
Page 135 of 343

Heating and Cooling
To Cool with A/C
1. Turn on the A/C by pressing the button. The light above the button
should come on when a fan speed
is selected.
2. Make sure the temperature control dial is all the way to the left. 3. Select
4. If the outside air is humid, select
Recirculation mode. If the outside
air is dry, select Fresh Air mode.
5. Set the fan to the desired speed.
If the interior is very warm from
being parked in the sun, you can cool it down more rapidly by setting up
the controls this way:
1. Start the engine.
2. Turn on the A/C by pressing the button. Make sure the tempera-
ture control dial is all the way to
the left.
3. Set the fan to maximum speed.
4. Open the windows partially. Select and Fresh Air mode. FAN CONTROL
DIAL
MODE BUTTONS
TEMPERATURE
CONTROL DIAL
RECIRCULATION BUTTON
When the interior has cooled down to a more comfortable temperature,close the windows and set the
controls as described for normal
cooling.
Air conditioning places an extra load
on the engine. Watch the engine
coolant temperature gauge (see page 63 ) when driving in stop-and-go
traffic or climbing a long, steep hill.
If it moves near the red zone, turn off the A/C until the gauge reads
normally.
Comfort and Convenience Features AIR CONDITIONING
BUTTONProCarManuals.comMain Menu Table of Contents s t