Page 51 of 343

Additional Information About Your SRS
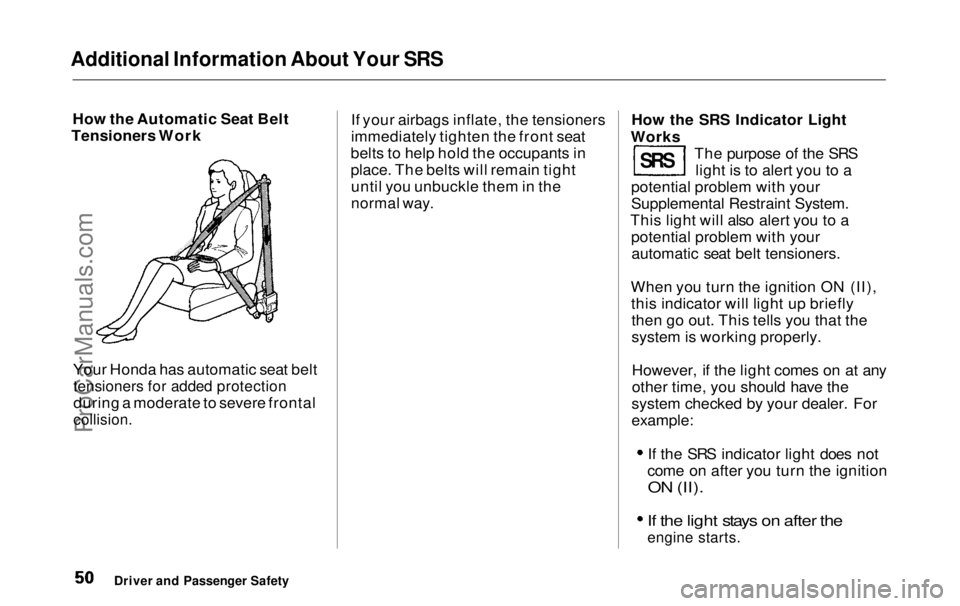
How the Automatic Seat Belt
Tensioners Work
Your Honda has automatic seat belt
tensioners for added protection
during a moderate to severe frontal
collision.
If your airbags inflate, the tensioners
immediately tighten the front seat
belts to help hold the occupants in
place. The belts will remain tight until you unbuckle them in the
normal way.
How the SRS Indicator Light
Works The purpose of the SRSlight is to alert you to a
potential problem with your
Supplemental Restraint System.
This light will also alert you to a potential problem with yourautomatic seat belt tensioners.
When you turn the ignition ON (II), this indicator will light up brieflythen go out. This tells you that the
system is working properly.
However, if the light comes on at any
other time, you should have the
system checked by your dealer. For
example:
If the SRS indicator light does not
come on after you turn the ignition
ON (II).
If the light stays on after the
engine starts.
Driver and Passenger Safety
SRSProCarManuals.comMain Menu Table of Contents s t
Page 59 of 343

Indicator Lights
Malfunction IndicatorLamp
Low Oil Pressure
Indicator
The engine can be severely damaged
if this light flashes or stays on when
the engine is running. For complete
information, see page 301.
Charging System
Indicator
If this light comes on when the
engine is running, the battery is not
being charged. For complete
information, see page 302 .
Supplemental Restraint
System Indicator
This indicator lights when you turn the ignition switch ON (II). If it
comes on at any other time, itindicates a problem in thesupplemental restraint system. For
complete information, see page 50 . Parking Brake
and Brake
System
Indicator
This light has two functions:
1. It comes on when you turn the ignition switch ON (II) as a
reminder to check the parking
brake. If the parking brake is not set, it goes off after the engine
starts. If the parking brake is set,
it goes off when you release the
parking brake with the engine running. Driving with the parking
brake applied can damage the
brakes and tires.
2. If it remains lit after you release the parking brake while the engine
is running, or comes on whiledriving, it can indicate a problem
in the brake system. For complete
information, see page 304 .
Instruments and Controls
See page 303 .
S R S
U.S.
Canada
BRAKEProCarManuals.comMain Menu Table of Contents s t
Page 60 of 343

Indicator Lights
U.S.
Anti-lock Brake System (ABS) Indicator
This light normally comes on for a few seconds when you turn theignition switch ON (II), and when
the ignition switch is turned to START (III). If this light comes on at
any other time, there is a problem in
the ABS. If this happens, take the
vehicle to your dealer to have it checked. With the light on, your
vehicle still has normal braking ability but no anti-lock. Traction Control System
(TCS) Indicator
On EX model
This indicator has three functions:
1. It comes on as a reminder that you have turned off the TractionControl System.
2. It flashes when the TCS is regulating wheelspin.
3. If it comes on and stays on when the Traction Control System is on,
it indicates that there is a problemin the TCS.
This light also comes on when you turn the ignition ON (II) and goes off after the engine starts. See page 207 for more information on the
TCS.
Immobilizer System
Indicator
This indicator comes on for a few seconds when you turn the ignition
switch ON (II). It will then go off if
you have inserted a properly-coded ignition key. If it is not a properly-
coded key, the indicator will blink
and the engine will not start (see
page 77).
This indicator also blinks several times when you turn the ignitionswitch from ON (II) to ACCESSORY (I) or LOCK (0).
Instruments and Controls
Canada
TCSProCarManuals.comMain Menu Table of Contents s t
Page 61 of 343

Indicator Lights
Power Sliding Door
Indicator
EX model only
This indicator comes on for a few
seconds when you turn the ignition
switch ON (II). If it comes on at anyother time, there is a problem in the
power sliding door system. With this
light on, move the main switch on
the dashboard to the OFF position, and have the system checked by
your Honda dealer as soon as possible. You can still open or closeeach sliding door manually. For
more information on the power
sliding doors, see page 90 . Turn Signal and
Hazard WarningIndicators
The left or right turn signal light blinks when you signal a lane changeor turn. If the light does not blink or
blinks rapidly, it usually means one of the turn signal bulbs is burned out (see page 267). Replace the bulb as
soon as possible, since other drivers
cannot see that you are signalling.
When you turn on the Hazard
Warning switch, both turn signal lights blink. All turn signals on theoutside of the vehicle should flash. Door and Brake Lamp Monitor
The appropriate light comes on in this display if the tailgate or any door
is not closed tightly. If a brake lightdoes not work, the BRAKE LAMP
indicator comes on when you push
the brake pedal with the ignition switch ON (II).
A burned out brake light is a hazard
when drivers behind you cannot tell you are braking. Have your brake
lights repaired right away.
All the lights in the monitor display come on when you turn the ignitionswitch ON (II). The lights go off
after the engine starts and the
tailgate and all doors are closed
tightly.
Instruments and Controls
SLIDING
DOOR
BRAKE LAMPProCarManuals.comMain Menu Table of Contents s t
Page 64 of 343

Gauges
Trip Meter
This meter shows the number of miles (U.S.) or kilometers (Canada)
driven since you last reset it.
There are two trip meters: Trip A and Trip B. Switch between these
displays by pressing the Select/
Reset button repeatedly. Each trip
meter works independently, so you
can keep track of two different
distances.
To reset a trip meter, display it and then press and hold the Select/Reset
button until the number resets to
"0.0".
Temperature Gauge
This shows the temperature of the
engine's coolant. During normal
operation, the pointer should rise
from the bottom white mark to about
the middle of the gauge. In severe driving conditions, such as very hot
weather or a long period of uphill driving, the pointer may rise to near
the upper white mark. If it reaches
the red (Hot) mark, pull safely to the side of the road. Turn to page 299 for
instructions and precautions on
checking the engine's cooling
system.
Fuel Gauge
This shows how much fuel you have. It is most accurate when the vehicle
is on level ground. It may show slightly more or less than the actual
amount when you are driving on
curvy or hilly roads.
The needle returns to the bottom after you turn off the ignition. The
gauge shows the fuel level reading immediately after you turn the
ignition switch back ON (II).
Instruments and ControlsProCarManuals.comMain Menu Table of Contents s t
Page 182 of 343
Before Driving
Before you begin driving your Honda,
you should know what gasoline to use, and how to check the levels of
important fluids. You also need to
know how to properly store luggageor packages. The information in thissection will help you. If you plan to
add any accessories to your vehicle,
please read the information in this section first. Break-in Period.............................. 182
Gasoline.......................................... 182
Service Station Procedures .......... 183 Filling the Fuel Tank................. 183Opening the Hood..................... 184 Oil Check................................ 186
Engine Coolant Check.......... 187
Fuel Economy................................ 188
Vehicle Condition...................... 188Driving Habits............................ 188
Accessories and Modifications.... 189 Carrying Cargo.............................. 191
Before DrivingProCarManuals.comMain Menu s t
Page 187 of 343
Service Station Procedures
Oil Check
Check the engine oil level every time
you fill the vehicle with fuel. Wait a few minutes after turning the engineoff before you check the oil.
1. Remove the dipstick (orange
handle).
2. Wipe the dipstick with a clean
cloth or paper towel. 3. Insert it all the way back in its tube.
Before Driving
DIPSTICKProCarManuals.comMain Menu Table of Contents s t
Page 188 of 343
Service Station Procedures
4. Remove the dipstick again and check the level. It should be
between the upper and lower marks.
If it is near or below the lower mark, see Adding Oil on page 233 . Engine Coolant Check
Look at the coolant level in the
radiator reserve tank. Make sure it is
between the MAX and MIN lines. If
it is below the MIN line, see Adding
Engine Coolant on page 237 for
information on adding the proper coolant. Refer to Owner Maintenance
Checks on page 231 for information
on checking other items in your
Honda.
Before Driving
UPPER MARK
LOWER MARK
MAX
MIN
RESERVE TANKProCarManuals.comMain Menu Table of Contents s t