1999 HONDA ODYSSEY manual transmission
[x] Cancel search: manual transmissionPage 1 of 343

1999 Odyssey Online Reference Owner's Manual
Use these links (and links throughout this manual) to navigate through\
this reference.
For a printed owner's manual, click on authorized manuals or go to www.h\
elminc.com.
Contents
Introduction ........................................................................\
................................................................. i
A Few Words About Safety........................................................................\
.........................................ii
Your Vehicle at a Glanc e........................................................................\
............................................ .2
Driver and Passenger Safety ........................................................................\
......................................5
Proper use and care of your vehicle's seat belts, and Supplemental Restr\
aint System.
Instruments and Control s........................................................................\
.........................................55
Instrume nt panel indicator and gauge, and how to use dashboard and steering colu\
mn controls.
Comfort and Convenience Features ........................................................................\
......................129
How to operate the climate control system, the audio system, and other c\
onvenience features.
Before Driving........................................................................\
..........................................................181
What gasoline to use, how to break -in your new vehicle, and how to load luggage and other cargo.
Driving ........................................................................\
......................................................................195
The proper way to start the engine, shift the transmission, and park, pl\
us towing a trailer.
Maintenance........................................................................\
.............................................................219
The Maintenance Schedule shows you when you need to take you r vehicle to the dealer.
Appearance Car e........................................................................\
..................................................... .277
Tips on cleaning and protecting your vehicle. Things to look for if your\
vehicle ever needs body repairs.
Taking Care of the Unexpecte d........................................................................\
..............................285
This section covers several problems motorists sometimes experience, an d how to handle them.
Technical Informatio n........................................................................\
.............................................313
ID numbers, dimensions, capacities, and technical information.
Warranty and Customer Relations (U.S. and Canad a
)...............................................................
.327
A summary of the warranties covering your new Acura, and how to contact \
us.
Authorized Manu als (U.S. only)........................................................................\
..............................333
How to order manuals and other technical literature.
Index........................................................................\
.............................................................................. I
Service Information Summary
A summary of information you need when you pull up to the fuel pump.
Owner's Identification Form
ProCarManuals.com
Page 75 of 343

Steering Wheel Controls
The cruise control may not hold the set speed when you are going up and
down hills. If your speed increases
going down a hill, use the brakes to slow down to the desired speed. This
will cancel the cruise control. To resume the set speed, press theRESUME/accel button. The
CRUISE CONTROL light on the
instrument panel comes on.
When climbing a steep hill, the automatic transmission maydownshift to hold the set speed. Changing the Set Speed
You can increase the set cruising speed in any of these ways: Press and hold the RESUME/
accel button. The vehicle will
accelerate. When you reach the
desired cruising speed, release the
button. Push on the accelerator pedal. Ac-
celerate to the desired cruising
speed and press the SET/decel
button. To increase your speed in very
small amounts, tap the RESUME/
accel button repeatedly. Each time
you do this, your vehicle will speed up about 1 mph (1.6 km/h). You can decrease the set cruising
speed in any of these ways: Press and hold the SET/decel
button. The vehicle will decelerate. Release the button when you
reach the desired speed. To slow down in very small
amounts, tap the SET/decel
button repeatedly. Each time you do this, your vehicle will slow
down about 1 mph (1.6 km/h). Tap the brake pedal lightly with
your foot. The CRUISE CONTROL light on the instru-
ment panel will go out. When the
vehicle slows to the desired speed,
press the SET/decel button. The
vehicle will then maintain the desired speed.
Instruments and ControlsProCarManuals.comMain Menu Table of Contents s t
Page 196 of 343

Driving
This section gives you tips on starting the engine under various
conditions, and how to operate the automatic transmission. It also
includes important information on
parking your vehicle, the braking system, the Traction Control System,
and facts you need if you are
planning to tow a trailer. Preparing to Drive......................... 196
Starting the Engine........................ 197
Starting in Cold Weather at High Altitude ..................... 197
Automatic Transmission............... 198 Shift Lever Position Indicator.. 198
Shift Lever Positions................. 199
Maximum Allowable Speeds.... 201
Shift Lock Release..................... 202
Parking............................................ 203
The Braking System...................... 204 Brake Wear Indicators.............. 204
Brake System Design................ 205
Anti-lock Brakes........................ 205
Important SafetyReminders.......................... 206
ABS Indicator......................... 206
Traction Control System............... 207 TCS ON/OFF Switch................ 209
TCS Indicator............................. 209
Driving in Bad Weather................ 210
Towing a Trailer............................ 212
DrivingProCarManuals.comMain Menu s t
Page 199 of 343

Automatic Transmission
Your Honda's transmission has fourforward speeds, and is electronicallycontrolled for smoother shifting. It
also has a "lock-up" torque converter
for better fuel economy. You may
feel what seems like another shift
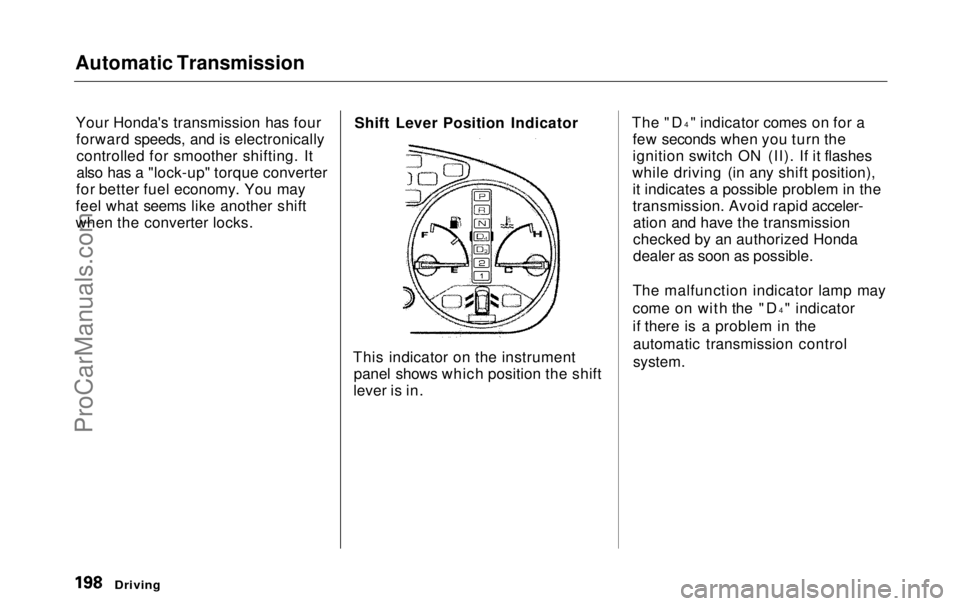
when the converter locks. Shift Lever Position Indicator
This indicator on the instrument panel shows which position the shift
lever is in. The "D
4
" indicator comes on for a
few seconds when you turn the
ignition switch ON (II). If it flashes
while driving (in any shift position), it indicates a possible problem in the
transmission. Avoid rapid acceler-ation and have the transmission
checked by an authorized Honda
dealer as soon as possible.
The malfunction indicator lamp may
come on with the "D 4
" indicator
if there is a problem in the automatic transmission control
system.
DrivingProCarManuals.comMain Menu Table of Contents s t
Page 200 of 343

Automatic Transmission
Shift Lever Positions
The shift lever has seven positions. It must be in Park or Neutral to start
the engine. When you are stopped in
D4, D3, 2,1, N or R, press firmly on
the brake pedal, and keep your foot
off
the accelerato
r pedal. Park (P) — This position mechani-
cally locks the transmission. Use Park whenever you are turning off or
starting the engine. To shift out ofPark, you must press on the brake
pedal and have your foot off the accelerator pedal. Pull the shift lever
towards you, then move it out of
Park.
If you have done all of the above and
still cannot move the lever out of
Park, see Shift Lock Release on page
201.
You must also pull the shift lever towards you to shift into Park. Toavoid transmission damage, come to
a complete stop before shifting into
Park. The shift lever must be in Park
before you can remove the key from
the ignition switch.
CONTINUED
Driving
SHIFT LEVERProCarManuals.comMain Menu Table of Contents s t
Page 201 of 343

Automatic Transmission
Reverse (R) — To shift to Reverse
from Park, see the explanation underPark. To shift to Reverse from
Neutral, come to a complete stop and
then shift. Pull the shift lever
towards you before shifting into Reverse from Neutral. Neutral (N) — Use Neutral if you
need to restart a stalled engine, or if
it is necessary to stop briefly with
the engine idling. Shift to Park posi-
tion if you need to leave the vehicle
for any reason. Press on the brake pe- dal when you are moving the shift
lever from Neutral to another gear.
Drive (D4) — Use this position for
your normal driving. The transmis- sion automatically selects a suitable
gear for your speed and acceleration.
You may notice the transmission shifting up at higher speeds when
the engine is cold. This helps the engine warm up faster. Drive (D3) —This position is similar
to D4, except only the first three
gears are selected. Use D 3
when
towing a trailer in hilly terrain, or to
provide engine braking when going down a steep hill. D 3
can also keep
the transmission from cycling
between third and fourth gears in stop-and-go driving.
For faster acceleration when in D 3
or
D4, you can get the transmission to
automatically downshift by pushing
the accelerator pedal to the floor.
The transmission will shift down one or two gears, depending on your
speed.
DrivingProCarManuals.comMain Menu Table of Contents s t
Page 202 of 343

Automatic Transmission
Second (2) — To shift to Second,
pull the shift lever towards you, then shift to the lower gear. This position
locks the transmission in second
gear. It does not downshift to first gear when you come to a stop.Second gives you more power when
climbing, and increased engine
braking when going down steep hills. Use second gear when starting out
on a slippery surface or in deep snow.
It will help reduce wheelspin.
When driving down hill with a trailer, use the Second position.
First (1) — To shift from Second toFirst, pull the shift lever towards you,
then shift to the lower gear. With the
lever in this position, the transmis- sion locks in First gear. By upshift-
ing and downshifting through 1, 2,
D3 and D4, you can operate this
transmission much like a manual
transmission without a clutch pedal. Engine Speed Limiter
If you exceed the maximum speed
for the gear you are in, the engine
speed will enter into the
tachometer's red zone. If this occurs,
you may feel the engine cut in and out. This is caused by a limiter
in the engine's computer controls.
The engine will run normally
when you reduce the RPM below the
red zone.
Shift Lock Release
This allows you to move the shift lever out of Park if the normal
method of pushing on the brakepedal and pulling the shift lever doesnot work.
1. Set the Parking brake.
2. Remove the key from the ignition
switch.
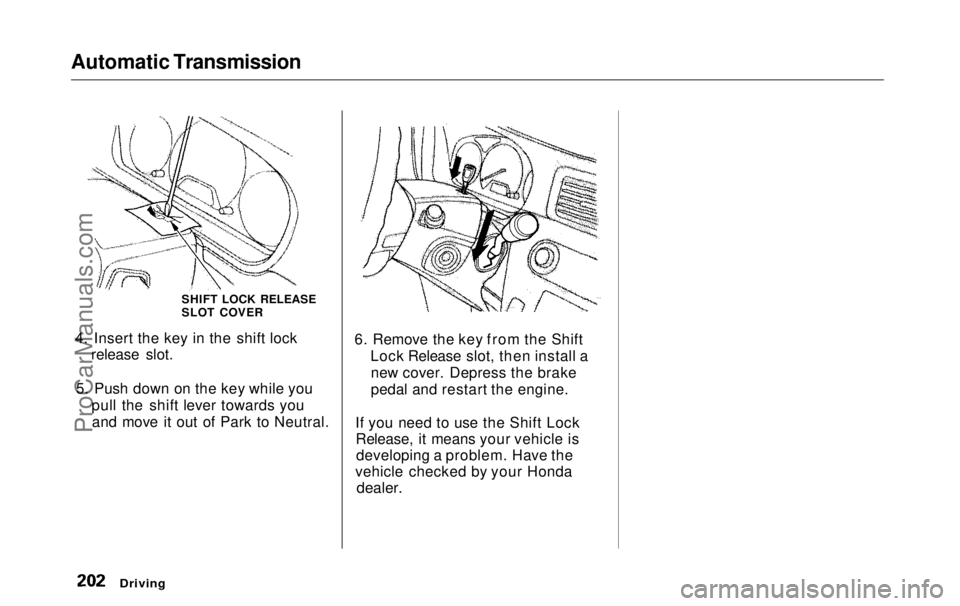
3. Place a cloth on the edge of the shift lock release slot cover on thesteering column. Remove the
cover by carefully prying on the
edge with a small flat-tipped screwdriver (not included in the
tool kit).
Driving
CONTINUEDProCarManuals.comMain Menu Table of Contents s t
Page 203 of 343

Automatic Transmission
4. Insert the key in the shift lock release slot.
5. Push down on the key while you pull the shift lever towards youand move it out of Park to Neutral. 6. Remove the key from the Shift
Lock Release slot, then install anew cover. Depress the brake
pedal and restart the engine.
If you need to use the Shift Lock Release, it means your vehicle isdeveloping a problem. Have the
vehicle checked by your Honda
dealer.
Driving
SHIFT LOCK RELEASE
SLOT COVERProCarManuals.comMain Menu Table of Contents s t