1999 HONDA ODYSSEY fuel
[x] Cancel search: fuelPage 1 of 343

1999 Odyssey Online Reference Owner's Manual
Use these links (and links throughout this manual) to navigate through\
this reference.
For a printed owner's manual, click on authorized manuals or go to www.h\
elminc.com.
Contents
Introduction ........................................................................\
................................................................. i
A Few Words About Safety........................................................................\
.........................................ii
Your Vehicle at a Glanc e........................................................................\
............................................ .2
Driver and Passenger Safety ........................................................................\
......................................5
Proper use and care of your vehicle's seat belts, and Supplemental Restr\
aint System.
Instruments and Control s........................................................................\
.........................................55
Instrume nt panel indicator and gauge, and how to use dashboard and steering colu\
mn controls.
Comfort and Convenience Features ........................................................................\
......................129
How to operate the climate control system, the audio system, and other c\
onvenience features.
Before Driving........................................................................\
..........................................................181
What gasoline to use, how to break -in your new vehicle, and how to load luggage and other cargo.
Driving ........................................................................\
......................................................................195
The proper way to start the engine, shift the transmission, and park, pl\
us towing a trailer.
Maintenance........................................................................\
.............................................................219
The Maintenance Schedule shows you when you need to take you r vehicle to the dealer.
Appearance Car e........................................................................\
..................................................... .277
Tips on cleaning and protecting your vehicle. Things to look for if your\
vehicle ever needs body repairs.
Taking Care of the Unexpecte d........................................................................\
..............................285
This section covers several problems motorists sometimes experience, an d how to handle them.
Technical Informatio n........................................................................\
.............................................313
ID numbers, dimensions, capacities, and technical information.
Warranty and Customer Relations (U.S. and Canad a
)...............................................................
.327
A summary of the warranties covering your new Acura, and how to contact \
us.
Authorized Manu als (U.S. only)........................................................................\
..............................333
How to order manuals and other technical literature.
Index........................................................................\
.............................................................................. I
Service Information Summary
A summary of information you need when you pull up to the fuel pump.
Owner's Identification Form
ProCarManuals.com
Page 4 of 343
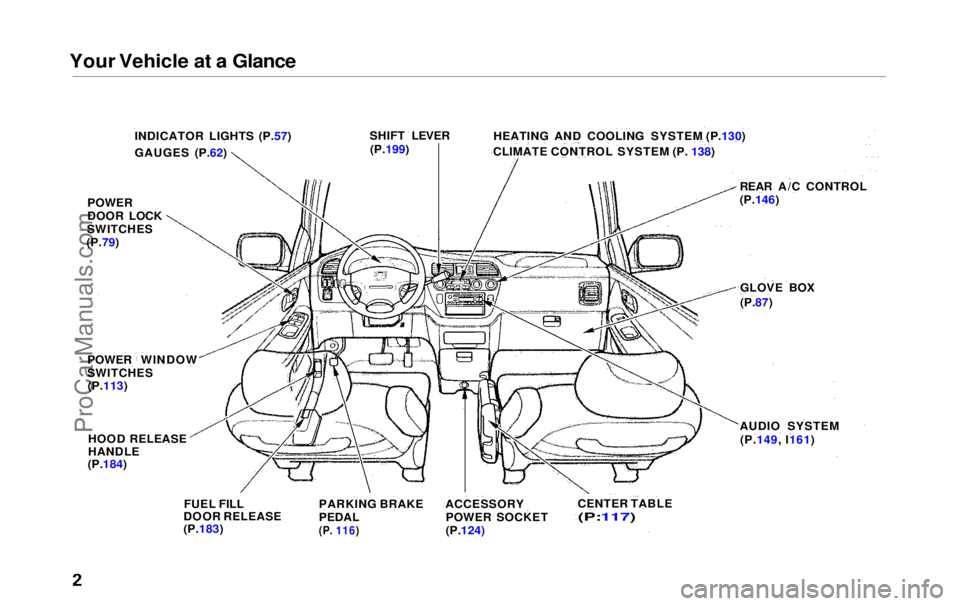
Your Vehicle at a Glance
INDICATOR LIGHTS (P.57)
GAUGES (P.62) HEATING AND COOLING SYSTEM (P.130)
CLIMATE CONTROL SYSTEM (P. 138)
SHIFT LEVER
(P.199)
REAR A/C CONTROL
(P.146)
GLOVE BOX
(P.87)
AUDIO SYSTEM (P.149, l161)
CENTER TABLE
(P:117)
ACCESSORY
POWER SOCKET
(P.124)
PARKING BRAKE
PEDAL
(P.
116)
FUEL FILL
DOOR RELEASE
(P.183)
HOOD RELEASE
HANDLE
(P.184)
POWER
DOOR LOCK
SWITCHES
(P.79)
POWER WINDOW
SWITCHES(P.113)ProCarManuals.comMain Menu s t
Page 57 of 343
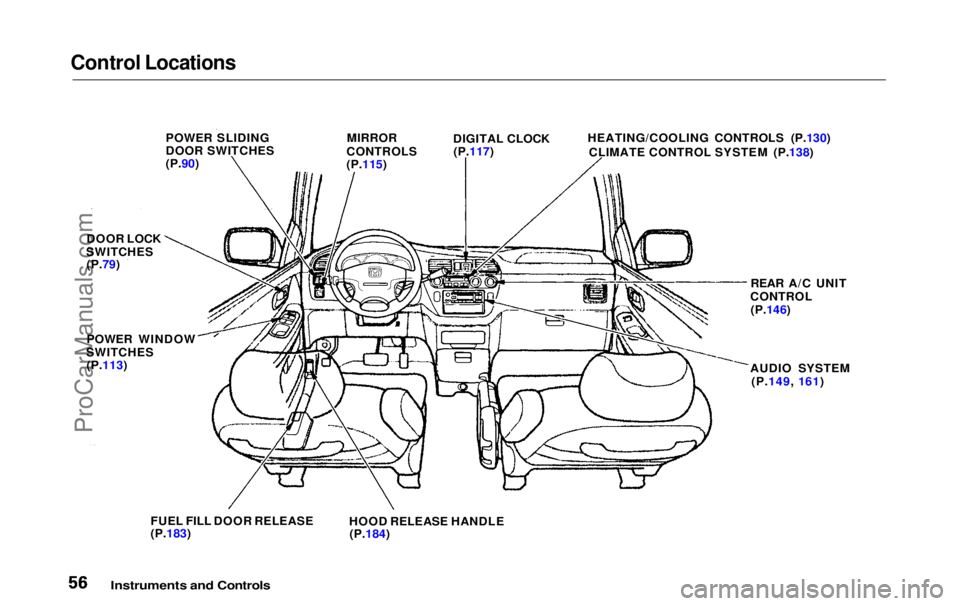
Control Locations
Instruments and Controls
POWER SLIDING
DOOR SWITCHES
(P.90)
MIRROR
CONTROLS
(P.115) DIGITAL CLOCK
(P.117) HEATING/COOLING CONTROLS (P.130)
CLIMATE CONTROL SYSTEM (P.138)
REAR A/C UNIT
CONTROL (P.146)
AUDIO SYSTEM (P.149, 161)
FUEL FILL DOOR RELEASE
(P.183)
HOOD RELEASE HANDLE
(P.184)
POWER WINDOW
SWITCHES
(P.113)
DOOR LOCK
SWITCHES (P.79)ProCarManuals.comMain Menu Table of Contents s t
Page 58 of 343
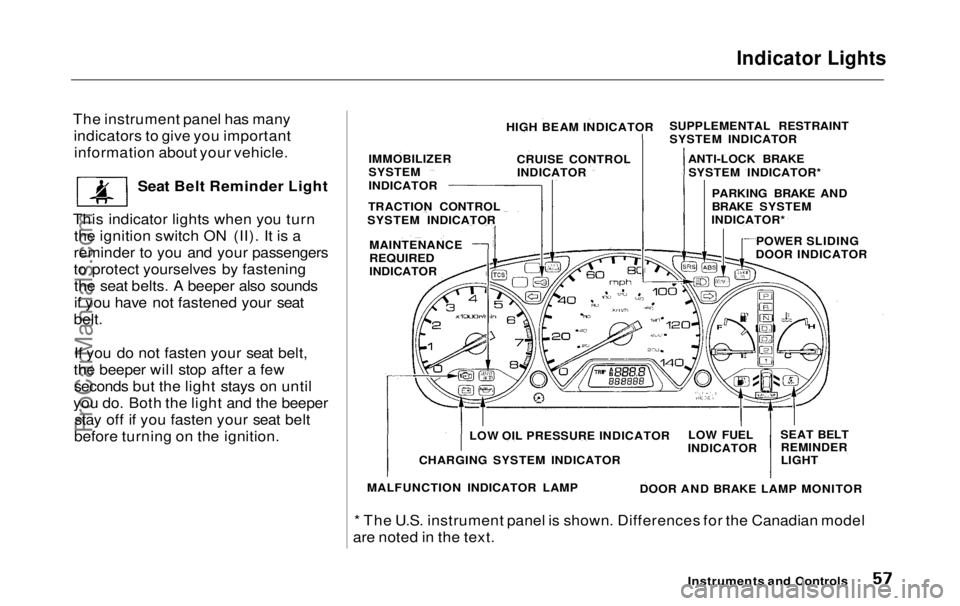
Indicator Lights
The instrument panel has many indicators to give you importantinformation about your vehicle.
Seat Belt Reminder Light
This indicator lights when you turn the ignition switch ON (II). It is a
reminder to you and your passengers
to protect yourselves by fastening the seat belts. A beeper also sounds
if you have not fastened your seat
belt.
If you do not fasten your seat belt,
the beeper will stop after a few seconds but the light stays on until
you do. Both the light and the beeper stay off if you fasten your seat belt
before turning on the ignition.
* The U.S. instrument panel is shown. Differences for the Canadian model
are noted in the text.
Instruments and Controls
HIGH BEAM INDICATOR
CRUISE CONTROLINDICATOR
IMMOBILIZER
SYSTEM
INDICATOR
TRACTION CONTROL
SYSTEM INDICATOR
MAINTENANCE
REQUIRED
INDICATOR SUPPLEMENTAL RESTRAINT
SYSTEM INDICATOR
ANTI-LOCK BRAKESYSTEM INDICATOR*
PARKING BRAKE AND
BRAKE SYSTEM
INDICATOR*
POWER SLIDING
DOOR INDICATOR
SEAT BELTREMINDER
LIGHT
LOW FUEL
INDICATOR
DOOR AND BRAKE LAMP MONITOR
LOW OIL PRESSURE INDICATOR
CHARGING SYSTEM INDICATOR
MALFUNCTION INDICATOR LAMPProCarManuals.comMain Menu Table of Contents s t
Page 62 of 343
Indicator Lights
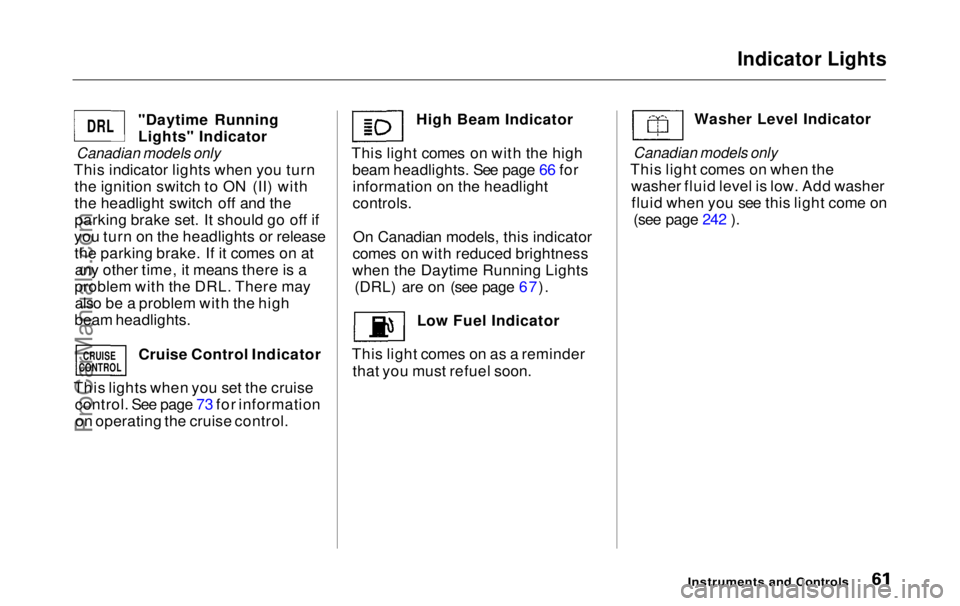
"Daytime Running
Lights" Indicator
Canadian models only
This indicator lights when you turn the ignition switch to ON (II) with
the headlight switch off and the
parking brake set. It should go off if
you turn on the headlights or release the parking brake. If it comes on atany other time, it means there is a
problem with the DRL. There may also be a problem with the high
beam headlights.
Cruise Control Indicator
This lights when you set the cruise control. See page 73 for informationon operating the cruise control. High Beam Indicator
This light comes on with the high beam headlights. See page 66 forinformation on the headlight
controls.
On Canadian models, this indicator
comes on with reduced brightness
when the Daytime Running Lights (DRL) are on (see page 67).
Low Fuel Indicator
This light comes on as a reminder that you must refuel soon. Washer Level Indicator
Canadian models only
This light comes on when the washer fluid level is low. Add washerfluid when you see this light come on (see page 242 ).
Instruments and Controls
DRL
CRUISE
CONTROL
ProCarManuals.comMain Menu Table of Contents s t
Page 63 of 343
Gauges
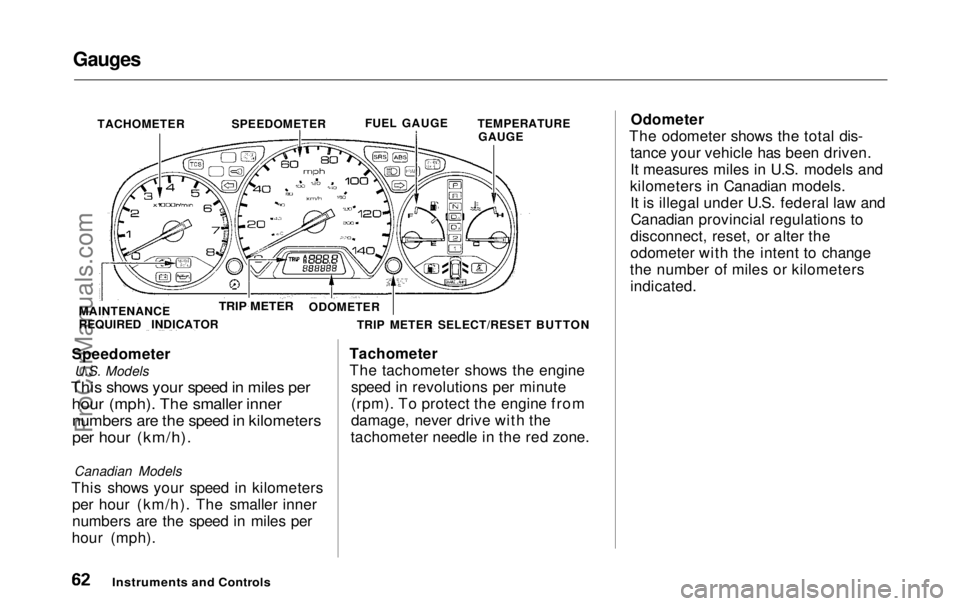
TACHOMETER SPEEDOMETERFUEL GAUGE
TEMPERATURE
GAUGE
Speedometer U.S. Models
This shows your speed in miles per
hour (mph). The smaller inner
numbers are the speed in kilometers
per hour (km/h).
Canadian Models
This shows your speed in kilometers per hour (km/h). The smaller inner
numbers are the speed in miles per
hour (mph). Tachometer
The tachometer shows the engine
speed in revolutions per minute
(rpm). To protect the engine from damage, never drive with the
tachometer needle in the red zone. Odometer
The odometer shows the total dis- tance your vehicle has been driven.
It measures miles in U.S. models and
kilometers in Canadian models. It is illegal under U.S. federal law andCanadian provincial regulations to
disconnect, reset, or alter the
odometer with the intent to change
the number of miles or kilometers indicated.
Instruments and Controls
TRIP METER SELECT/RESET BUTTON
ODOMETER
TRIP METER
MAINTENANCE
REQUIRED INDICATORProCarManuals.comMain Menu Table of Contents s t
Page 64 of 343

Gauges
Trip Meter
This meter shows the number of miles (U.S.) or kilometers (Canada)
driven since you last reset it.
There are two trip meters: Trip A and Trip B. Switch between these
displays by pressing the Select/
Reset button repeatedly. Each trip
meter works independently, so you
can keep track of two different
distances.
To reset a trip meter, display it and then press and hold the Select/Reset
button until the number resets to
"0.0".
Temperature Gauge
This shows the temperature of the
engine's coolant. During normal
operation, the pointer should rise
from the bottom white mark to about
the middle of the gauge. In severe driving conditions, such as very hot
weather or a long period of uphill driving, the pointer may rise to near
the upper white mark. If it reaches
the red (Hot) mark, pull safely to the side of the road. Turn to page 299 for
instructions and precautions on
checking the engine's cooling
system.
Fuel Gauge
This shows how much fuel you have. It is most accurate when the vehicle
is on level ground. It may show slightly more or less than the actual
amount when you are driving on
curvy or hilly roads.
The needle returns to the bottom after you turn off the ignition. The
gauge shows the fuel level reading immediately after you turn the
ignition switch back ON (II).
Instruments and ControlsProCarManuals.comMain Menu Table of Contents s t
Page 78 of 343

Keys and Locks
These keys contain electronic circuits that are activated by the
Immobilizer System. They will not
work to start the engine if the circuits are damaged. Protect the keys from direct
sunlight, high temperature, and
high humidity. Do not drop the keys or set heavy
objects on them.
Keep the keys away from liquids.
If they get wet, dry them immedi-
ately with a soft cloth.
The keys do not contain batteries. Do not try to take them apart.
Remote Transmitter
Some models also come with a
remote transmitter; see page 81 for
an explanation of its operation.
Immobilizer System
The Immobilizer System protects your vehicle from theft. A properly-coded master or valet key must be
used in the ignition switch for theengine to start. If an improperly-
coded key (or other device) is used,
the engine's fuel system is disabled.
When you turn the ignition switch to ON (II), the Immobilizer System
indicator should come on for a few seconds, then go out. If the indicator
starts to blink, it means the system does not recognize the coding of the
key. Turn the ignition switch to LOCK (0), remove the key, reinsert
it, and turn the switch to ON (II)
again.
The system may not recognize your
key's coding if any other immobilizer
key is near the ignition switch. To make sure the system recognizes the
key code, keep each immobilizer key on a separate ring.
If the system repeatedly does not
recognize the coding of your key, contact your Honda dealer.
This indicator will also blink several times when you turn the ignitionswitch from ON (II) to ACCESSORY (I) or LOCK (0).
Do not attempt to alter this system
or add other devices to it. Electrical
problems could result that may make
your vehicle undriveable.
If you have lost your key and you
cannot start the engine, contact your
Honda dealer.
Instruments and Controls CONTINUEDProCarManuals.comMain Menu Table of Contents s t