Page 90 of 343
Sliding Doors
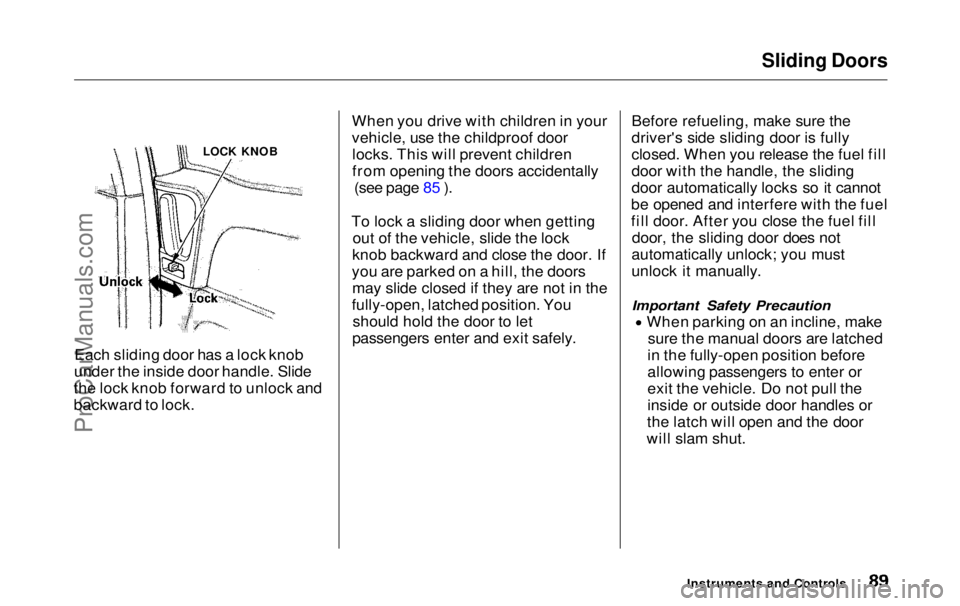
Each sliding door has a lock knob
under the inside door handle. Slide
the lock knob forward to unlock and
backward to lock. When you drive with children in your
vehicle, use the childproof door
locks. This will prevent children
from opening the doors accidentally (see page 85 ).
To lock a sliding door when getting out of the vehicle, slide the lock
knob backward and close the door. If
you are parked on a hill, the doors may slide closed if they are not in the
fully-open, latched position. You should hold the door to let
passengers enter and exit safely. Before refueling, make sure the
driver's side sliding door is fully
closed. When you release the fuel fill
door with the handle, the sliding
door automatically locks so it cannot
be opened and interfere with the fuel
fill door. After you close the fuel fill door, the sliding door does not
automatically unlock; you must
unlock it manually.
Important Safety Precaution
When parking on an incline, make
sure the manual doors are latched
in the fully-open position before
allowing passengers to enter or
exit the vehicle. Do not pull the
inside or outside door handles or
the latch will open and the door
will slam shut.
Instruments and Controls
LOCK KNOBProCarManuals.comMain Menu Table of Contents s t
Page 94 of 343
Sliding Doors
Before refueling, make sure the driver's side sliding door is fully
closed. When you release the fuel fill
door with the handle, the sliding door automatically locks so it cannot
be opened and interfere with the fuel fill door. After you close the fuel filldoor, the sliding door does not
automatically unlock; you must
unlock it manually.
When you drive with children in your vehicle, use the childproof doorlocks. This will prevent children
from opening the doors accidentally (see page 85).
How to Reset the Power Sliding
Doors
If your vehicle's battery is disconnected or goes dead while the
sliding doors are open, the power
sliding door system needs to besynchronized. After reconnecting
the battery: Close each sliding door completely
by hand; or Move the MAIN switch on the
dashboard to the ON position.
Push and hold the upper side of
each door switch until each sliding
door closes completely.
If the power sliding doors are closed,
the system will reset itself automatically once the battery has
been reconnected. If the power sliding doors do not
operate properly after resetting,
have your vehicle checked by a Honda dealer.
CONTINUED
Instruments and ControlsProCarManuals.comMain Menu Table of Contents s t
Page 182 of 343
Before Driving
Before you begin driving your Honda,
you should know what gasoline to use, and how to check the levels of
important fluids. You also need to
know how to properly store luggageor packages. The information in thissection will help you. If you plan to
add any accessories to your vehicle,
please read the information in this section first. Break-in Period.............................. 182
Gasoline.......................................... 182
Service Station Procedures .......... 183 Filling the Fuel Tank................. 183Opening the Hood..................... 184 Oil Check................................ 186
Engine Coolant Check.......... 187
Fuel Economy................................ 188
Vehicle Condition...................... 188Driving Habits............................ 188
Accessories and Modifications.... 189 Carrying Cargo.............................. 191
Before DrivingProCarManuals.comMain Menu s t
Page 183 of 343
Break-in Period, Gasoline
Break-in Period
Help assure your vehicle's future
reliability and performance by paying extra attention to how you driveduring the first 600 miles (1,000 km).
During this period:
Avoid full-throttle starts and rapid
acceleration.
Avoid hard braking. New brakes need to be broken-in by moderate
use for the first 200 miles (300
km). You should follow these same re-
commendations with an overhauled
or exchanged engine, or when the
brakes are replaced.
We also recommend that you should not tow a trailer during the first 500
miles (800 km).
Gasoline
Your Honda is designed to operate on unleaded gasoline with a pump
octane number of 86 or higher. Use
of a lower octane gasoline can cause
a persistent, heavy metallic rapping
noise in the engine that can lead to
mechanical damage.
We recommend gasolines containing detergent additives that help prevent
fuel system and engine deposits.
Using gasoline containing lead will
damage your vehicle's emissions
controls. This contributes to air
pollution.
Before DrivingProCarManuals.comMain Menu Table of Contents s t
Page 184 of 343
Gasoline, Service Station Procedures
In Canada, some gasolines contain
an octane-enhancing additive called
MMT. If you use such gasolines,
your emission control system performance may deteriorate and
the Malfunction Indicator Lamp on
your instrument panel may turn on. If this happens, contact your
authorized Honda dealer for service.
Filling the Fuel Tank
1. Because the fuel fill cap is on the driver's side of the vehicle, park
with that side closest to the service station pumps.
2. Open the fuel fill door by pulling on the handle to the left of the
driver's seat.
Before refueling, make sure the rear
sliding door on the driver's side is
closed.
CONTINUED
Before Driving
FUEL FILL CAP
Gasoline is highly flammable
and explosive. You can be
burned or seriously injured
when handling fuel.
Stop the engine and keep
heat, sparks, and flame away.Handle fuel only outdoors.
Wipe up spills immediately.
PullProCarManuals.comMain Menu Table of Contents s t
Page 185 of 343
Service Station Procedures
3. Remove the fuel fill cap slowly.
You may hear a hissing sound aspressure inside the tank escapes.Place the cap in the holder on the
fuel fill door.
4. Stop filling the tank after the fuel pump automatically clicks off. Donot try to "top off" the tank, leavesome room for the fuel to expand
with temperature changes.
5. Screw the fuel fill cap back on, tighten it until it clicks at least
three times. If you do not properly
tighten the cap, the MalfunctionIndicator Lamp may come on (see
page 303 ).
6. Push the fuel fill door closed until it latches.
Opening the Hood
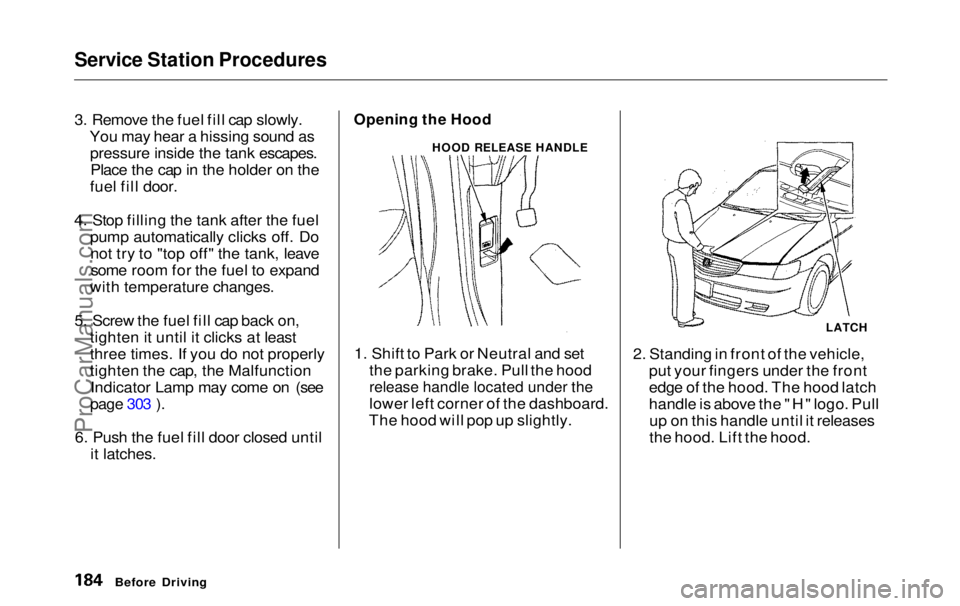
1. Shift to Park or Neutral and set the parking brake. Pull the hood
release handle located under the
lower left corner of the dashboard.
The hood will pop up slightly. 2. Standing in front of the vehicle,
put your fingers under the front
edge of the hood. The hood latch
handle is above the "H" logo. Pullup on this handle until it releases
the hood. Lift the hood.
Before Driving
HOOD RELEASE HANDLE
LATCHProCarManuals.comMain Menu Table of Contents s t
Page 187 of 343
Service Station Procedures
Oil Check
Check the engine oil level every time
you fill the vehicle with fuel. Wait a few minutes after turning the engineoff before you check the oil.
1. Remove the dipstick (orange
handle).
2. Wipe the dipstick with a clean
cloth or paper towel. 3. Insert it all the way back in its tube.
Before Driving
DIPSTICKProCarManuals.comMain Menu Table of Contents s t
Page 189 of 343
Fuel Economy
The condition of your vehicle and your driving habits are the two mostimportant things that affect the fuel
mileage you get.
Vehicle Condition Always maintain your vehicle accord- ing to the maintenance schedule.
This will keep it in top operating
condition.
An important part of that mainte- nance is the Owner Maintenance
Checks (see page 231 ). For
example, an underinflated tire
causes more "rolling resistance,"
which uses fuel. It also wears out
faster, so check the tire pressure at
least monthly.
In winter, the build-up of snow on
your vehicle's underside adds weight and rolling resistance. Frequent
cleaning helps your fuel mileage and
reduces the chance of corrosion. Driving Habits
You can improve fuel economy by driving moderately. Rapid acceler-
ation, abrupt cornering, and hard
braking use more fuel.
Always drive in the highest gear that allows the engine to run and acceler-
ate smoothly.
Depending on traffic conditions, try
to maintain a constant speed. Every
time you slow down and speed up,
your vehicle uses extra fuel. Use the cruise control, when appropriate, to
increase fuel economy. A cold engine uses more fuel than a
warm engine. It is not necessary to "warm-up" a cold engine by letting it
idle for a long time. You can drive
away in about a minute, no matter
how cold it is outside. The engine
will warm up faster, and you get
better fuel economy. To cut down on
the number of "cold starts," try to combine several short trips into one.
The air conditioning puts an extra load on the engine which makes it
use more fuel. Turn off the A/C tocut down on air conditioning use.
Use the flow-through ventilation
when the outside air temperature is
moderate.
Before DrivingProCarManuals.comMain Menu Table of Contents s t