1999 HONDA ODYSSEY display
[x] Cancel search: displayPage 56 of 343

Instruments and Controls
This section gives information about
the controls and displays that
contribute to the daily operation of
your Honda. All the essential
controls are within easy reach.
Control Locations............................ 56
Indicator Lights................................ 57
Gauges.............................................. 62
Controls Near the Steering
Wheel........................................65
Headlights...................................
. 66
Automatic Lightin g
Off
Feature......................................67
Daytime Running Lights............. 67
Instrument Panel Brightness..... 67
Turn Signals................................. 68
Windshield Wipers.....................
. 68
Windshield Washers..................
. 70
Rear Windo w
Wiper and
Washer......................................70
Hazard Warning........................... 70
Rear Window Defogger.............. 71
Steering Wheel Adjustment....... 72
Steering Wheel Controls ................ 73
Cruise Control.............................. 73
Remote Audio Controls .............. 76
Keys and Locks................................ 76
Keys............................................... 76
Immobilizer System..................... 77
Ignition Switch............................. 78
Power Door Locks....................... 79
Remote Transmitter.................... 81Childproof Door Locks............... 85
Tailgate......................................... 85
Glove Box..................................... 87
Sliding Doors.................................... 88
Manual Sliding Doors.................. 88
Power Sliding Doors.................... 90
Important Safety Precautions.... 94
HomeLink Universal Transmitter.................................. 95
Seats.................................................. 99
Passenger Seating....................... 99
Seat Adjustments....................... 100
Driver's Seat Power
Adjustments........................... 102
Armrests..................................... 103
Head Restraints......................... 104
Third Seat Access...................... 105 Moving the Second Row Bucket Seat............................ 106
Removing the Bucket Seats in the Second Row................. 108
Removing the Bench Seat in the Second Row................. 109
Folding the Third Seat.............. 110
Power Windows............................. 113
Mirrors............................................ 115 Parking Brake................................ 116
Digital Clock................................... 117
Center Table................................... 117
Beverage Holder............................ 118
Sunglasses Holder......................... 120
Sun Visor......................................... 121
Vanity Mirror................................. 121 Rear Compartment........................ 122Center Pocket................................ 122
Coin Holder.................................... 122
Storage Box.................................... 123 Coat Hook....................................... 123
Accessory Power Sockets............. 124 Interior Lights................................ 125
Instruments and ControlsProCarManuals.comMain Menu s t
Page 61 of 343

Indicator Lights
Power Sliding Door
Indicator
EX model only
This indicator comes on for a few
seconds when you turn the ignition
switch ON (II). If it comes on at anyother time, there is a problem in the
power sliding door system. With this
light on, move the main switch on
the dashboard to the OFF position, and have the system checked by
your Honda dealer as soon as possible. You can still open or closeeach sliding door manually. For
more information on the power
sliding doors, see page 90 . Turn Signal and
Hazard WarningIndicators
The left or right turn signal light blinks when you signal a lane changeor turn. If the light does not blink or
blinks rapidly, it usually means one of the turn signal bulbs is burned out (see page 267). Replace the bulb as
soon as possible, since other drivers
cannot see that you are signalling.
When you turn on the Hazard
Warning switch, both turn signal lights blink. All turn signals on theoutside of the vehicle should flash. Door and Brake Lamp Monitor
The appropriate light comes on in this display if the tailgate or any door
is not closed tightly. If a brake lightdoes not work, the BRAKE LAMP
indicator comes on when you push
the brake pedal with the ignition switch ON (II).
A burned out brake light is a hazard
when drivers behind you cannot tell you are braking. Have your brake
lights repaired right away.
All the lights in the monitor display come on when you turn the ignitionswitch ON (II). The lights go off
after the engine starts and the
tailgate and all doors are closed
tightly.
Instruments and Controls
SLIDING
DOOR
BRAKE LAMPProCarManuals.comMain Menu Table of Contents s t
Page 64 of 343
Gauges
Trip Meter
This meter shows the number of miles (U.S.) or kilometers (Canada)
driven since you last reset it.
There are two trip meters: Trip A and Trip B. Switch between these
displays by pressing the Select/
Reset button repeatedly. Each trip
meter works independently, so you
can keep track of two different
distances.
To reset a trip meter, display it and then press and hold the Select/Reset
button until the number resets to
"0.0".
Temperature Gauge
This shows the temperature of the
engine's coolant. During normal
operation, the pointer should rise
from the bottom white mark to about
the middle of the gauge. In severe driving conditions, such as very hot
weather or a long period of uphill driving, the pointer may rise to near
the upper white mark. If it reaches
the red (Hot) mark, pull safely to the side of the road. Turn to page 299 for
instructions and precautions on
checking the engine's cooling
system.
Fuel Gauge
This shows how much fuel you have. It is most accurate when the vehicle
is on level ground. It may show slightly more or less than the actual
amount when you are driving on
curvy or hilly roads.
The needle returns to the bottom after you turn off the ignition. The
gauge shows the fuel level reading immediately after you turn the
ignition switch back ON (II).
Instruments and ControlsProCarManuals.comMain Menu Table of Contents s t
Page 118 of 343
Digital Clock, Center Table
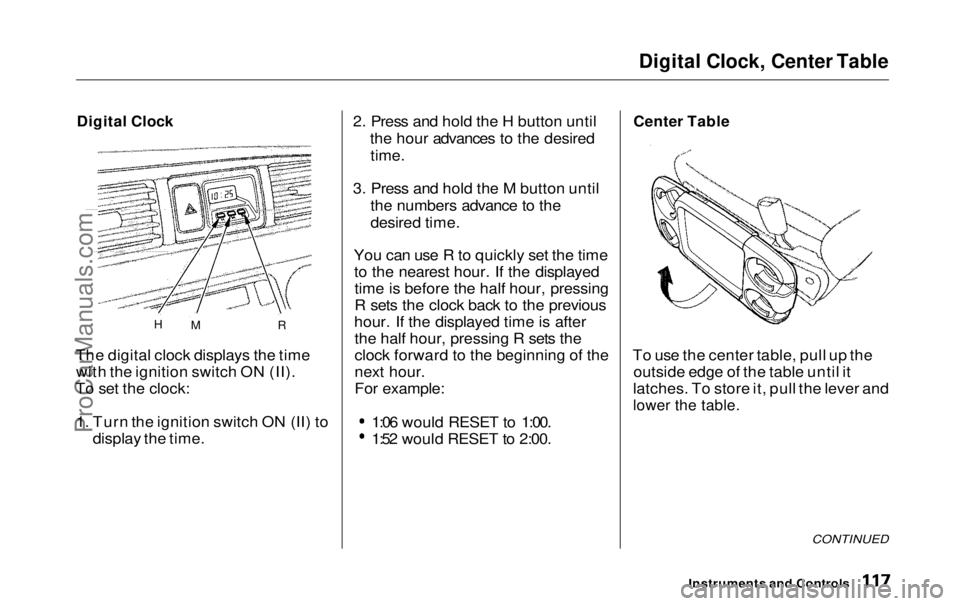
Digital Clock
The digital clock displays the time with the ignition switch ON (II).
To set the clock:
1. Turn the ignition switch ON (II) to display the time. 2. Press and hold the H button until
the hour advances to the desired
time.
3. Press and hold the M button until the numbers advance to the
desired time.
You can use R to quickly set the time to the nearest hour. If the displayedtime is before the half hour, pressing
R sets the clock back to the previous
hour. If the displayed time is after the half hour, pressing R sets the
clock forward to the beginning of the
next hour.
For example: 1:06 would RESET to 1:00.
1:52 would RESET to 2:00.
Center Table
To use the center table, pull up the outside edge of the table until it
latches. To store it, pull the lever and
lower the table.
CONTINUED
Instruments and Controls
H
M RProCarManuals.comMain Menu Table of Contents s t
Page 141 of 343
Climate Control System
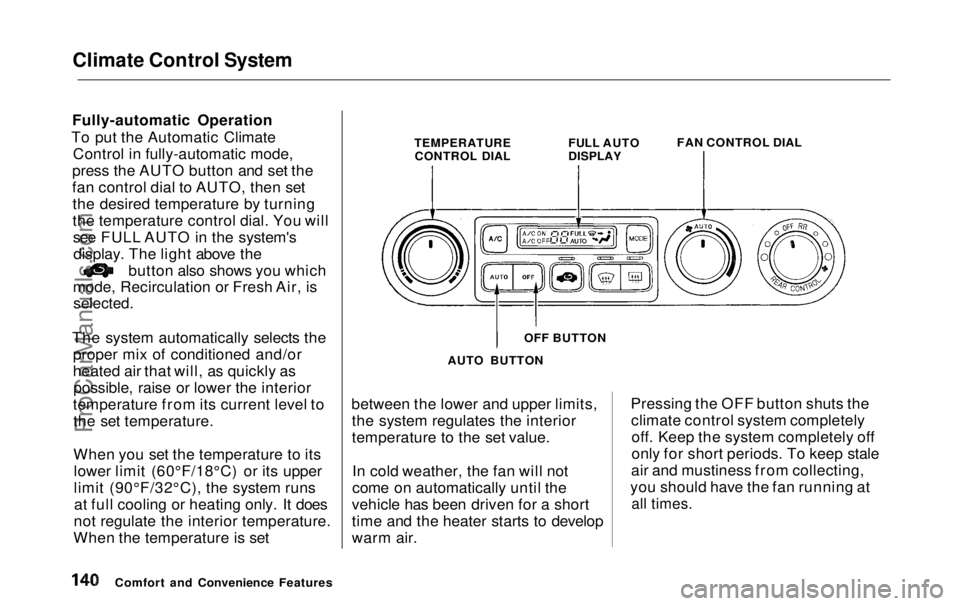
Fully-automatic Operation
To put the Automatic Climate Control in fully-automatic mode,
press the AUTO button and set the
fan control dial to AUTO, then set the desired temperature by turning
the temperature control dial. You willsee FULL AUTO in the system'sdisplay. The light above the button also shows you which
mode, Recirculation or Fresh Air, is
selected.
The system automatically selects the proper mix of conditioned and/or
heated air that will, as quickly aspossible, raise or lower the interior
temperature from its current level to the set temperature.
When you set the temperature to itslower limit (60°F/18°C) or its upper
limit (90°F/32°C), the system runsat full cooling or heating only. It does
not regulate the interior temperature.
When the temperature is set between the lower and upper limits,
the system regulates the interior
temperature to the set value.
In cold weather, the fan will not
come on automatically until the
vehicle has been driven for a short
time and the heater starts to develop
warm air. Pressing the OFF button shuts the
climate control system completelyoff. Keep the system completely off
only for short periods. To keep stale
air and mustiness from collecting,
you should have the fan running at
all times.
Comfort and Convenience Features TEMPERATURE
CONTROL DIAL FULL AUTO
DISPLAY
FAN CONTROL DIAL
OFF BUTTON
AUTO BUTTONProCarManuals.comMain Menu Table of Contents s t
Page 142 of 343
Climate Control System
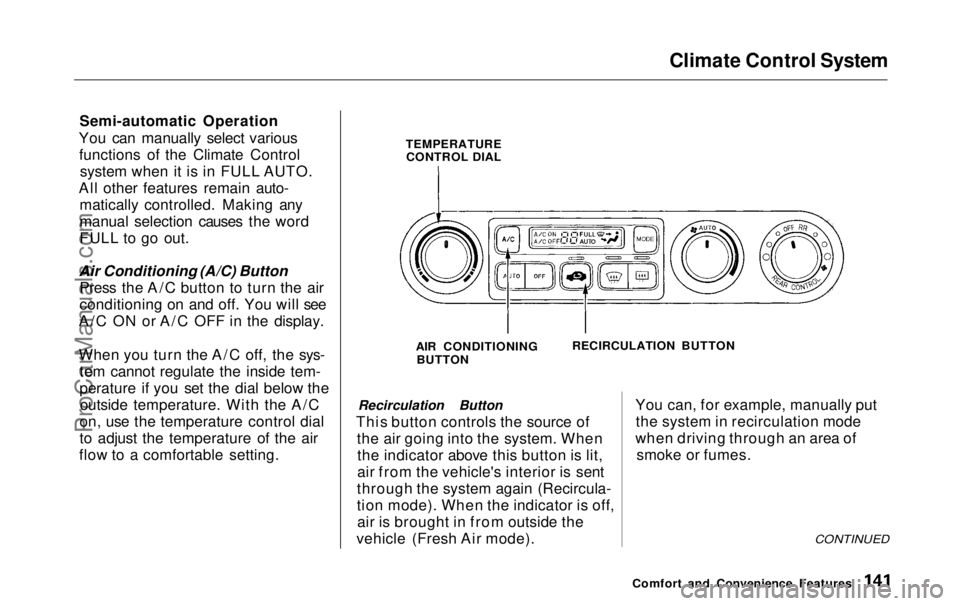
Semi-automatic Operation
You can manually select various functions of the Climate Control system when it is in FULL AUTO.
All other features remain auto- matically controlled. Making any
manual selection causes the word
FULL to go out.
Air Conditioning (A/C) Button Press the A/C button to turn the air
conditioning on and off. You will see
A/C ON or A/C OFF in the display.
When you turn the A/C off, the sys- tem cannot regulate the inside tem-
perature if you set the dial below theoutside temperature. With the A/C
on, use the temperature control dial
to adjust the temperature of the air
flow to a comfortable setting. Recirculation Button
This button controls the source of the air going into the system. Whenthe indicator above this button is lit,
air from the vehicle's interior is sent
through the system again (Recircula-
tion mode). When the indicator is off, air is brought in from outside the
vehicle (Fresh Air mode). You can, for example, manually put
the system in recirculation mode
when driving through an area of smoke or fumes.
CONTINUED
Comfort and Convenience Features
TEMPERATURE
CONTROL DIAL
AIR CONDITIONINGBUTTON RECIRCULATION BUTTONProCarManuals.comMain Menu Table of Contents s t
Page 143 of 343
Climate Control System
Fan Control Dial
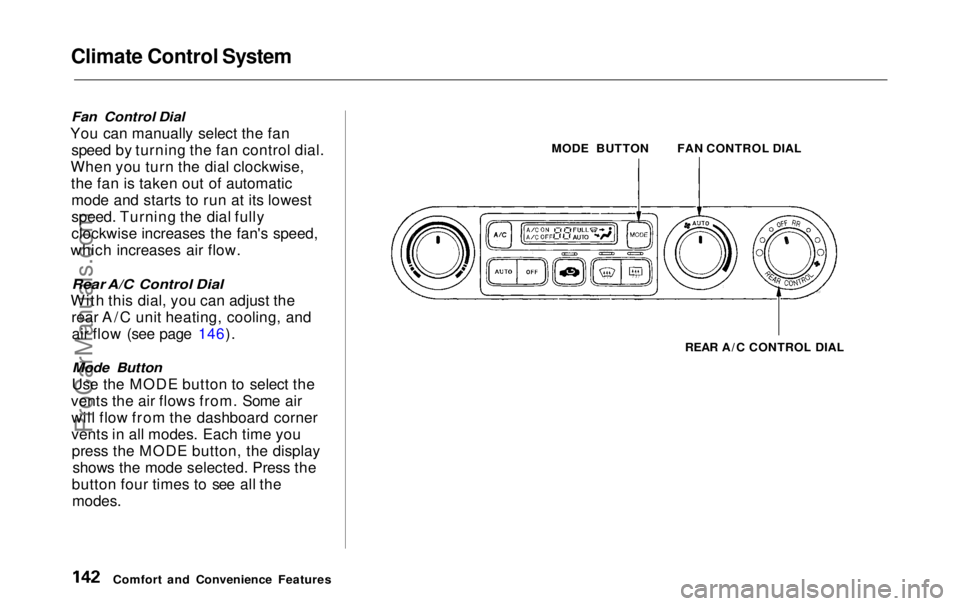
You can manually select the fan speed by turning the fan control dial.
When you turn the dial clockwise, the fan is taken out of automaticmode and starts to run at its lowest
speed. Turning the dial fully
clockwise increases the fan's speed,
which increases air flow.
Rear A/C Control Dial
With this dial, you can adjust the rear A/C unit heating, cooling, andair flow (see page 146).
Mode Button
Use the MODE button to select the
vents the air flows from. Some air will flow from the dashboard corner
vents in all modes. Each time youpress the MODE button, the display shows the mode selected. Press the
button four times to see all the
modes.
MODE BUTTON
REAR A/C CONTROL DIAL
Comfort and Convenience Features FAN CONTROL DIALProCarManuals.comMain Menu Table of Contents s t
Page 151 of 343
Audio System
Operating the Radio
The ignition switch must be in ACCESSORY (I) or ON (II) to operate the audio system. Turn thesystem on by pushing the PWR/
VOL knob.
Adjust the volume by turning the PWR/VOLknob.
The band and frequency that the radio was last tuned to is displayed.
To change bands, press the AM/FM button. On the FM band, ST will be
displayed if the station is broadcast-
ing in stereo. Stereo reproduction on
AM is not available.
You can use any of four methods to
find radio stations on the selectedband: TUNE, SEEK, SCAN or the
Preset buttons.
TUNE — Use the TUNE bar to tune the radio to a desired frequency. Press the upper part ( ) to tune
to a higher frequency, or the lower part ( ) to tune to a lower
frequency. The frequency numbers
will start to change rapidly. Release the bar when the display reaches the
desired frequency. To change the
frequency in small increments, press
and release the TUNE bar quickly. SEEK — The SEEK function
searches the band for a station with
a strong signal. To activate it, push
the SEEK switch up or down, then
release it. Depending on which way
you push the switch, the system scans upward or downward from the
current frequency. It stops when it
finds a station with a strong signal.
Comfort and Convenience FeaturesProCarManuals.comMain Menu Table of Contents s t