1999 HONDA ODYSSEY oil change
[x] Cancel search: oil changePage 54 of 343
Carbon Monoxide Hazard
Your vehicle's exhaust contains carbon monoxide gas. You should
have no problem with carbon
monoxide entering the vehicle in
normal driving if you maintain your
vehicle properly.
Have the exhaust system inspected
for leaks whenever:
The vehicle is raised for an oil
change.
You notice a change in the sound of the exhaust.
The vehicle was in an accident that may have damaged the under-
side.
High levels of carbon monoxide can
collect rapidly in enclosed areas,
such as a garage. Do not run the
engine with the garage door closed.
Even with the door open, run the
engine only long enough to move the
vehicle out of the garage. With the tailgate open, air flow can
pull exhaust gas into your vehicle's
interior and create a hazardous
condition. If you must drive with the
tailgate open, open all the windowsand set the heating and coolingsystem/climate control system as
shown below.
If you must sit in your parked vehicle,
even in an unconfined area, with the engine running, adjust the heating
and cooling system/climate control
system as follows:
1. Select the Fresh Air mode. 2. Select the mode.
3. Turn the fan on high speed.
4. Set the temperature control to a
comfortable setting.
Driver and Passenger Safety
Carbon monoxide gas is toxic.
Breathing it can cause
unconsciousness and even kill
you.
Avoid any enclosed areas or activities that expose you to
carbon monoxide.ProCarManuals.comMain Menu Table of Contents s t
Page 211 of 343

Driving in Bad Weather
Rain, fog, and snow conditions re-quire a different driving technique
because of reduced traction and
visibility. Keep your vehicle well- maintained and exercise greater
caution when you need to drive in
bad weather. The cruise control should not be used in these condi-
tions.
Driving Technique — Always drive
slower than you would in dry
weather. It takes your vehicle longer to react, even in conditions that mayseem just barely damp. Applysmooth, even pressure to all the
controls. Abrupt steering wheel
movements or sudden, hard appli-
cation of the brakes can cause loss of control in wet weather. Be extra
cautious for the first few miles (kilometers) of driving while you
adjust to the change in driving
conditions. This is especially true in snow. A person can forget some
snow-driving techniques during the
summer months. Practice is needed
to relearn those skills.
Exercise extra caution when driving
in rain after a long dry spell. After
months of dry weather, the first
rains bring oil to the surface of the
roadway, making it slippery. Visibility — Being able to see
clearly in all directions and being
visible to other drivers are important in all weather conditions. This ismore difficult in bad weather. To beseen more clearly during daylight
hours, turn on your headlights.
Inspect your windshield wipers and
washers frequently. Keep the wind- shield washer reservoir full of the
proper fluid. Have the windshield
wiper blades replaced if they start to streak the windshield or leave parts
unwiped. Use the defroster and air conditioning to keep the windows
from fogging up on the inside (see
pages 135 and 144 ).
DrivingProCarManuals.comMain Menu Table of Contents s t
Page 235 of 343
Engine Oil
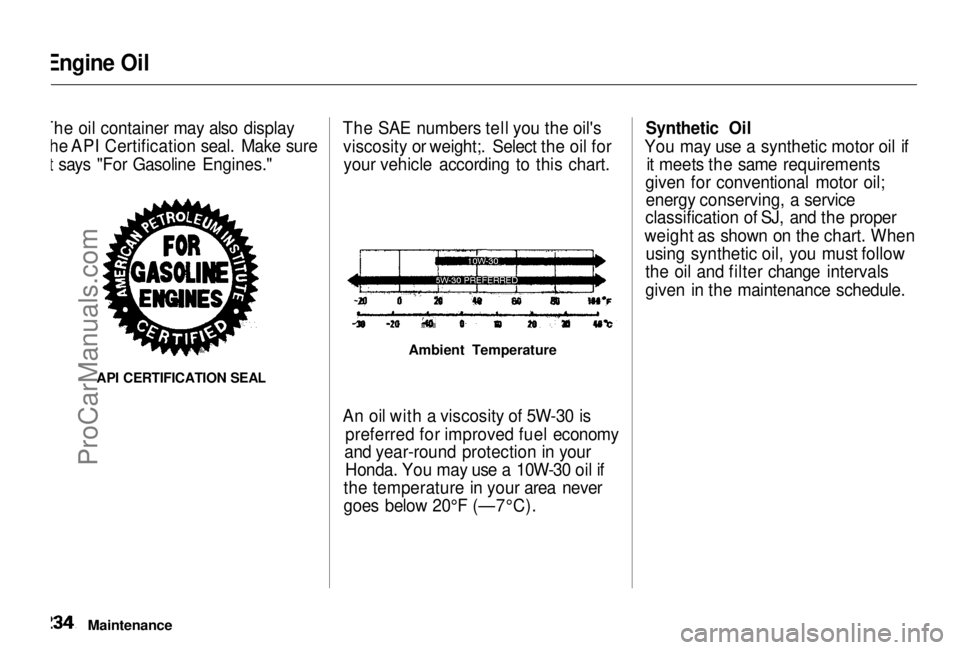
The oil container may also display the API Certification seal. Make sure
it says "For Gasoline Engines."
API CERTIFICATION SEAL
The SAE numbers tell you the oil's
viscosity or weight;. Select the oil foryour vehicle according to this chart.
Ambient Temperature
An oil with a viscosity of 5W-30 is preferred for improved fuel economy
and year-round protection in your
Honda. You may use a 10W-30 oil if
the temperature in your area never
goes below 20°F (—7°C). Synthetic Oil
You may use a synthetic motor oil if it meets the same requirements
given for conventional motor oil; energy conserving, a service
classification of SJ, and the proper
weight as shown on the chart. When using synthetic oil, you must follow
the oil and filter change intervals
given in the maintenance schedule.
MaintenanceProCarManuals.comMain Menu Table of Contents s t
Page 236 of 343
Engine Oil
Additives Your Honda does not need any oil
additives. Purchasing additives for
the engine or transmission will not
increase your vehicle's performance
or longevity. It only increases the
cost of operating your vehicle. Changing the Oil and Filter
Always change the oil and filter according to the time and distance (miles/kilometers) recommenda-
tions in the maintenance schedule.
The oil and filter collect contami- nants that can damage your engine if
they are not removed regularly.
Changing the oil and filter requiresspecial tools and access from
underneath the vehicle. The vehicle should be raised on a service station-
type hydraulic lift for this service. Unless you have the knowledge and
proper equipment, you should have
this maintenance done by a skilled
mechanic.
1. Run the engine until it reaches normal operating temperature,
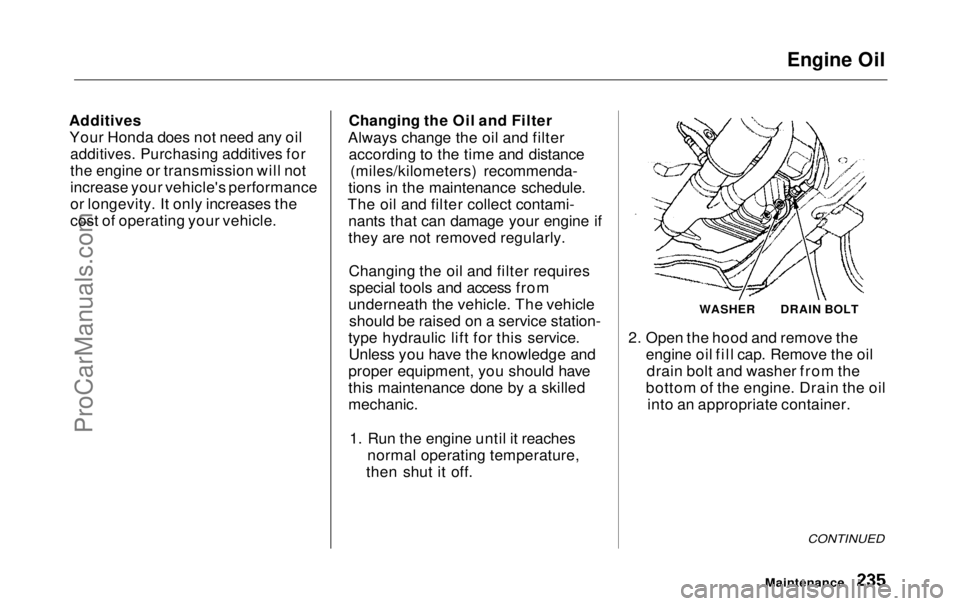
then shut it off. WASHER
2. Open the hood and remove the engine oil fill cap. Remove the oildrain bolt and washer from the
bottom of the engine. Drain the oil into an appropriate container.
CONTINUED
Maintenance
DRAIN BOLTProCarManuals.comMain Menu Table of Contents s t
Page 237 of 343
Engine Oil
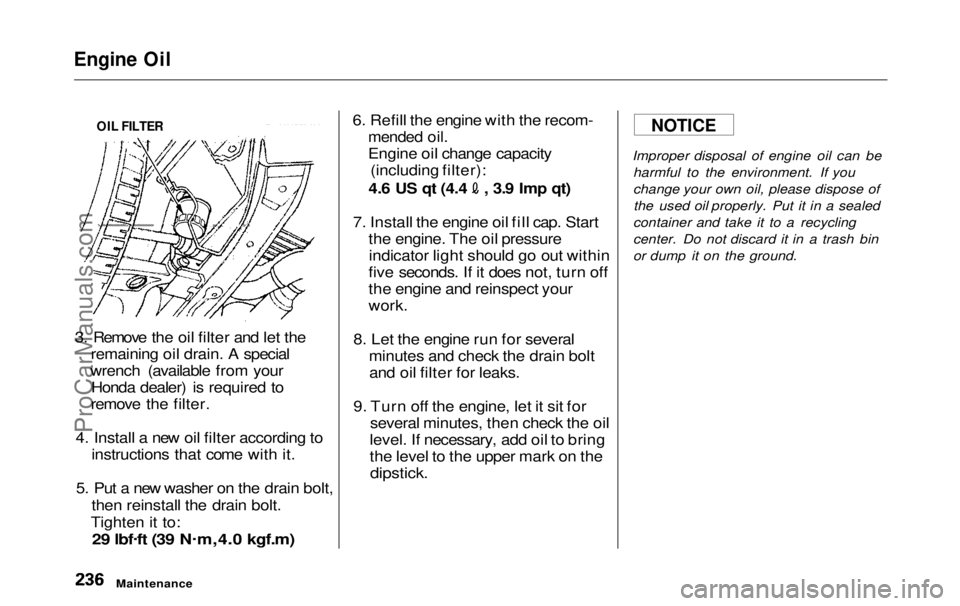
3. Remove the oil filter and let the remaining oil drain. A special
wrench (available from your Honda dealer) is required to
remove the filter.
4. Install a new oil filter according to instructions that come with it.
5. Put a new washer on the drain bolt, then reinstall the drain bolt.
Tighten it to:
29 lbf .
ft (39 N .
m,4.0 kgf.m)
6. Refill the engine with the recom-
mended oil.
Engine oil change capacity(including filter): 4.6 US qt (4.4 , 3.9 Imp qt)
7. Install the engine oil fill cap. Start the engine. The oil pressureindicator light should go out within
five seconds. If it does not, turn off
the engine and reinspect your
work.
8. Let the engine run for several minutes and check the drain boltand oil filter for leaks.
9. Turn off the engine, let it sit for several minutes, then check the oil
level. If necessary, add oil to bring
the level to the upper mark on the
dipstick.
Improper disposal of engine oil can be
harmful to the environment. If you
change your own oil, please dispose ofthe used oil properly. Put it in a sealed
container and take it to a recycling
center. Do not discard it in a trash bin
or dump it on the ground.
Maintenance
NOTICE
OIL FILTERProCarManuals.comMain Menu Table of Contents s t
Page 267 of 343
Lights
Headlight Aiming
The headlights were properly aimed when your vehicle was new. If youregularly carry heavy items in thecargo area or pull a trailer,
readjustment may be required.
Adjustment of the headlights should be performed by a Honda technicianor other qualified mechanic. Replacing a Headlight Bulb
Your vehicle has halogen headlight bulbs, one on each side. When
replacing a bulb, handle it by its steel
base and protect the glass fromcontact with your skin or hard
objects. If you touch the glass, clean
it with denatured alcohol and a clean cloth.
Halogen headlight bulbs get very hot when lit. Oil, perspiration, or a scratch
on the glass can cause the bulb to
overheat and shatter.
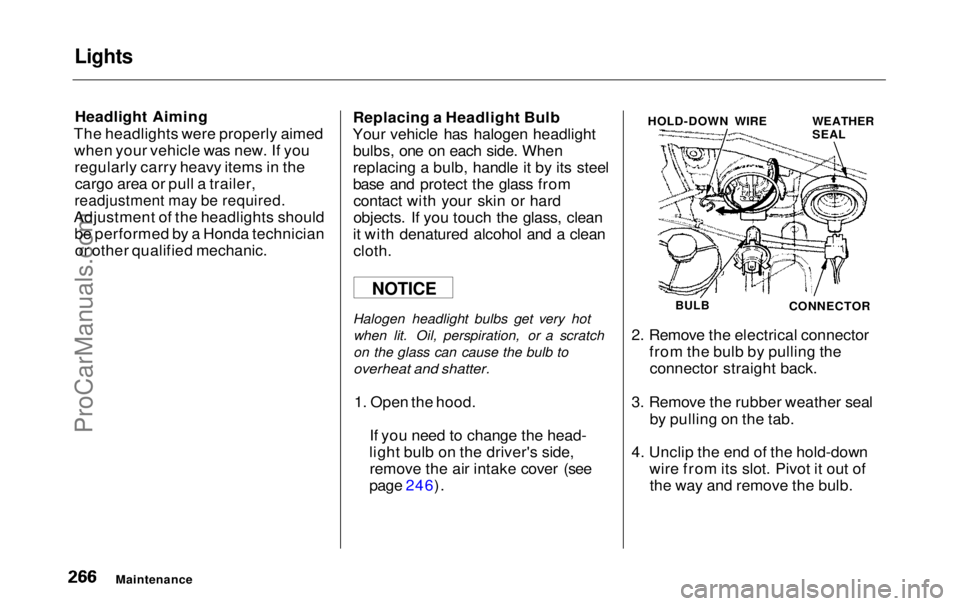
1. Open the hood. If you need to change the head-
light bulb on the driver's side, remove the air intake cover (see
page 246). HOLD-DOWN WIRE
WEATHER
SEAL
BULB
CONNECTOR
2. Remove the electrical connector from the bulb by pulling theconnector straight back.
3. Remove the rubber weather seal by pulling on the tab.
4. Unclip the end of the hold-down wire from its slot. Pivot it out ofthe way and remove the bulb.
Maintenance
NOTICEProCarManuals.comMain Menu Table of Contents s t
Page 276 of 343
Storing Your Vehicle
If you need to park your vehicle for an extended period (more than one
month), there are several things you should do to prepare it for storage.
Proper preparation helps prevent
deterioration and makes it easier to
get your vehicle back on the road. If
possible, store your vehicle indoors.
Fill the fuel tank.Change the engine oil and filter (see page 235).
Wash and dry the exterior
completely.
Clean the interior. Make sure the
carpeting, floor mats, etc. are
completely dry.
Leave the parking brake off. Put
the transmission in Park. Block the rear wheels.
If the vehicle is to be stored for a
longer period, it should be supported on jackstands so the
tires are off the ground.
Leave one window open slightly (if
the vehicle is being stored indoors).
Disconnect the battery.
Support the front and rear wiper
blade arms with a folded towel or
rag so they do not touch the
windshield.
To minimize sticking, apply a silicone spray lubricant to all door
and tailgate seals. Also, apply a
vehicle body wax to the painted surfaces that mate with the door
and tailgate seals. Cover the vehicle with a
"breathable" cover, one made
from a porous material such as cotton. Nonporous materials, such
as plastic sheeting, trap moisture,
which can damage the paint.
If possible, run the engine for a
while periodically (preferably once a month).
If you store your vehicle for 12
months or longer, have your Honda dealer perform the inspections called
for in the 24 months/30,000 miles (48,000 km) maintenance schedule(Normal Conditions) as soon as you
take it out of storage (see page 224).
The replacements called for in the maintenance schedule are not
needed unless the vehicle hasactually reached that time or mileage.
MaintenanceProCarManuals.comMain Menu Table of Contents s t
Page 334 of 343

Index
Battery
Charging SystemIndicator............................ 58, 302
Jump Starting............................. 297 Maintenance............................... 251
Specifications............................. 317
Before Driving............................... 181
Belts, Seat..................................... 8, 45
Beverage Holder............................ 118
Body Repair.................................... 283
Brakes Anti-lock System (ABS)............ 205Break-in, New Linings .............. 182
Fluid............................................ 244
Light, Burned-out...................... 268
Parking........................................ 116
System Indicator.................. 58, 304
Wear Indicators......................... 204
Brakes, ABS Operation.................................... 205
System Indicator.................. 59, 206
Braking System.............................. 204
Break-in, New Vehicle .................. 182
Brightness Control, Instruments... 67 Brights, Headlights......................... 66
Bulb Replacement
Back-up Lights........................... 269
Brake Lights............................... 268Cargo Area Light....................... 272
Front Parking Lights................. 267
Front Side Marker Lights......... 267 Headlights.................................. 266
High-mount Brake Light.......... 270
Individual Map Lights............... 272 License Plate Light.................... 271
Rear Bulbs.......................... 268, 269
Specifications............................. 317
Turn Signal Lights..................... 267
Bulbs, Halogen............................... 266
Cables, Jump Starting With.......... 298
Cancel Button................................... 75
Capacities Chart............................. 316
Carbon Monoxide Hazard.............. 53
Cargo Area Light........................... 127
Cargo Net....................................... 194
Carrying Cargo.............................. 191
Cassette Player
Care............................................. 178
Operation........................... 154, 175
CAUTION, Explanation of.............. ii
CD Changer...........................157, 171 CD Player ...............................157, 169
Center Pocket................................ 122
Center Table................................... 117
Certification Label......................... 314
Chains............................................. 263 Change Oil How to.........................................235
When to....................................... 224
Changing a Flat Tire..................... 287
Changing Engine Coolant............. 239
Charging System Indicator .... 58, 302
Checking Automatic Transmission
Fluid........................................ 243
Battery Condition...................... 251
Brake Fluid................................. 244Drive Belts.................................. 256
Engine Coolant........................... 187
Engine Oil................................... 186
Fuses........................................... 306
Power Steering Fluid................. 245ProCarManuals.comMain Menu s t