1999 HONDA ODYSSEY parking brake
[x] Cancel search: parking brakePage 4 of 343
Your Vehicle at a Glance
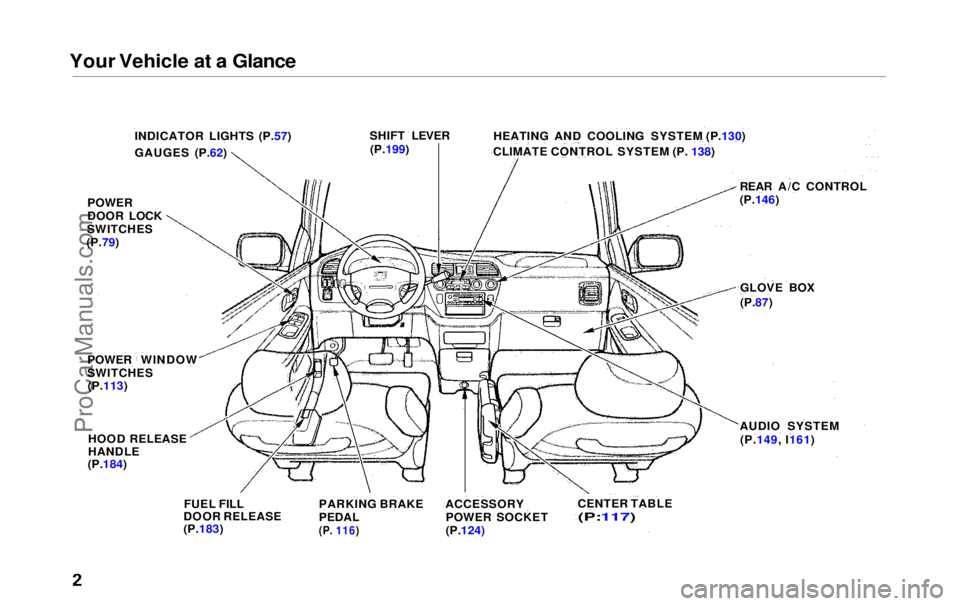
INDICATOR LIGHTS (P.57)
GAUGES (P.62) HEATING AND COOLING SYSTEM (P.130)
CLIMATE CONTROL SYSTEM (P. 138)
SHIFT LEVER
(P.199)
REAR A/C CONTROL
(P.146)
GLOVE BOX
(P.87)
AUDIO SYSTEM (P.149, l161)
CENTER TABLE
(P:117)
ACCESSORY
POWER SOCKET
(P.124)
PARKING BRAKE
PEDAL
(P.
116)
FUEL FILL
DOOR RELEASE
(P.183)
HOOD RELEASE
HANDLE
(P.184)
POWER
DOOR LOCK
SWITCHES
(P.79)
POWER WINDOW
SWITCHES(P.113)ProCarManuals.comMain Menu s t
Page 56 of 343

Instruments and Controls
This section gives information about
the controls and displays that
contribute to the daily operation of
your Honda. All the essential
controls are within easy reach.
Control Locations............................ 56
Indicator Lights................................ 57
Gauges.............................................. 62
Controls Near the Steering
Wheel........................................65
Headlights...................................
. 66
Automatic Lightin g
Off
Feature......................................67
Daytime Running Lights............. 67
Instrument Panel Brightness..... 67
Turn Signals................................. 68
Windshield Wipers.....................
. 68
Windshield Washers..................
. 70
Rear Windo w
Wiper and
Washer......................................70
Hazard Warning........................... 70
Rear Window Defogger.............. 71
Steering Wheel Adjustment....... 72
Steering Wheel Controls ................ 73
Cruise Control.............................. 73
Remote Audio Controls .............. 76
Keys and Locks................................ 76
Keys............................................... 76
Immobilizer System..................... 77
Ignition Switch............................. 78
Power Door Locks....................... 79
Remote Transmitter.................... 81Childproof Door Locks............... 85
Tailgate......................................... 85
Glove Box..................................... 87
Sliding Doors.................................... 88
Manual Sliding Doors.................. 88
Power Sliding Doors.................... 90
Important Safety Precautions.... 94
HomeLink Universal Transmitter.................................. 95
Seats.................................................. 99
Passenger Seating....................... 99
Seat Adjustments....................... 100
Driver's Seat Power
Adjustments........................... 102
Armrests..................................... 103
Head Restraints......................... 104
Third Seat Access...................... 105 Moving the Second Row Bucket Seat............................ 106
Removing the Bucket Seats in the Second Row................. 108
Removing the Bench Seat in the Second Row................. 109
Folding the Third Seat.............. 110
Power Windows............................. 113
Mirrors............................................ 115 Parking Brake................................ 116
Digital Clock................................... 117
Center Table................................... 117
Beverage Holder............................ 118
Sunglasses Holder......................... 120
Sun Visor......................................... 121
Vanity Mirror................................. 121 Rear Compartment........................ 122Center Pocket................................ 122
Coin Holder.................................... 122
Storage Box.................................... 123 Coat Hook....................................... 123
Accessory Power Sockets............. 124 Interior Lights................................ 125
Instruments and ControlsProCarManuals.comMain Menu s t
Page 58 of 343
Indicator Lights
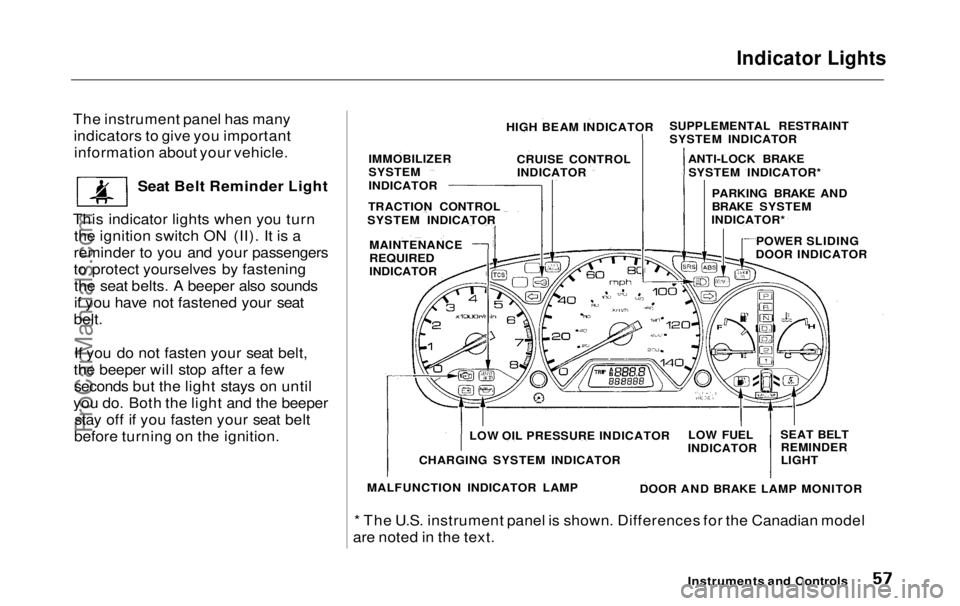
The instrument panel has many indicators to give you importantinformation about your vehicle.
Seat Belt Reminder Light
This indicator lights when you turn the ignition switch ON (II). It is a
reminder to you and your passengers
to protect yourselves by fastening the seat belts. A beeper also sounds
if you have not fastened your seat
belt.
If you do not fasten your seat belt,
the beeper will stop after a few seconds but the light stays on until
you do. Both the light and the beeper stay off if you fasten your seat belt
before turning on the ignition.
* The U.S. instrument panel is shown. Differences for the Canadian model
are noted in the text.
Instruments and Controls
HIGH BEAM INDICATOR
CRUISE CONTROLINDICATOR
IMMOBILIZER
SYSTEM
INDICATOR
TRACTION CONTROL
SYSTEM INDICATOR
MAINTENANCE
REQUIRED
INDICATOR SUPPLEMENTAL RESTRAINT
SYSTEM INDICATOR
ANTI-LOCK BRAKESYSTEM INDICATOR*
PARKING BRAKE AND
BRAKE SYSTEM
INDICATOR*
POWER SLIDING
DOOR INDICATOR
SEAT BELTREMINDER
LIGHT
LOW FUEL
INDICATOR
DOOR AND BRAKE LAMP MONITOR
LOW OIL PRESSURE INDICATOR
CHARGING SYSTEM INDICATOR
MALFUNCTION INDICATOR LAMPProCarManuals.comMain Menu Table of Contents s t
Page 59 of 343
Indicator Lights
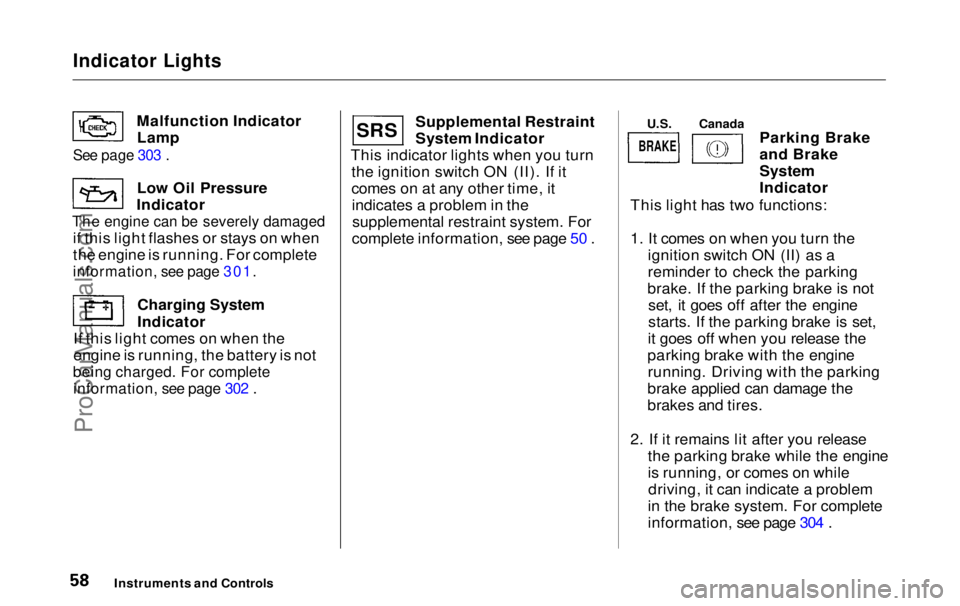
Malfunction IndicatorLamp
Low Oil Pressure
Indicator
The engine can be severely damaged
if this light flashes or stays on when
the engine is running. For complete
information, see page 301.
Charging System
Indicator
If this light comes on when the
engine is running, the battery is not
being charged. For complete
information, see page 302 .
Supplemental Restraint
System Indicator
This indicator lights when you turn the ignition switch ON (II). If it
comes on at any other time, itindicates a problem in thesupplemental restraint system. For
complete information, see page 50 . Parking Brake
and Brake
System
Indicator
This light has two functions:
1. It comes on when you turn the ignition switch ON (II) as a
reminder to check the parking
brake. If the parking brake is not set, it goes off after the engine
starts. If the parking brake is set,
it goes off when you release the
parking brake with the engine running. Driving with the parking
brake applied can damage the
brakes and tires.
2. If it remains lit after you release the parking brake while the engine
is running, or comes on whiledriving, it can indicate a problem
in the brake system. For complete
information, see page 304 .
Instruments and Controls
See page 303 .
S R S
U.S.
Canada
BRAKEProCarManuals.comMain Menu Table of Contents s t
Page 62 of 343
Indicator Lights
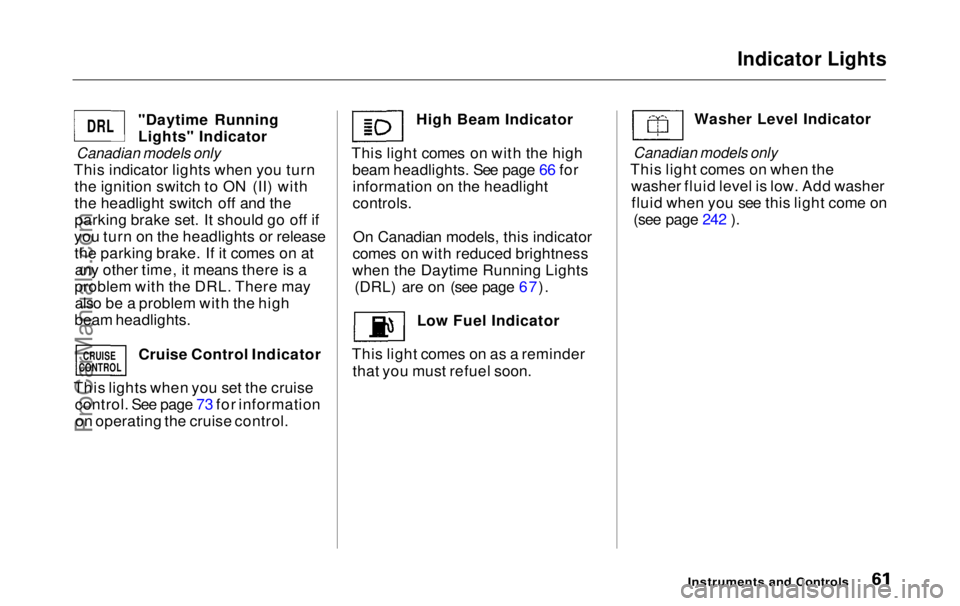
"Daytime Running
Lights" Indicator
Canadian models only
This indicator lights when you turn the ignition switch to ON (II) with
the headlight switch off and the
parking brake set. It should go off if
you turn on the headlights or release the parking brake. If it comes on atany other time, it means there is a
problem with the DRL. There may also be a problem with the high
beam headlights.
Cruise Control Indicator
This lights when you set the cruise control. See page 73 for informationon operating the cruise control. High Beam Indicator
This light comes on with the high beam headlights. See page 66 forinformation on the headlight
controls.
On Canadian models, this indicator
comes on with reduced brightness
when the Daytime Running Lights (DRL) are on (see page 67).
Low Fuel Indicator
This light comes on as a reminder that you must refuel soon. Washer Level Indicator
Canadian models only
This light comes on when the washer fluid level is low. Add washerfluid when you see this light come on (see page 242 ).
Instruments and Controls
DRL
CRUISE
CONTROL
ProCarManuals.comMain Menu Table of Contents s t
Page 68 of 343
Controls Near the Steering Wheel
Automatic Lighting Off Feature
On EX model
The Automatic Lighting Off feature turns off the headlights, parking
lights, taillights, side marker lights,
license plate lights and instrumentpanel lights within 15 seconds ofremoving the key from the ignitionswitch and closing the driver's door.
This feature activates if you leave the headlight switch in the or
position, remove the key, and
open and close the driver's door.
If you remove the key from the
ignition switch with the headlight switch on, but do not open the door
and get out, the lights will turn off
after 10 minutes. The lights will turn on again when
you unlock or open the driver's door. If you unlock the door, but do not
open it within 15 seconds, the lights
will go off. With the driver's door open, you will hear a lights-on
reminder chime.
Daytime Running Lights(Canadian Models)
With the headlight switch off, the high beam headlights come on withreduced brightness when you turn
the ignition switch to ON (II) and release the parking brake. They
remain on until you turn the ignitionoff, even if you set the parking brake.
The headlights revert to normal operation when you turn them on
with the switch. Instrument Panel Brightness
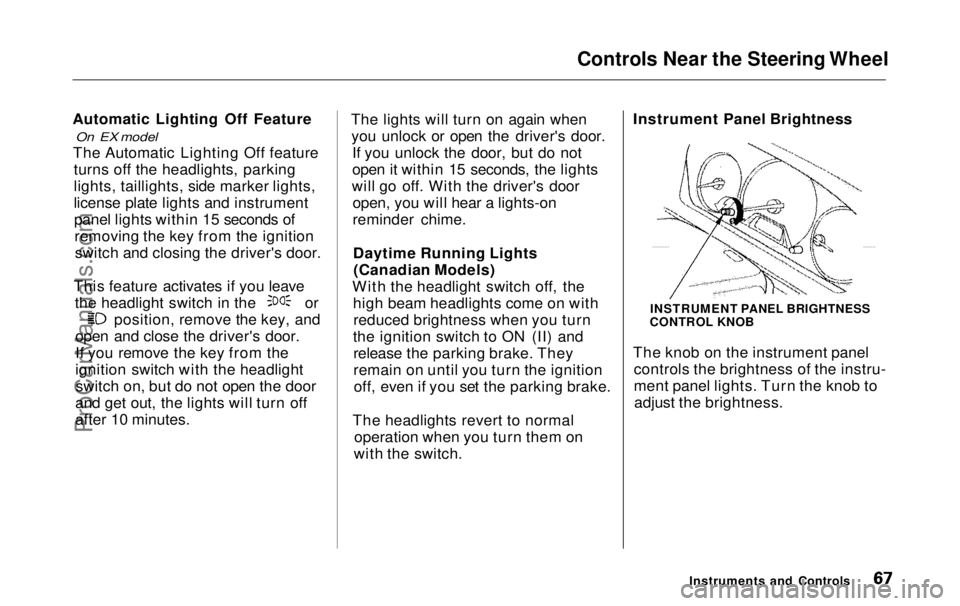
The knob on the instrument panel
controls the brightness of the instru-
ment panel lights. Turn the knob toadjust the brightness.
Instruments and Controls
INSTRUMENT PANEL BRIGHTNESS
CONTROL KNOBProCarManuals.comMain Menu Table of Contents s t
Page 117 of 343
Mirrors, Parking Brake
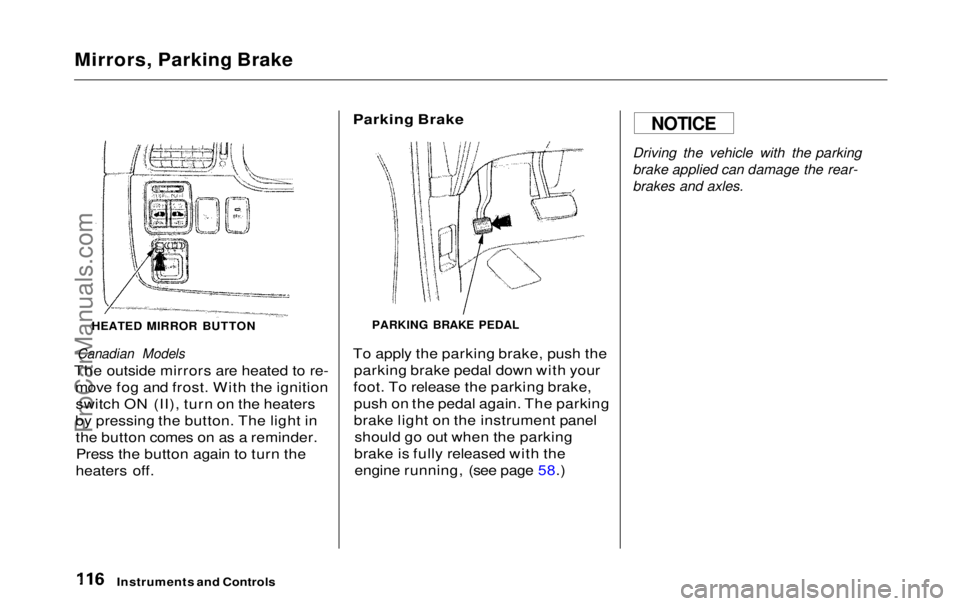
HEATED MIRROR BUTTON
Canadian Models
The outside mirrors are heated to re- move fog and frost. With the ignitionswitch ON (II), turn on the heaters
by pressing the button. The light in the button comes on as a reminder.Press the button again to turn the
heaters off.
Parking Brake
PARKING BRAKE PEDAL
To apply the parking brake, push the parking brake pedal down with your
foot. To release the parking brake, push on the pedal again. The parking
brake light on the instrument panel should go out when the parking
brake is fully released with the engine running, (see page 58.)
Driving the vehicle with the parking
brake applied can damage the rear-
brakes and axles.
Instruments and Controls
NOTICEProCarManuals.comMain Menu Table of Contents s t
Page 185 of 343
Service Station Procedures
3. Remove the fuel fill cap slowly.
You may hear a hissing sound aspressure inside the tank escapes.Place the cap in the holder on the
fuel fill door.
4. Stop filling the tank after the fuel pump automatically clicks off. Donot try to "top off" the tank, leavesome room for the fuel to expand
with temperature changes.
5. Screw the fuel fill cap back on, tighten it until it clicks at least
three times. If you do not properly
tighten the cap, the MalfunctionIndicator Lamp may come on (see
page 303 ).
6. Push the fuel fill door closed until it latches.
Opening the Hood
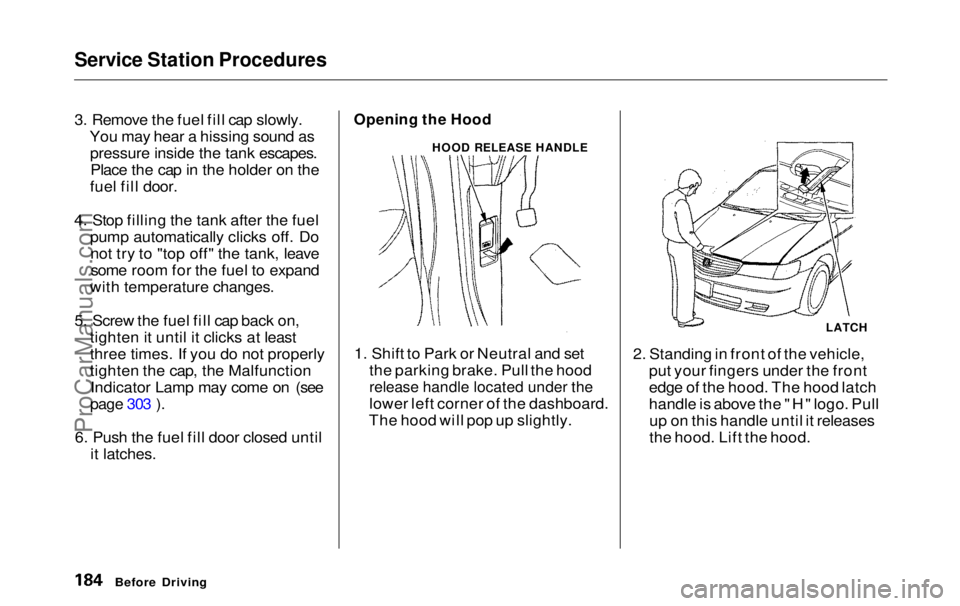
1. Shift to Park or Neutral and set the parking brake. Pull the hood
release handle located under the
lower left corner of the dashboard.
The hood will pop up slightly. 2. Standing in front of the vehicle,
put your fingers under the front
edge of the hood. The hood latch
handle is above the "H" logo. Pullup on this handle until it releases
the hood. Lift the hood.
Before Driving
HOOD RELEASE HANDLE
LATCHProCarManuals.comMain Menu Table of Contents s t