1999 HONDA ODYSSEY wiper blades
[x] Cancel search: wiper bladesPage 211 of 343

Driving in Bad Weather
Rain, fog, and snow conditions re-quire a different driving technique
because of reduced traction and
visibility. Keep your vehicle well- maintained and exercise greater
caution when you need to drive in
bad weather. The cruise control should not be used in these condi-
tions.
Driving Technique — Always drive
slower than you would in dry
weather. It takes your vehicle longer to react, even in conditions that mayseem just barely damp. Applysmooth, even pressure to all the
controls. Abrupt steering wheel
movements or sudden, hard appli-
cation of the brakes can cause loss of control in wet weather. Be extra
cautious for the first few miles (kilometers) of driving while you
adjust to the change in driving
conditions. This is especially true in snow. A person can forget some
snow-driving techniques during the
summer months. Practice is needed
to relearn those skills.
Exercise extra caution when driving
in rain after a long dry spell. After
months of dry weather, the first
rains bring oil to the surface of the
roadway, making it slippery. Visibility — Being able to see
clearly in all directions and being
visible to other drivers are important in all weather conditions. This ismore difficult in bad weather. To beseen more clearly during daylight
hours, turn on your headlights.
Inspect your windshield wipers and
washers frequently. Keep the wind- shield washer reservoir full of the
proper fluid. Have the windshield
wiper blades replaced if they start to streak the windshield or leave parts
unwiped. Use the defroster and air conditioning to keep the windows
from fogging up on the inside (see
pages 135 and 144 ).
DrivingProCarManuals.comMain Menu Table of Contents s t
Page 220 of 343

Maintenance
This section explains why it is important to keep your vehicle well
maintained and to follow basic
maintenance safety precautions.
This section also includes Maintenance Schedules for normaldriving and severe driving conditions,
a Maintenance Record, and instruc-
tions for simple maintenance tasks
you may want to take care of yourself.
If you have the skills and tools to per-
form more complex maintenance tasks on your Honda, you may want
to purchase the Service Manual. See page 333 for information on how toobtain a copy, or see your Honda
dealer.
Maintenance Safety.......................
220
Important Safet
y
Precautions ..
221
Maintenance Schedule.................
.
222
Required Maintenance Record.... 229
Owner Maintenance Checks........ 231
Fluid Locations............................... 232
Engine Oil....................................... 233
Adding Oil................................... 233
Recommended Oil..................... 233
Synthetic Oil............................... 234
Additives..................................... 235
Changing the Oil and Filter...... 235
Cooling System.............................. 237
Adding Engine Coolant............. 237Replacing Engine Coolant........ 239
Windshield Washers..................... 242
Automatic Transmission Fluid..... 243
Brake Fluid..................................... 244
Brake System............................. 244
Power Steering............................... 245
Air Cleaner Element...................... 246
Hood Latch..................................... 248
Spark Plugs..................................... 248
Replacement............................... 248
Specifications............................. 250
Battery............................................ 251
Wiper Blades.................................. 253
Air Conditioning System............... 255
Air Conditioning Filter.................. 256
Drive Belts...................................... 256
Timing Belt..................................... 257
Tires................................................ 257 Inflation....................................... 257
Inspection................................... 259Maintenance............................... 260
Tire Rotation.............................. 260
Replacing Tires and Wheels.... 261
Wheels and Tires....................... 262 Winter Driving........................... 262
Snow Tires.............................. 263
Tire Chains............................. 263
Lights..............................................264
Headlight Aiming...................... 266
Replacing Bulbs......................... 266
Storing Your Vehicle..................... 275
MaintenanceProCarManuals.comMain Menu s t
Page 243 of 343
Windshield Washers
Check the level in the windshield
washer reservoir at least monthly during normal usage. In bad weather,
when you use the washers often, check the level every time you stop
for fuel. This reservoir supplies the
windshield and rear window washers.
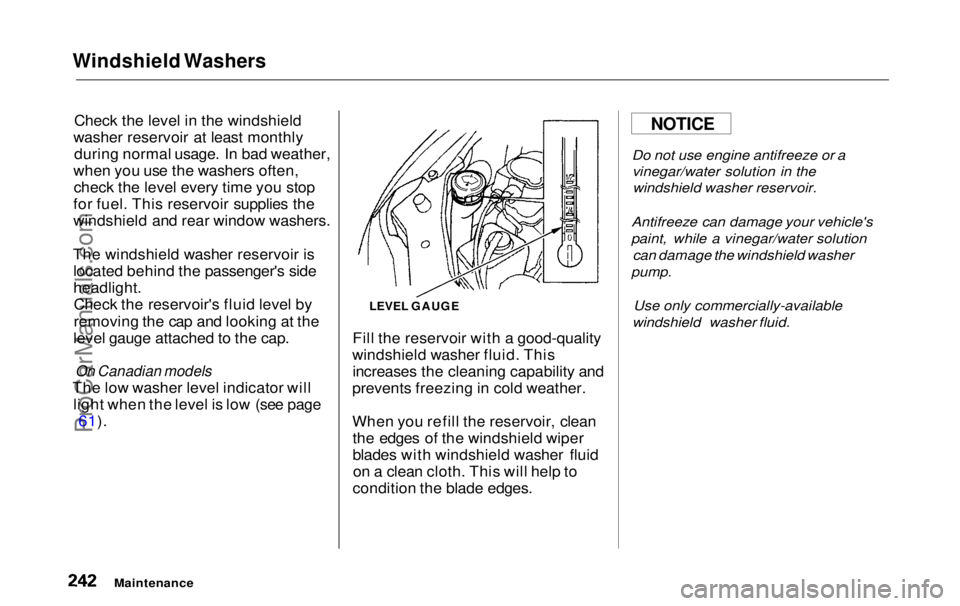
The windshield washer reservoir is located behind the passenger's side
headlight.Check the reservoir's fluid level by
removing the cap and looking at the
level gauge attached to the cap.
On Canadian models
The low washer level indicator will light when the level is low (see page
61).
Fill the reservoir with a good-quality
windshield washer fluid. This increases the cleaning capability and
prevents freezing in cold weather.
When you refill the reservoir, clean the edges of the windshield wiper
blades with windshield washer fluidon a clean cloth. This will help to
condition the blade edges.
Do not use engine antifreeze or a
vinegar/water solution in thewindshield washer reservoir.
Antifreeze can damage your vehicle's
paint, while a vinegar/water solution
can damage the windshield washer
pump.
Use only commercially-available
windshield washer fluid.
Maintenance
LEVEL GAUGE
NOTICEProCarManuals.comMain Menu Table of Contents s t
Page 254 of 343

Wiper Blades
Check the condition of the wiper
blades at least every six months. Look for signs of cracking in the
rubber, or areas that are getting
hard. Replace the blades if you find
these signs, or they leave streaks and unwiped areas when used.
WIPER ARMS
To replace a wiper blade:
1. Raise the wiper arm off the
window.
Front windshield: Raise the driver's
side first, then the passenger's
side.
LOCK TAB
2. Disconnect the blade assembly from the wiper arm by pushing inthe lock tab. Hold it in while you
push the blade assembly toward the base of the arm.
CONTINUED
MaintenanceProCarManuals.comMain Menu Table of Contents s t
Page 255 of 343

Wiper Blades
BLADE
3. Remove the blade from its holder by grasping the tabbed end of the
blade. Pull firmly until the tabs
come out of the holder. BLADE
REINFORCEMENT
4. Examine the new wiper blades. If they have no plastic or metal rein-
forcement along the back edge,remove the metal reinforcement
strips from the old wiper blade and
install them in the slots along the
edge of the new blade. 5. Slide the new wiper blade into the
holder until the tabs lock.
6. Slide the wiper blade assembly onto the wiper arm. Make sure it
locks in place.
7. Lower the wiper arm down against the window.
Front windshield: Lower the
passenger's side first, then the driver's side.
MaintenanceProCarManuals.comMain Menu Table of Contents s t
Page 339 of 343

Index
Parking Brake................................ 116 Parking Lights.................................. 66
Parking Over Things that Burn... 203
PGM-FI System.............................. 324
Polishing and Waxing................... 279
Power
Door Locks................................... 79
Mirrors........................................ 115
Seats............................................ 102
Sliding Doors................................ 90
Steering....................................... 245
Windows..................................... 113
Power Sliding Doors Indicator................................. 60, 94
Operation...................................... 90
Switches........................................ 90
Pre-Drive Safety Checklist............. 11
Pregnancy, Using Seat Belts.......... 20
Protecting Adults.............................12
Additional Safety Precautions.... 20
Advice for Pregnant Women...... 20
Protecting Children......................... 22
Protecting Infants........................ 30
Protecting Larger Children........ 39
Protecting Small Children.......... 35
Using Child Seats with
Tethers...................................... 43
Radiator Overheating.................... 299
Radio/CD Sound System.............. 161
Rear A/C Unit................................ 146 Rear Compartment........................ 122
Rear End Towing........................... 311
Rear Lights, Bulb Replacement...................... 268, 269
Rear View Mirror........................... 115
Rear Window Defogger.................. 71
Rear Windows................................ 114
Rear Window Wiper and Washer.. 70
Reclining the Seat Backs..... 101, 103
Reclining the Second Seats.......... 101
Reclining the Third Seat...............101
Reminder Lights.............................. 57
Remote Audio Controls................. 179 Remote Transmitter........................ 81
Removing the Second
Seats................................... 108, 109
Replacement Information Air Cleaner Element.................. 246
Coolant........................................239
Engine Oil and Filter................. 235
Fuses...........................................306
Light Bulbs................................. 266 Schedule..................................... 222
Spark Plugs................................. 248
Timing Belt................................. 257
Tires............................................261
Wiper Blades.............................. 253
Replacing Seat Belts After a
Crash............................................. 47
Reserve Tank, Engine Coolant.... 187
Reverse Gear Position................... 200
Rotation, Tire................................. 260
Safety Belts................................... 8, 45
Safety Defects, Reporting* .......... 332
Safety Features.................................. 7 Air bags........................................... 9Door Locks................................... 10
Head Restraints........................... 10
Seat Belts........................................ 8
Seats & Seat-Backs...................... 10
CONTINUEDProCarManuals.comMain Menu s t
Page 342 of 343

Index
Warning Beepers Headlights on............................... 66
Key in Ignition.............................. 79
Seat Belts............................... 45, 57
WARNING, Explanation of.............. ii
Warning Labels, Location of.......... 54
Warranty Coverages*................... 331
Washer, Windshield Checking the Fluid Level......... 242
Level Indicator............................. 61
Operation...................................... 70
Washing..........................................278
Waxing and Polishing................... 279
Wheels
Adjusting the Steering................ 72
Alignment and Balance............. 260Compact Spare........................... 286
Wrench....................................... 289
Windows
Cleaning...................................... 281
Operating the Power................. 113
Rear.............................................114
Rear, Defogger............................ 71
Windshield
Cleaning........................................ 68
Defroster........................... 135, 144
Wipers, Windshield
Changing Blades........................ 253
Operation...................................... 68
Rear Windshield Wiper and Washer......................................70
Worn Tires..................................... 259
Wrecker, Emergency Towing...... 311
* : U.S. and Canada onlyProCarManuals.comMain Menu s t