Page 147 of 343
Climate Control System
Rear A/C Unit
Your vehicle has two controls for the rear A/C unit. The rear A/C controldial is located on the climate control
panel, and the rear A/C passenger control panel is on the ceiling behind
the driver's seat.
You can adjust the heating, cooling, and air flow of the rear A/C unit with
these control dials. The rear passengers can also adjust thedirection and the amount of air flow
with the rear ceiling vents.
REAR CEILING VENT
REAR A/CPASSENGER
CONTROL PANEL REAR A/C
CONTROL DIAL
Comfort and Convenience FeaturesProCarManuals.comMain Menu Table of Contents s t
Page 148 of 343

Climate Control System
RearA/C Control Dial
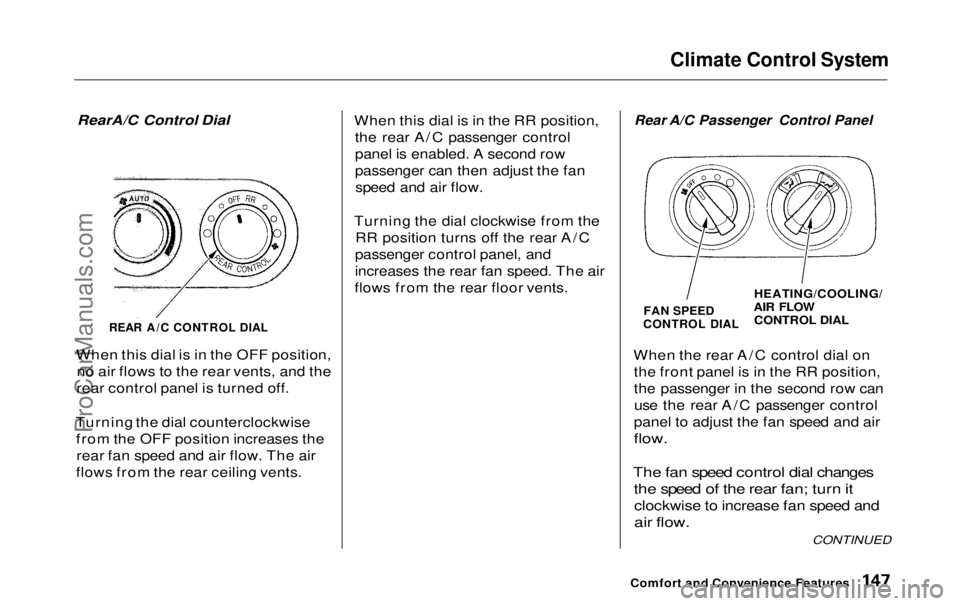
REAR A/C CONTROL DIAL
When this dial is in the OFF position, no air flows to the rear vents, and the
rear control panel is turned off.
Turning the dial counterclockwise from the OFF position increases therear fan speed and air flow. The air
flows from the rear ceiling vents. When this dial is in the RR position,
the rear A/C passenger control
panel is enabled. A second row
passenger can then adjust the fanspeed and air flow.
Turning the dial clockwise from the RR position turns off the rear A/C
passenger control panel, and
increases the rear fan speed. The air
flows from the rear floor vents.
Rear A/C Passenger Control Panel
FAN SPEED
CONTROL DIAL
HEATING/COOLING/
AIR FLOW
CONTROL DIAL
When the rear A/C control dial on the front panel is in the RR position,
the passenger in the second row canuse the rear A/C passenger control
panel to adjust the fan speed and air
flow.
The fan speed control dial changes the speed of the rear fan; turn it
clockwise to increase fan speed and
air flow.
Comfort and Convenience Features
CONTINUEDProCarManuals.comMain Menu Table of Contents s t
Page 149 of 343
Climate Control System
The heating/cooling/air flow control dial selects the temperature and
level of the air flow.
When the dial is in the position, heated air flows
from the rear floor vents.
When the dial is in the position, cooled air flows
from the rear ceiling vents. Cooled air can be selected when the A/C
switch on the front control panel is
turned on. Rear Ceiling Vents
TAB
LEVER
The direction and quantity of air flow from each rear ceiling vent is
adjustable.
To adjust the direction of the air coming from a rear ceiling vent,
move the tab in the center of each
vent back-and-forth, and rotate the
vent with the tab. The lever next to each vent can be opened and closed
to regulate the amount of air flow.
Comfort and Convenience FeaturesProCarManuals.comMain Menu Table of Contents s t
Page 217 of 343

Towing a Trailer
Spare Vehicle Tire
When towing a trailer, you should carry a full-size wheel and tire as aspare in case you have a flat. If you
use the compact spare tire that came
with the vehicle, it may adversely affect vehicle handling. See page 317 for information on proper tire
size, and page 293 for information on
how to store a full-size tire. When storing a full-size spare tire in the
trailer, follow the trailer maker's
instructions.
Additional Trailer equipment
Many states and provinces require
special outside mirrors when towing
a trailer. Even if they don't, you should install special mirrors if you
cannot clearly see behind you, or if
the trailer creates a blind spot.
Ask your trailer sales or rental agency if any other items are
recommended or required for your
towing situation. Pre-Tow Checklist
When preparing to tow, and before driving away, be sure to check the
following:
The vehicle has been properlyserviced, and the tires, brakes,
suspension, and cooling system
are in good operating condition.
All weights and loads are within limits (see pages 212 and 213).
The hitch, safety chain, and any other attachments are secure.
All items on and in the trailer are properly secured and cannot shift
while you drive.
The lights and brakes on your vehicle and the trailer are workingproperly. Your vehicle tires and spare are
properly inflated (see page 317),and the trailer tires and spare are
inflated as recommended by the
trailer maker.
You may want to fill the fuel tank with premium fuel. Premium fuelprovides improved performance.
DrivingProCarManuals.comMain Menu Table of Contents s t
Page 220 of 343

Maintenance
This section explains why it is important to keep your vehicle well
maintained and to follow basic
maintenance safety precautions.
This section also includes Maintenance Schedules for normaldriving and severe driving conditions,
a Maintenance Record, and instruc-
tions for simple maintenance tasks
you may want to take care of yourself.
If you have the skills and tools to per-
form more complex maintenance tasks on your Honda, you may want
to purchase the Service Manual. See page 333 for information on how toobtain a copy, or see your Honda
dealer.
Maintenance Safety.......................
220
Important Safet
y
Precautions ..
221
Maintenance Schedule.................
.
222
Required Maintenance Record.... 229
Owner Maintenance Checks........ 231
Fluid Locations............................... 232
Engine Oil....................................... 233
Adding Oil................................... 233
Recommended Oil..................... 233
Synthetic Oil............................... 234
Additives..................................... 235
Changing the Oil and Filter...... 235
Cooling System.............................. 237
Adding Engine Coolant............. 237Replacing Engine Coolant........ 239
Windshield Washers..................... 242
Automatic Transmission Fluid..... 243
Brake Fluid..................................... 244
Brake System............................. 244
Power Steering............................... 245
Air Cleaner Element...................... 246
Hood Latch..................................... 248
Spark Plugs..................................... 248
Replacement............................... 248
Specifications............................. 250
Battery............................................ 251
Wiper Blades.................................. 253
Air Conditioning System............... 255
Air Conditioning Filter.................. 256
Drive Belts...................................... 256
Timing Belt..................................... 257
Tires................................................ 257 Inflation....................................... 257
Inspection................................... 259Maintenance............................... 260
Tire Rotation.............................. 260
Replacing Tires and Wheels.... 261
Wheels and Tires....................... 262 Winter Driving........................... 262
Snow Tires.............................. 263
Tire Chains............................. 263
Lights..............................................264
Headlight Aiming...................... 266
Replacing Bulbs......................... 266
Storing Your Vehicle..................... 275
MaintenanceProCarManuals.comMain Menu s t
Page 238 of 343

Cooling System
Adding Engine Coolant
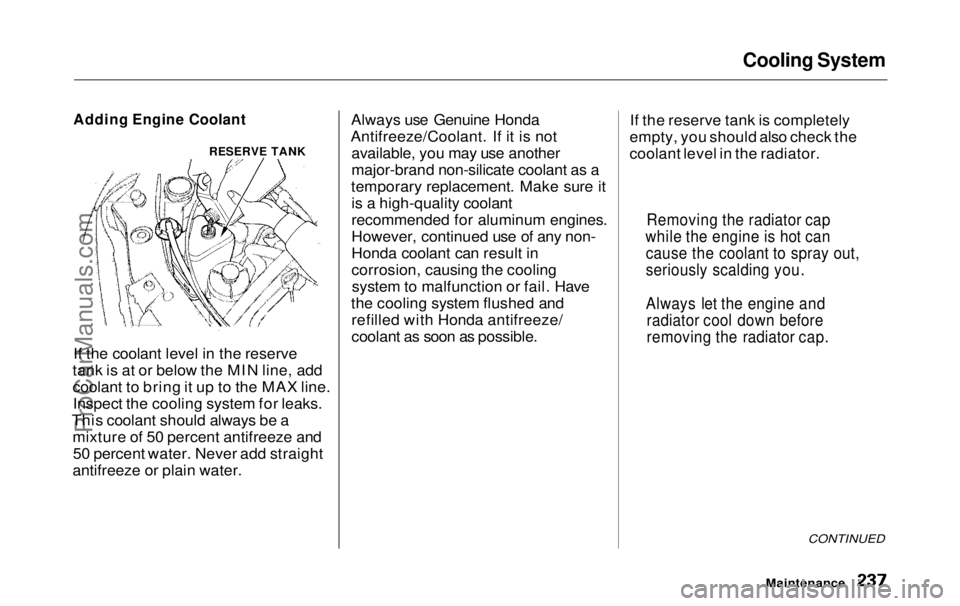
If the coolant level in the reserve
tank is at or below the MIN line, add
coolant to bring it up to the MAX line. Inspect the cooling system for leaks.
This coolant should always be a mixture of 50 percent antifreeze and50 percent water. Never add straight
antifreeze or plain water. Always use Genuine Honda
Antifreeze/Coolant. If it is not available, you may use another
major-brand non-silicate coolant as a
temporary replacement. Make sure it is a high-quality coolant
recommended for aluminum engines.
However, continued use of any non-
Honda coolant can result in
corrosion, causing the coolingsystem to malfunction or fail. Have
the cooling system flushed and refilled with Honda antifreeze/
coolant as soon as possible. If the reserve tank is completely
empty, you should also check the
coolant level in the radiator.
CONTINUED
Maintenance
Removing the radiator cap
while the engine is hot can cause the coolant to spray out,
seriously scalding you.
Always let the engine and radiator cool down before
removing the radiator cap.
RESERVE TANKProCarManuals.comMain Menu Table of Contents s t
Page 239 of 343
Cooling System
1. Make sure the engine and radiator
are cool.
2. Turn the radiator cap counter- clockwise, without pressing downon it, until it stops. This relieves
any pressure remaining in the
cooling system.
3. Remove the radiator cap by pushing down and turning
counterclockwise.
4. The coolant level should be up to
the base of the filler neck. Addcoolant if it is low.
5. Put the radiator cap back on. Tighten it fully.
6. Pour coolant into the reserve tank. Fill it to halfway between the MAX
and MIN marks. Put the cap back
on the reserve tank.
Do not add any rust inhibitors or
other additives to your vehicle's
cooling system. They may not be
compatible with the coolant or
engine components.
Maintenance
RADIATOR CAP
RESERVE TANKProCarManuals.comMain Menu Table of Contents s t
Page 240 of 343
Cooling System
Replacing Engine Coolant
The cooling system should be completely drained and refilled with
new coolant according to the timeand distance recommendations in
the maintenance schedule. Only use Genuine Honda Antifreeze/Coolant.
Draining the coolant requires access
to the underside of the vehicle. Unless you have the tools and
knowledge, you should have this maintenance done by a skilled
mechanic.
1. Turn the ignition ON (II). Turn
the heater temperature controldial fully clockwise. Turn the
ignition off.
Open the hood. Make sure the
engine and radiator are cool to the
touch.
2. Remove the radiator cap. 3. Loosen the drain plug on the
bottom of the radiator. Thecoolant will drain through thesplash guard. Loosen the drain
bolt.
CONTINUED
Maintenance
DRAIN BOLT
DRAIN PLUGProCarManuals.comMain Menu Table of Contents s t