1999 DODGE NEON Timing belt
[x] Cancel search: Timing beltPage 791 of 1200
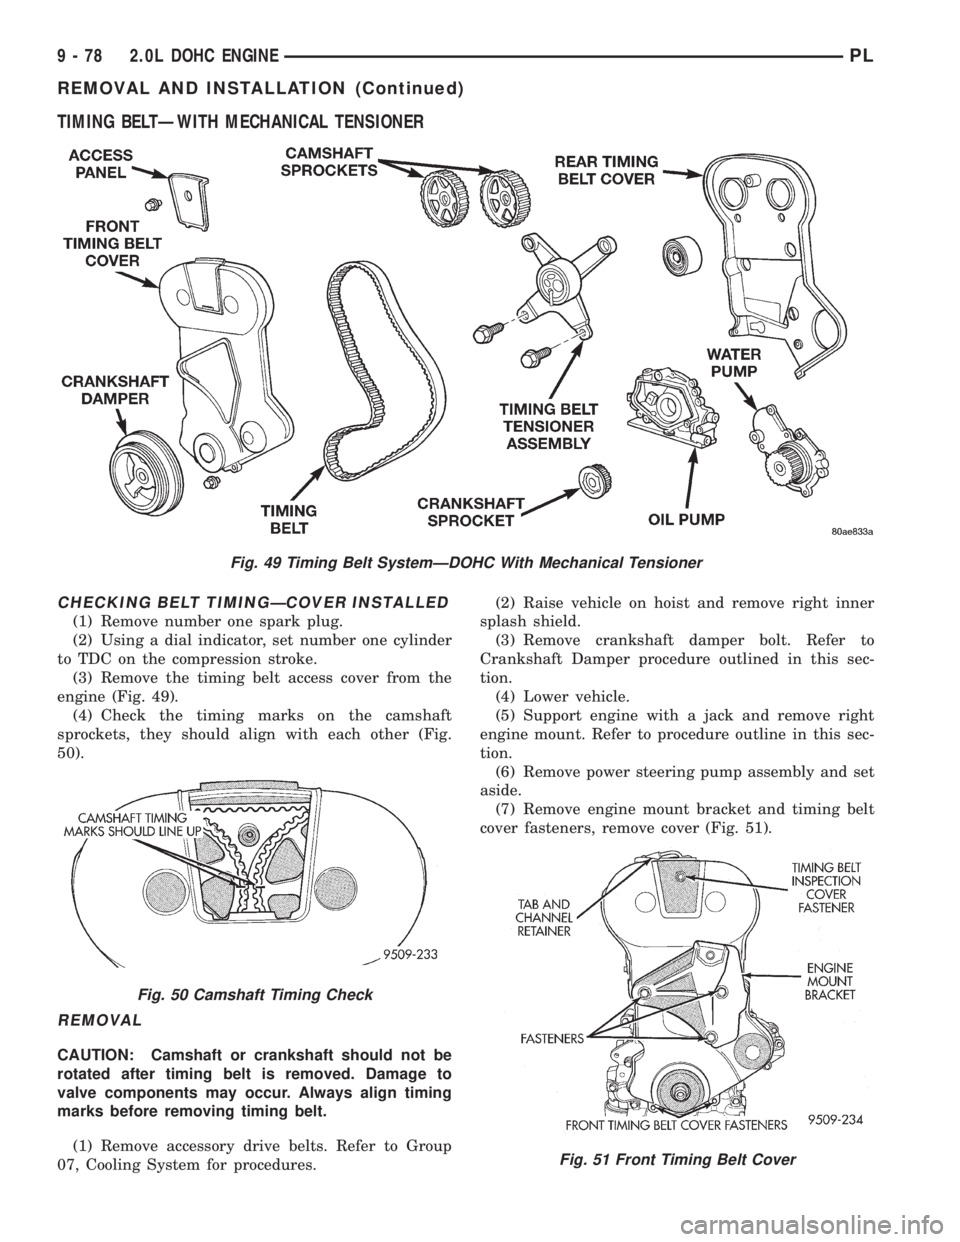
TIMING BELTÐWITH MECHANICAL TENSIONER
CHECKING BELT TIMINGÐCOVER INSTALLED
(1) Remove number one spark plug.
(2) Using a dial indicator, set number one cylinder
to TDC on the compression stroke.
(3) Remove the timing belt access cover from the
engine (Fig. 49).
(4) Check the timing marks on the camshaft
sprockets, they should align with each other (Fig.
50).
REMOVAL
CAUTION: Camshaft or crankshaft should not be
rotated after timing belt is removed. Damage to
valve components may occur. Always align timing
marks before removing timing belt.
(1) Remove accessory drive belts. Refer to Group
07, Cooling System for procedures.(2) Raise vehicle on hoist and remove right inner
splash shield.
(3) Remove crankshaft damper bolt. Refer to
Crankshaft Damper procedure outlined in this sec-
tion.
(4) Lower vehicle.
(5) Support engine with a jack and remove right
engine mount. Refer to procedure outline in this sec-
tion.
(6) Remove power steering pump assembly and set
aside.
(7) Remove engine mount bracket and timing belt
cover fasteners, remove cover (Fig. 51).
Fig. 49 Timing Belt SystemÐDOHC With Mechanical Tensioner
Fig. 50 Camshaft Timing Check
Fig. 51 Front Timing Belt Cover
9 - 78 2.0L DOHC ENGINEPL
REMOVAL AND INSTALLATION (Continued)
Page 792 of 1200
CAUTION: Align camshaft and crankshaft timing
marks before removing the timing belt by rotating
the engine with the crankshaft. Do not rotate the
camshaft once the timing belt has been removed as
damage to valve components may occur.
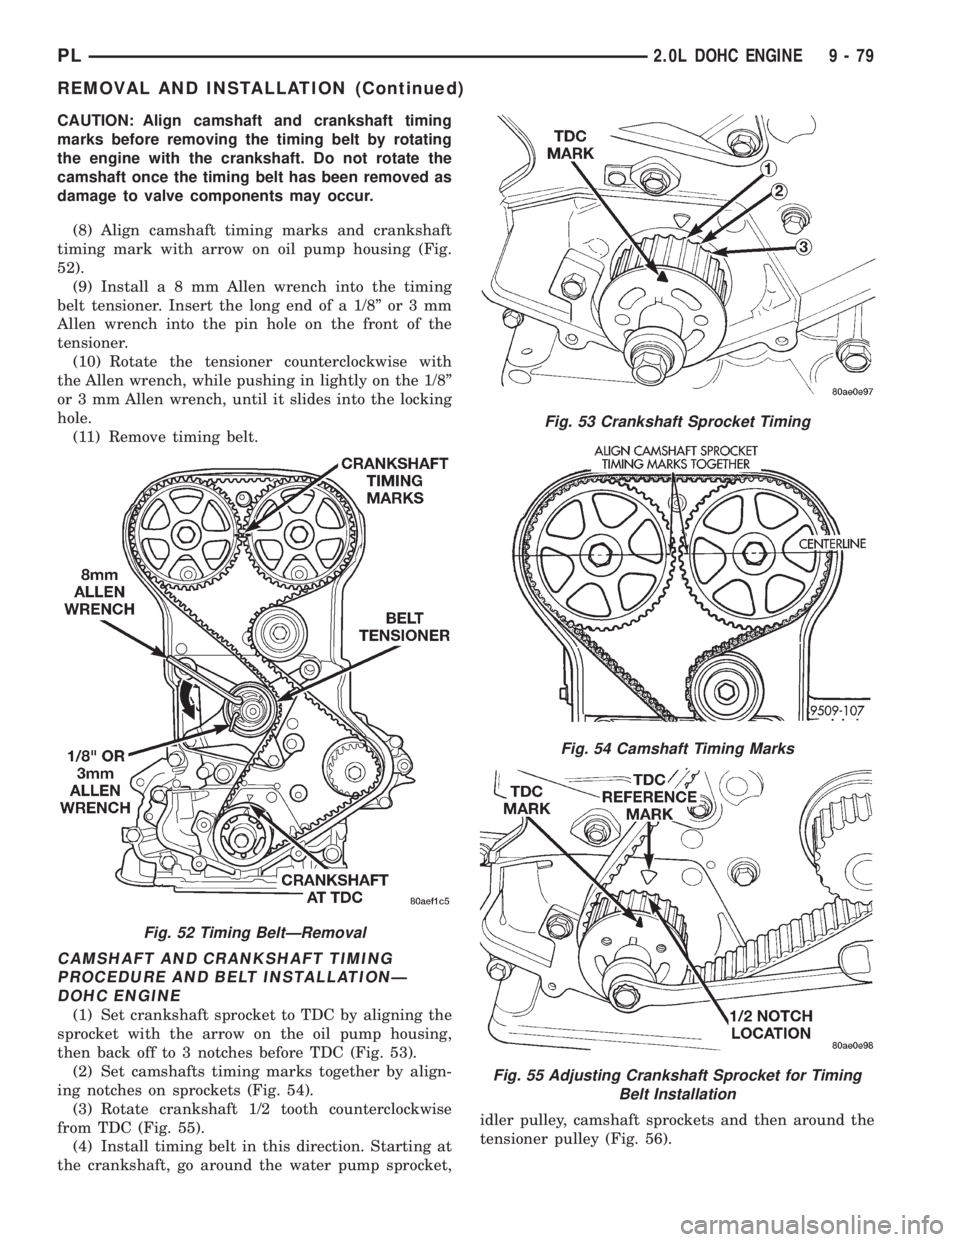
(8) Align camshaft timing marks and crankshaft
timing mark with arrow on oil pump housing (Fig.
52).
(9) Installa8mmAllen wrench into the timing
belt tensioner. Insert the long end of a 1/8º or 3 mm
Allen wrench into the pin hole on the front of the
tensioner.
(10) Rotate the tensioner counterclockwise with
the Allen wrench, while pushing in lightly on the 1/8º
or 3 mm Allen wrench, until it slides into the locking
hole.
(11) Remove timing belt.
CAMSHAFT AND CRANKSHAFT TIMING
PROCEDURE AND BELT INSTALLATIONÐ
DOHC ENGINE
(1) Set crankshaft sprocket to TDC by aligning the
sprocket with the arrow on the oil pump housing,
then back off to 3 notches before TDC (Fig. 53).
(2) Set camshafts timing marks together by align-
ing notches on sprockets (Fig. 54).
(3) Rotate crankshaft 1/2 tooth counterclockwise
from TDC (Fig. 55).
(4) Install timing belt in this direction. Starting at
the crankshaft, go around the water pump sprocket,idler pulley, camshaft sprockets and then around the
tensioner pulley (Fig. 56).
Fig. 52 Timing BeltÐRemoval
Fig. 53 Crankshaft Sprocket Timing
Fig. 54 Camshaft Timing Marks
Fig. 55 Adjusting Crankshaft Sprocket for Timing
Belt Installation
PL2.0L DOHC ENGINE 9 - 79
REMOVAL AND INSTALLATION (Continued)
Page 793 of 1200
(5) Move crankshaft sprocket to TDC to take up
belt slack.
(6) Release the tensioner by removing the pin or
Allen wrench from the belt tensioner.
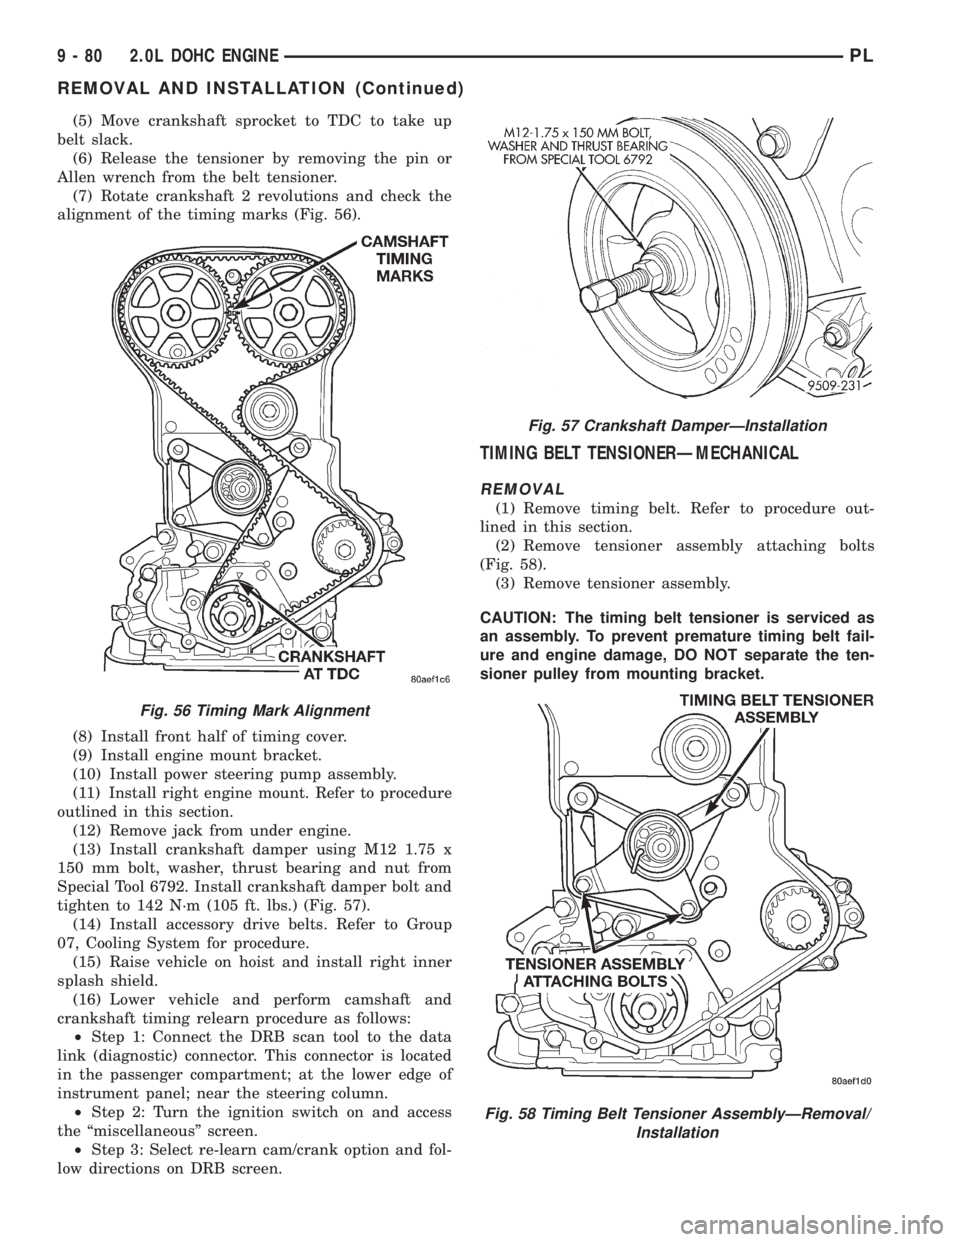
(7) Rotate crankshaft 2 revolutions and check the
alignment of the timing marks (Fig. 56).
(8) Install front half of timing cover.
(9) Install engine mount bracket.
(10) Install power steering pump assembly.
(11) Install right engine mount. Refer to procedure
outlined in this section.
(12) Remove jack from under engine.
(13) Install crankshaft damper using M12 1.75 x
150 mm bolt, washer, thrust bearing and nut from
Special Tool 6792. Install crankshaft damper bolt and
tighten to 142 N´m (105 ft. lbs.) (Fig. 57).
(14) Install accessory drive belts. Refer to Group
07, Cooling System for procedure.
(15) Raise vehicle on hoist and install right inner
splash shield.
(16) Lower vehicle and perform camshaft and
crankshaft timing relearn procedure as follows:
²Step 1: Connect the DRB scan tool to the data
link (diagnostic) connector. This connector is located
in the passenger compartment; at the lower edge of
instrument panel; near the steering column.
²Step 2: Turn the ignition switch on and access
the ªmiscellaneousº screen.
²Step 3: Select re-learn cam/crank option and fol-
low directions on DRB screen.
TIMING BELT TENSIONERÐMECHANICAL
REMOVAL
(1) Remove timing belt. Refer to procedure out-
lined in this section.
(2) Remove tensioner assembly attaching bolts
(Fig. 58).
(3) Remove tensioner assembly.
CAUTION: The timing belt tensioner is serviced as
an assembly. To prevent premature timing belt fail-
ure and engine damage, DO NOT separate the ten-
sioner pulley from mounting bracket.
Fig. 56 Timing Mark Alignment
Fig. 57 Crankshaft DamperÐInstallation
Fig. 58 Timing Belt Tensioner AssemblyÐRemoval/
Installation
9 - 80 2.0L DOHC ENGINEPL
REMOVAL AND INSTALLATION (Continued)
Page 794 of 1200
INSTALLATION
(1) Install timing belt tensioner assembly. Tighten
attaching bolts to 28 N´m (250 in. lbs.).
(2) Install timing belt. Refer to procedure outlined
in this section.
OIL PAN
REMOVAL
(1) Drain engine oil.
(2) Remove front engine mount bracket. Refer to
Engine MountÐFront, in this section for procedures.
(3) Remove powertrain bending strut.
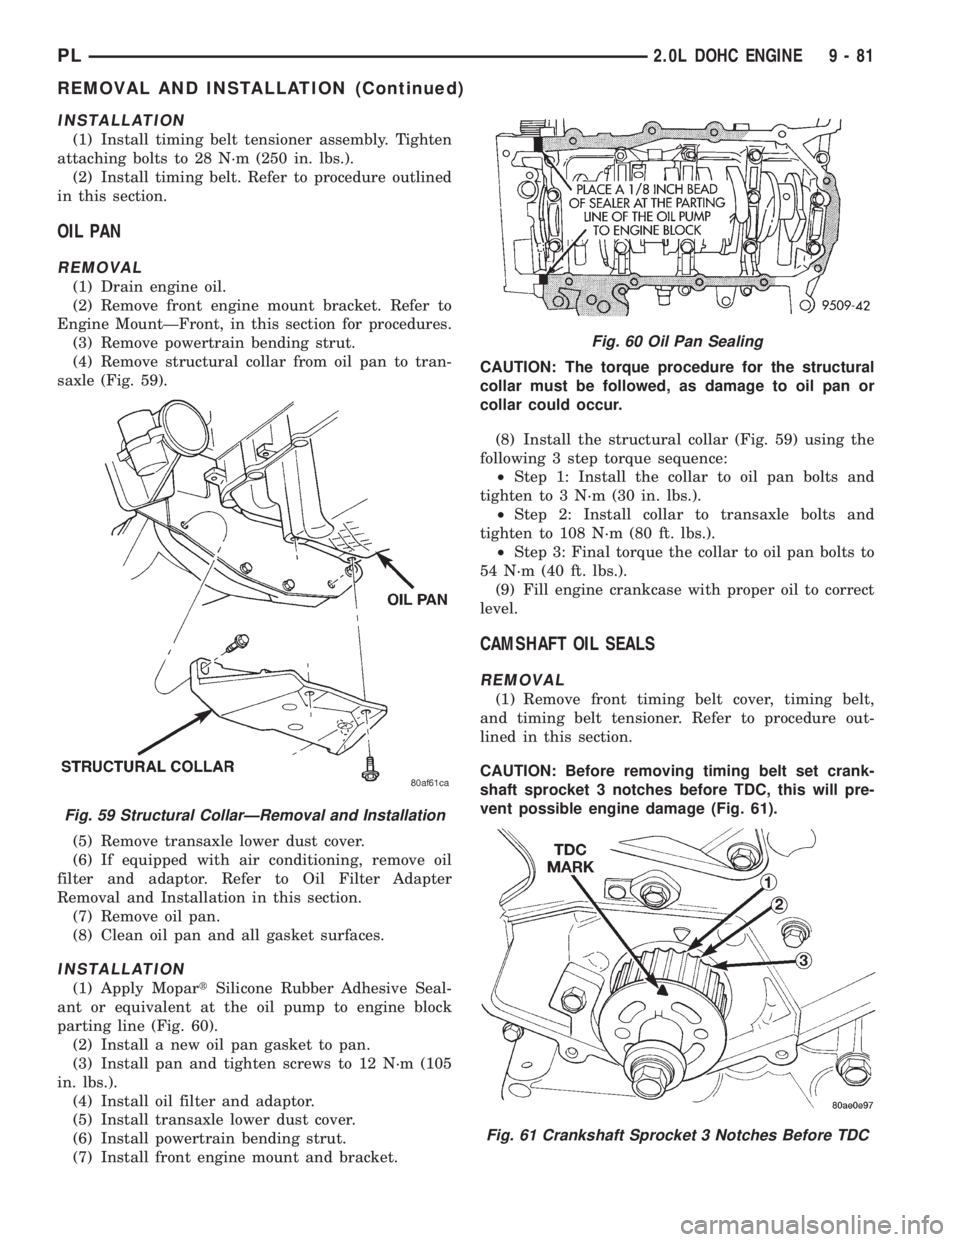
(4) Remove structural collar from oil pan to tran-
saxle (Fig. 59).
(5) Remove transaxle lower dust cover.
(6) If equipped with air conditioning, remove oil
filter and adaptor. Refer to Oil Filter Adapter
Removal and Installation in this section.
(7) Remove oil pan.
(8) Clean oil pan and all gasket surfaces.
INSTALLATION
(1) Apply MopartSilicone Rubber Adhesive Seal-
ant or equivalent at the oil pump to engine block
parting line (Fig. 60).
(2) Install a new oil pan gasket to pan.
(3) Install pan and tighten screws to 12 N´m (105
in. lbs.).
(4) Install oil filter and adaptor.
(5) Install transaxle lower dust cover.
(6) Install powertrain bending strut.
(7) Install front engine mount and bracket.CAUTION: The torque procedure for the structural
collar must be followed, as damage to oil pan or
collar could occur.
(8) Install the structural collar (Fig. 59) using the
following 3 step torque sequence:
²Step 1: Install the collar to oil pan bolts and
tighten to 3 N´m (30 in. lbs.).
²Step 2: Install collar to transaxle bolts and
tighten to 108 N´m (80 ft. lbs.).
²Step 3: Final torque the collar to oil pan bolts to
54 N´m (40 ft. lbs.).
(9) Fill engine crankcase with proper oil to correct
level.
CAMSHAFT OIL SEALS
REMOVAL
(1) Remove front timing belt cover, timing belt,
and timing belt tensioner. Refer to procedure out-
lined in this section.
CAUTION: Before removing timing belt set crank-
shaft sprocket 3 notches before TDC, this will pre-
vent possible engine damage (Fig. 61).
Fig. 59 Structural CollarÐRemoval and Installation
Fig. 60 Oil Pan Sealing
Fig. 61 Crankshaft Sprocket 3 Notches Before TDC
PL2.0L DOHC ENGINE 9 - 81
REMOVAL AND INSTALLATION (Continued)
Page 795 of 1200
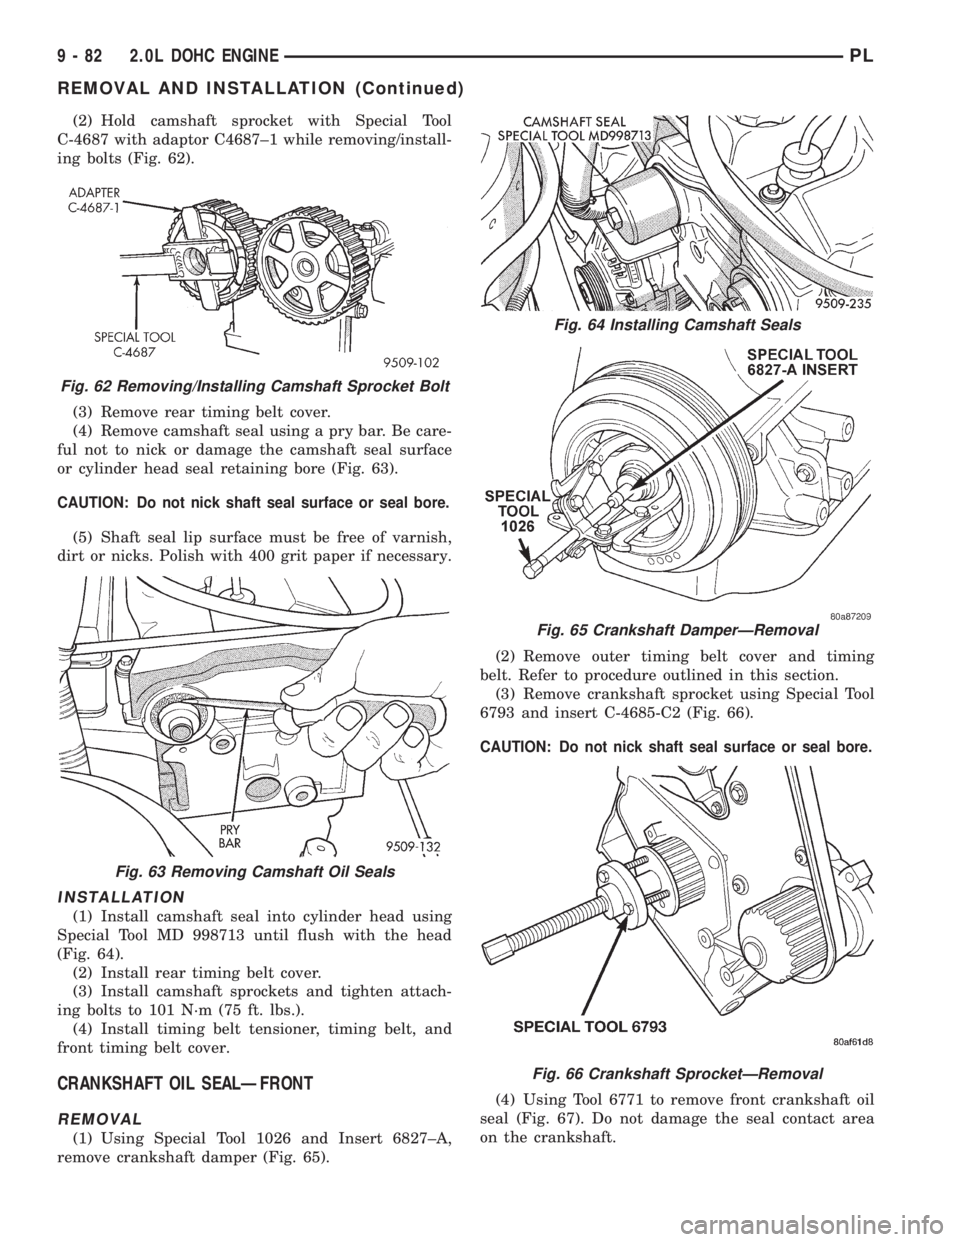
(2) Hold camshaft sprocket with Special Tool
C-4687 with adaptor C4687±1 while removing/install-
ing bolts (Fig. 62).
(3) Remove rear timing belt cover.
(4) Remove camshaft seal using a pry bar. Be care-
ful not to nick or damage the camshaft seal surface
or cylinder head seal retaining bore (Fig. 63).
CAUTION: Do not nick shaft seal surface or seal bore.
(5) Shaft seal lip surface must be free of varnish,
dirt or nicks. Polish with 400 grit paper if necessary.
INSTALLATION
(1) Install camshaft seal into cylinder head using
Special Tool MD 998713 until flush with the head
(Fig. 64).
(2) Install rear timing belt cover.
(3) Install camshaft sprockets and tighten attach-
ing bolts to 101 N´m (75 ft. lbs.).
(4) Install timing belt tensioner, timing belt, and
front timing belt cover.
CRANKSHAFT OIL SEALÐFRONT
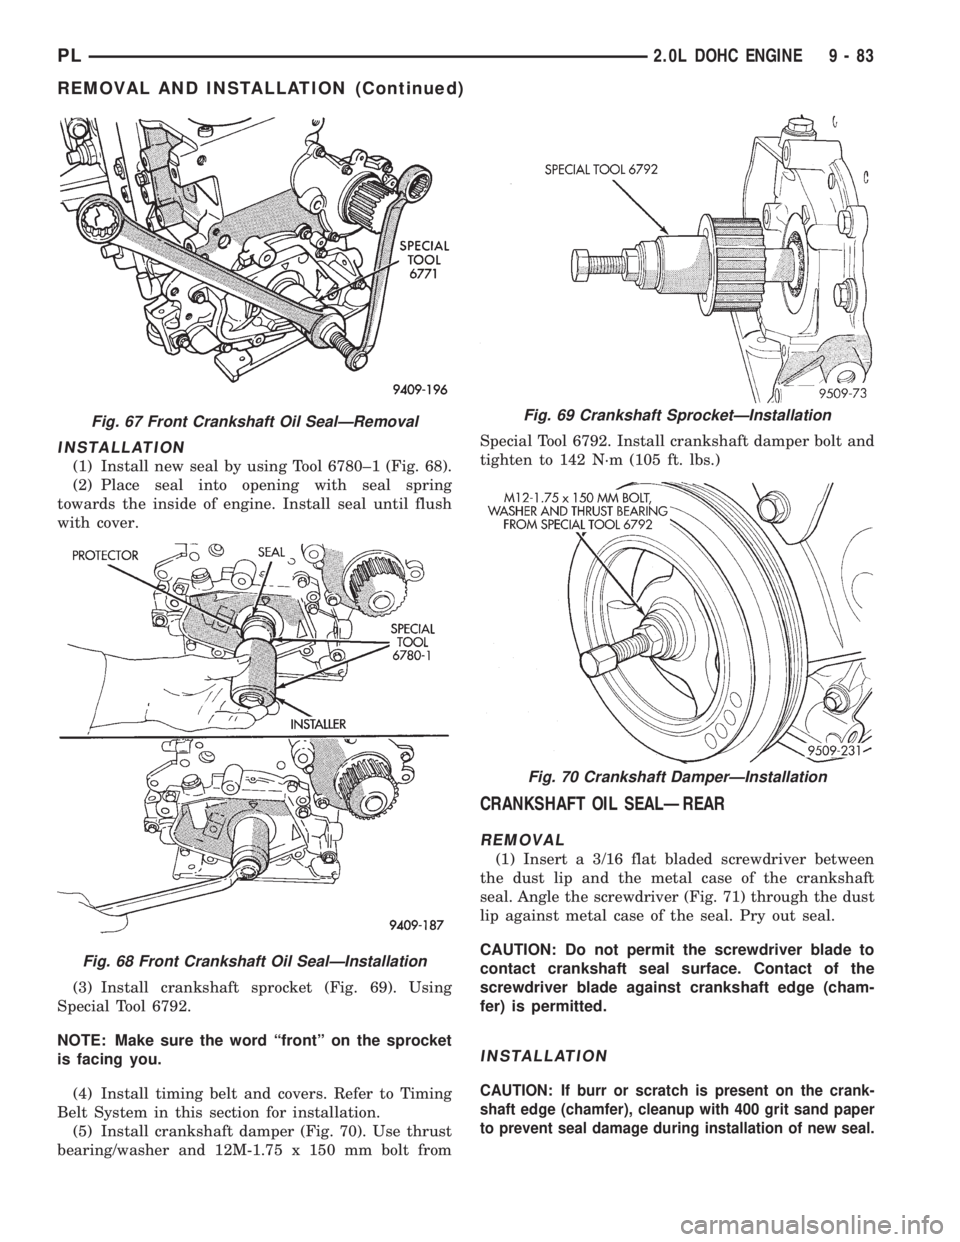
REMOVAL
(1) Using Special Tool 1026 and Insert 6827±A,
remove crankshaft damper (Fig. 65).(2) Remove outer timing belt cover and timing
belt. Refer to procedure outlined in this section.
(3) Remove crankshaft sprocket using Special Tool
6793 and insert C-4685-C2 (Fig. 66).
CAUTION: Do not nick shaft seal surface or seal bore.
(4) Using Tool 6771 to remove front crankshaft oil
seal (Fig. 67). Do not damage the seal contact area
on the crankshaft.
Fig. 62 Removing/Installing Camshaft Sprocket Bolt
Fig. 63 Removing Camshaft Oil Seals
Fig. 64 Installing Camshaft Seals
Fig. 65 Crankshaft DamperÐRemoval
Fig. 66 Crankshaft SprocketÐRemoval
9 - 82 2.0L DOHC ENGINEPL
REMOVAL AND INSTALLATION (Continued)
Page 796 of 1200
INSTALLATION
(1) Install new seal by using Tool 6780±1 (Fig. 68).
(2) Place seal into opening with seal spring
towards the inside of engine. Install seal until flush
with cover.
(3) Install crankshaft sprocket (Fig. 69). Using
Special Tool 6792.
NOTE: Make sure the word ªfrontº on the sprocket
is facing you.
(4) Install timing belt and covers. Refer to Timing
Belt System in this section for installation.
(5) Install crankshaft damper (Fig. 70). Use thrust
bearing/washer and 12M-1.75 x 150 mm bolt fromSpecial Tool 6792. Install crankshaft damper bolt and
tighten to 142 N´m (105 ft. lbs.)
CRANKSHAFT OIL SEALÐREAR
REMOVAL
(1) Insert a 3/16 flat bladed screwdriver between
the dust lip and the metal case of the crankshaft
seal. Angle the screwdriver (Fig. 71) through the dust
lip against metal case of the seal. Pry out seal.
CAUTION: Do not permit the screwdriver blade to
contact crankshaft seal surface. Contact of the
screwdriver blade against crankshaft edge (cham-
fer) is permitted.
INSTALLATION
CAUTION: If burr or scratch is present on the crank-
shaft edge (chamfer), cleanup with 400 grit sand paper
to prevent seal damage during installation of new seal.
Fig. 67 Front Crankshaft Oil SealÐRemoval
Fig. 68 Front Crankshaft Oil SealÐInstallation
Fig. 69 Crankshaft SprocketÐInstallation
Fig. 70 Crankshaft DamperÐInstallation
PL2.0L DOHC ENGINE 9 - 83
REMOVAL AND INSTALLATION (Continued)
Page 801 of 1200
OIL PUMP
REMOVAL
(1) Disconnect negative cable from battery.
(2) Remove Timing Belt. Refer to procedure in this
section.
(3) Remove Oil Pan. Refer to procedure in this sec-
tion.
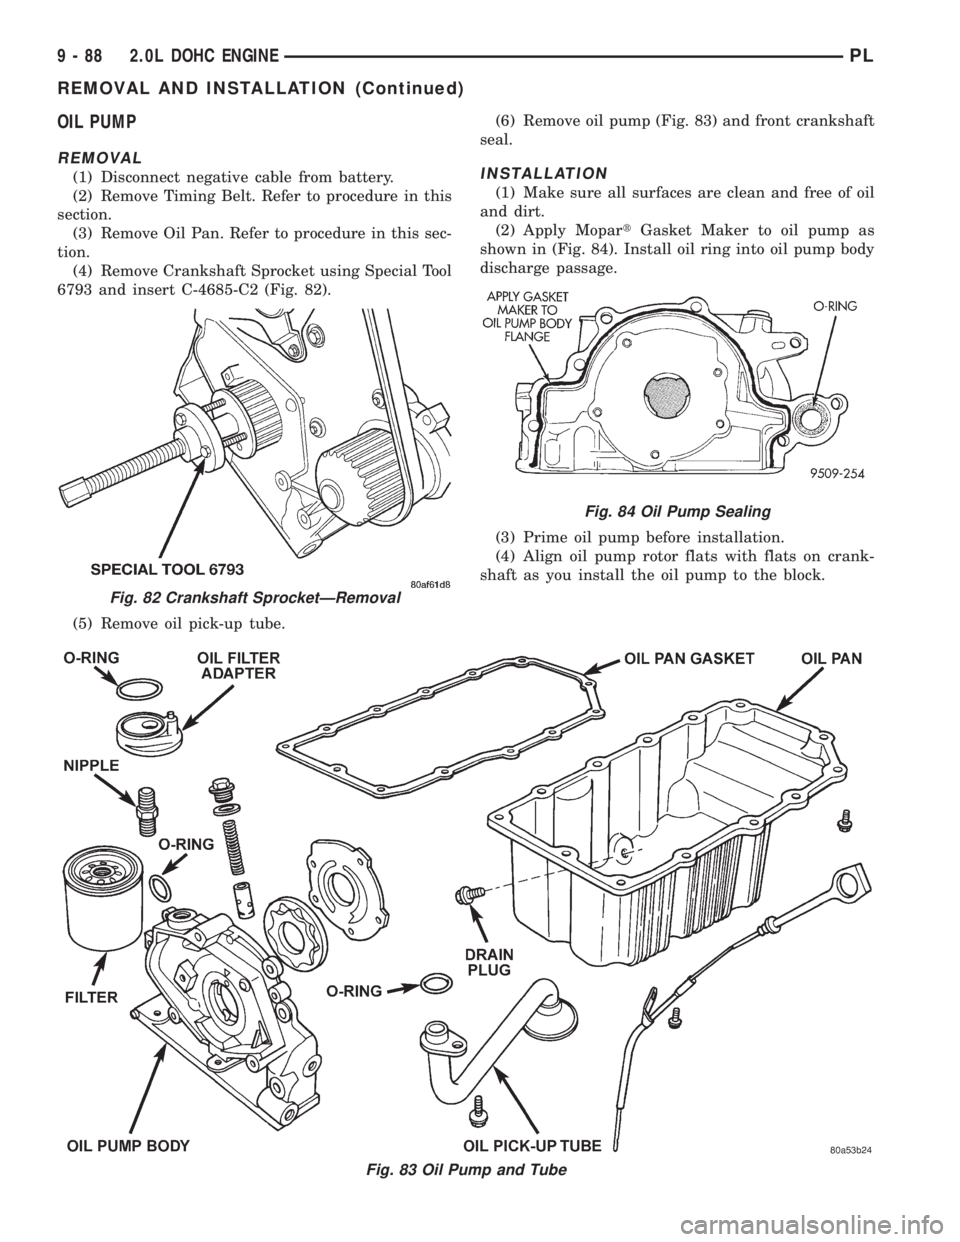
(4) Remove Crankshaft Sprocket using Special Tool
6793 and insert C-4685-C2 (Fig. 82).
(5) Remove oil pick-up tube.(6) Remove oil pump (Fig. 83) and front crankshaft
seal.INSTALLATION
(1) Make sure all surfaces are clean and free of oil
and dirt.
(2) Apply MopartGasket Maker to oil pump as
shown in (Fig. 84). Install oil ring into oil pump body
discharge passage.
(3) Prime oil pump before installation.
(4) Align oil pump rotor flats with flats on crank-
shaft as you install the oil pump to the block.
Fig. 83 Oil Pump and Tube
Fig. 82 Crankshaft SprocketÐRemoval
Fig. 84 Oil Pump Sealing
9 - 88 2.0L DOHC ENGINEPL
REMOVAL AND INSTALLATION (Continued)
Page 802 of 1200
NOTE: Front crankshaft seal MUST be out of pump
to align, or damage may result.
(5) Torque all oil pump attaching bolts to 28 N´m
(250 in. lbs.)
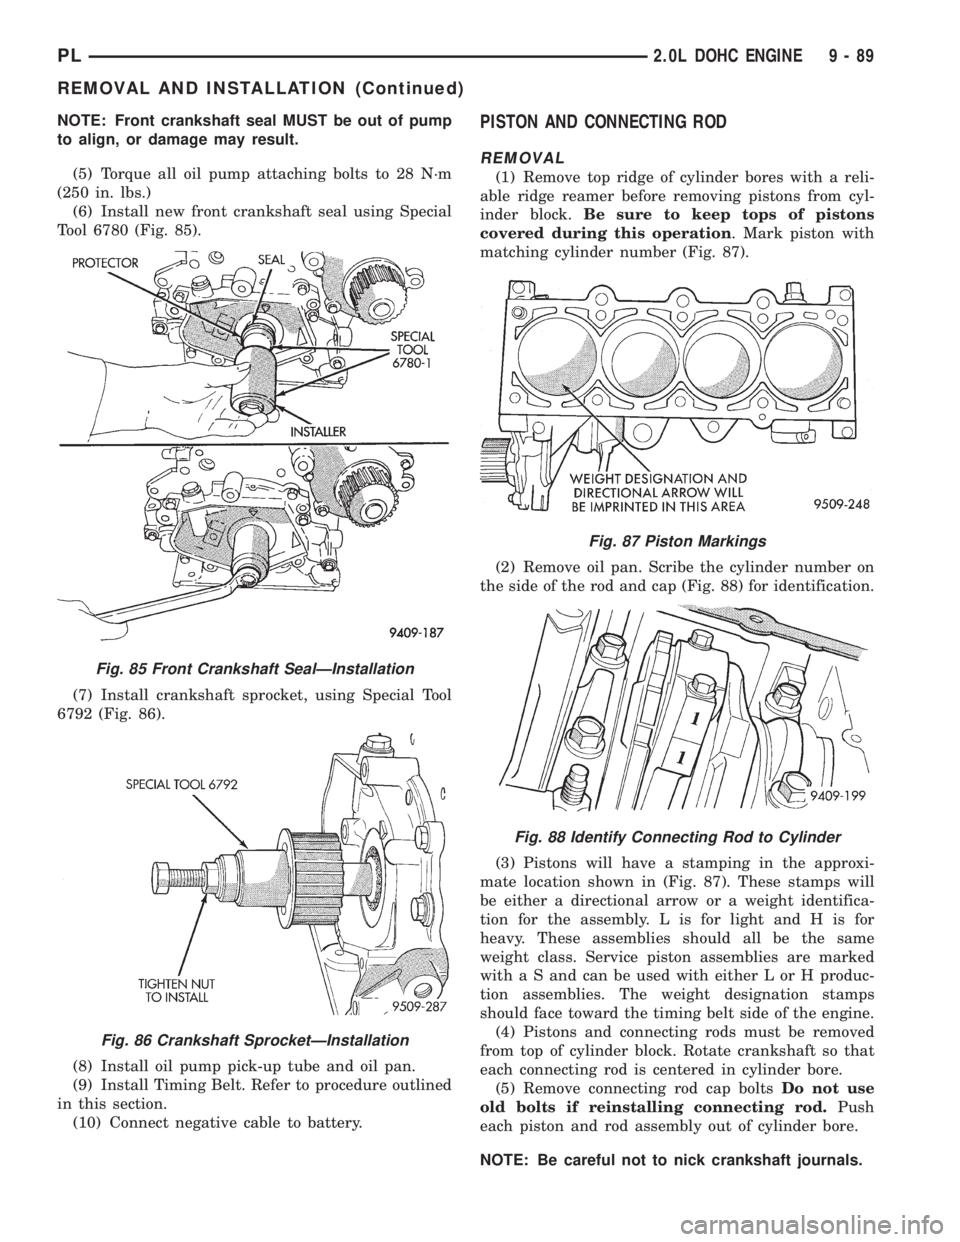
(6) Install new front crankshaft seal using Special
Tool 6780 (Fig. 85).
(7) Install crankshaft sprocket, using Special Tool
6792 (Fig. 86).
(8) Install oil pump pick-up tube and oil pan.
(9) Install Timing Belt. Refer to procedure outlined
in this section.
(10) Connect negative cable to battery.PISTON AND CONNECTING ROD
REMOVAL
(1) Remove top ridge of cylinder bores with a reli-
able ridge reamer before removing pistons from cyl-
inder block.Be sure to keep tops of pistons
covered during this operation. Mark piston with
matching cylinder number (Fig. 87).
(2) Remove oil pan. Scribe the cylinder number on
the side of the rod and cap (Fig. 88) for identification.
(3) Pistons will have a stamping in the approxi-
mate location shown in (Fig. 87). These stamps will
be either a directional arrow or a weight identifica-
tion for the assembly. L is for light and H is for
heavy. These assemblies should all be the same
weight class. Service piston assemblies are marked
with a S and can be used with either L or H produc-
tion assemblies. The weight designation stamps
should face toward the timing belt side of the engine.
(4) Pistons and connecting rods must be removed
from top of cylinder block. Rotate crankshaft so that
each connecting rod is centered in cylinder bore.
(5) Remove connecting rod cap boltsDo not use
old bolts if reinstalling connecting rod.Push
each piston and rod assembly out of cylinder bore.
NOTE: Be careful not to nick crankshaft journals.
Fig. 85 Front Crankshaft SealÐInstallation
Fig. 86 Crankshaft SprocketÐInstallation
Fig. 87 Piston Markings
Fig. 88 Identify Connecting Rod to Cylinder
PL2.0L DOHC ENGINE 9 - 89
REMOVAL AND INSTALLATION (Continued)