1999 DODGE NEON warning
[x] Cancel search: warningPage 129 of 1200
PARK BRAKE LEVER ASSEMBLY
WARNING: THE AUTO ADJUSTING FEATURE OF
THIS PARKING BRAKE LEVER ASSEMBLY CON-
TAINS A CLOCK SPRING LOADED TO APPROXI-
MATELY 20 POUNDS. DO NOT RELEASE THE AUTO
ADJUSTER LOCKOUT DEVICE BEFORE INSTALL-
ING CABLES INTO THE EQUALIZER. KEEP HANDS
OUT OF AUTO ADJUSTER SECTOR AND PAWL
AREA. FAILURE TO OBSERVE CAUTION IN HAN-
DLING THIS MECHANISM COULD LEAD TO SERI-
OUS INJURY.
REMOVE
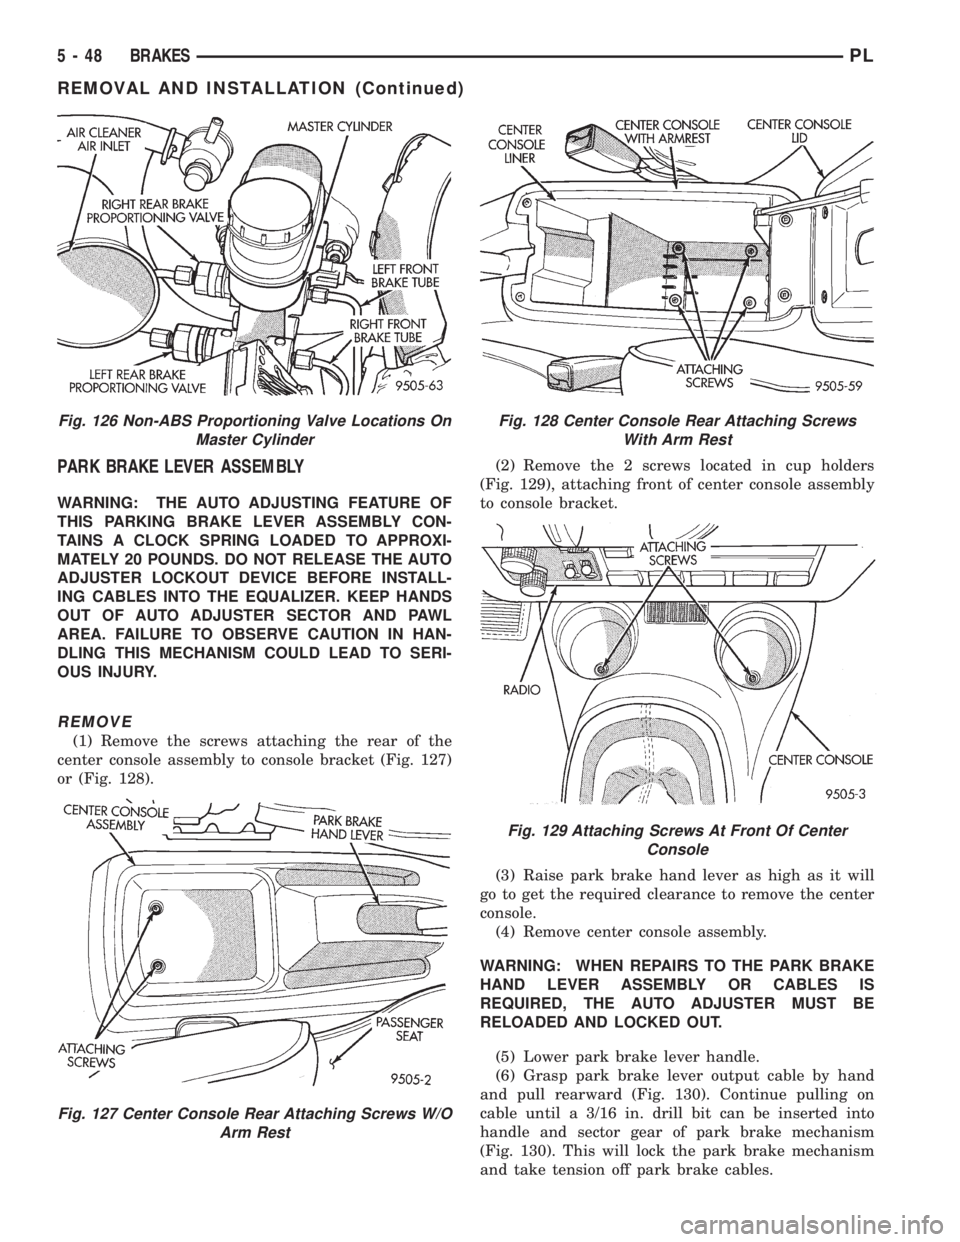
(1) Remove the screws attaching the rear of the
center console assembly to console bracket (Fig. 127)
or (Fig. 128).(2) Remove the 2 screws located in cup holders
(Fig. 129), attaching front of center console assembly
to console bracket.
(3) Raise park brake hand lever as high as it will
go to get the required clearance to remove the center
console.
(4) Remove center console assembly.
WARNING: WHEN REPAIRS TO THE PARK BRAKE
HAND LEVER ASSEMBLY OR CABLES IS
REQUIRED, THE AUTO ADJUSTER MUST BE
RELOADED AND LOCKED OUT.
(5) Lower park brake lever handle.
(6) Grasp park brake lever output cable by hand
and pull rearward (Fig. 130). Continue pulling on
cable until a 3/16 in. drill bit can be inserted into
handle and sector gear of park brake mechanism
(Fig. 130). This will lock the park brake mechanism
and take tension off park brake cables.
Fig. 126 Non-ABS Proportioning Valve Locations On
Master Cylinder
Fig. 127 Center Console Rear Attaching Screws W/O
Arm Rest
Fig. 128 Center Console Rear Attaching Screws
With Arm Rest
Fig. 129 Attaching Screws At Front Of Center
Console
5 - 48 BRAKESPL
REMOVAL AND INSTALLATION (Continued)
Page 130 of 1200
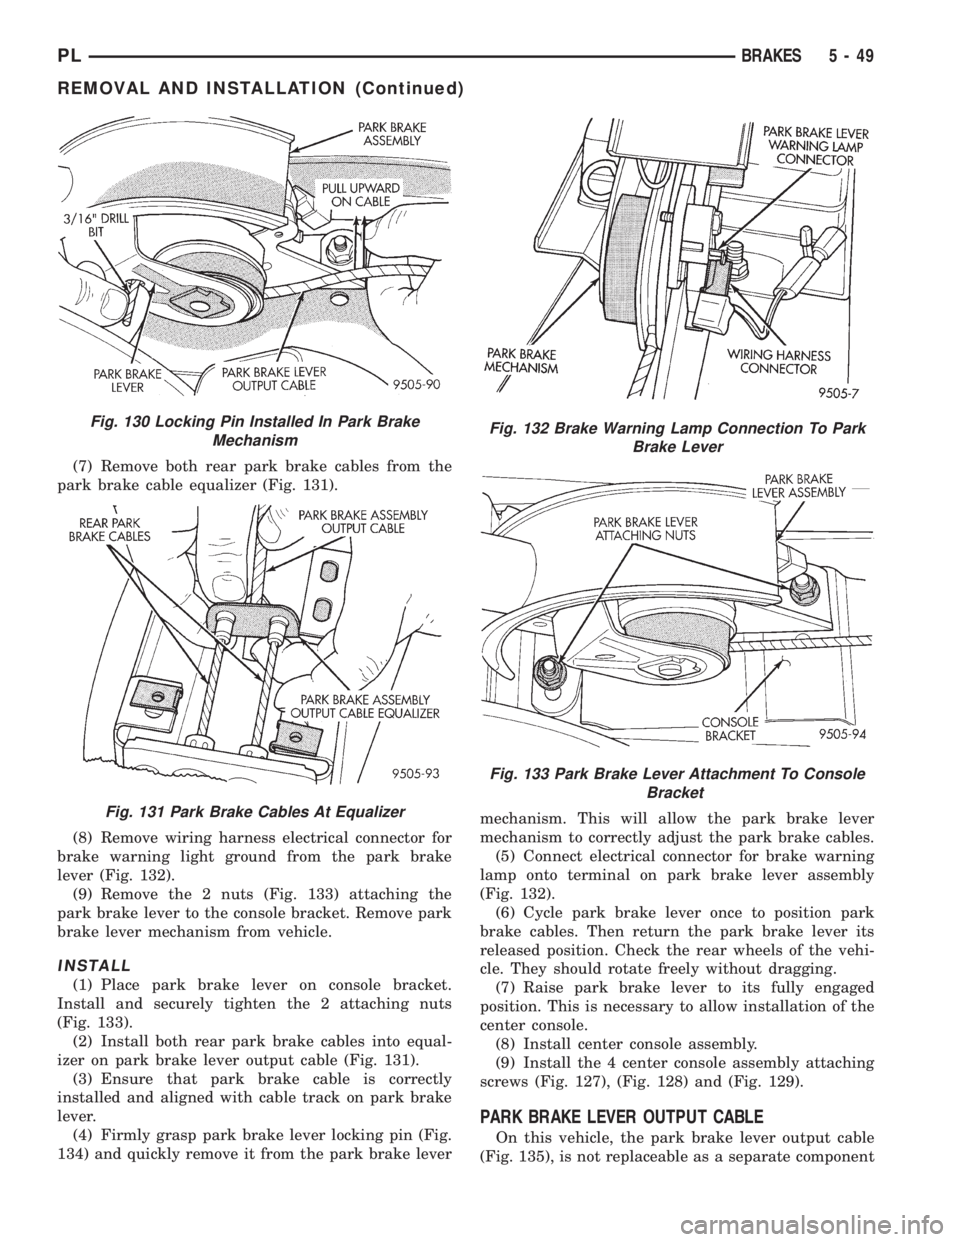
(7) Remove both rear park brake cables from the
park brake cable equalizer (Fig. 131).
(8) Remove wiring harness electrical connector for
brake warning light ground from the park brake
lever (Fig. 132).
(9) Remove the 2 nuts (Fig. 133) attaching the
park brake lever to the console bracket. Remove park
brake lever mechanism from vehicle.
INSTALL
(1) Place park brake lever on console bracket.
Install and securely tighten the 2 attaching nuts
(Fig. 133).
(2) Install both rear park brake cables into equal-
izer on park brake lever output cable (Fig. 131).
(3) Ensure that park brake cable is correctly
installed and aligned with cable track on park brake
lever.
(4) Firmly grasp park brake lever locking pin (Fig.
134) and quickly remove it from the park brake levermechanism. This will allow the park brake lever
mechanism to correctly adjust the park brake cables.
(5) Connect electrical connector for brake warning
lamp onto terminal on park brake lever assembly
(Fig. 132).
(6) Cycle park brake lever once to position park
brake cables. Then return the park brake lever its
released position. Check the rear wheels of the vehi-
cle. They should rotate freely without dragging.
(7) Raise park brake lever to its fully engaged
position. This is necessary to allow installation of the
center console.
(8) Install center console assembly.
(9) Install the 4 center console assembly attaching
screws (Fig. 127), (Fig. 128) and (Fig. 129).
PARK BRAKE LEVER OUTPUT CABLE
On this vehicle, the park brake lever output cable
(Fig. 135), is not replaceable as a separate component
Fig. 130 Locking Pin Installed In Park Brake
Mechanism
Fig. 131 Park Brake Cables At Equalizer
Fig. 132 Brake Warning Lamp Connection To Park
Brake Lever
Fig. 133 Park Brake Lever Attachment To Console
Bracket
PLBRAKES 5 - 49
REMOVAL AND INSTALLATION (Continued)
Page 131 of 1200
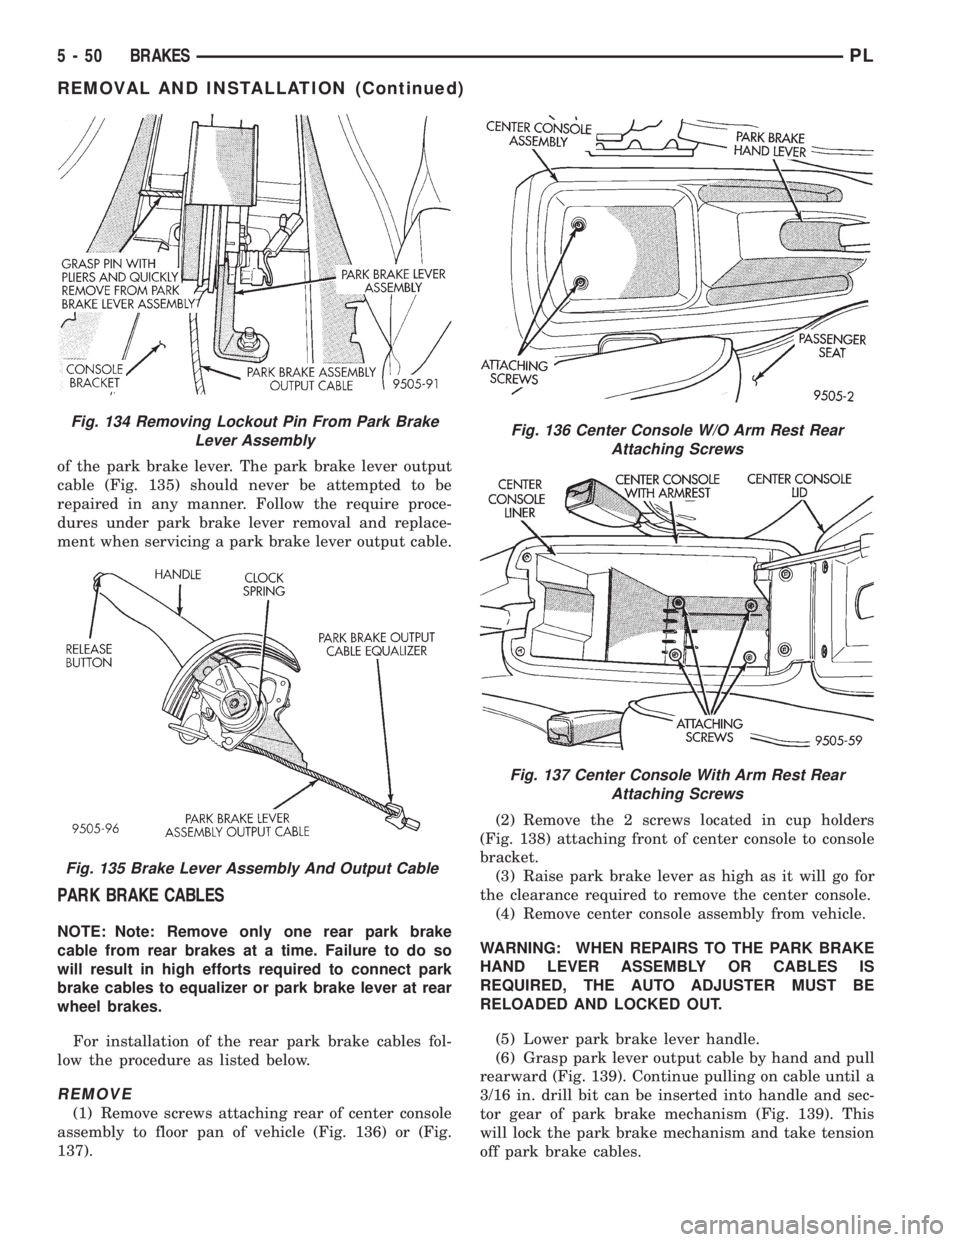
of the park brake lever. The park brake lever output
cable (Fig. 135) should never be attempted to be
repaired in any manner. Follow the require proce-
dures under park brake lever removal and replace-
ment when servicing a park brake lever output cable.
PARK BRAKE CABLES
NOTE: Note: Remove only one rear park brake
cable from rear brakes at a time. Failure to do so
will result in high efforts required to connect park
brake cables to equalizer or park brake lever at rear
wheel brakes.
For installation of the rear park brake cables fol-
low the procedure as listed below.
REMOVE
(1) Remove screws attaching rear of center console
assembly to floor pan of vehicle (Fig. 136) or (Fig.
137).(2) Remove the 2 screws located in cup holders
(Fig. 138) attaching front of center console to console
bracket.
(3) Raise park brake lever as high as it will go for
the clearance required to remove the center console.
(4) Remove center console assembly from vehicle.
WARNING: WHEN REPAIRS TO THE PARK BRAKE
HAND LEVER ASSEMBLY OR CABLES IS
REQUIRED, THE AUTO ADJUSTER MUST BE
RELOADED AND LOCKED OUT.
(5) Lower park brake lever handle.
(6) Grasp park lever output cable by hand and pull
rearward (Fig. 139). Continue pulling on cable until a
3/16 in. drill bit can be inserted into handle and sec-
tor gear of park brake mechanism (Fig. 139). This
will lock the park brake mechanism and take tension
off park brake cables.
Fig. 134 Removing Lockout Pin From Park Brake
Lever Assembly
Fig. 135 Brake Lever Assembly And Output Cable
Fig. 136 Center Console W/O Arm Rest Rear
Attaching Screws
Fig. 137 Center Console With Arm Rest Rear
Attaching Screws
5 - 50 BRAKESPL
REMOVAL AND INSTALLATION (Continued)
Page 141 of 1200
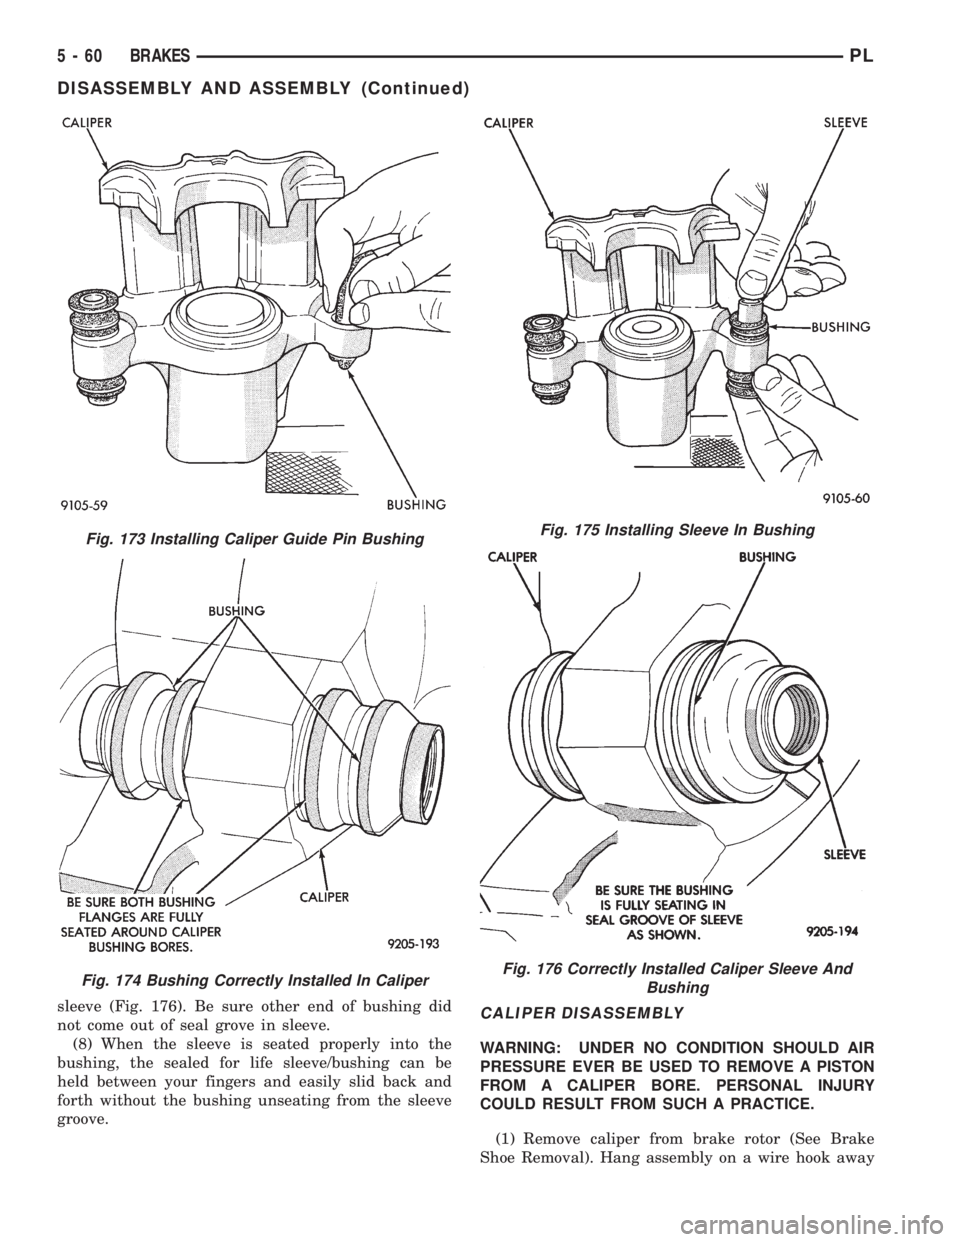
sleeve (Fig. 176). Be sure other end of bushing did
not come out of seal grove in sleeve.
(8) When the sleeve is seated properly into the
bushing, the sealed for life sleeve/bushing can be
held between your fingers and easily slid back and
forth without the bushing unseating from the sleeve
groove.CALIPER DISASSEMBLY
WARNING: UNDER NO CONDITION SHOULD AIR
PRESSURE EVER BE USED TO REMOVE A PISTON
FROM A CALIPER BORE. PERSONAL INJURY
COULD RESULT FROM SUCH A PRACTICE.
(1) Remove caliper from brake rotor (See Brake
Shoe Removal). Hang assembly on a wire hook away
Fig. 173 Installing Caliper Guide Pin Bushing
Fig. 174 Bushing Correctly Installed In Caliper
Fig. 175 Installing Sleeve In Bushing
Fig. 176 Correctly Installed Caliper Sleeve And
Bushing
5 - 60 BRAKESPL
DISASSEMBLY AND ASSEMBLY (Continued)
Page 150 of 1200
ANTILOCK BRAKE SYSTEM±TEVES MARK 20
INDEX
page page
DESCRIPTION AND OPERATION
ABS BRAKE SYSTEM COMPONENTS........ 71
ABS BRAKES OPERATION AND VEHICLE
PERFORMANCE....................... 69
ABS COMPONENT ABBREVIATION LIST...... 69
ABS FLUID ACCUMULATORS.............. 72
ABS FUSES............................ 73
ABS MASTER CYLINDER AND POWER BRAKE
BOOSTER............................ 71
ABS RELAYS........................... 73
ABS WARNING LAMP (YELLOW)............ 75
ANTILOCK BRAKES OPERATION
DESCRIPTION........................ 69
CONTROLLER ANTILOCK BRAKES (CAB)..... 74
HCU PUMP/MOTOR..................... 72
HYDRAULIC CIRCUITS AND VALVE
OPERATION.......................... 75
INLET VALVES AND SOLENOIDS............ 72
INTEGRATED CONTROL UNIT (ICU)......... 71
OUTLET VALVES AND SOLENOIDS.......... 72
PROPORTIONING VALVE................. 73
WHEEL SPEED SENSORS................. 73
DIAGNOSIS AND TESTING
ABS DIAGNOSTIC TROUBLE CODES........ 78
ABS DIAGNOSTICS MANUAL.............. 76
ABS GENERAL DIAGNOSTICS INFORMATION . 75
ABS SERVICE PRECAUTIONS.............. 76
ABS SYSTEM SELF DIAGNOSTICS.......... 77ABS WIRING DIAGRAM INFORMATION....... 76
BRAKE FLUID CONTAMINATION............ 80
DRB DIAGNOSTIC CONNECTOR............ 77
DRB DIAGNOSTIC SCAN TOOL USAGE...... 77
INTERMITTENT DIAGNOSTIC TROUBLE
CODES.............................. 78
PROPORTIONING VALVE................. 79
TEST DRIVING ABS COMPLAINT VEHICLE.... 80
TONEWHEEL INSPECTION................ 79
SERVICE PROCEDURES
BLEEDING TEVES MARK 20 HYDRAULIC
SYSTEM............................. 81
BRAKE FLUID LEVEL INSPECTION.......... 80
REMOVAL AND INSTALLATION
ABS GENERAL SERVICE PRECAUTIONS..... 81
ABS HYDRAULIC CONTROL UNIT........... 82
CONTROLLER ANTILOCK BRAKES (CAB)..... 86
FRONT WHEEL SPEED SENSOR........... 87
MASTER CYLINDER AND POWER BRAKE
BOOSTER............................ 86
PROPORTIONING VALVES................ 86
REAR WHEEL SPEED SENSOR............ 88
SPECIFICATIONS
BRAKE FASTENER TORQUE SPECIFICATIONS . 89
SPEED SENSOR TONE WHEEL RUNOUT..... 89
WHEEL SPEED SENSOR TO TONE WHEEL
CLEARANCE.......................... 89
DESCRIPTION AND OPERATION
ANTILOCK BRAKES OPERATION DESCRIPTION
The purpose of an Antilock Brake System (ABS) is
to prevent wheel lock-up under braking conditions on
virtually any type of road surface. Antilock Braking
is desirable because a vehicle which is stopped with-
out locking the wheels will retain directional stability
and some steering capability. This allows the driver
to retain greater control of the vehicle during brak-
ing.
This section of the service manual covers the
description and on car service for the ITT Teves
Mark 20 ABS Brake System. If other service is
required on the non ABS related components of the
brake system, refer to the appropriate section in this
group of the service manual for the specific service
procedure required.
ABS COMPONENT ABBREVIATION LIST
In this section of the service manual, several
abbreviations are used for the components of the
Teves Mark 20 ABS Brake System. They are listed
below for your reference.
²CAB±Controller Antilock Brake
²ICU±Integrated Control Unit
²HCU±Hydraulic Control Unit
²ABS±Antilock Brake System
²PSI±Pounds Per Square Inch (pressure)
²WSS±Wheel Speed Sensor
²FWD±Front Wheel Drive
²DTC±Diagnostic Trouble Code
ABS BRAKES OPERATION AND VEHICLE
PERFORMANCE
This ABS System represents the current state-of-
the-art in vehicle braking systems and offers the
driver increased safety and control during braking.
PLBRAKES 5 - 69
Page 151 of 1200
This is accomplished by a sophisticated system of
electrical and hydraulic components. As a result,
there are a few performance characteristics that may
at first seem different but should be considered nor-
mal. These characteristics are discussed below.
NORMAL BRAKING SYSTEM FUNCTION
Under normal braking conditions, the ABS System
functions the same as a standard brake system with
a diagonally split master cylinder and conventional
vacuum assist.
ABS SYSTEM OPERATION
If a wheel locking tendency is detected during a
brake application, the brake system will enter the
ABS mode. During ABS braking, hydraulic pressure
in the four wheel circuits is modulated to prevent
any wheel from locking. Each wheel circuit is
designed with a set of electric solenoids to allow mod-
ulation, although for vehicle stability, both rear
wheel solenoids receive the same electrical signal.
During an ABS stop, the brakes hydraulic system
is still diagonally split. However, the brake system
pressure is further split into four control channels.
During antilock operation of the vehicle's brake sys-
tem the front wheels are controlled independently
and are on two separate control channels and the
rear wheels of the vehicle are controlled together.
The system can build and release pressure at each
wheel, depending on signals generated by the wheel
speed sensors (WSS) at each wheel and received at
the Controller Antilock Brake (CAB).
ABS operation is available at all vehicle speeds
above 3 to 5 mph. Wheel lockup may be perceived at
the very end of an ABS stop and is considered nor-
mal.
VEHICLE HANDLING PERFORMANCE DURING
ABS BRAKING
It is important to remember that an antilock brake
system does not shorten a vehicle's stopping distance
under all driving conditions, but does provide
improved control of the vehicle while stopping. Vehi-
cle stopping distance is still dependent on vehicle
speed, weight, tires, road surfaces and other factors.
Though ABS provides the driver with some steer-
ing control during hard braking, there are conditions
however, where the system does not provide any ben-
efit. In particular, hydroplaning is still possible when
the tires ride on a film of water. This results in the
vehicles tires leaving the road surface rendering the
vehicle virtually uncontrollable. In addition, extreme
steering maneuvers at high speed or high speed cor-
nering beyond the limits of tire adhesion to the road
surface may cause vehicle skidding, independent of
vehicle braking. For this reason, the ABS system is
termed Antilock instead of Anti-Skid.
NOISE AND BRAKE PEDAL FEEL
During ABS braking, some brake pedal movement
may be felt. In addition, ABS braking will create
ticking, popping and/or groaning noises heard by the
driver. This is normal due to pressurized fluid being
transferred between the master cylinder and the
brakes. If ABS operation occurs during hard braking,
some pulsation may be felt in the vehicle body due to
fore and aft movement of the suspension as brake
pressures are modulated.
At the end of an ABS stop, ABS will be turned off
when the vehicle is slowed to a speed of 3±4 mph.
There may be a slight brake pedal drop anytime that
the ABS is deactivated, such as at the end of the stop
when the vehicle speed is less then 3 mph or during
an ABS stop where ABS is no longer required. These
conditions will exist when a vehicle is being stopped
on a road surface with patches of ice, loose gravel or
sand on it. Also stopping a vehicle on a bumpy road
surface will activate ABS because of the wheel hop
caused by the bumps.
TIRE NOISE AND MARKS
Although the ABS system prevents complete wheel
lock-up, some wheel slip is desired in order to
achieve optimum braking performance. Wheel slip is
defined as follows, 0 percent slip means the wheel is
rolling freely and 100 percent slip means the wheel is
fully locked. During brake pressure modulation,
wheel slip is allowed to reach up to 25 to30%. This
means that the wheel rolling velocity is 25 to 30%
less than that of a free rolling wheel at a given vehi-
cle speed. This slip may result in some tire chirping,
depending on the road surface. This sound should not
be interpreted as total wheel lock-up.
Complete wheel lock up normally leaves black tire
marks on dry pavement. The ABS System will not
leave dark black tire marks since the wheel never
reaches a fully locked condition. Tire marks may
however be noticeable as light patched marks.
START UP CYCLE
When the ignition is turned on, a popping sound
and a slight brake pedal movement may be noticed.
Additionally, when the vehicle is first driven off a
humming may be heard and/or felt by the driver at
approximately 20 to 40 kph (12 to 25 mph). The ABS
warning lamp will also be on for up to 5 seconds
after the ignition is turned on. All of these conditions
are a normal function of ABS as the system is per-
forming a diagnosis check.
5 - 70 BRAKESPL
DESCRIPTION AND OPERATION (Continued)
Page 152 of 1200
PREMATURE ABS CYCLING
NOTE: When working on a vehicle which has a
complaint of premature ABS cycling it may be nec-
essary to use a DRB Scan Tool to detect and verify
the condition.
There is one complaint called Premature ABS
Cycling in which neither the Red Brake Warning
Lamp nor the Amber Antilock Lamp were illumi-
nated and no fault codes were stored in the CAB.
Symptoms of Premature ABS Cycling, include click-
ing sounds from the solenoids valves, pump motor
running and pulsations in the brake pedal. This con-
dition can occur at any braking rate of the vehicle
and on any type of road surface. This creates an
additional condition which needs to be correctly
assessed when diagnosing problems with the antilock
brake system.
The following conditions are common causes that
need to be checked when diagnosing a condition of
Premature ABS Cycling. Damaged tone wheels,
incorrect tone wheels, damage to a wheel speed sen-
sor mounting boss on a steering knuckle, a loose
wheel speed sensor mounting bolt, and excessive tone
wheel runout. Also, an excessively large tone wheel
to wheel speed sensor air gap can lead to the condi-
tion of Premature ABS Cycling. Special attention is
to be given to these components when diagnosing a
vehicle exhibiting the condition of Premature ABS
Cycling. After diagnosing the defective component,
repair or replace as required.
When the component repair or replacement is com-
pleted, test drive the vehicle to verify the condition of
Premature ABS Cycling has been corrected.
ABS BRAKE SYSTEM COMPONENTS
The following is a detailed description of the Teves
Mark 20 ABS brake system components. For infor-
mation on servicing the base brake system compo-
nents, see the base Brake System section of this
Service Manual.
ABS MASTER CYLINDER AND POWER BRAKE
BOOSTER
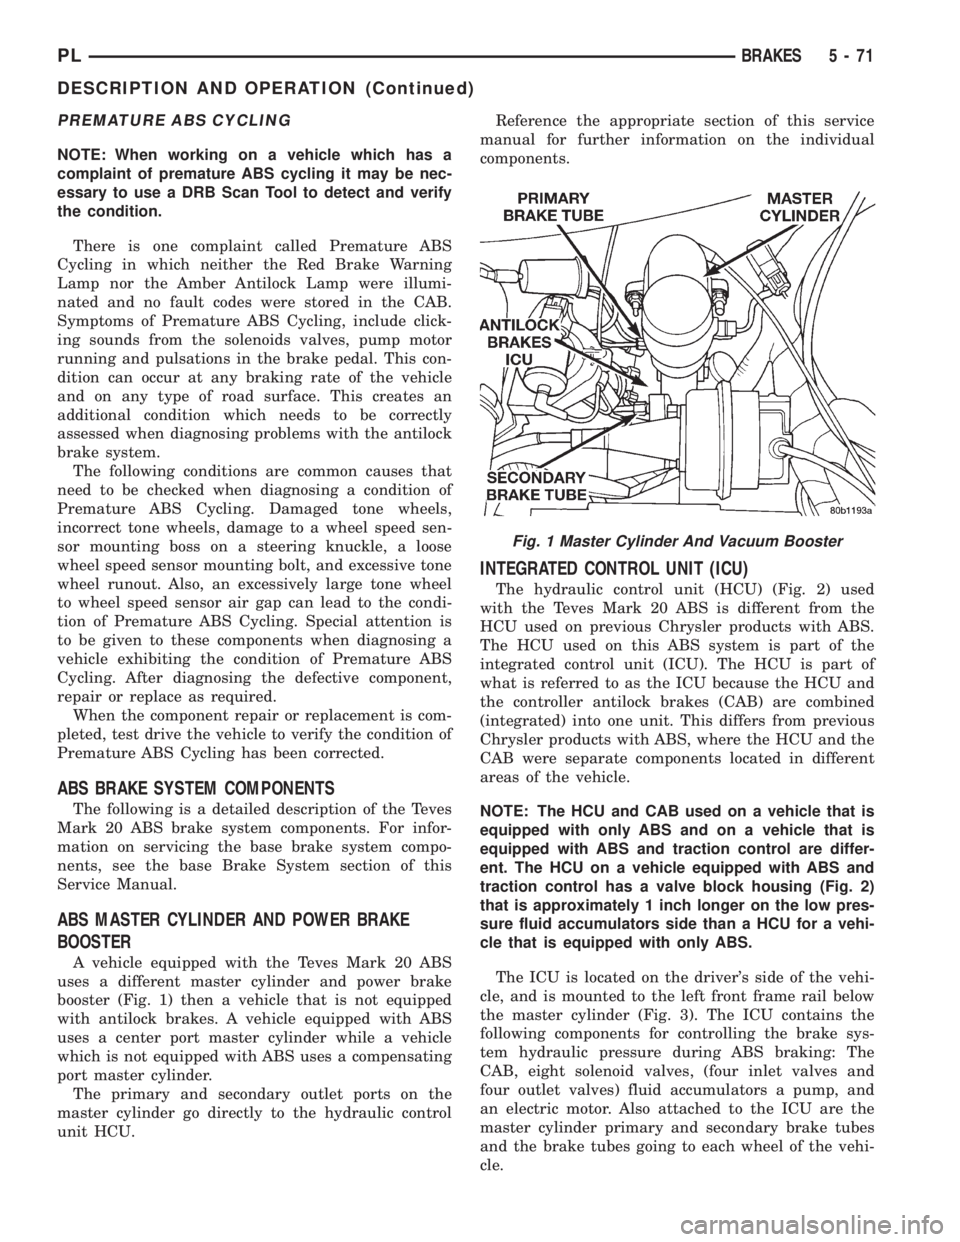
A vehicle equipped with the Teves Mark 20 ABS
uses a different master cylinder and power brake
booster (Fig. 1) then a vehicle that is not equipped
with antilock brakes. A vehicle equipped with ABS
uses a center port master cylinder while a vehicle
which is not equipped with ABS uses a compensating
port master cylinder.
The primary and secondary outlet ports on the
master cylinder go directly to the hydraulic control
unit HCU.Reference the appropriate section of this service
manual for further information on the individual
components.
INTEGRATED CONTROL UNIT (ICU)
The hydraulic control unit (HCU) (Fig. 2) used
with the Teves Mark 20 ABS is different from the
HCU used on previous Chrysler products with ABS.
The HCU used on this ABS system is part of the
integrated control unit (ICU). The HCU is part of
what is referred to as the ICU because the HCU and
the controller antilock brakes (CAB) are combined
(integrated) into one unit. This differs from previous
Chrysler products with ABS, where the HCU and the
CAB were separate components located in different
areas of the vehicle.
NOTE: The HCU and CAB used on a vehicle that is
equipped with only ABS and on a vehicle that is
equipped with ABS and traction control are differ-
ent. The HCU on a vehicle equipped with ABS and
traction control has a valve block housing (Fig. 2)
that is approximately 1 inch longer on the low pres-
sure fluid accumulators side than a HCU for a vehi-
cle that is equipped with only ABS.
The ICU is located on the driver's side of the vehi-
cle, and is mounted to the left front frame rail below
the master cylinder (Fig. 3). The ICU contains the
following components for controlling the brake sys-
tem hydraulic pressure during ABS braking: The
CAB, eight solenoid valves, (four inlet valves and
four outlet valves) fluid accumulators a pump, and
an electric motor. Also attached to the ICU are the
master cylinder primary and secondary brake tubes
and the brake tubes going to each wheel of the vehi-
cle.
Fig. 1 Master Cylinder And Vacuum Booster
PLBRAKES 5 - 71
DESCRIPTION AND OPERATION (Continued)
Page 154 of 1200
ABS FUSES
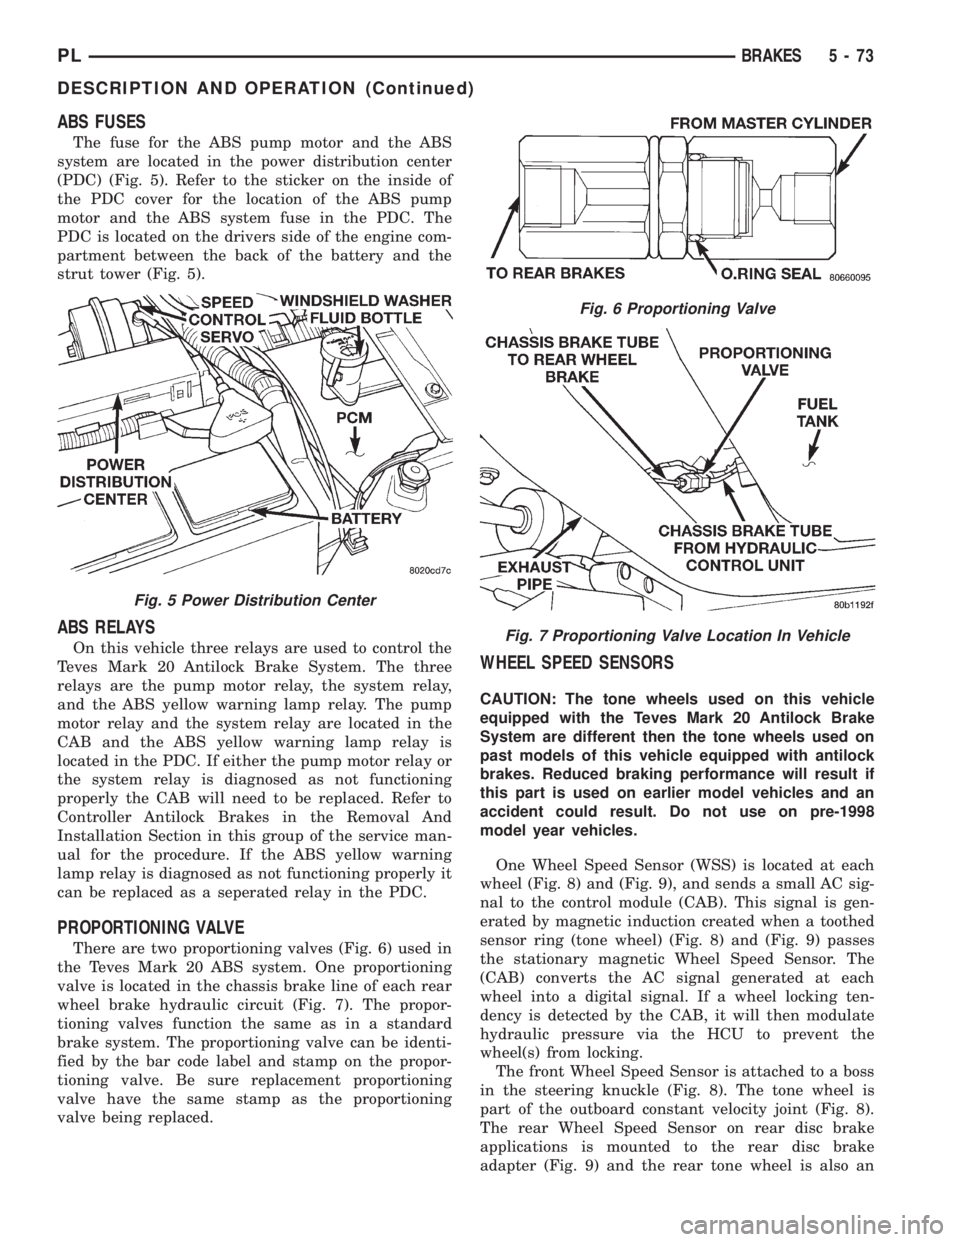
The fuse for the ABS pump motor and the ABS
system are located in the power distribution center
(PDC) (Fig. 5). Refer to the sticker on the inside of
the PDC cover for the location of the ABS pump
motor and the ABS system fuse in the PDC. The
PDC is located on the drivers side of the engine com-
partment between the back of the battery and the
strut tower (Fig. 5).
ABS RELAYS
On this vehicle three relays are used to control the
Teves Mark 20 Antilock Brake System. The three
relays are the pump motor relay, the system relay,
and the ABS yellow warning lamp relay. The pump
motor relay and the system relay are located in the
CAB and the ABS yellow warning lamp relay is
located in the PDC. If either the pump motor relay or
the system relay is diagnosed as not functioning
properly the CAB will need to be replaced. Refer to
Controller Antilock Brakes in the Removal And
Installation Section in this group of the service man-
ual for the procedure. If the ABS yellow warning
lamp relay is diagnosed as not functioning properly it
can be replaced as a seperated relay in the PDC.
PROPORTIONING VALVE
There are two proportioning valves (Fig. 6) used in
the Teves Mark 20 ABS system. One proportioning
valve is located in the chassis brake line of each rear
wheel brake hydraulic circuit (Fig. 7). The propor-
tioning valves function the same as in a standard
brake system. The proportioning valve can be identi-
fied by the bar code label and stamp on the propor-
tioning valve. Be sure replacement proportioning
valve have the same stamp as the proportioning
valve being replaced.
WHEEL SPEED SENSORS
CAUTION: The tone wheels used on this vehicle
equipped with the Teves Mark 20 Antilock Brake
System are different then the tone wheels used on
past models of this vehicle equipped with antilock
brakes. Reduced braking performance will result if
this part is used on earlier model vehicles and an
accident could result. Do not use on pre-1998
model year vehicles.
One Wheel Speed Sensor (WSS) is located at each
wheel (Fig. 8) and (Fig. 9), and sends a small AC sig-
nal to the control module (CAB). This signal is gen-
erated by magnetic induction created when a toothed
sensor ring (tone wheel) (Fig. 8) and (Fig. 9) passes
the stationary magnetic Wheel Speed Sensor. The
(CAB) converts the AC signal generated at each
wheel into a digital signal. If a wheel locking ten-
dency is detected by the CAB, it will then modulate
hydraulic pressure via the HCU to prevent the
wheel(s) from locking.
The front Wheel Speed Sensor is attached to a boss
in the steering knuckle (Fig. 8). The tone wheel is
part of the outboard constant velocity joint (Fig. 8).
The rear Wheel Speed Sensor on rear disc brake
applications is mounted to the rear disc brake
adapter (Fig. 9) and the rear tone wheel is also an
Fig. 5 Power Distribution Center
Fig. 6 Proportioning Valve
Fig. 7 Proportioning Valve Location In Vehicle
PLBRAKES 5 - 73
DESCRIPTION AND OPERATION (Continued)