1999 DODGE NEON check engine
[x] Cancel search: check enginePage 773 of 1200
incorporates main bearing caps. Rear seal retainer is
integral with the block.
CRANKSHAFTA nodular cast iron crankshaft is
used. The engine has 5 main bearings, with number
3 flanged to control thrust. The 52 mm diameter
main and 48 mm diameter crank pin journals (all)
have undercut fillet radiuses that are deep rolled for
added strength. To optimize bearing loading 8 coun-
terweights are used. Hydrodynamic seals provide end
sealing, where the crankshaft exits the block.
Anaerobic gasket material is used for parting line
sealing. A sintered iron timing belt sprocket is
mounted on the crankshaft nose. This sprocket pro-
vides motive power; via timing belt to the camshaft
sprocket providing timed valve actuation.
PISTONSThe DOHC EngineDO NOThave pro-
vision for a free wheeling valve train. Non free
wheeling valve train means, in the event of a broken
timing belt Pistons will contact the Valves. All
engines use pressed-in piston pins to attach forged
powdered metal connecting rods. The connecting rods
are a cracked cap design and are not repairable. Hex
head cap screw are used to provide alignment and
durability in the assembly.
PISTON RINGSThe piston rings include a
molybdenum faced top ring for reliable compression
sealing and a taper faced intermediate ring for addi-
tional cylinder pressure control. Oil Control Ring
Package contains of 2 steel rails and a expander
spacer.
CYLINDER HEADFeatures a Dual Over Head
Camshaft (DOHC), 4 valves per cylinder cross flow
design. The valves are arranged in two in-line banks,
with the ports of the bank of two intake valves per
cylinder facing toward the radiator side of engine
and ports of the bank of two exhaust valves per cyl-
inder facing toward the dash panel. Incorporates
powder metal valve guides and seats. Integral oil gal-
leys within the cylinder head supplies oil to the
hydraulic lash adjusters, camshaft and valve mecha-
nisms.
CAMSHAFTSThe nodular iron camshafts have
six bearing journals and 2 cam lobes per cylinder.
Flanges at the rear journals control camshaft end
play. Provision for cam position sensor is located on
the intake camshaft at the rear of cylinder head. A
hydrodynamic oil seal is used for oil control at the
front of the camshaft.
VA LV E SFour valves per cylinder are actuated by
roller cam followers which pivot on stationary
hydraulic lash adjusters. All valves have 6 mm diam-
eter chrome plated valve stems. The valve sizes are
34.8 mm (1.370 inch.) diameter intake valves and
30.5 mm (1.20 inch.) diameter exhaust valves. Viton
rubber valve stem seals are integral with the springseats. Valve springs, spring retainers, and locks are
conventional.
INTAKE MANIFOLDThe intake manifold is a
two piece aluminum casting, attached to the cylinder
head with ten fasteners. This long branch fan design
enhances low and mid-speed torque.
EXHAUST MANIFOLDThe exhaust manifold is
made of nodular cast iron for strength and high tem-
peratures. Exhaust gasses exit through a machined,
articulated joint connection to the exhaust pipe.
COMPONENT REPLACEMENT
If any of the following parts have been changed or
replaced:
²Camshaft
²Camshaft Position Sensor
²Camshaft Position Sensor Target Magnet
²Cylinder Block
²Cylinder Head
²Water Pump
²Powertrain Control Module (PCM)
²Timing Belt and Timing Belt Tensioner
The camshaft and crankshaft timing relearn proce-
dure must be performed. Refer to the component
Removal and Installation procedure outlined in this
Group.
DIAGNOSIS AND TESTING
CHECKING ENGINE OIL PRESSURE
(1) Remove oil pressure switch and install gauge
assembly C-3292 with adaptor.
(2) Run engine until thermostat opens.
CAUTION: If oil pressure is 0 at idle, Do Not per-
form the 3000 RPM test in the next step.
(3) Oil Pressure:Curb Idle25 kPa (4 psi) mini-
mum3000 RPM170-550 kPa (25-80 psi).
(4) If oil pressure is 0 at idle. Shut off engine,
check for pressure relief valve stuck open, a clogged
oil pick-up screen or a damaged oil pick-up tube
O-ring.
SERVICE PROCEDURES
CYLINDER BORE AND PISTON SIZING
The cylinder walls should be checked for out-of-
round and taper with Tool C-119 (Fig. 4). The cylin-
der bore out-of-round is 0.050 mm (.002 inch)
maximum and cylinder bore taper is 0.051 mm (0.002
inch) maximum. If the cylinder walls are badly
scuffed or scored, the cylinder block should be
rebored and honed, and new pistons and rings fitted.
Whatever type of boring equipment is used, boring
and honing operation should be closely coordinated
9 - 60 2.0L DOHC ENGINEPL
DESCRIPTION AND OPERATION (Continued)
Page 774 of 1200
with the fitting of pistons and rings in order that
specified clearances may be maintained.Refer to
Honing Cylinder Bores outlined in the Stan-
dard Service Procedures for specification and
procedures.
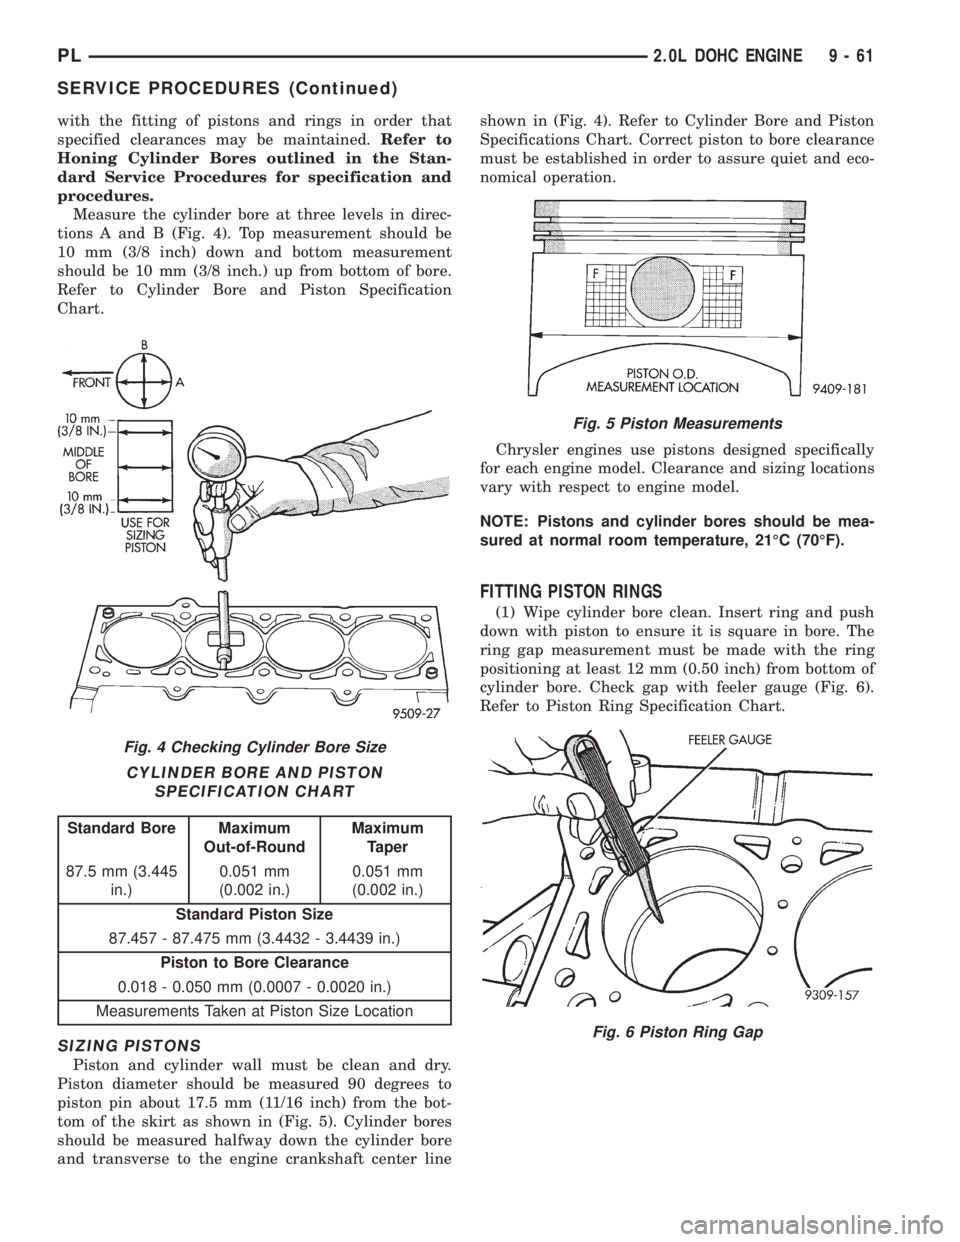
Measure the cylinder bore at three levels in direc-
tions A and B (Fig. 4). Top measurement should be
10 mm (3/8 inch) down and bottom measurement
should be 10 mm (3/8 inch.) up from bottom of bore.
Refer to Cylinder Bore and Piston Specification
Chart.
SIZING PISTONS
Piston and cylinder wall must be clean and dry.
Piston diameter should be measured 90 degrees to
piston pin about 17.5 mm (11/16 inch) from the bot-
tom of the skirt as shown in (Fig. 5). Cylinder bores
should be measured halfway down the cylinder bore
and transverse to the engine crankshaft center lineshown in (Fig. 4). Refer to Cylinder Bore and Piston
Specifications Chart. Correct piston to bore clearance
must be established in order to assure quiet and eco-
nomical operation.
Chrysler engines use pistons designed specifically
for each engine model. Clearance and sizing locations
vary with respect to engine model.
NOTE: Pistons and cylinder bores should be mea-
sured at normal room temperature, 21ÉC (70ÉF).
FITTING PISTON RINGS
(1) Wipe cylinder bore clean. Insert ring and push
down with piston to ensure it is square in bore. The
ring gap measurement must be made with the ring
positioning at least 12 mm (0.50 inch) from bottom of
cylinder bore. Check gap with feeler gauge (Fig. 6).
Refer to Piston Ring Specification Chart.
Fig. 4 Checking Cylinder Bore Size
CYLINDER BORE AND PISTON
SPECIFICATION CHART
Standard Bore Maximum
Out-of-RoundMaximum
Taper
87.5 mm (3.445
in.)0.051 mm
(0.002 in.)0.051 mm
(0.002 in.)
Standard Piston Size
87.457 - 87.475 mm (3.4432 - 3.4439 in.)
Piston to Bore Clearance
0.018 - 0.050 mm (0.0007 - 0.0020 in.)
Measurements Taken at Piston Size Location
Fig. 5 Piston Measurements
Fig. 6 Piston Ring Gap
PL2.0L DOHC ENGINE 9 - 61
SERVICE PROCEDURES (Continued)
Page 775 of 1200
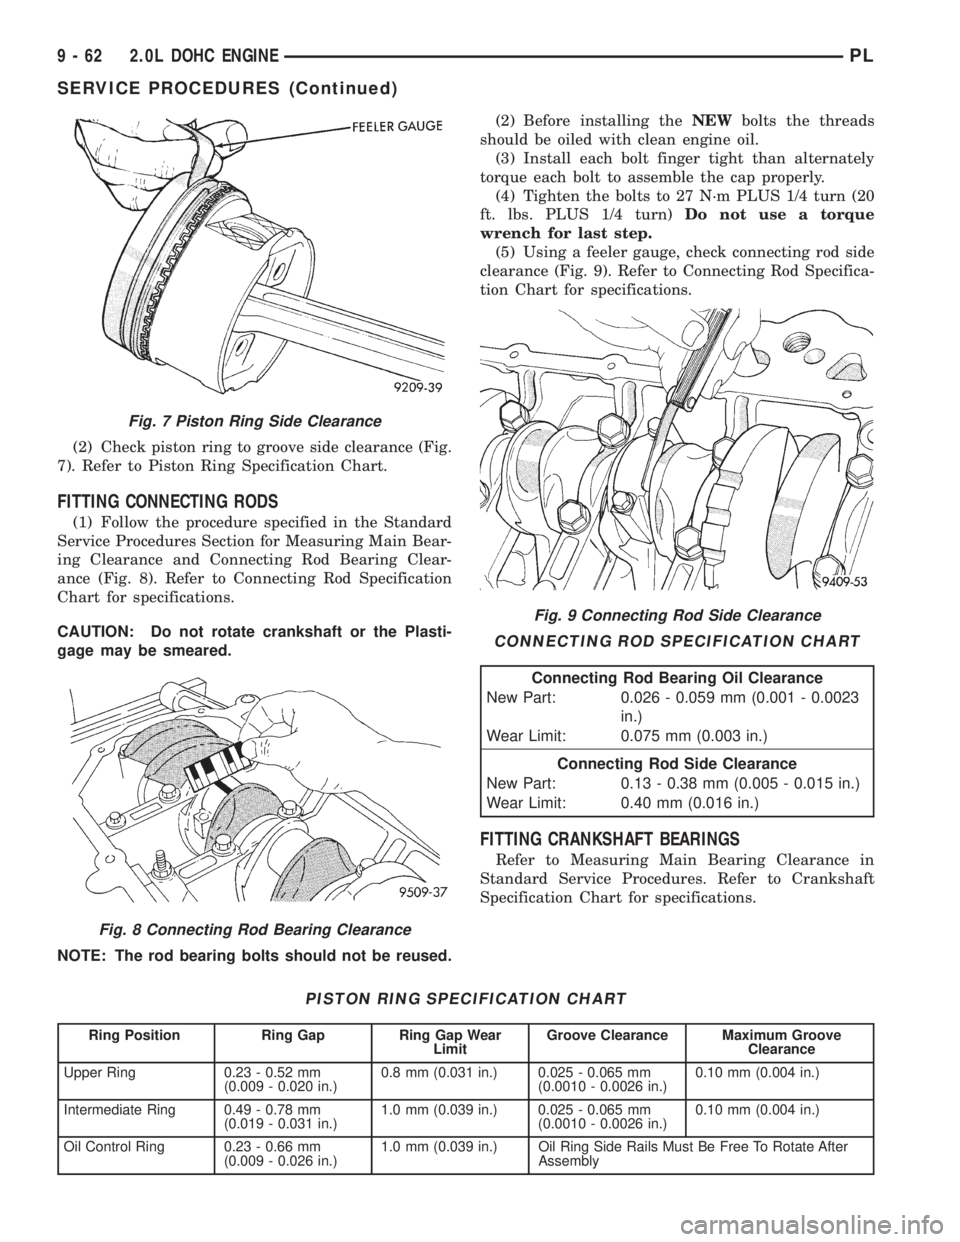
(2) Check piston ring to groove side clearance (Fig.
7). Refer to Piston Ring Specification Chart.
FITTING CONNECTING RODS
(1) Follow the procedure specified in the Standard
Service Procedures Section for Measuring Main Bear-
ing Clearance and Connecting Rod Bearing Clear-
ance (Fig. 8). Refer to Connecting Rod Specification
Chart for specifications.
CAUTION: Do not rotate crankshaft or the Plasti-
gage may be smeared.
NOTE: The rod bearing bolts should not be reused.(2) Before installing theNEWbolts the threads
should be oiled with clean engine oil.
(3) Install each bolt finger tight than alternately
torque each bolt to assemble the cap properly.
(4) Tighten the bolts to 27 N´m PLUS 1/4 turn (20
ft. lbs. PLUS 1/4 turn)Do not use a torque
wrench for last step.
(5) Using a feeler gauge, check connecting rod side
clearance (Fig. 9). Refer to Connecting Rod Specifica-
tion Chart for specifications.
FITTING CRANKSHAFT BEARINGS
Refer to Measuring Main Bearing Clearance in
Standard Service Procedures. Refer to Crankshaft
Specification Chart for specifications.
Fig. 7 Piston Ring Side Clearance
PISTON RING SPECIFICATION CHART
Ring Position Ring Gap Ring Gap Wear
LimitGroove Clearance Maximum Groove
Clearance
Upper Ring 0.23 - 0.52 mm
(0.009 - 0.020 in.)0.8 mm (0.031 in.) 0.025 - 0.065 mm
(0.0010 - 0.0026 in.)0.10 mm (0.004 in.)
Intermediate Ring 0.49 - 0.78 mm
(0.019 - 0.031 in.)1.0 mm (0.039 in.) 0.025 - 0.065 mm
(0.0010 - 0.0026 in.)0.10 mm (0.004 in.)
Oil Control Ring 0.23 - 0.66 mm
(0.009 - 0.026 in.)1.0 mm (0.039 in.) Oil Ring Side Rails Must Be Free To Rotate After
Assembly
Fig. 8 Connecting Rod Bearing Clearance
Fig. 9 Connecting Rod Side Clearance
CONNECTING ROD SPECIFICATION CHART
Connecting Rod Bearing Oil Clearance
New Part: 0.026 - 0.059 mm (0.001 - 0.0023
in.)
Wear Limit: 0.075 mm (0.003 in.)
Connecting Rod Side Clearance
New Part: 0.13 - 0.38 mm (0.005 - 0.015 in.)
Wear Limit: 0.40 mm (0.016 in.)
9 - 62 2.0L DOHC ENGINEPL
SERVICE PROCEDURES (Continued)
Page 776 of 1200
CRANKSHAFT END PLAY
DIAL INDICATOR METHOD
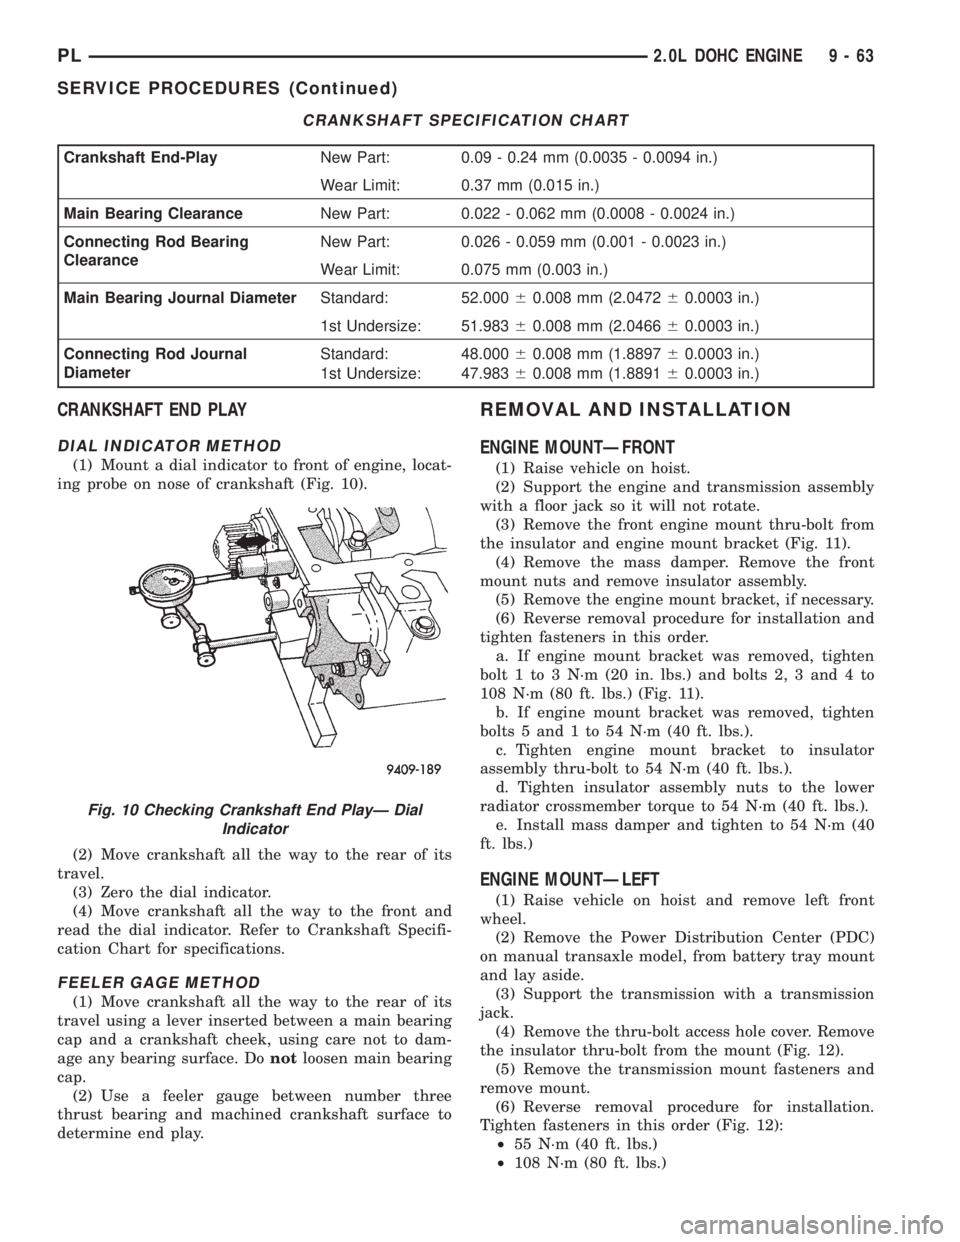
(1) Mount a dial indicator to front of engine, locat-
ing probe on nose of crankshaft (Fig. 10).
(2) Move crankshaft all the way to the rear of its
travel.
(3) Zero the dial indicator.
(4) Move crankshaft all the way to the front and
read the dial indicator. Refer to Crankshaft Specifi-
cation Chart for specifications.
FEELER GAGE METHOD
(1) Move crankshaft all the way to the rear of its
travel using a lever inserted between a main bearing
cap and a crankshaft cheek, using care not to dam-
age any bearing surface. Donotloosen main bearing
cap.
(2) Use a feeler gauge between number three
thrust bearing and machined crankshaft surface to
determine end play.
REMOVAL AND INSTALLATION
ENGINE MOUNTÐFRONT
(1) Raise vehicle on hoist.
(2) Support the engine and transmission assembly
with a floor jack so it will not rotate.
(3) Remove the front engine mount thru-bolt from
the insulator and engine mount bracket (Fig. 11).
(4) Remove the mass damper. Remove the front
mount nuts and remove insulator assembly.
(5) Remove the engine mount bracket, if necessary.
(6) Reverse removal procedure for installation and
tighten fasteners in this order.
a. If engine mount bracket was removed, tighten
bolt 1 to 3 N´m (20 in. lbs.) and bolts 2, 3 and 4 to
108 N´m (80 ft. lbs.) (Fig. 11).
b. If engine mount bracket was removed, tighten
bolts 5 and 1 to 54 N´m (40 ft. lbs.).
c. Tighten engine mount bracket to insulator
assembly thru-bolt to 54 N´m (40 ft. lbs.).
d. Tighten insulator assembly nuts to the lower
radiator crossmember torque to 54 N´m (40 ft. lbs.).
e. Install mass damper and tighten to 54 N´m (40
ft. lbs.)
ENGINE MOUNTÐLEFT
(1) Raise vehicle on hoist and remove left front
wheel.
(2) Remove the Power Distribution Center (PDC)
on manual transaxle model, from battery tray mount
and lay aside.
(3) Support the transmission with a transmission
jack.
(4) Remove the thru-bolt access hole cover. Remove
the insulator thru-bolt from the mount (Fig. 12).
(5) Remove the transmission mount fasteners and
remove mount.
(6) Reverse removal procedure for installation.
Tighten fasteners in this order (Fig. 12):
²55 N´m (40 ft. lbs.)
²108 N´m (80 ft. lbs.)
CRANKSHAFT SPECIFICATION CHART
Crankshaft End-PlayNew Part: 0.09 - 0.24 mm (0.0035 - 0.0094 in.)
Wear Limit: 0.37 mm (0.015 in.)
Main Bearing ClearanceNew Part: 0.022 - 0.062 mm (0.0008 - 0.0024 in.)
Connecting Rod Bearing
ClearanceNew Part: 0.026 - 0.059 mm (0.001 - 0.0023 in.)
Wear Limit: 0.075 mm (0.003 in.)
Main Bearing Journal DiameterStandard: 52.00060.008 mm (2.047260.0003 in.)
1st Undersize: 51.98360.008 mm (2.046660.0003 in.)
Connecting Rod Journal
DiameterStandard: 48.00060.008 mm (1.889760.0003 in.)
1st Undersize: 47.98360.008 mm (1.889160.0003 in.)
Fig. 10 Checking Crankshaft End PlayÐ Dial
Indicator
PL2.0L DOHC ENGINE 9 - 63
SERVICE PROCEDURES (Continued)
Page 781 of 1200
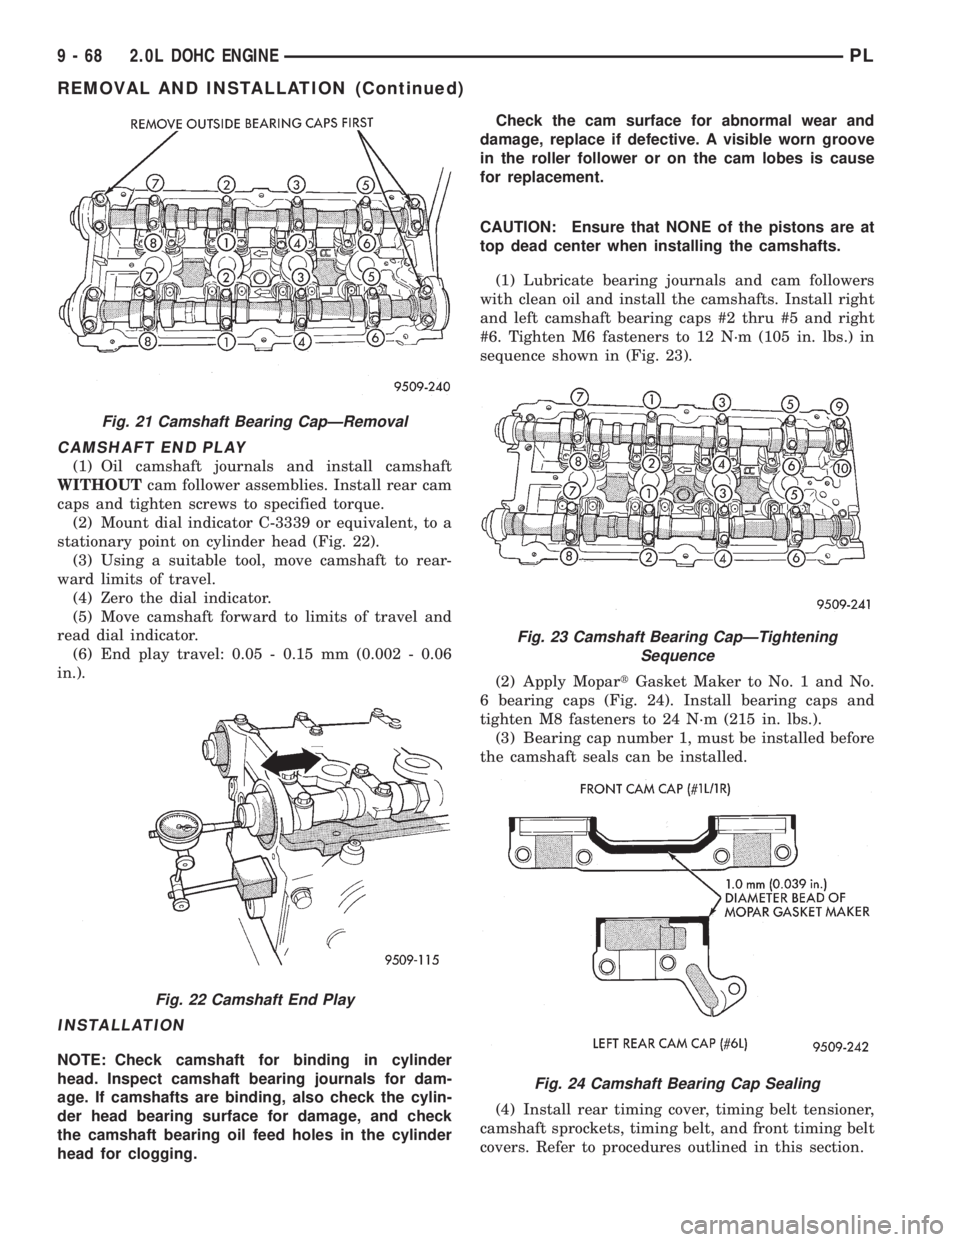
CAMSHAFT END PLAY
(1) Oil camshaft journals and install camshaft
WITHOUTcam follower assemblies. Install rear cam
caps and tighten screws to specified torque.
(2) Mount dial indicator C-3339 or equivalent, to a
stationary point on cylinder head (Fig. 22).
(3) Using a suitable tool, move camshaft to rear-
ward limits of travel.
(4) Zero the dial indicator.
(5) Move camshaft forward to limits of travel and
read dial indicator.
(6) End play travel: 0.05 - 0.15 mm (0.002 - 0.06
in.).
INSTALLATION
NOTE: Check camshaft for binding in cylinder
head. Inspect camshaft bearing journals for dam-
age. If camshafts are binding, also check the cylin-
der head bearing surface for damage, and check
the camshaft bearing oil feed holes in the cylinder
head for clogging.Check the cam surface for abnormal wear and
damage, replace if defective. A visible worn groove
in the roller follower or on the cam lobes is cause
for replacement.
CAUTION: Ensure that NONE of the pistons are at
top dead center when installing the camshafts.
(1) Lubricate bearing journals and cam followers
with clean oil and install the camshafts. Install right
and left camshaft bearing caps #2 thru #5 and right
#6. Tighten M6 fasteners to 12 N´m (105 in. lbs.) in
sequence shown in (Fig. 23).
(2) Apply MopartGasket Maker to No. 1 and No.
6 bearing caps (Fig. 24). Install bearing caps and
tighten M8 fasteners to 24 N´m (215 in. lbs.).
(3) Bearing cap number 1, must be installed before
the camshaft seals can be installed.
(4) Install rear timing cover, timing belt tensioner,
camshaft sprockets, timing belt, and front timing belt
covers. Refer to procedures outlined in this section.
Fig. 21 Camshaft Bearing CapÐRemoval
Fig. 22 Camshaft End Play
Fig. 23 Camshaft Bearing CapÐTightening
Sequence
Fig. 24 Camshaft Bearing Cap Sealing
9 - 68 2.0L DOHC ENGINEPL
REMOVAL AND INSTALLATION (Continued)
Page 785 of 1200
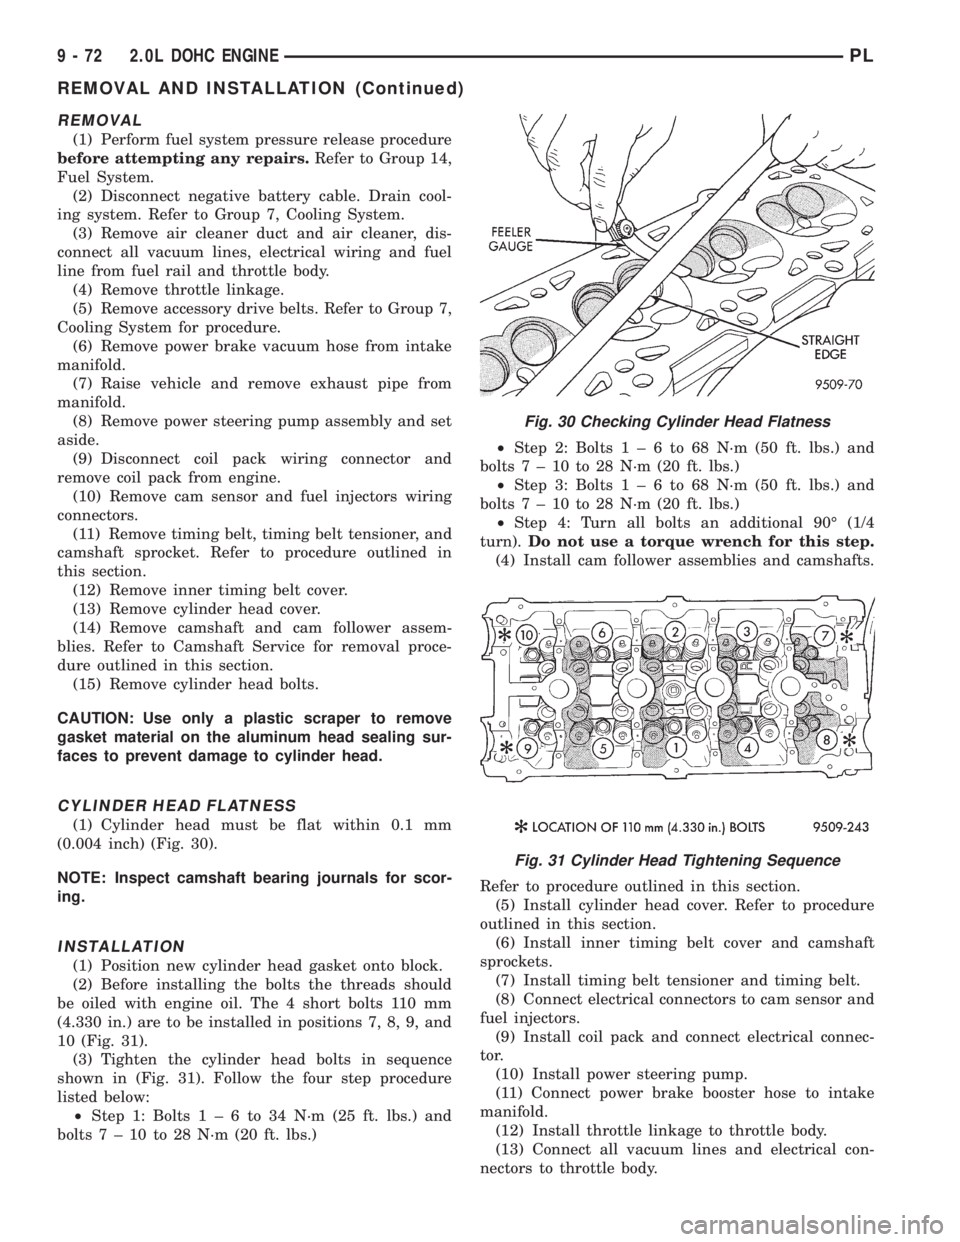
REMOVAL
(1) Perform fuel system pressure release procedure
before attempting any repairs.Refer to Group 14,
Fuel System.
(2) Disconnect negative battery cable. Drain cool-
ing system. Refer to Group 7, Cooling System.
(3) Remove air cleaner duct and air cleaner, dis-
connect all vacuum lines, electrical wiring and fuel
line from fuel rail and throttle body.
(4) Remove throttle linkage.
(5) Remove accessory drive belts. Refer to Group 7,
Cooling System for procedure.
(6) Remove power brake vacuum hose from intake
manifold.
(7) Raise vehicle and remove exhaust pipe from
manifold.
(8) Remove power steering pump assembly and set
aside.
(9) Disconnect coil pack wiring connector and
remove coil pack from engine.
(10) Remove cam sensor and fuel injectors wiring
connectors.
(11) Remove timing belt, timing belt tensioner, and
camshaft sprocket. Refer to procedure outlined in
this section.
(12) Remove inner timing belt cover.
(13) Remove cylinder head cover.
(14) Remove camshaft and cam follower assem-
blies. Refer to Camshaft Service for removal proce-
dure outlined in this section.
(15) Remove cylinder head bolts.
CAUTION: Use only a plastic scraper to remove
gasket material on the aluminum head sealing sur-
faces to prevent damage to cylinder head.
CYLINDER HEAD FLATNESS
(1) Cylinder head must be flat within 0.1 mm
(0.004 inch) (Fig. 30).
NOTE: Inspect camshaft bearing journals for scor-
ing.
INSTALLATION
(1) Position new cylinder head gasket onto block.
(2) Before installing the bolts the threads should
be oiled with engine oil. The 4 short bolts 110 mm
(4.330 in.) are to be installed in positions 7, 8, 9, and
10 (Fig. 31).
(3) Tighten the cylinder head bolts in sequence
shown in (Fig. 31). Follow the four step procedure
listed below:
²Step 1: Bolts1±6to34N´m(25ft.lbs.) and
bolts7±10to28N´m(20ft.lbs.)²Step 2: Bolts1±6to68N´m(50ft.lbs.) and
bolts7±10to28N´m(20ft.lbs.)
²Step 3: Bolts1±6to68N´m(50ft.lbs.) and
bolts7±10to28N´m(20ft.lbs.)
²Step 4: Turn all bolts an additional 90É (1/4
turn).Do not use a torque wrench for this step.
(4) Install cam follower assemblies and camshafts.
Refer to procedure outlined in this section.
(5) Install cylinder head cover. Refer to procedure
outlined in this section.
(6) Install inner timing belt cover and camshaft
sprockets.
(7) Install timing belt tensioner and timing belt.
(8) Connect electrical connectors to cam sensor and
fuel injectors.
(9) Install coil pack and connect electrical connec-
tor.
(10) Install power steering pump.
(11) Connect power brake booster hose to intake
manifold.
(12) Install throttle linkage to throttle body.
(13) Connect all vacuum lines and electrical con-
nectors to throttle body.
Fig. 30 Checking Cylinder Head Flatness
Fig. 31 Cylinder Head Tightening Sequence
9 - 72 2.0L DOHC ENGINEPL
REMOVAL AND INSTALLATION (Continued)
Page 786 of 1200
(14) Connect fuel supply hose to fuel rail.
(15) Install air cleaner duct and air cleaner.
(16) Install accessory drive belts. Refer to Group
07, Cooling System for procedures.
(17) Raise vehicle and connect exhaust system to
exhaust manifold.
(18) Lower vehicle and connect negative cable to
battery.
(19) With DRB scan tool use ASD Fuel System
Test to pressurize fuel system. Check for fuel leaks.
CAUTION: When using the ASD Fuel System Test,
the Auto Shutdown (ASD) relay will remain ener-
gized for 7 minutes, or until the ignition switch is
turned to the OFF position, or Stop All Test is
selected.
(20) Perform camshaft and crankshaft timing
relearn procedure as follows:
²Step 1: Connect the DRB scan tool to the data
link (diagnostic) connector. This connector is located
in the passenger compartment; at the lower edge of
instrument panel; near the steering column.
²Step 2: Turn the ignition switch on and access
the ªmiscellaneousº screen.
²Step 3: Select re-learn cam/crank option and fol-
low directions on DRB screen.
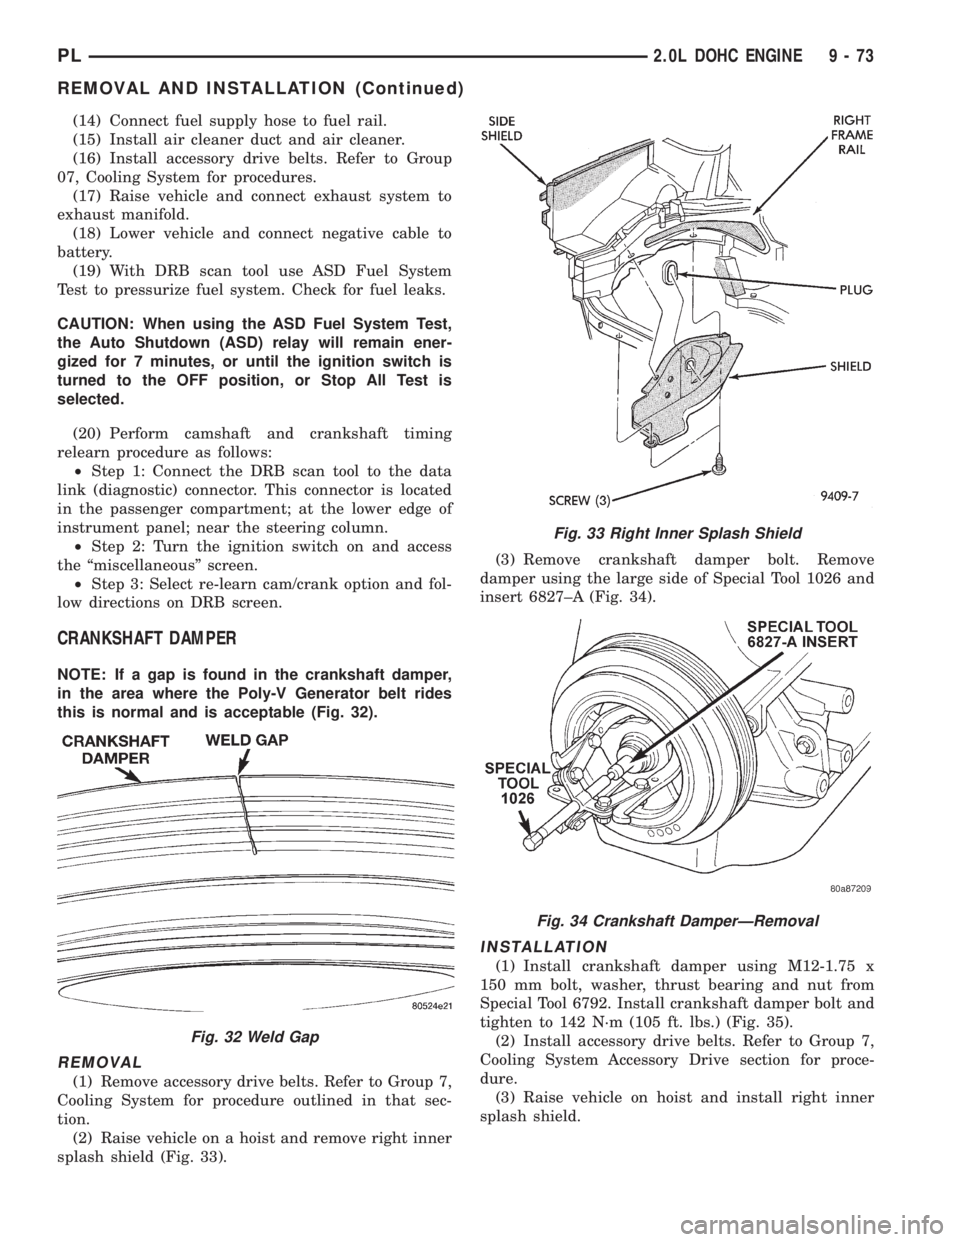
CRANKSHAFT DAMPER
NOTE: If a gap is found in the crankshaft damper,
in the area where the Poly-V Generator belt rides
this is normal and is acceptable (Fig. 32).
REMOVAL
(1) Remove accessory drive belts. Refer to Group 7,
Cooling System for procedure outlined in that sec-
tion.
(2) Raise vehicle on a hoist and remove right inner
splash shield (Fig. 33).(3) Remove crankshaft damper bolt. Remove
damper using the large side of Special Tool 1026 and
insert 6827±A (Fig. 34).
INSTALLATION
(1) Install crankshaft damper using M12-1.75 x
150 mm bolt, washer, thrust bearing and nut from
Special Tool 6792. Install crankshaft damper bolt and
tighten to 142 N´m (105 ft. lbs.) (Fig. 35).
(2) Install accessory drive belts. Refer to Group 7,
Cooling System Accessory Drive section for proce-
dure.
(3) Raise vehicle on hoist and install right inner
splash shield.
Fig. 32 Weld Gap
Fig. 33 Right Inner Splash Shield
Fig. 34 Crankshaft DamperÐRemoval
PL2.0L DOHC ENGINE 9 - 73
REMOVAL AND INSTALLATION (Continued)
Page 788 of 1200
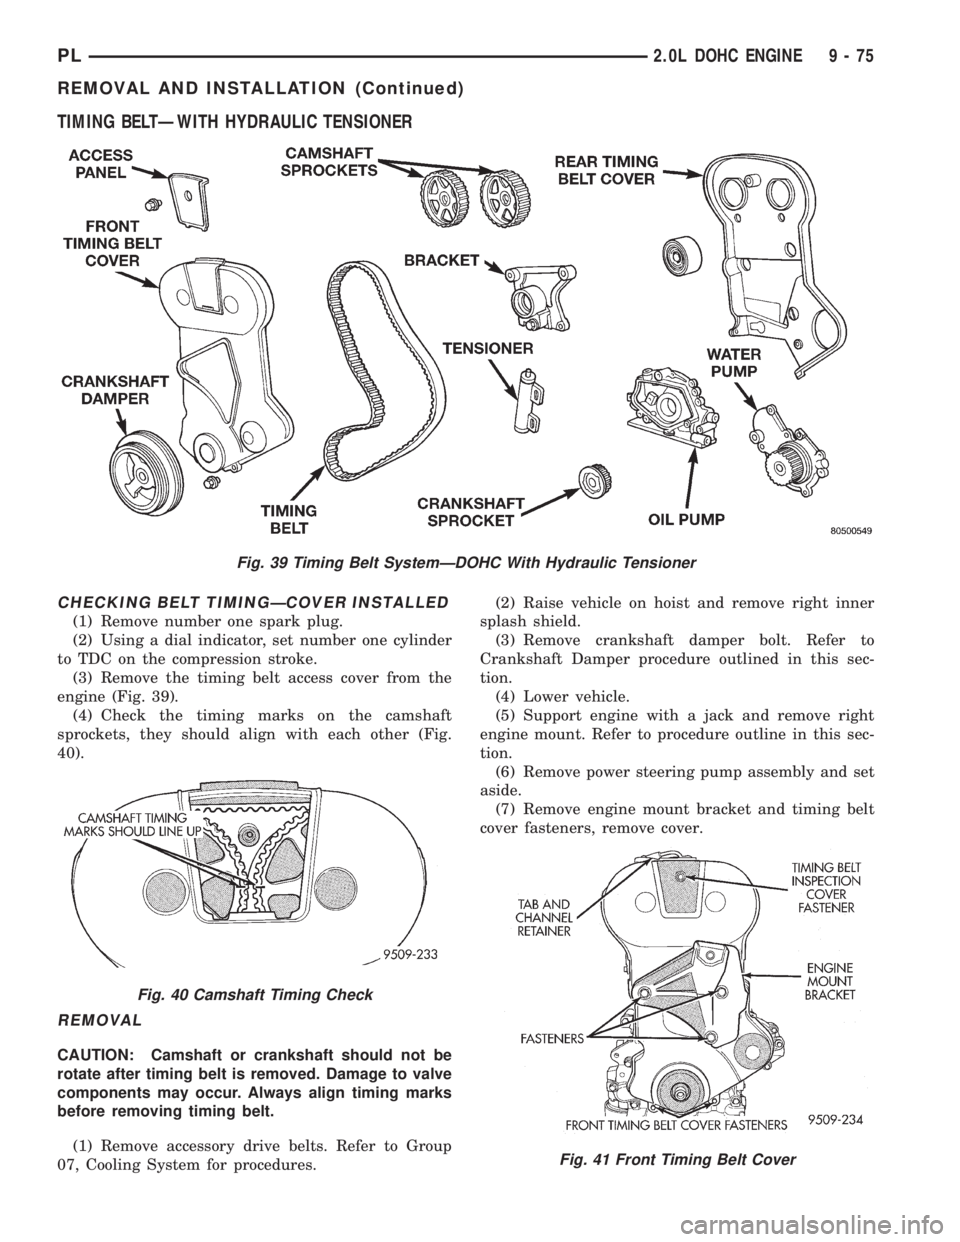
TIMING BELTÐWITH HYDRAULIC TENSIONER
CHECKING BELT TIMINGÐCOVER INSTALLED
(1) Remove number one spark plug.
(2) Using a dial indicator, set number one cylinder
to TDC on the compression stroke.
(3) Remove the timing belt access cover from the
engine (Fig. 39).
(4) Check the timing marks on the camshaft
sprockets, they should align with each other (Fig.
40).
REMOVAL
CAUTION: Camshaft or crankshaft should not be
rotate after timing belt is removed. Damage to valve
components may occur. Always align timing marks
before removing timing belt.
(1) Remove accessory drive belts. Refer to Group
07, Cooling System for procedures.(2) Raise vehicle on hoist and remove right inner
splash shield.
(3) Remove crankshaft damper bolt. Refer to
Crankshaft Damper procedure outlined in this sec-
tion.
(4) Lower vehicle.
(5) Support engine with a jack and remove right
engine mount. Refer to procedure outline in this sec-
tion.
(6) Remove power steering pump assembly and set
aside.
(7) Remove engine mount bracket and timing belt
cover fasteners, remove cover.
Fig. 39 Timing Belt SystemÐDOHC With Hydraulic Tensioner
Fig. 40 Camshaft Timing Check
Fig. 41 Front Timing Belt Cover
PL2.0L DOHC ENGINE 9 - 75
REMOVAL AND INSTALLATION (Continued)