Page 193 of 328

6-
yellowblue
6-1
Section 6 Service and Appearance Care
Here you will find information about the care of your vehicle. This section begins with service and fuel information,
and then it shows how to check important fluid and lubricant levels. There is also technical information about your
vehicle, and a part devoted to its appearance care.
6
-2 Service
6
-3 Fuel
6
-5 Fuels in Foreign Countries
6
-5 Filling Your Tank
6
-8 Filling a Portable Fuel Container
6
-8 Checking Things Under the Hood
6
-13 Engine Oil
6
-17 Engine Air Cleaner/Filter
6
-20 Automatic Transaxle Fluid
6
-23 Manual Transaxle Fluid
6
-24 Clutch Adjustment
6
-24 Radiator Pressure Cap
6
-25 Thermostat
6
-25 Engine Coolant
6
-27 Power Steering Fluid
6
-28 Windshield Washer Fluid6
-29 Brakes
6
-33 Low Maintenance Battery
6
-34 Bulb Replacement
6
-35 Headlamp Aiming
6
-40 Tires
6
-48 Appearance Care
6
-48 Cleaning the Inside of Your Vehicle
6
-50 Care of the Safety Belts
6
-52 Cleaning the Outside of Your Vehicle
6
-54 Underbody Maintenance
6
-56 Vehicle Identification Number (VIN)
6
-57 Electrical System
6
-60 Replacement Bulbs
6
-60 Capacities and Specifications
6
-61 Air Conditioning Refrigerants
6
-61 Normal Maintenance Replacement Parts
Page 221 of 328
yellowblue
6-29
Open the cap with the washer symbol on it. Add washer
fluid until the tank is full.
NOTICE:
�When using concentrated washer fluid,
follow the manufacturer's instructions for
adding water.
�Don't mix water with ready
-to-use washer
fluid. Water can cause the solution to freeze
and damage your washer fluid tank and
other parts of the washer system. Also,
water doesn't clean as well as washer fluid.
�Fill your washer fluid tank only
three
-quarters full when it's very cold. This
allows for expansion if freezing occurs,
which could damage the tank if it is
completely full.
�Don't use engine coolant (antifreeze) in
your windshield washer. It can damage
your washer system and paint.
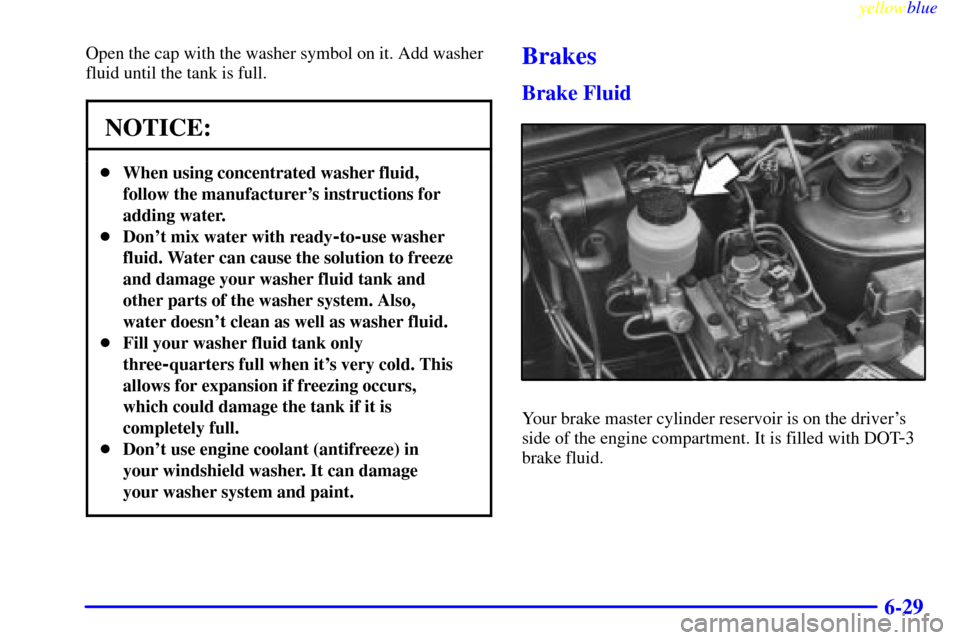
Brakes
Brake Fluid
Your brake master cylinder reservoir is on the driver's
side of the engine compartment. It is filled with DOT
-3
brake fluid.
Page 222 of 328

yellowblue
6-30
There are only two reasons why the brake fluid level in the
reservoir might go down. The first is that the brake fluid
goes down to an acceptable level during normal brake
lining wear. When new linings are put in, the fluid level
goes back up. The other reason is that fluid is leaking out
of the brake system. If it is, you should have your brake
system fixed, since a leak means that sooner or later your
brakes won't work well, or won't work at all.
So, it isn't a good idea to ªtop offº your brake fluid.
Adding brake fluid won't correct a leak. If you add fluid
when your linings are worn, then you'll have too much
fluid when you get new brake linings. You should add
(or remove) brake fluid, as necessary, only when work is
done on the brake hydraulic system.
CAUTION:
If you have too much brake fluid, it can spill on the
engine. The fluid will burn if the engine is hot
enough. You or others could be burned, and your
vehicle could be damaged. Add brake fluid only
when work is done on the brake hydraulic system.
When your brake fluid falls to a low level, your brake
warning light will come on. See ªBrake System Warning
Lightº in the Index.
Page 223 of 328

yellowblue
6-31
What to Add
When you do need brake fluid, use only DOT
-3 brake
fluid. Use new brake fluid from a sealed container only.
Refer to ªRecommended Fluids and Lubricantsº in the
Maintenance Schedule.
Always clean the brake fluid reservoir cap and the area
around the cap before removing it. This will help keep
dirt from entering the reservoir.
CAUTION:
With the wrong kind of fluid in your brake
system, your brakes may not work well, or they
may not even work at all. This could cause a
crash. Always use the proper brake fluid.
NOTICE:
�Using the wrong fluid can badly damage
brake system parts. For example, just a few
drops of mineral
-based oil, such as engine
oil, in your brake system can damage brake
system parts so badly that they'll have to be
replaced. Don't let someone put in the
wrong kind of fluid.
�If you spill brake fluid on your vehicle's
painted surfaces, the paint finish can be
damaged. Be careful not to spill brake fluid
on your vehicle. If you do, wash it off
immediately. See ªAppearance Careº in
the Index.
Page 224 of 328

yellowblue
6-32 Brake Wear
Your vehicle has front disc brakes and rear drum brakes.
Disc brake pads have built
-in wear indicators that make a
high
-pitched warning sound when the brake pads are worn
and new pads are needed. The sound may come and go or
be heard all the time your vehicle is moving (except when
you are pushing on the brake pedal firmly).
CAUTION:
The brake wear warning sound means that soon
your brakes won't work well. That could lead to
an accident. When you hear the brake wear
warning sound, have your vehicle serviced.
NOTICE:
Continuing to drive with worn-out brake pads
could result in costly brake repair.
Some driving conditions or climates may cause a brake
squeal when the brakes are first applied or lightly
applied. This does not mean something is wrong with
your brakes.
Properly torqued wheel nuts are necessary to help
prevent brake pulsation. When tires are rotated, inspect
brake pads for wear and evenly torque wheel nuts in the
proper sequence to GM specifications.
Your rear drum brakes don't have wear indicators, but if
you ever hear a rear brake rubbing noise, have the rear
brake linings inspected immediately. Also, the rear
brake drums should be removed and inspected each time
the tires are removed for rotation or changing. When
you have the front brake pads replaced, have the rear
brakes inspected, too.
Brake linings should always be replaced as complete
axle sets.
See ªBrake System Inspectionº in Section 7 of this manual
under Part C ªPeriodic Maintenance Inspections.º
Brake Pedal Travel
See your dealer if the brake pedal does not return to
normal height, or if there is a rapid increase in pedal
travel. This could be a sign of brake trouble.
Page 225 of 328

yellowblue
6-33 Brake Adjustment
Every time you make a moderate brake stop, your disc
brakes adjust for wear. If you rarely make a moderate or
heavier stop, then your brakes might not adjust correctly.
If you drive in that way, then
-- very carefully -- make
a few moderate brake stops about every 1,000 miles
(1 600 km), so your brakes will adjust properly.
Replacing Brake System Parts
The braking system on a vehicle is complex. Its many
parts have to be of top quality and work well together if
the vehicle is to have really good braking. Your vehicle
was designed and tested with top
-quality GM brake
parts. When you replace parts of your braking
system
-- for example, when your brake linings wear
down and you have to have new ones put in
-- be sure
you get new approved GM replacement parts. If you
don't, your brakes may no longer work properly. For
example, if someone puts in brake linings that are wrong
for your vehicle, the balance between your front and
rear brakes can change
-- for the worse. The braking
performance you've come to expect can change in many
other ways if someone puts in the wrong replacement
brake parts.
Low Maintenance Battery
The battery in your vehicle needs only periodic service.
You never have to add water. But check the battery,
cables and battery bracket for corrosion. Clean off any
corrosion using a brush and a solution of ammonia and
water or baking soda and water. Rinse with clear water.
Vehicle Storage
If you're not going to drive your vehicle for 25 days or
more, remove the black, negative (
-) cable from the
battery. This will help keep your battery from
running down.
CAUTION:
Batteries have acid that can burn you and gas
that can explode. You can be badly hurt if you
aren't careful. See ªJump Startingº in the Index
for tips on working around a battery without
getting hurt.
Contact your dealer to learn how to prepare your vehicle
for longer storage periods.
Page 264 of 328
 should be performed after 100,000 miles
(166 000 km) at the same interval")
Short Trip/City Scheduled Maintenance
yellowblue
7-8
The services shown in this schedule up to 100,000 miles
(166 000 km) should be performed after 100,000 miles
(166 000 km) at the same intervals. The service shown
at 120,000 miles (200 000 km) should be performed at
the same interval after 120,000 miles (200 000 km).
See ªOwner Checks and Servicesº and ªPeriodic
Maintenance Inspectionsº following.
Footnotes
� The U.S. Environmental Protection Agency or the
California Air Resources Board has determined that the
failure to perform this maintenance item will not nullify
the emission warranty or limit recall liability prior to the
completion of the vehicle's useful life. We, however,
urge that all recommended maintenance services be
performed at the indicated intervals and the maintenance
be recorded.# Lubricate the parking brake cable guides, underbody
contact points and linkage.
+ A good time to check your brakes is during tire
rotation. See ªBrake System Inspectionº under ªPeriodic
Maintenance Inspectionsº in Part C of this schedule.
Page 282 of 328
 should be performed after 100,000 miles
(166 000 km) at the same inter")
Long Trip/Highway Scheduled Maintenance
yellowblue
7-26
The services shown in this schedule up to 100,000 miles
(166 000 km) should be performed after 100,000 miles
(166 000 km) at the same intervals. The service shown
at 120,000 miles (200 000 km) should be performed at
the same interval after 120,000 miles (200 000 km).
See ªOwner Checks and Servicesº and ªPeriodic
Maintenance Inspectionsº following.
Footnotes
� The U.S. Environmental Protection Agency or the
California Air Resources Board has determined that the
failure to perform this maintenance item will not nullify
the emission warranty or limit recall liability prior to the
completion of the vehicle's useful life. We, however,
urge that all recommended maintenance services be
performed at the indicated intervals and the maintenance
be recorded.# Lubricate the parking brake cable guides, underbody
contact points and linkage.
+ A good time to check your brakes is during tire
rotation. See ªBrake System Inspectionº under ªPeriodic
Maintenance Inspectionsº in Part C of this schedule.