Page 8 of 344
yellowblue
viii
For example,
these symbols
are used on an
original battery:
CAUTION
POSSIBLE
INJURY
PROTECT
EYES BY
SHIELDING
CAUSTIC
BATTERY
ACID COULD
CAUSE
BURNS
AVOID
SPARKS OR
FLAMES
SPARK OR
FLAME
COULD
EXPLODE
BATTERY
These symbols
are important
for you and
your passengers
whenever your
vehicle is
driven:
DOOR LOCK
UNLOCK
FASTEN
SEAT
BELTS
POWER
WINDOW
AIR BAG
These symbols
have to do with
your lamps:
MASTER
LIGHTING
SWITCH
TURN
SIGNALS
PARKING
LAMPS
HAZARD
WARNING
FLASHER
DAYTIME
RUNNING
LAMPS
FOG LAMPS
These symbols
are on some of
your controls:
WINDSHIELD
WIPER
WINDSHIELD
WASHER
WINDSHIELD
DEFROSTER
REAR
WINDOW
DEFOGGER
VENTILATING
FAN
These symbols
are used on
warning and
indicator lights:
ENGINE
COOLANT
TEMP
BATTERY
CHARGING
SYSTEM
BRAKE
COOLANT
ENGINE OIL
PRESSURE
ANTI-LOCK
BRAKES
Here are some
other symbols
you may see:
FUSE
LIGHTER
HORN
SPEAKER
FUEL
Vehicle Symbols
These are some of the symbols you may find on your vehicle.
Page 20 of 344
yellowblue
1-12
Driver Position
This part describes the driver's restraint system.
Lap-Shoulder Belt
The driver has a lap-shoulder belt. Here's how to wear
it properly.
1. Close and lock the door.
2. Adjust the seat (to see how, see ªSeatsº in the Index)
so you can sit up straight.
3. Pick up the latch plate and pull the belt across you.
Don't let it get twisted.
The shoulder belt may lock if you pull the belt across
you very quickly. If this happens, let the belt go back
slightly to unlock it. Then pull the belt across you
more slowly.
4. Push the latch plate into the buckle until it clicks.
Page 63 of 344

2-
yellowblue
2-1
Section 2 Features and Controls
Here you can learn about the many standard and optional features on your vehicle, and information on starting,
shifting and braking. Also explained are the instrument panel and the warning systems that tell you if everything is
working properly
-- and what to do if you have a problem.
2
-2 Keys
2
-4 Door Locks
2
-6 Keyless Entry System (Option)
2
-9 Trunk
2
-11 Theft
2
-12 Passlock�
2-13 New Vehicle ªBreak-Inº
2
-13 Ignition Positions
2
-15 Starting Your Engine
2
-17 Engine Coolant Heater (If Equipped)
2
-19 Automatic Transaxle Operation
2
-23 Parking Brake
2
-24 Shifting Into PARK (P)
2
-26 Shifting Out of PARK (P)
2
-27 Parking Over Things That Burn
2
-27 Engine Exhaust2
-28 Running Your Engine While You're Parked
2
-29 Windows
2
-30 Tilt Wheel
2
-30 Turn Signal/Multifunction Lever
2
-36 Exterior Lamps
2
-39 Interior Lamps
2
-40 Mirrors
2
-42 Storage Compartments
2
-43 Ashtray and Lighter
2
-44 Sun Visors
2
-44 Accessory Power Outlet
2
-45 Garment Hook
2
-45 Sunroof (If Equipped)
2
-46 The Instrument Panel-Your
Information System
2
-50 Warning Lights, Gages and Indicators
Page 66 of 344
yellowblue
2-4
Door Locks
CAUTION:
Unlocked doors can be dangerous.
Passengers -- especially children -- can easily
open the doors and fall out. When a door is
locked, the inside handle won't open it.
Outsiders can easily enter through an unlocked
door when you slow down or stop your vehicle.
This may not be so obvious: You increase the
chance of being thrown out of the vehicle in a
crash if the doors aren't locked. Wear safety belts
properly, lock your doors, and you will be far
better off whenever you drive your vehicle.
There are several ways to lock and unlock your vehicle.
From the outside, use your key or keyless entry system,
if your vehicle has this feature.
From the inside, to lock the door, move the locking
lever forward.
To unlock the door, move the locking lever rearward.
Page 67 of 344
yellowblue
2-5 Power Door Locks (If Equipped)
With the power door locks,
you can unlock or lock all
of the doors of your vehicle
from the driver or front
passenger door lock switch.
Pull up on the switch to unlock all of the doors. Push
down on it to lock all the doors.
Door Ajar Reminder
If one of the doors of your vehicle is not closed
properly, the ignition is on and you shift from PARK (P)
or NEUTRAL (N), you will hear a chime. Also, the
Door Ajar light on the instrument panel will come on
and stay on until the doors are closed and
completely latched.
Rear Door Security Locks
Your vehicle is equipped
with rear door security
locks that help prevent
passengers from opening
the rear doors of your
vehicle from the inside.
The switch is located on the inside of the rear door. To
use the security locks:
1. Move the switch up.
2. Close the door.
3. Do the same thing on the other rear door.
Page 68 of 344

yellowblue
2-6
The rear doors of your vehicle cannot be opened from
the inside when this feature is in use. If you want to
open a rear door when the security lock is on:
1. Unlock the door from the inside.
2. Then open the door from the outside.
If you don't cancel the security lock feature, adults or
older children who ride in the rear won't be able to open
the rear door from the inside. You should let adults and
older children know how these security locks work, and
how to cancel the locks.
To cancel the rear door lock:
1. Unlock the door from the inside and open it from
the outside.
2. Move the switch down.
3. Do the same for the other rear door.
The rear doors will now work normally.
Leaving Your Vehicle
If you are leaving your vehicle, open your door and
set the locks from the inside, then get out and close
the door.
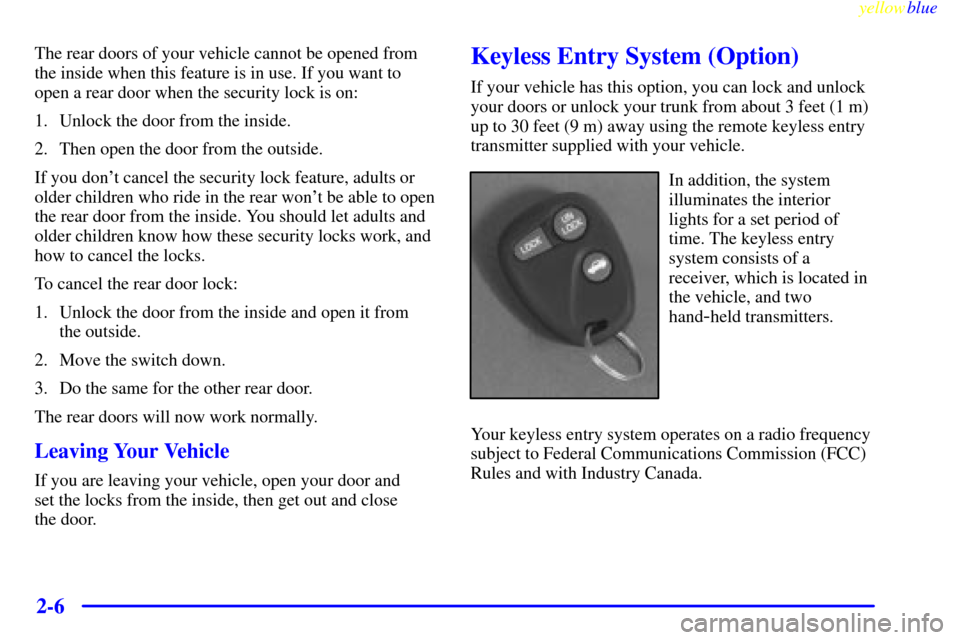
Keyless Entry System (Option)
If your vehicle has this option, you can lock and unlock
your doors or unlock your trunk from about 3 feet (1 m)
up to 30 feet (9 m) away using the remote keyless entry
transmitter supplied with your vehicle.
In addition, the system
illuminates the interior
lights for a set period of
time. The keyless entry
system consists of a
receiver, which is located in
the vehicle, and two
hand
-held transmitters.
Your keyless entry system operates on a radio frequency
subject to Federal Communications Commission (FCC)
Rules and with Industry Canada.
Page 69 of 344

yellowblue
2-7
This device complies with Part 15 of the FCC Rules.
Operation is subject to the following two conditions:
(1) this device may not cause harmful interference, and
(2) this device must accept any interference received,
including interference that may cause
undesired operation.
This device complies with RSS
-210 of Industry Canada.
Operation is subject to the following two conditions:
(1) this device may not cause interference, and (2) this
device must accept any interference received, including
interference that may cause undesired operation of
the device.
Changes or modifications to this system by other than an
authorized service facility could void authorization to
use this equipment.
At times you may notice a decrease in range. This is
normal for any remote keyless entry system. If the
transmitter does not work or if you have to stand closer
to your vehicle for the transmitter to work, try this:
�Check to determine if battery replacement or
resynchronization is necessary. See the instructions
that follow.
�Check the distance. You may be too far from your
vehicle. You may need to stand closer during rainy
or snowy weather.�Check the location. Other vehicles or objects may be
blocking the signal. Take a few steps to the left or
right, hold the transmitter higher, and try again.
�If you're still having trouble, see your dealer or a
qualified technician for service.Operation
The following functions are available with the keyless
entry system:
LOCK: All doors will automatically lock when the
LOCK button on the transmitter is pressed. Press the
button a second time and you will hear a ªchirpº to
indicate that the doors have been locked.
UNLOCK: The driver's door will unlock automatically
when the UNLOCK button on the transmitter is pressed.
If the UNLOCK button is pressed again within five
seconds, all remaining doors will unlock.
: The trunk will unlock anytime this button on
the transmitter is pressed, the trunk lockout is not
engaged and the gear selector is in PARK (P) or
NEUTRAL (N) .
Page 71 of 344

yellowblue
2-9
To replace the battery in the keyless entry system:
1. Use a small coin or flathead screwdriver to separate
the bottom half from the top half of the transmitter.
2. Remove the battery and replace it with the new one.
Make sure the positive (+) side of the battery faces
down. Use one three
-volt, CR2032, or
equivalent, type battery.
3. Put the two halves back together. Make sure the
cover is on tightly, so water won't get in.
4. Check the operation of the transmitter with your
vehicle. If the transmitter does not work, try
resynchronizing the transmitter with the receiver.
Resynchronization
Your keyless entry system is equipped with a security
system that prevents anyone from recording and playing
back your signal. The transmitter does not send the same
signal twice to the receiver. The receiver will not
respond to a signal that has been sent to it more
than once.To synchronize your transmitter and receiver, follow
these directions:
1. Stand close to your vehicle.
2. Press and hold the LOCK and UNLOCK buttons on
the transmitter at the same time.
3. Hold the buttons for five seconds. In this time, the
doors should lock and unlock once. This confirms
the resynchronization. If the doors do not lock and
unlock, see your dealer for service.
Trunk
To unlock the trunk from the outside, insert the key and
turn the trunk lock cylinder.