Page 50 of 3115

AC1IS-04
I24817
I24818
AC-70
- AIR CONDITIONINGCONDENSER
2795 Author�: Date�:
2004 LAND CRUISER (RM1071U)
REMOVAL
1. DISCHARGE REFRIGERANT FROM REFRIGERATION
SYSTEM
HINT:
At the time of installation, refer to the following items evacuate
air from the refrigeration system and charge system with the re-
frigerant and inspect for leaks of the refrigerant.
Specified amount: 1,050 ± 50 g (37.03 ± 1.76 oz.)
2. REMOVE RADIATOR GRILL
3. REMOVE A/T AIR COOLED OIL COOLER
(See page AT-17)
4. REMOVE ENGINE UNDER COVER
5. REMOVE DISCHARGE TUBE
(a) Remove the bolt and disconnect the tube from the con-
denser.
Torque: 5.4 N´m (55 kgf´cm, 48 in.´lbf)
(b) Loosen the nut and remove the tube.
Torque: 22 N´m (225 kgf´cm, 16 ft´lbf)
NOTICE:
Cap the open fittings immediately to keep moisture or dirt
out of the system.
HINT:
At the time of installation, lubricate 2 new O-rings with com-
pressor oil and install them on the tube.
6. DISCONNECT LIQUID TUBE
Remove the bolt and disconnect the tube.
Torque: 10 N´m (100 kgf´cm, 7 ft´lbf)
NOTICE:
Cap the open fittings immediately to keep moisture or dirt
out of the system.
HINT:
At the time of installation, lubricate a new O-ring with compres-
sor oil and install them on the tube.
Page 74 of 3115
AC1KI-04
I06727
I25894
Second Ridge
View A
UpperHose Clip
Lower
MarkingRHLH Upper
LowerMarking
View A
I06728
I06729
AC-40
- AIR CONDITIONINGFRONT HEATER UNIT
2765 Author�: Date�:
2004 LAND CRUISER (RM1071U)
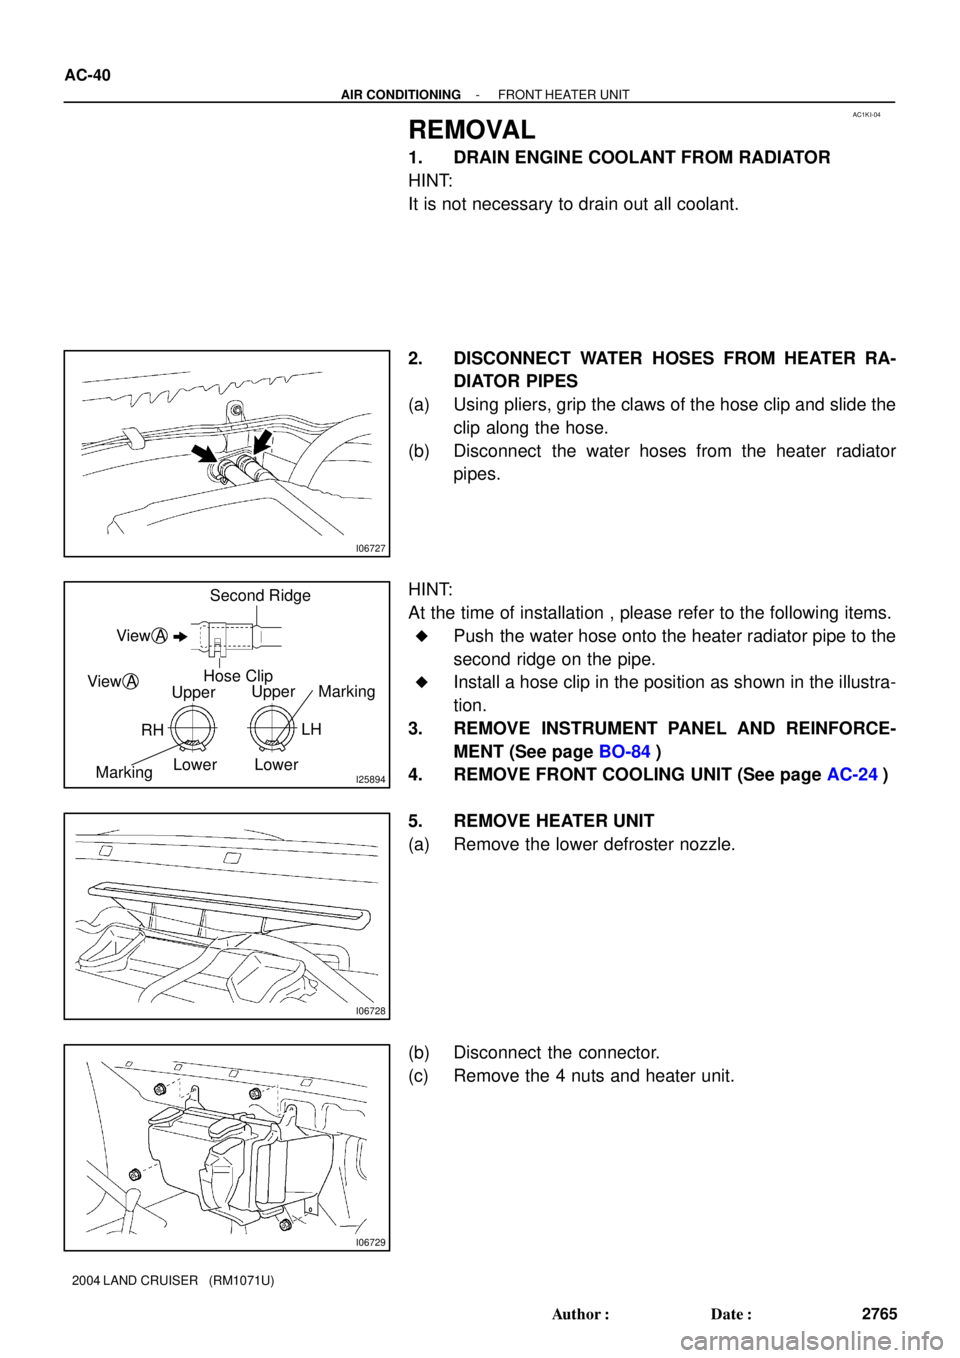
REMOVAL
1. DRAIN ENGINE COOLANT FROM RADIATOR
HINT:
It is not necessary to drain out all coolant.
2. DISCONNECT WATER HOSES FROM HEATER RA-
DIATOR PIPES
(a) Using pliers, grip the claws of the hose clip and slide the
clip along the hose.
(b) Disconnect the water hoses from the heater radiator
pipes.
HINT:
At the time of installation , please refer to the following items.
�Push the water hose onto the heater radiator pipe to the
second ridge on the pipe.
�Install a hose clip in the position as shown in the illustra-
tion.
3. REMOVE INSTRUMENT PANEL AND REINFORCE-
MENT (See page BO-84)
4. REMOVE FRONT COOLING UNIT (See page AC-24)
5. REMOVE HEATER UNIT
(a) Remove the lower defroster nozzle.
(b) Disconnect the connector.
(c) Remove the 4 nuts and heater unit.
Page 85 of 3115
AC1JE-04
I25169
AC-92
- AIR CONDITIONINGPRESSURE SWITCH
2817 Author�: Date�:
2004 LAND CRUISER (RM1071U)
REMOVAL
1. DISCHARGE REFRIGERANT FROM REFRIGERATION
SYSTEM
HINT:
At the time of installation, evacuate air from refrigeration system
and charge system with refrigerant and inspect for leakage of
refrigerant.
Specified amount: 1,050 ± 50 g (37.03 ± 1.76 oz.)
2. REMOVE RADIATOR GRILL
3. REMOVE PRESSURE SWITCH FROM LIQUID TUBE
Disconnect the connector and remove the pressure switch.
Torque: 10 N´m (100 kgf´cm, 7 ft´lbf)
HINT:
�Lock the switch mount on the tube with an open-end
wrench, be careful not to deform the tube, and remove the
switch.
�At the time of installation, lubricate a new O-ring with
compressor oil and install the switch.
Page 109 of 3115
AC1KO-04
I03973
I05080
Second Ridge
Hose Clip
Water Hose
I03924
- AIR CONDITIONINGREAR HEATER UNIT
AC-47
2772 Author�: Date�:
2004 LAND CRUISER (RM1071U)
REMOVAL
1. DRAIN ENGINE COOLANT FROM RADIATOR
HINT:
It is not necessary to drain out all the coolant.
2. DISCONNECT WATER HOSES FROM HEATER RA-
DIATOR PIPES
(a) Using pliers, grip the claws of the clip and slide the clip
along the hose
(b) Disconnect the water hoses
HINT:
At the time of installation, push the water hose on to the heater
radiator pipe to the second ridge on the pipe.
3. REMOVE FRONT SEATS
4. REMOVE REAR CONSOLE BOX
5. REMOVE FRONT CONSOLE BOX COVER
6. REMOVE LOWER CENTER CLUSTER FINISH PANEL
7. REMOVE FRONT DOOR SCUFF PLATE
8. REMOVE COWL SIDE TRIMS
9. REMOVE REAR DOOR SCUFF PLATES
10. REMOVE CENTER PILLAR GARNISHES
11. SLIDE FLOOR CARPET BACKWARD
12. REMOVE COOLER BRACKET
Remove the 4 bolts and the cooler bracket.
Page 607 of 3115
CH06N-05
B16653
B00809
CH-16
- CHARGINGGENERATOR
1851 Author�: Date�:
2004 LAND CRUISER (RM1071U)
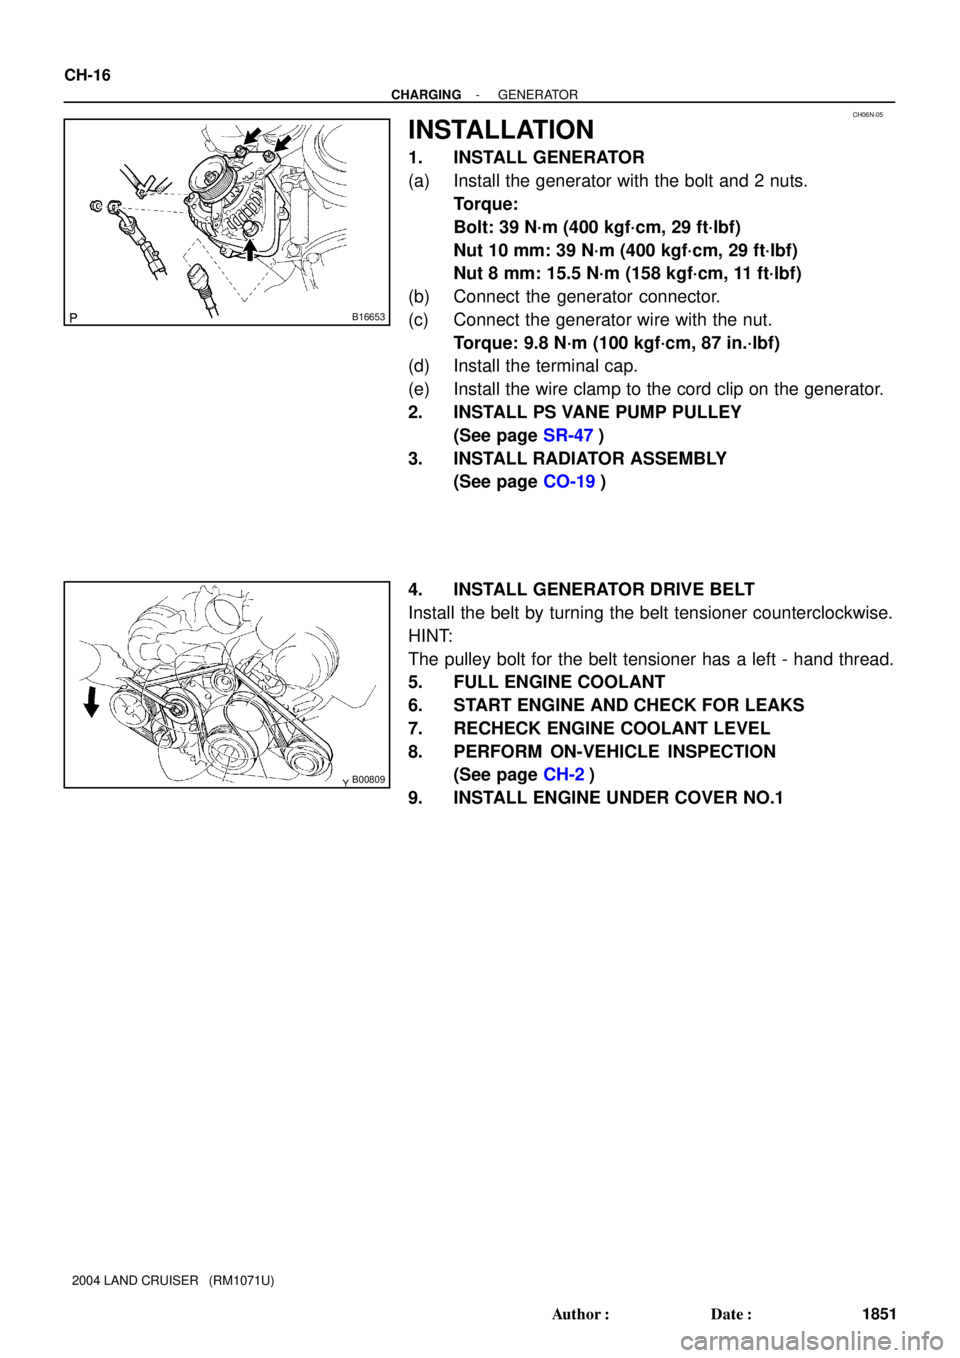
INSTALLATION
1. INSTALL GENERATOR
(a) Install the generator with the bolt and 2 nuts.
Torque:
Bolt: 39 N´m (400 kgf´cm, 29 ft´lbf)
Nut 10 mm: 39 N´m (400 kgf´cm, 29 ft´lbf)
Nut 8 mm: 15.5 N´m (158 kgf´cm, 11 ft´lbf)
(b) Connect the generator connector.
(c) Connect the generator wire with the nut.
Torque: 9.8 N´m (100 kgf´cm, 87 in.´lbf)
(d) Install the terminal cap.
(e) Install the wire clamp to the cord clip on the generator.
2. INSTALL PS VANE PUMP PULLEY
(See page SR-47)
3. INSTALL RADIATOR ASSEMBLY
(See page CO-19)
4. INSTALL GENERATOR DRIVE BELT
Install the belt by turning the belt tensioner counterclockwise.
HINT:
The pulley bolt for the belt tensioner has a left - hand thread.
5. FULL ENGINE COOLANT
6. START ENGINE AND CHECK FOR LEAKS
7. RECHECK ENGINE COOLANT LEVEL
8. PERFORM ON-VEHICLE INSPECTION
(See page CH-2)
9. INSTALL ENGINE UNDER COVER NO.1
Page 681 of 3115
(Without Battery Carrier Support): RH (With Battery Carrier Support):
INSTALLATION
LH:
RH (With Battery Carrier Support):
[RH only]
LH:
Intercooler Mounting Retainer
1. Temporarily install the new parts and measure
each part in accordance with the body dimen-
sion diagram.
HINT: First install the radiator upper support.
BODY PANEL REPLACEMENTRE-5
Page 710 of 3115
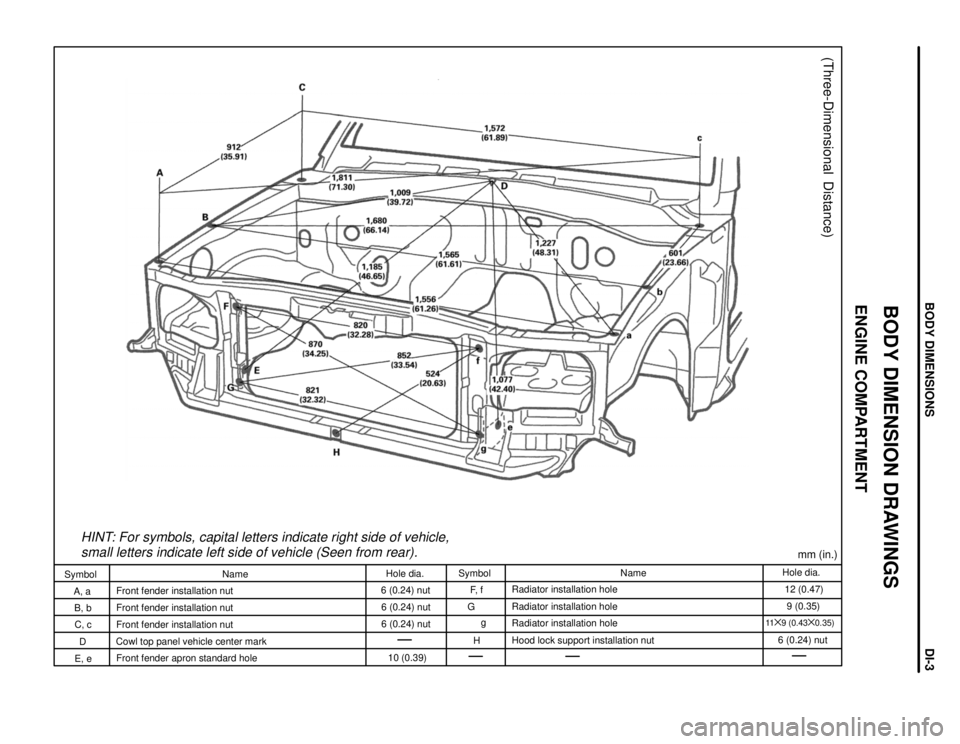
HINT: For symbols, capital letters indicate right side of vehicle,
small letters indicate left side of vehicle (Seen from rear).
(Three-Dimensional Distance)
mm (in.)
Hole dia.
12 (0.47)
9 (0.35)
11y9 (0.43
y0.35)
6 (0.24) nut Name
Radiator installation hole
Radiator installation hole
Radiator installation hole
Hood lock support installation nut Symbol
F, f
G
g
H Hole dia.
6 (0.24) nut
6 (0.24) nut
6 (0.24) nut
10 (0.39) Name
Front fender installation nut
Front fender installation nut
Front fender installation nut
Cowl top panel vehicle center mark
Front fender apron standard hole Symbol
A, a
B, b
C, c
D
E, e
BODY DIMENSION DRAWINGS
ENGINE COMPARTMENT
BODY DIMENSIONSDI-3
Page 744 of 3115

CO0IO-06
- COOLINGCOOLANT
CO-1
1762 Author�: Date�:
2004 LAND CRUISER (RM1071U)
COOLANT
INSPECTION
HINT:
Check the coolant level when the engine is cold.
1. CHECK ENGINE COOLANT LEVEL AT RADIATOR RESERVOIR
The engine coolant level should be between the ºLOWº and ºFULLº lines at normal temperature
(20°C(68°F)).
If low, check for leaks and add ºToyota Super Long Life Coolantº or similar high quality ethylene glycol based
non-silicate, non-amine, non-nitrite, and non-borate coolant with long-life hybrid organic acid technology
up to the ºFULLº line.
2. CHECK ENGINE COOLANT QUALITY
(a) Remove the radiator cap.
CAUTION:
To avoid the danger of being burned, do not remove the radiator cap while the engine and radiator
are still hot, as fluid and steam can be blown out under pressure.
(b) There should not be any excessive deposits of rust or scale around the radiator cap or radiator filler
hole, and the coolant should be free from oil.
If excessively dirty, clean the coolant passages and replace the coolant.
(c) Reinstall the radiator cap.


![TOYOTA LAND CRUISER 1998 Factory Repair Manual (Without Battery Carrier Support): RH (With Battery Carrier Support):
INSTALLATION
LH:
RH (With Battery Carrier Support):
[RH only]
LH:
Intercooler Mounting Retainer
1. Temporarily install the new par](/manual-img/14/57459/w960_57459-680.png "TOYOTA LAND CRUISER 1998 Factory Repair Manual (Without Battery Carrier Support): RH (With Battery Carrier Support):
INSTALLATION
LH:
RH (With Battery Carrier Support):
[RH only]
LH:
Intercooler Mounting Retainer
1. Temporarily install the new par")