Page 218 of 3115

I06184
F
1/2
E 321
- BODY ELECTRICALCOMBINATION METER
BE-67
2440 Author�: Date�:
6. INSPECT FUEL SENDER GAUGE VOLTAGE
(a) Apply voltage (4.5 V - 5.0 V) between terminals 2 and 3.
(b) Measure voltage between terminals 1 and 2 for each float
position.
Float position mm (in.)Voltage (V)
F: Approx. 85.3 (3.36)Approx. 4.60 ± 0.1
1/2: Approx. 1.7 (0.67)Approx. 2.45 ± 0.1
E: Approx. 91.9 (3.62)Approx. 0.30 ± 0.1
If voltage value is not as specified, replace main sender gauge.
7. INSPECT LOW OIL PRESSURE WARNING LIGHT
(a) Disconnect the connector from the low oil pressure
switch.
(b) Turn the ignition switch ON.
(c) Connect the terminal of wire harness side connector and
ground, then check the warning light.
8. INSPECT PARKING BRAKE WARNING LIGHT
(a) Disconnect the connector from the parking brake switch
and ground terminal on the wire harness side connector.
(b) Turn the ignition switch ON and check that the warning
light lights up.
9. INSPECT BRAKE WARNING LIGHT
(a) Disconnect the connector from the brake fluid level warn-
ing switch and ground terminal on the wire harness side
connector.
(b) Turn the ignition switch ON and check that the warning
light lights up.
10. INSPECT BRAKE FLUID LEVEL WARNING SWITCH
(a) Remove the reservoir tank cap and retainer.
(b) Disconnect the connector.
(c) Check that the continuity exists between the terminal.
(d) Use syphon, etc., to take fluid out of the reservoir tank.
(e) Check that the continuity exists between terminals.
(f) Pour the fluid back in the reservoir tank.
11. INSPECT OPEN DOOR WARNING LIGHT
(a) DIsconnect the connector from the driver door courtesy
switch and ground terminal on the wire harness side con-
nector.
(b) Turn the ignition switch ON and check that the warning
light lights up.
Page 616 of 3115

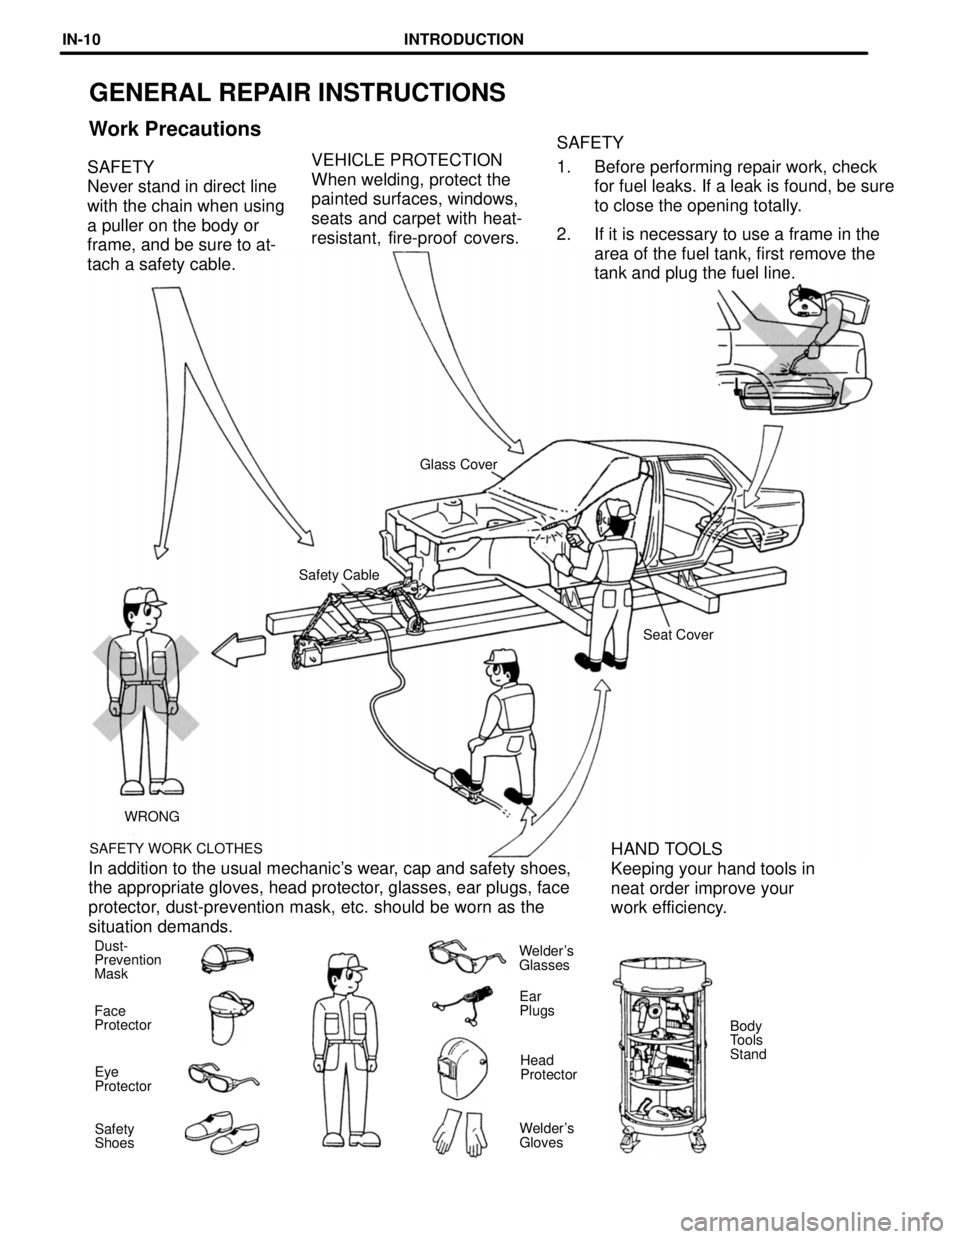
GENERAL REPAIR INSTRUCTIONS
Work PrecautionsSAFETY
1. Before performing repair work, check
for fuel leaks. If a leak is found, be sure
to close the opening totally.
2. If it is necessary to use a frame in the
area of the fuel tank, first remove the
tank and plug the fuel line. SAFETY
Never stand in direct line
with the chain when using
a puller on the body or
frame, and be sure to at-
tach a safety cable.VEHICLE PROTECTION
When welding, protect the
painted surfaces, windows,
seats and carpet with heat-
resistant, fire-proof covers.
Glass Cover
Safety Cable
Seat Cover
WRONG
SAFETY WORK CLOTHES
HAND TOOLS
Keeping your hand tools in
neat order improve your
work efficiency. In addition to the usual mechanic's wear, cap and safety shoes,
the appropriate gloves, head protector, glasses, ear plugs, face
protector, dust-prevention mask, etc. should be worn as the
situation demands.
Dust-
Prevention
MaskWelder's
Glasses
Ear
Plugs
Face
Protector
Body
Tools
Stand
Head
Protector Eye
Protector
Welder's
Gloves Safety
Shoes
INTRODUCTIONIN-10
Page 1272 of 3115

A21544
CCV
Pressure Switching Valve
EVAP VSV
Cold Start
ECT/IAT near same temp.Open
ClosedOpen ClosedOpen
Closed
Closed
Closed Open
P0441, P0446,
P0455, P2418
Negative Pressure
OccursP0442, P0456
Tank & Canister
Leak CheckP0446
Pressure Switching
Valve Testing
(ex. Fuel tank cap loose)
(ex. Disconnect of vacuum hose)
P2418
CCV
Testing
Pressure
Switching
valve open
malfunction
(P2418)
(P0455) Gross Leak
P0442
P0456
- DIAGNOSTICSENGINE
DI-223
416 Author�: Date�:
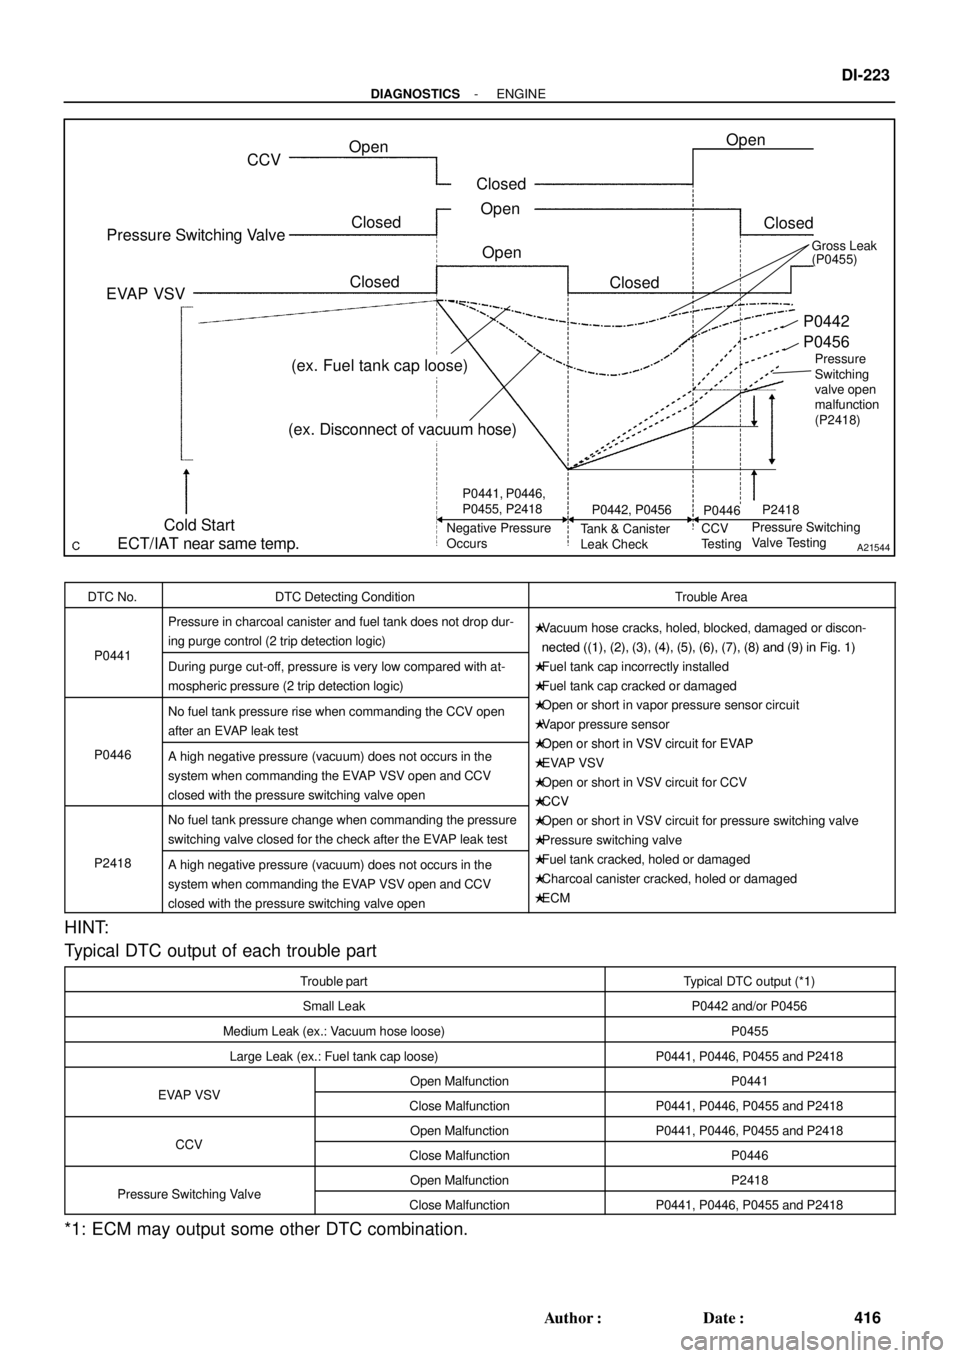
DTC No.DTC Detecting ConditionTrouble Area
P0441
Pressure in charcoal canister and fuel tank does not drop dur-
ing purge control (2 trip detection logic)�Vacuum hose cracks, holed, blocked, damaged or discon-
nected
((1), (2), (3), (4), (5), (6), (7), (8) and (9) in Fig. 1)P0441During purge cut-off, pressure is very low compared with at-
mospheric pressure (2 trip detection logic)
nected ((1), (2), (3), (4), (5), (6), (7), (8) and (9) in Fig. 1)
�Fuel tank cap incorrectly installed
�Fuel tank cap cracked or damaged
No fuel tank pressure rise when commanding the CCV open
after an EVAP leak test
g
�Open or short in vapor pressure sensor circuit
�Vapor pressure sensor
�Open or short in VSV circuit for EVAPP0446A high negative pressure (vacuum) does not occurs in the
system when commanding the EVAP VSV open and CCV
closed with the pressure switching valve open�Open or short in VSV circuit for EVAP
�EVAP VSV
�Open or short in VSV circuit for CCV
�
CCV
No fuel tank pressure change when commanding the pressure
switching valve closed for the check after the EVAP leak test
�CCV
�Open or short in VSV circuit for pressure switching valve
�Pressure switching valve
P2418A high negative pressure (vacuum) does not occurs in the
system when commanding the EVAP VSV open and CCV
closed with the pressure switching valve open
g
�Fuel tank cracked, holed or damaged
�Charcoal canister cracked, holed or damaged
�ECM
HINT:
Typical DTC output of each trouble part
Trouble partTypical DTC output (*1)
Small LeakP0442 and/or P0456
Medium Leak (ex.: Vacuum hose loose)P0455
Large Leak (ex.: Fuel tank cap loose)P0441, P0446, P0455 and P2418
EVAP VSVOpen MalfunctionP0441EVAP VSVClose MalfunctionP0441, P0446, P0455 and P2418
CCVOpen MalfunctionP0441, P0446, P0455 and P2418CCVClose MalfunctionP0446
PSithiVlOpen MalfunctionP2418Pressure Switching ValveClose MalfunctionP0441, P0446, P0455 and P2418
*1: ECM may output some other DTC combination.
Page 1277 of 3115

DI-228
- DIAGNOSTICSENGINE
421 Author�: Date�:
INSPECTION PROCEDURE
HINT:
�If DTC P0441 (Purge Flow), P0446 (CCV) or P2418 (Pressure switching valve) or P0451 (Evaporative
Pressure Sensor) is output with DTC P0442, P0455 or P0456, first troubleshoot DTC P0441, P0446
or P0451. If no malfunction is detected, troubleshoot DTC P0442, P0455 or P0456 next.
�Read freeze frame data using the hand-held tester or the OBD II scan tool. Freeze frame data records
the engine conditions when a malfunction is detected. When troubleshooting, freeze frame data can
help determine if the vehicle was running or stopped, if the engine was warmed up or not, if the air-fuel
ratio was lean or rich, and other data from the time the malfunction occurred.
�When the ENGINE RUN TIME in the freeze frame data is less than 200 seconds, carefully check the
vapor pressure sensor.
Hand-held tester:
1 Check that fuel tank cap meets OEM specifications.
NG Replace with a cap that meets OEM specifica-
tions.
OK
2 Check that fuel tank cap is correctly installed.
NG Correctly install fuel tank cap.
OK
3 Check fuel tank cap (See page EC-5).
NG Replace fuel tank cap.
OK
Page 1278 of 3115
A19812
VSV is ON
VSV is OFF
- DIAGNOSTICSENGINE
DI-229
422 Author�: Date�:
4 Check filler neck for damage.
PREPARATION:
Remove the fuel tank cap.
CHECK:
Visually inspect the filler neck for damage.
NG Replace filler pipe.
OK
5 Check purge flow.
PREPARATION:
(a) Connect the hand-held tester to the DLC3.
(b) Select the ºENHANCED OBD II / ACTIVE TESTº mode on
the hand-held tester.
(c) Disconnect the vacuum hose for the EVAP VSV from the
charcoal canister.
(d) Start the engine.
(e) Select the item ºEVAP (ALON) / ALLº in the ACTIVE TEST
and operate EVAP VSV.
CHECK:
When the EVAP VSV is operated by the hand-held tester,
check whether the disconnected hose applies suction to your
finger.
OK:
VSV is ON:
Disconnected hose applies suction to your finger.
VSV is OFF:
Disconnected hose applies no suction to your finger.
OK Go to step 9.
NG
Page 1286 of 3115
- DIAGNOSTICSENGINE
DI-237
430 Author�: Date�:
OBD II scan tool (excluding hand-held tester):
1 Check that fuel tank cap meets OEM specifications.
NG Replace with a cap that meets OEM specifica-
tions.
OK
2 Check that fuel tank cap is correctly installed.
NG Correctly install fuel tank cap.
OK
3 Check fuel tank cap (See page EC-5).
NG Replace fuel tank cap.
OK
4 Check filler neck for damage.
PREPARATION:
Remove the fuel tank cap.
CHECK:
Visually inspect the filler neck for damage.
NG Replace filler pipe.
OK
Page 1293 of 3115
DI-244
- DIAGNOSTICSENGINE
437 Author�: Date�:
22 Check for open and short in harness and connector between EFI or ECD relay
and pressure switching valve, and pressure switching valve and ECM (See page
IN-36).
NG Repair or replace harness or connector.
OK
Replace ECM (See page SF-60).
23 Check fuel tank inlet valve.
NG Replace fuel tank inlet valve.
OK
24 Check fuel tank.
NG Replace fuel tank.
OK
It is likely that vehicle user did not properly
close fuel tank cap.
Page 1295 of 3115

A21544
CCV
Pressure Switching Valve
EVAP VSV
Cold Start
ECT/IAT near same temp.Open
ClosedOpen ClosedOpen
Closed
Closed
Closed Open
P0441, P0446,
P0455, P2418
Negative Pressure
OccursP0442, P0456
Tank & Canister
Leak CheckP0446
Pressure Switching
Valve Testing
(ex. Fuel tank cap loose)
(ex. Disconnect of vacuum hose)
P2418
CCV
Testing
Pressure
Switching
valve open
malfunction
(P2418)
(P0455) Gross Leak
P0442
P0456
DI-246
- DIAGNOSTICSENGINE
439 Author�: Date�:
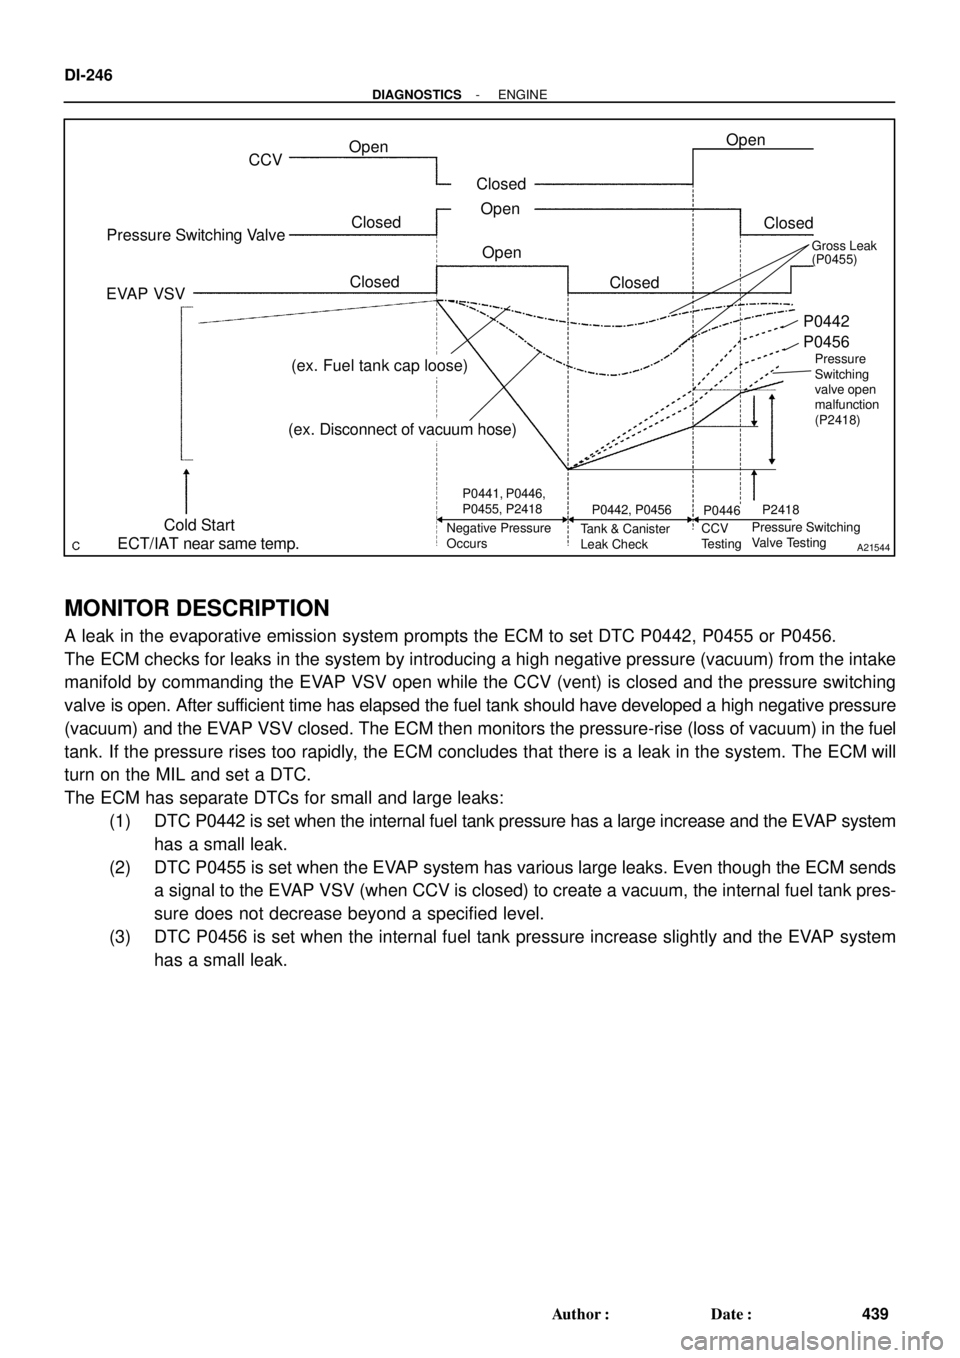
MONITOR DESCRIPTION
A leak in the evaporative emission system prompts the ECM to set DTC P0442, P0455 or P0456.
The ECM checks for leaks in the system by introducing a high negative pressure (vacuum) from the intake
manifold by commanding the EVAP VSV open while the CCV (vent) is closed and the pressure switching
valve is open. After sufficient time has elapsed the fuel tank should have developed a high negative pressure
(vacuum) and the EVAP VSV closed. The ECM then monitors the pressure-rise (loss of vacuum) in the fuel
tank. If the pressure rises too rapidly, the ECM concludes that there is a leak in the system. The ECM will
turn on the MIL and set a DTC.
The ECM has separate DTCs for small and large leaks:
(1) DTC P0442 is set when the internal fuel tank pressure has a large increase and the EVAP system
has a small leak.
(2) DTC P0455 is set when the EVAP system has various large leaks. Even though the ECM sends
a signal to the EVAP VSV (when CCV is closed) to create a vacuum, the internal fuel tank pres-
sure does not decrease beyond a specified level.
(3) DTC P0456 is set when the internal fuel tank pressure increase slightly and the EVAP system
has a small leak.