Page 74 of 3115
AC1KI-04
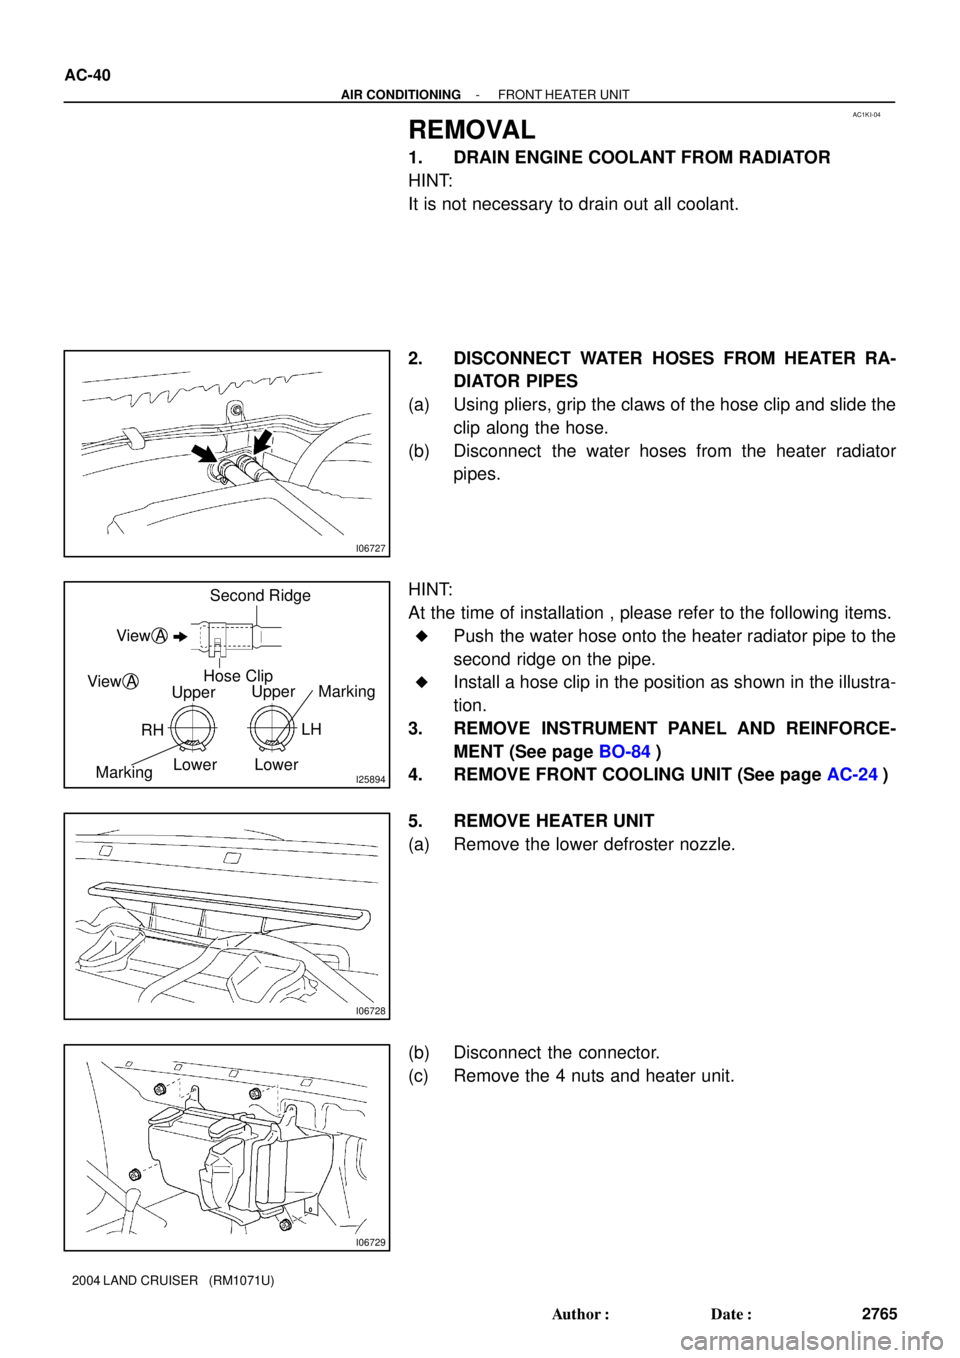
I06727
I25894
Second Ridge
View A
UpperHose Clip
Lower
MarkingRHLH Upper
LowerMarking
View A
I06728
I06729
AC-40
- AIR CONDITIONINGFRONT HEATER UNIT
2765 Author�: Date�:
2004 LAND CRUISER (RM1071U)
REMOVAL
1. DRAIN ENGINE COOLANT FROM RADIATOR
HINT:
It is not necessary to drain out all coolant.
2. DISCONNECT WATER HOSES FROM HEATER RA-
DIATOR PIPES
(a) Using pliers, grip the claws of the hose clip and slide the
clip along the hose.
(b) Disconnect the water hoses from the heater radiator
pipes.
HINT:
At the time of installation , please refer to the following items.
�Push the water hose onto the heater radiator pipe to the
second ridge on the pipe.
�Install a hose clip in the position as shown in the illustra-
tion.
3. REMOVE INSTRUMENT PANEL AND REINFORCE-
MENT (See page BO-84)
4. REMOVE FRONT COOLING UNIT (See page AC-24)
5. REMOVE HEATER UNIT
(a) Remove the lower defroster nozzle.
(b) Disconnect the connector.
(c) Remove the 4 nuts and heater unit.
Page 109 of 3115
AC1KO-04
I03973
I05080
Second Ridge
Hose Clip
Water Hose
I03924
- AIR CONDITIONINGREAR HEATER UNIT
AC-47
2772 Author�: Date�:
2004 LAND CRUISER (RM1071U)
REMOVAL
1. DRAIN ENGINE COOLANT FROM RADIATOR
HINT:
It is not necessary to drain out all the coolant.
2. DISCONNECT WATER HOSES FROM HEATER RA-
DIATOR PIPES
(a) Using pliers, grip the claws of the clip and slide the clip
along the hose
(b) Disconnect the water hoses
HINT:
At the time of installation, push the water hose on to the heater
radiator pipe to the second ridge on the pipe.
3. REMOVE FRONT SEATS
4. REMOVE REAR CONSOLE BOX
5. REMOVE FRONT CONSOLE BOX COVER
6. REMOVE LOWER CENTER CLUSTER FINISH PANEL
7. REMOVE FRONT DOOR SCUFF PLATE
8. REMOVE COWL SIDE TRIMS
9. REMOVE REAR DOOR SCUFF PLATES
10. REMOVE CENTER PILLAR GARNISHES
11. SLIDE FLOOR CARPET BACKWARD
12. REMOVE COOLER BRACKET
Remove the 4 bolts and the cooler bracket.
Page 204 of 3115

27 Noise NOISE PRODUCED BY VIBRATION OR SHOCK WHILE DRIVING
No
Ye s Is radio assembly properly installed?
Noise is produced from static eletricity accumulating in the vehicle body. With vehicles stationary lightly tap each system.
Is noise produced?Install properly.
Each system faulty. Is speaker properly installed?
No
No Ye s
Ye s
28 Noise NOISE PRODUCED WHEN ENGINE STARTS
NoYe s Whistling noise which becomes high-pitched when
accelerator strongly depressed, disappears shortly
after engine stops.Generator noise.
A/C noise.
Fuel gauge noise.
Horn noise.
Ignition noise.
Turn signal noise.
Washer noise.
Engine coolant temp. gauge noise.
Wiper noise. Whining noise occurs when A/C is operating.
Scratching noise occurs during sudden acceleration, driving on rough
roads or when ignition switch is turned ON.
Clicking sound is heard when horn button is pressed, then
released. Whirring/grating sound is heard when pushed
continuously.
Murmuring sound stops when engine stops.
Tick-tack noise occurs in co-ordination with blinking
offlasher.
Noise occurs during window washer operation.
Scratching noise occurs while engine is running,
and continues a while even after engine stops.
Scraping noise in line with wiper beat.
Other type of noiseYe s
Ye s
Ye s
Ye s
Ye s
Ye s
Ye s
Ye s No
No
No
No
No
No
No
No
BE-168
- BODY ELECTRICALAUDIO SYSTEM
2541 Author�: Date�:
2004 LAND CRUISER (RM1071U)
Page 223 of 3115
I24744
Seat Belt Warning
Occupant Detection Sensor
Fuel Tank
� Fuel Sender Gauge
Park/ Neutral Position Switch Engine Coolant
Tempareture Sender Gauge
Speed Sensor
Oil Pressure Gauge
- BODY ELECTRICALCOMBINATION METER
BE-57
2430 Author�: Date�:
2004 LAND CRUISER (RM1071U)
Page 339 of 3115
 Rear washer motor does not operate.
1. Rear Washer Motor
2. Rear Washer Switch
3. Wire HarnessBE-52
BE-52
-
Was")
BE-6
- BODY ELECTRICALTROUBLESHOOTING
2379 Author�: Date�:
2004 LAND CRUISER (RM1071U) Rear washer motor does not operate.
1. Rear Washer Motor
2. Rear Washer Switch
3. Wire HarnessBE-52
BE-52
-
Washer fluid does not operate.1. Washer Hose and Nozzle-
*1: Inspect wiper arm and blade set positions.
COMBINATION METER (Meter Gauges and Illumination):
SymptomSuspect AreaSee page
Tachometer, fuel gauge and engine coolant temperature gauge do
not operate.1. GAUGE2 Fuse
2. Combination Meter
3. Wire Harness-
BE-58
-
Speedometer does not operate.
1. Speed Sensor
2. Combination Meter
3. Wire HarnessBE-63
BE-58
-
Tachometer does not operate.
1. Igniter
2. Combination Meter
3. Wire HarnessIG-1
BE-58
-
Fuel gauge does not operate or is in abnormal operation.
1. Fuel Receiver Gauge
2. Fuel Sender Gauge
3. Combination Meter
4. Wire HarnessBE-63
BE-63
BE-58
-
Oil pressure gauge does not operate.
1. Oil Pressure Receiver Gauge
2. Oil Pressure Sender Gauge
3. Combination Meter
4. Wire HarnessBE-63
BE-63
BE-58
-
Voltmeter does not operate.
1. Voltmeter
2. Combination Meter
3. Wire HarnessBE-63
BE-58
-
Engine coolant temperature gauge does not operate or is in ab-
normal operation
1. Engine Coolant Temperature Receiver Gauge
2. Engine Coolant Temperature Sender Gauge
3. Combination Meter
4. Wire HarnessBE-63
BE-63
BE-58
-
All illumination lights do not light up.1. Light Control Rheostat
2. Wire HarnessBE-63
-
Brightness does not change even when rheostat is turned.1. Bulb
2. Wire Harness-
-
Only one illumination light does not light up.1. Bulb
2. Wire Harness-
-
COMBINATION METER (Warning Light):
SymptomSuspect AreaSee page
Warning lights do not light up. (Except discharge, open door and
SRS)1. GAUGE1 Fuse
2. Combination Meter
3. Wire Harness-
BE-58
-
Fuel level warning light does not light up.
1. LED
2. Combination Meter
3. Fuel Sender Gauge
4. Wire Harness-
BE-58
BE-63
-
ABS warning light does not light up.
1. LED
2. ABS ECU
3. Wire Harness-
DI-502
-
Page 607 of 3115
CH06N-05
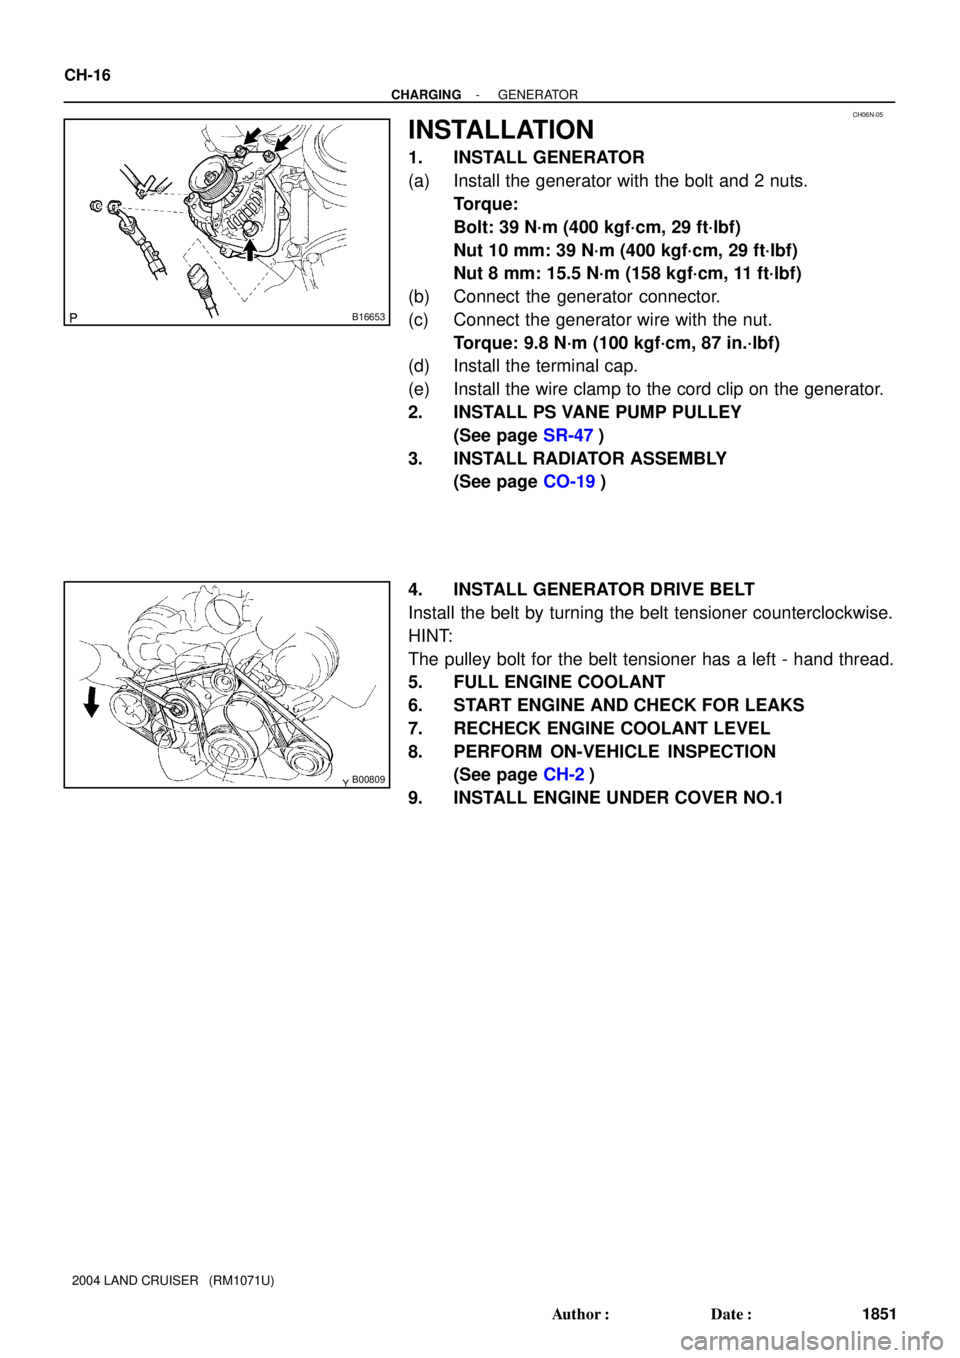
B16653
B00809
CH-16
- CHARGINGGENERATOR
1851 Author�: Date�:
2004 LAND CRUISER (RM1071U)
INSTALLATION
1. INSTALL GENERATOR
(a) Install the generator with the bolt and 2 nuts.
Torque:
Bolt: 39 N´m (400 kgf´cm, 29 ft´lbf)
Nut 10 mm: 39 N´m (400 kgf´cm, 29 ft´lbf)
Nut 8 mm: 15.5 N´m (158 kgf´cm, 11 ft´lbf)
(b) Connect the generator connector.
(c) Connect the generator wire with the nut.
Torque: 9.8 N´m (100 kgf´cm, 87 in.´lbf)
(d) Install the terminal cap.
(e) Install the wire clamp to the cord clip on the generator.
2. INSTALL PS VANE PUMP PULLEY
(See page SR-47)
3. INSTALL RADIATOR ASSEMBLY
(See page CO-19)
4. INSTALL GENERATOR DRIVE BELT
Install the belt by turning the belt tensioner counterclockwise.
HINT:
The pulley bolt for the belt tensioner has a left - hand thread.
5. FULL ENGINE COOLANT
6. START ENGINE AND CHECK FOR LEAKS
7. RECHECK ENGINE COOLANT LEVEL
8. PERFORM ON-VEHICLE INSPECTION
(See page CH-2)
9. INSTALL ENGINE UNDER COVER NO.1
Page 611 of 3115
CH06I-04
B00809
B16653
- CHARGINGGENERATOR
CH-7
1842 Author�: Date�:
2004 LAND CRUISER (RM1071U)
REMOVAL
1. DRAIN ENGINE COOLANT
(See page CO-2)
2. REMOVE GENERATOR DRIVE BELT
Loosen the belt tension by turning the belt tensioner counter-
clockwise, and remove the drive belt.
HINT:
The pulley bolt for the belt tensioner has a left - hand thread.
3. REMOVE ENGINE UNDER COVER NO.1
4. REMOVE RADIATOR ASSEMBLY
(See page CO-17)
5. REMOVE PS VANE PUMP PULLEY
(See page SR-40)
6. REMOVE GENERATOR
(a) Disconnect the generator connector.
(b) Remove the rubber cap and nut, and disconnect the gen-
erator wire.
(c) Disconnect the generator wire clamp from the cord clip on
the generator.
(d) Remove the bolt, 2 nuts and generator.
Page 744 of 3115

COOLANT
INSPECTION
HINT:
Check the coolant level when the engine is cold.
1. CHECK ENGINE COOLANT LEVEL AT RADIATOR RE")
CO0IO-06
- COOLINGCOOLANT
CO-1
1762 Author�: Date�:
2004 LAND CRUISER (RM1071U)
COOLANT
INSPECTION
HINT:
Check the coolant level when the engine is cold.
1. CHECK ENGINE COOLANT LEVEL AT RADIATOR RESERVOIR
The engine coolant level should be between the ºLOWº and ºFULLº lines at normal temperature
(20°C(68°F)).
If low, check for leaks and add ºToyota Super Long Life Coolantº or similar high quality ethylene glycol based
non-silicate, non-amine, non-nitrite, and non-borate coolant with long-life hybrid organic acid technology
up to the ºFULLº line.
2. CHECK ENGINE COOLANT QUALITY
(a) Remove the radiator cap.
CAUTION:
To avoid the danger of being burned, do not remove the radiator cap while the engine and radiator
are still hot, as fluid and steam can be blown out under pressure.
(b) There should not be any excessive deposits of rust or scale around the radiator cap or radiator filler
hole, and the coolant should be free from oil.
If excessively dirty, clean the coolant passages and replace the coolant.
(c) Reinstall the radiator cap.